Most patio slab problems fall into one of four categories: cracks, sunken or uneven sections, crumbling surfaces and broken edges, or repeated failures driven by a bad base or drainage issue underneath. The fix you need depends entirely on which of those you're dealing with and whether the damage is still actively moving or has stabilized. Slapping filler into a crack that's still shifting, or patching a surface sitting over a washed-out base, will just mean doing it all again in a year. Get the diagnosis right first, and the repair becomes straightforward.
Fix Patio Slabs: Diagnose Cracks, Uneven Sections, and Base Issues

Talia Lang
7 May 2026
Quick diagnosis: what's actually wrong with your patio slabs
Before you buy anything or mix anything, spend ten minutes reading what the slabs are actually telling you. The failure mode shapes everything that comes next.
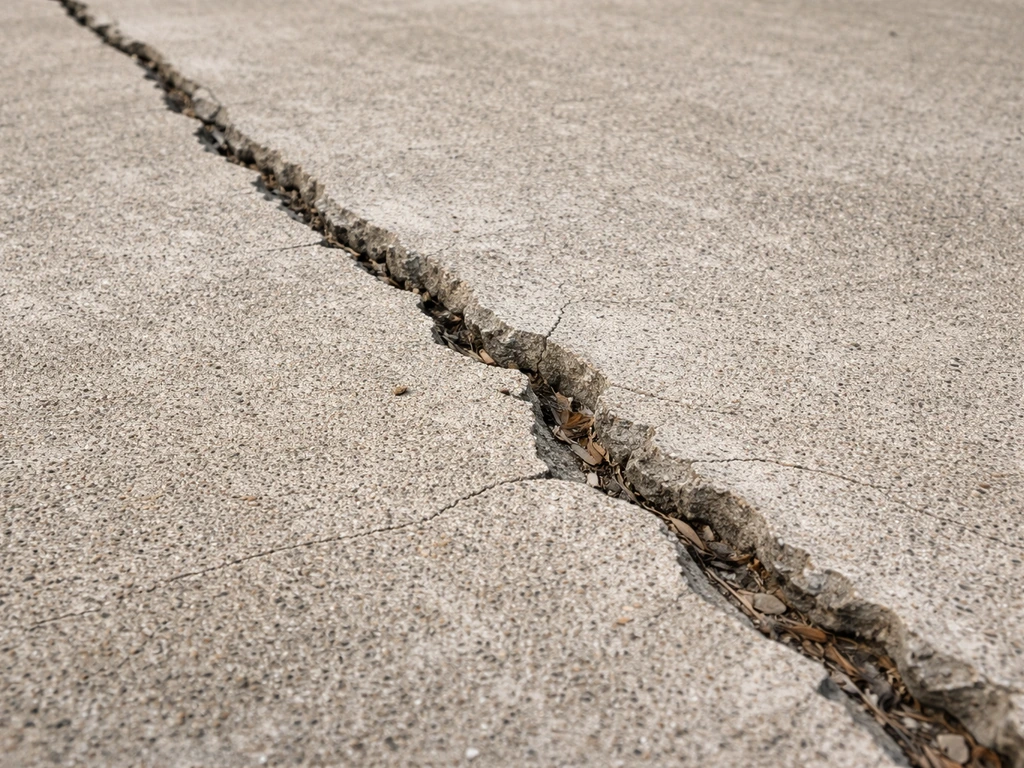
Cracks: hairline, wide, active, or displaced
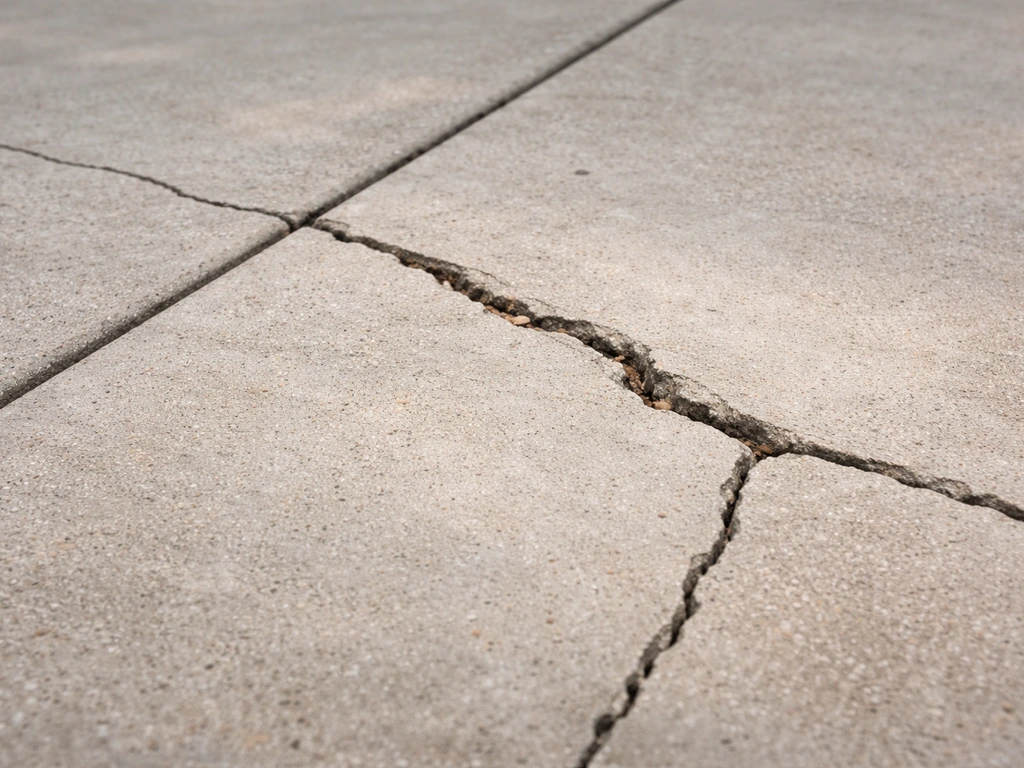
Not all cracks are equal. A hairline crack under 0.3mm wide that has been sitting unchanged for two seasons is a sealed-and-forgotten job. A crack wider than 1mm, especially one that changes width between summer and winter, is an active crack and needs a flexible repair material, not rigid filler that will just fracture again. Here's the thing most guides skip: crack width alone doesn't tell you how serious the problem is. A narrower crack with one edge sitting higher than the other (called differential displacement) is more concerning than a wider crack that's perfectly flush. Run your finger or a straight edge across the crack. If you feel a step, that slab has moved relative to its neighbor and the base underneath is not supporting it evenly.
Also look for rust-brown staining running along the crack line. On reinforced concrete slabs, that stain is a red flag: it means the rebar or wire mesh inside is corroding. Corroding steel expands, which is what's actually forcing the crack wider. This is one of the situations where DIY patching won't solve the root cause.
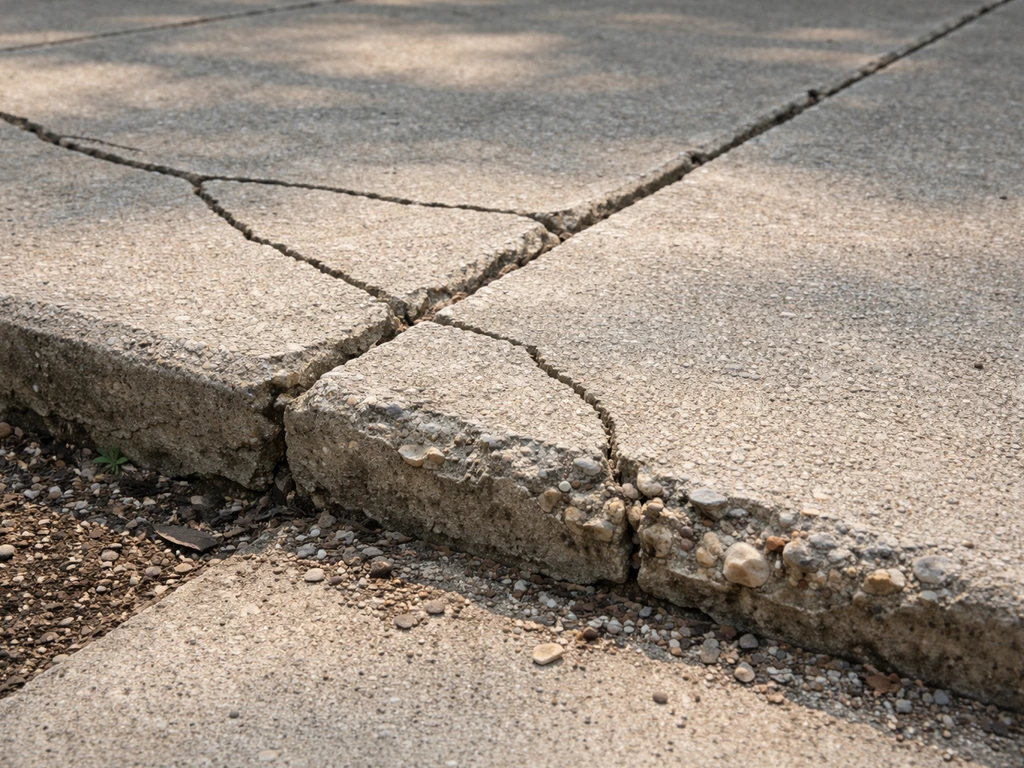
Sunken or uneven slabs
If a slab is sitting low compared to the ones around it, or rocks when you step on it, the base material underneath has either compacted further, washed out, or was never properly prepared. A slab that's sunk uniformly is a re-leveling job. One that rocks at the corners has a void underneath and needs the base rebuilt before it's worth resetting.
Crumbling, spalling, and broken edges
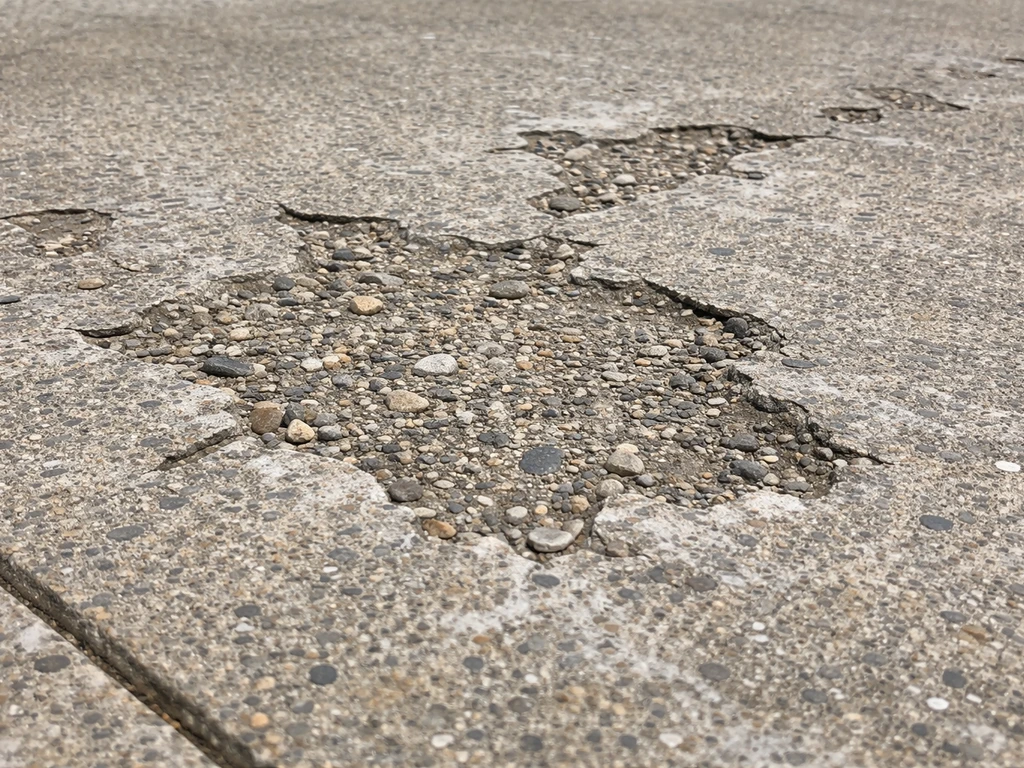
Spalling is when the surface layer flakes or pops off in chunks, often leaving a rough, pitted texture. It's almost always caused by freeze-thaw cycles, salt damage, or a poor surface finish during the original pour. Broken edges at slab joints are usually impact damage or the result of slabs shifting against each other without a proper expansion gap. Both are patchable if the slab body underneath is still solid. Tap the surface with a hammer handle: a solid thud means good concrete underneath, a hollow ring means the bond has failed and the patch won't stick.
Tools and materials you'll need for common slab repairs
Having the right kit before you start saves a wasted trip to the hardware store mid-job. Here's what covers the most common repairs.
| Item | What it's for | Notes |
|---|---|---|
| Cold chisel and hammer (or angle grinder with diamond blade) | Opening cracks and removing loose material | Angle grinder is faster; cold chisel works fine for smaller areas |
| Wire brush / stiff broom | Surface prep and cleaning | Essential before any patching or sealing |
| Shop vac or blower | Removing dust from cracks and surface | Dust kills adhesion on repairs |
| Polyurethane or epoxy crack filler | Sealing active or stable cracks | Polyurethane for active cracks; epoxy for stable, structural cracks |
| Hydraulic cement or fast-setting concrete mix | Filling voids and rebuilding broken edges | Hydraulic cement sets in minutes; useful near moisture |
| Polymer-modified mortar | Patching spalled surfaces and broken edges | Better adhesion than plain sand/cement mix |
| Bonding agent (e.g., PVA or epoxy primer) | Helping patches stick to old concrete | Don't skip this step on any patch larger than a small crack |
| Jointing sand or mortar (for pavers) | Relaying loose slabs | Use polymeric sand for paver joints to resist washout |
| Tamper or plate compactor | Re-compacting base material | Rental plate compactor for larger areas |
| Sharp sand and MOT Type 1 (crushed stone) | Rebuilding the sub-base | Type 1 for structural base, sharp sand for bedding layer |
| Pry bar and bolster chisel | Lifting slabs for relay | Protect slab edges with a piece of timber |
| Straight edge and spirit level | Checking level and slope | Minimum 1:60 fall away from the house for drainage |
| Rubber mallet | Bedding slabs without cracking them | Never use a steel hammer directly on slab surface |
| Concrete sealer | Protecting repaired surfaces | Apply after full cure, not before |
Fix options for cracks: seal vs patch vs full reset
Hairline and stable cracks: seal only

If the crack is under about 3mm wide, has no displacement, and hasn't changed in size over time, you can seal it and move on. Clean the crack thoroughly with a wire brush, blow out all the dust with compressed air or a shop vac, and let it dry completely. Apply a penetrating concrete sealer or a liquid polyurethane filler rated for concrete. Work it into the crack with a putty knife or the applicator tip. Tool it flush and feather the edges so water can't pool. Cure time is typically 24 to 48 hours before foot traffic. This won't make the crack invisible, but it stops water getting in and freezing, which is what causes cracks to grow.
Wider or active cracks: flexible patch
For cracks between 3mm and roughly 20mm that show signs of movement (edges aren't exactly flush, or the width has varied seasonally), rigid fillers will fail. The crack is still responding to ground movement or thermal expansion. A California DOT concrete pavement guide on joint and crack sealing cautions that using epoxy or glue in working cracks is generally not recommended because it can contribute to problems The crack is still responding to ground movement or thermal expansion. Use a flexible polyurethane sealant rated for concrete expansion joints. First, widen the crack slightly with an angle grinder to create a consistent channel, ideally 6mm to 10mm wide and at least 10mm deep. This sounds counterproductive but it gives the sealant a proper shape to bond into. If the crack is deep, insert a foam backer rod to fill the bottom third before applying sealant. The backer rod controls the depth of the sealant and stops it bonding at the bottom, which would restrict its flexibility. Apply sealant, tool it slightly concave (not proud), and allow the full cure time on the product label, usually 24 to 72 hours.
Cracked slab with displacement or rust staining: full reset or replacement
If the crack has differential displacement (one edge higher than the other) or you see rust staining, patching the surface is treating the symptom. The slab has moved because its support has failed, or the internal reinforcement is failing. In these cases, the slab needs to come up, the base needs to be assessed and rebuilt, and the slab either reset or replaced. If rust staining is present, the concrete itself may be structurally compromised and replacement is more honest than repair. Relaying the slab after fixing the base is covered in the next section.
Fix options for sunken or uneven slabs: re-leveling and base repair
A sunken or rocking slab is always a base problem, not a surface problem. You can't fix it from the top.
Step-by-step: lifting and resetting a sunken slab
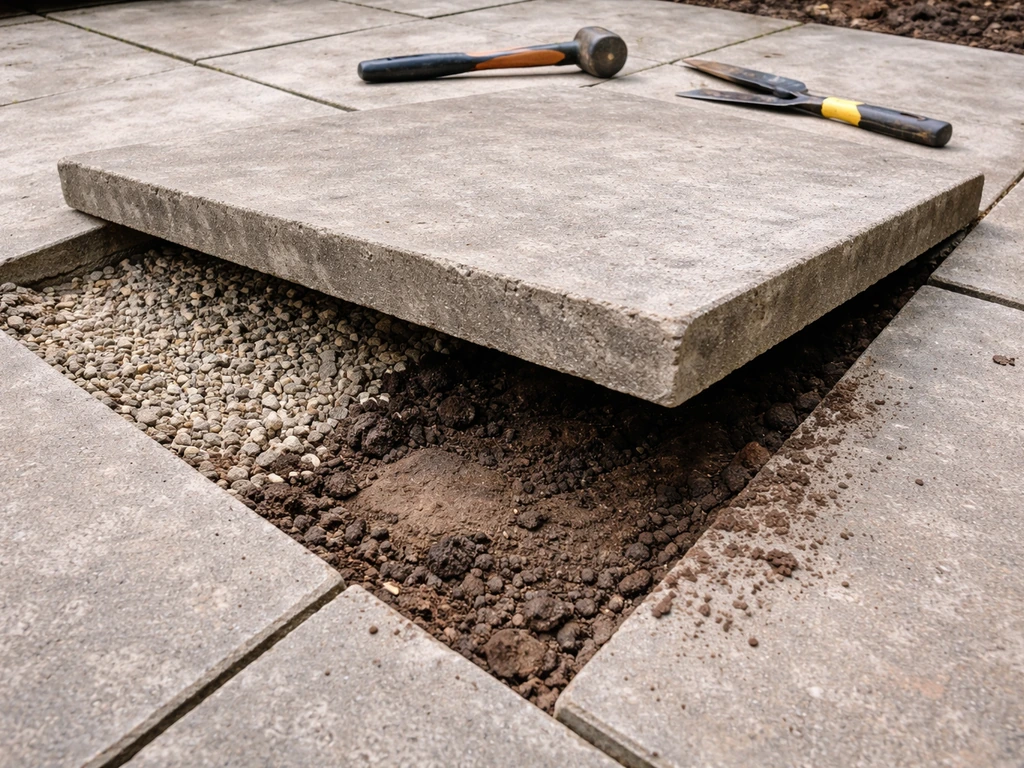
- Clear the area and remove any furniture. Score around the edges of the slab with an angle grinder if it's mortared in, to break the bond without damaging the slab itself.
- Protect the slab edge with a timber offcut, then use a bolster chisel and pry bar to lift one edge. Work slowly and evenly. If the slab cracks during lifting, you may need to replace it rather than relay it.
- Once lifted, slide timber packers underneath to hold it clear while you assess and fix the base.
- Look at what's underneath. Compacted, level, slightly damp sharp sand means the slab just settled and you can add sand and re-bed. A hollow void, waterlogged ground, or loose soil means the sub-base has failed and needs rebuilding before re-bedding.
- For a failed sub-base: remove all loose material down to firm ground. Compact a fresh layer of MOT Type 1 crushed stone, typically 100mm to 150mm deep. Compact it in 75mm layers using a plate compactor. Then add a 25mm to 50mm bedding layer of sharp sand, screed it level using a straight edge, and check the slope (aim for at least 1:60 fall away from the house).
- For a simple re-bed with no base failure: add sharp sand to build the level back up, screed and compact.
- Apply a bonding agent to the underside of the slab if you're re-bedding onto a semi-dry mortar mix rather than pure sand. This improves adhesion.
- Lower the slab carefully back onto the prepared bed. Tap it down with a rubber mallet and check level in multiple directions. Compare height to surrounding slabs.
- Re-point the joints with mortar or polymeric jointing sand once the slab is positioned correctly. Don't walk on it for at least 24 hours; give mortar-bedded slabs 48 to 72 hours before full load.
For multiple sunken slabs in one area, don't just relay them one at a time. Lift the whole section, address the base across the entire area, then relay. Fixing slabs individually in a zone with a failing base just means you'll be back lifting the next one in six months.
Fix options for crumbling surfaces, spalling, and broken edges
Surface spalling repair
Spalling needs aggressive prep before anything else. Use an angle grinder with a diamond cup wheel or a cold chisel to remove all the loose, flaking material back to a solid surface. Don't be shy about this: leaving even slightly loose concrete under a patch is the main reason patches fail. Go until you're getting a solid thud from your hammer rather than a hollow sound. The repair area should be at minimum 6mm deep for a patch to bond properly. Feathered, thin patches at the edges will always pop off.
Once you have a clean, solid substrate, brush on a concrete bonding agent and let it go tacky (usually 10 to 20 minutes depending on the product). Mix a polymer-modified concrete repair mortar to a stiff consistency and pack it into the repair area. Work it in firmly to eliminate air pockets. Build it up in layers no more than 20mm thick if the repair is deep. Screed it flush with surrounding concrete using a straight edge. For the final surface, match the texture of the existing slab as best you can: a brush finish with a stiff broom, or a float finish if the original is smooth. Cover with plastic sheeting for 24 to 48 hours to slow curing and reduce shrinkage cracking. Don't allow the repair to dry too fast in hot or windy weather.
Broken edge repair
Broken corners and edges are patched the same way as spalling but you need to form the edge while the mortar is wet. Make a simple timber or foam shutter held in place with a clamp or weight to support the repair until it firms up. Apply bonding agent, pack in polymer-modified mortar, and shape the edge against the shutter. Remove the shutter after the mortar has stiffened, usually 30 to 60 minutes for fast-setting mixes. Smooth the edge with a damp sponge or trowel. Again, keep it damp during curing.
If you find the slab is crumbling significantly throughout rather than just at the surface or edges, that's a different situation. Widespread internal deterioration means the concrete mix was poor, the water-to-cement ratio was too high, or freeze-thaw damage has gone deep. Patching the top won't save it. At that point, replacing the slab entirely is more cost-effective than multiple rounds of surface repair.
Drainage and base problems that keep causing slab failure
If you've repaired the same slab more than once, or if multiple slabs in one area are failing in quick succession, the surface isn't the real problem. Something underneath is failing repeatedly, and that almost always comes back to drainage or base preparation.
Why drainage causes slab failure
Water is the main enemy of a patio base. When water pools under or around slabs, it softens the bedding sand and sub-base, allowing slabs to sink and shift. In climates with freezing winters, water that infiltrates under a slab expands when it freezes, lifting the slab and then dropping it as it thaws. Do this enough times and you get cracked, displaced, or sunken slabs. This freeze-thaw cycle is also what drives most spalling on concrete surfaces: water gets into surface pores, freezes, and blows the surface apart from inside.
The solution on the surface is to ensure the patio has an adequate fall, at minimum 1:60 (roughly 15mm per metre) running away from the house or toward a drain. If your patio is flat or slopes toward the house, water is sitting there every time it rains. Re-grading or relaying slabs to improve the fall is a bigger job but the only permanent fix.
Sub-base failures
A slab is only as stable as what's under it. The correct build-up for a standard domestic patio is compacted sub-base (MOT Type 1, 100mm minimum), followed by a mortar or sharp sand bedding layer (25mm to 50mm). Skipping or skimping on the sub-base, or using uncompacted soft fill, leads to differential settlement over time. If you're lifting slabs and finding sandy loam or soft topsoil immediately under the bedding layer with no compacted stone, that's your answer. The whole base needs rebuilding properly before any surface repair will last. If you are wondering whether old bricks can be reused for a patio, the key is whether they are still sound and the base and bedding are built correctly to prevent future movement surface repair will last. A mortar bond can also be removed when you are resetting or replacing slabs by breaking the joints and scraping back to sound concrete before any relaying remove mortar from patio slabs.
Tree roots are another cause worth checking. If your patio is near mature trees, roots can work under slabs and lift them over years. In that case, even a perfectly rebuilt base will keep failing unless the root issue is addressed, which may mean root barriers, selective pruning, or rerouting the patio layout.
Failed sealant letting water in
A lot of people seal their patio once and consider it done. Concrete and paver sealers have a limited lifespan, typically 2 to 5 years depending on the product and conditions. Failed sealant lets water infiltrate the surface and joints. Re-sealing on the correct schedule is maintenance, not optional. Before re-sealing, always clean the surface thoroughly and address any open joints or cracks, because sealant over damaged joints just traps moisture.
When to stop DIY and call a pro
Most of what's described above is genuinely within reach for a careful DIYer with a weekend and the right materials. But there are situations where continuing to DIY costs you more money in the long run than just calling someone who can fix it properly the first time.
- Rust staining along crack lines on a reinforced concrete slab: internal rebar corrosion is progressing and structural integrity may be compromised. This needs professional assessment, not a surface patch.
- Widespread differential settlement across a large area: if multiple slabs or a large continuous slab has settled unevenly in multiple directions, the sub-base has failed broadly. Rebuilding a large base properly requires equipment and material quantities beyond most DIY budgets and timelines.
- Slabs that have cracked, sunk, or moved back to their pre-repair state within one season of being fixed: this is telling you the underlying cause hasn't been resolved and you're chasing symptoms. A pro can assess whether it's a drainage, root, or structural issue.
- Any slab repair near a retaining wall, step structure, or foundation: differential movement near structural elements needs professional eyes before any ground disturbance.
- Very large cracks with significant displacement on a thick structural slab (a slab-on-grade floor that doubles as a patio, for example): this is beyond cosmetic repair and needs a structural assessment.
- Drainage problems that require regrading a large area, redirecting surface water, or installing a French drain or channel drain system: these are often worth professionalizing to get the gradient and pipe runs right the first time.
How to prep before a pro arrives
Before a contractor comes to quote, do a few things that will make the conversation more useful. Take clear photos of every problem area, including close-ups of cracks with something for scale (a coin or tape measure works). Note whether any cracking or movement has been getting worse recently, and roughly how fast. Mark areas where slabs rock or sound hollow when you tap them. If you've had previous repairs done, note what was used and when. This gives the contractor a faster path to diagnosis and a more accurate quote, and it helps you spot anyone who's rushing through the assessment.
One last honest note: if you're at the stage of replacing damaged slabs entirely, or relaying a section after fixing the base, those processes have their own specific steps worth understanding in detail before you start, from how to lift and store old slabs to how long you actually need to wait before using the new surface. If you decide to replace slabs or relayout a section, you can often reuse old bricks for patios and walkways as part of the new surface plan using old bricks for patios and walkways. If you are figuring out what to do with old patio slabs, learning the basics of lifting, storing, and timing the relayout can prevent costly rework replacing damaged slabs entirely. For a full walkthrough of the process, see how to replace patio slabs. Getting the details right at each stage is what separates a repair that holds for a decade from one you're revisiting next spring.
FAQ
How can I tell if a crack is actively moving versus just dried-out shrinkage when I fix patio slabs?
Beyond width, check for repeated edge height differences and seasonal width changes, then watch the crack after rain or frost. If the crack opens and closes noticeably over weeks or you see new dust at the crack edges, treat it as active movement and use a flexible concrete expansion joint sealant rather than a rigid patch.
What should I do if the crack looks stable but the surrounding slab sounds hollow when tapped?
A hollow ring suggests the slab is not well bonded to the base, so sealing the crack will not stop the underlying failure. Focus on testing whether the slab is moving at the base level, then address the bedding and sub-base before any surface-only repair.
Can I level a sunken patio slab by just adding sand underneath without lifting the whole section?
Usually no. If you top up locally, you tend to create new uneven support, and adjacent slabs can settle next. The safer approach is lifting the full affected zone so you can rebuild and compact the sub-base across the entire area.
How deep should I remove spalled concrete before fixing cracks or surface damage?
Remove material until the surrounding concrete is sound, indicated by a solid thud from a hammer rather than a hollow sound. As a practical minimum, leave the repair area at least 6mm deep so the bonding agent and repair mortar have enough body to adhere reliably.
Is it ever okay to use builder’s filler or standard cement grout to fix patio slabs?
Generally avoid rigid fillers for cracks that show movement, seasonal width change, or differential displacement. For active cracks, use products specifically rated for concrete expansion joints and, when needed, a foam backer rod to keep sealant depth consistent and maintain flexibility.
What’s the correct way to prep joints and cracks before resealing so I don’t trap water?
Clean thoroughly, remove loose debris, and open up partially filled or contaminated joints so sealant can bond to clean concrete. If you apply sealer over an area that still has open movement, it can trap moisture and worsen corrosion and freeze-thaw damage.
How do I know whether reinforced concrete cracking means I should replace rather than patch?
Look for rust-brown staining that runs along the crack line. That can indicate corrosion of internal steel, which expands and continues to widen cracks. In that situation, plan for base and slab assessment, and consider replacement if the concrete has lost structural integrity.
Why do some repairs fail even when I use the right products for fixing patio slabs?
Most failures come from skipping the base cause (drainage, voids, un-compacted sub-base) or from insufficient surface prep. Also watch curing conditions, if the repair dries too fast it can shrink and crack, and if edges are feathered too thin they often pop off.
What patio fall should I aim for to prevent slabs from settling after I repair them?
Aim for at least 1:60, about 15mm per metre, directing water away from the house or toward a drain. If your patio is flat or slopes toward the home, water will keep pooling under slabs and you are likely to see repeat cracking and movement.
How do tree roots change my repair plan for patio slabs?
If mature trees are nearby, roots can lift slabs over long periods even with a rebuilt base. In that case, you may need a root barrier, selective pruning, or redesigning the patio layout so the slab path avoids root-dense zones.
When is it smarter to call a contractor instead of continuing DIY on fixing patio slabs?
If multiple slabs in an area are failing quickly, if you find soft loam or uncompacted material immediately under the bedding, or if rust staining suggests potential internal reinforcement corrosion, the cost of repeated DIY repairs usually outweighs professional base assessment and relaying.
What information should I gather before a contractor quotes work to fix patio slabs?
Take close photos with scale, note whether movement is worsening and how fast, mark hollow-sounding areas from hammer tests, and list any prior repairs with approximate dates and materials used. This reduces guesswork and helps pinpoint whether the core issue is drainage, base compaction, or reinforcement-related damage.
Next Article
How to Fix Cement Patio Cracks: Diagnose and Repair
Diagnose concrete patio crack types and repair with the right sealant or patch, from prep to curing and prevention.