For most patios, polymeric jointing sand is the best material to fill gaps between slabs. It's easy to apply, locks hard when activated with water, resists weeds, and handles outdoor freeze-thaw conditions far better than ordinary sand or basic mortar. If your gaps are wider than about 1.5 inches, or the slabs themselves have shifted significantly, you'll need mortar or a flexible pointing compound instead. The right choice depends on joint width, slab type, and how much movement is still happening underneath.
How to Fill Gaps in Patio Slabs Step by Step

Talia Lang
5 May 2026
Why patio slab gaps fail in the first place
Before you fill anything, it's worth spending two minutes understanding what caused the gaps to open up. If you skip this step, you'll probably be back out there doing the same repair in a year.
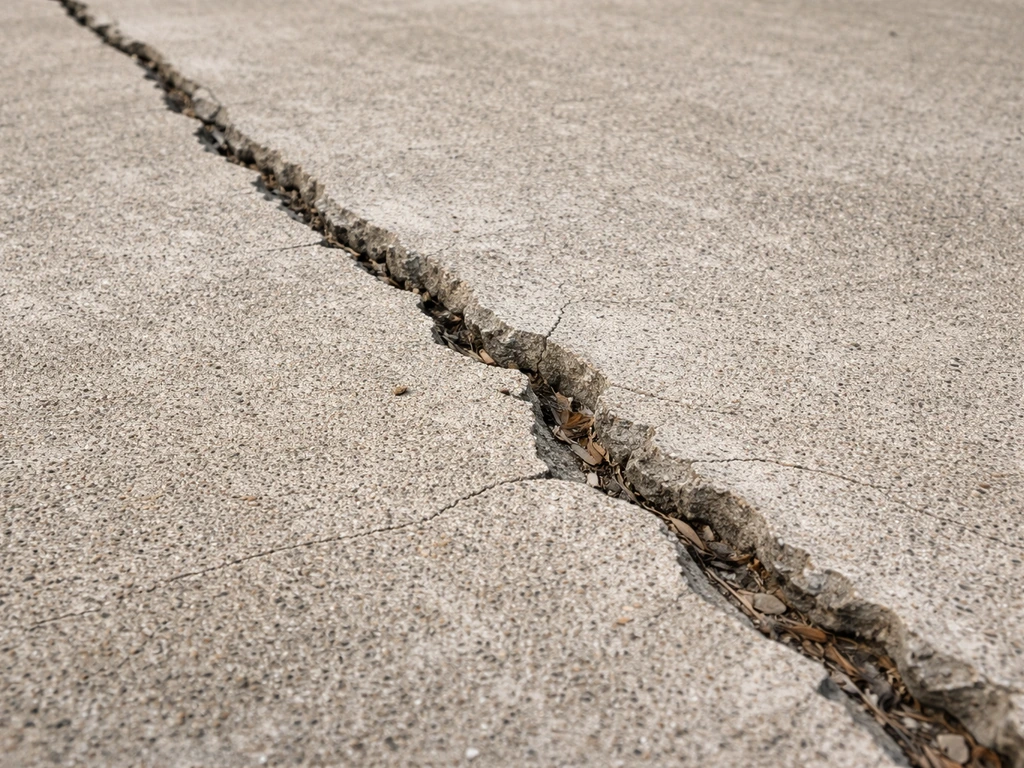
The most common causes of joint-gap failure are freeze-thaw cycles, settlement, base erosion, and plain old age. Water gets into a joint, freezes, expands, and widens the gap a little more each winter. Over time, that water also washes out the fine material beneath the slabs, undermining the bedding layer. Once the bedding weakens, slabs shift, gaps widen further, and more water gets in. It becomes a self-reinforcing loop that keeps getting worse until you address it properly.
On older patios especially, you'll often see a combination of all of these. The original mortar or sand has eroded, some slabs have rocked or dropped slightly, and the joint edges may be chipped and uneven. That uneven base is what makes old patio slabs trickier to regrout than a brand-new installation.
- Freeze-thaw cycles that expand existing cracks and gaps each winter
- Settlement or differential movement in the sub-base underneath
- Erosion and washout of bedding sand through joint gaps during heavy rain
- Original mortar reaching the end of its lifespan (typically 10 to 20 years outdoors)
- Tree roots or persistent weeds physically forcing joints apart
- Failed sealant allowing water ingress at the surface level
If your slabs are noticeably rocking, uneven, or sunken in places, simple gap filling won't fix the problem. That's a base issue that needs slabs lifted and relaid. Gap filling only works well when the slabs themselves are stable.
Choose the right filler: what to use and when
The filler you choose matters a lot. The wrong material in the wrong situation is usually what causes these repairs to fail quickly. Here's how the main options stack up.
| Material | Best joint width | Typical durability | When to use it | Watch out for |
|---|---|---|---|---|
| Polymeric jointing sand | 1/16" to 4" wide, min 1.5" deep | 5 to 10+ years with good prep | Stable slabs with consistent joint depth; most common patio scenario | Rain before curing; joints shallower than 1.5"; temperatures near freezing at application |
| Mortar mix (cement-based) | Any width; best for 0.5" to 2" wide | 10 to 20 years | Rigid slabs firmly set in concrete; large or irregular gaps | Cracks over time if slabs still moving; needs damp-curing; messy to apply |
| Flexible pointing compound (ready-mix) | Up to about 1.5" wide | 3 to 8 years | Slabs with minor movement; renovating old patios without lifting | More expensive; may stain certain stone types; follow manufacturer drying times |
| Plain kiln-dried sand | Narrow gaps, mostly decorative | 1 to 3 years | Temporary fix or very narrow gaps only | Washes out quickly; no weed resistance; not a long-term solution |
| Self-binding gravel / resin bound | Wide irregular gaps | Varies widely | Decorative fills or very wide gaps at patio edges | Not suited for narrow precision joints; changes appearance significantly |
For the vast majority of homeowners, polymeric jointing sand is the go-to. Products like Techniseal HP NextGel or Sakrete PermaSand work in joints from 1/16 inch up to 4 inches wide, as long as the joint is at least 1.5 inches deep. They're designed specifically for this job and outperform basic sand or mortar in almost every outdoor condition. If your joints are shallower than 1.5 inches, or your slabs are set in a solid concrete bed and have very wide cracks, mortar or a flexible compound will serve you better. The topic of how to use jointing compound on patios specifically is worth reading separately if you're leaning that direction.
Everything you need before you start
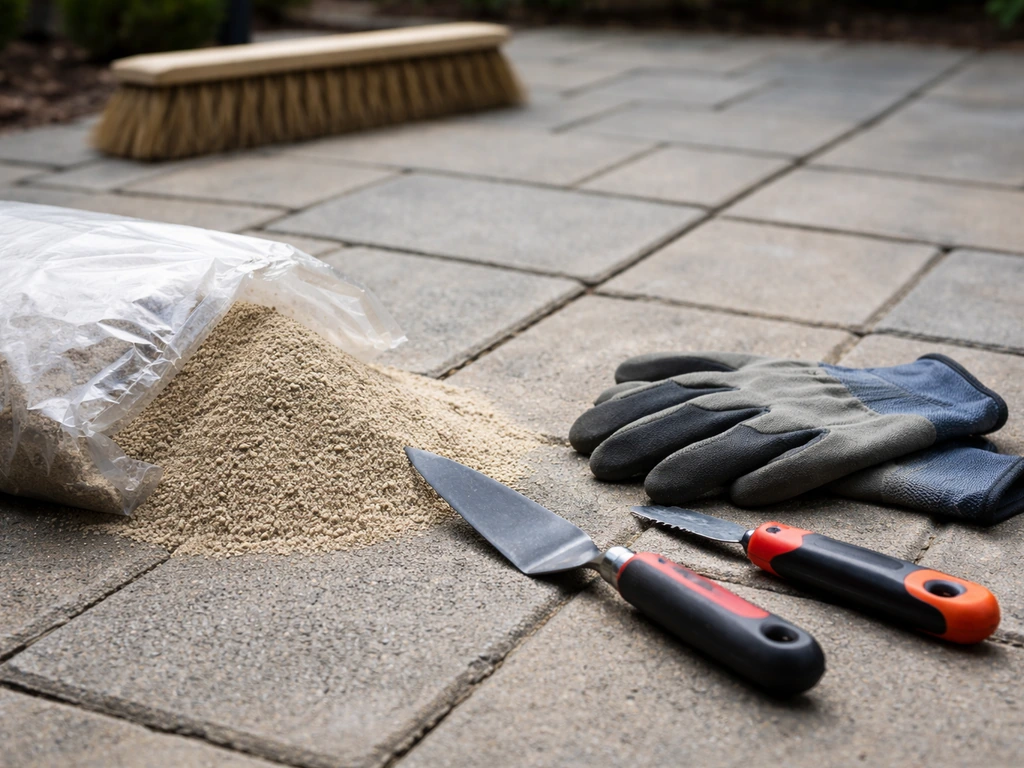
Getting the right tools together before you begin makes the whole job cleaner and faster. Running back to the hardware store mid-project is genuinely annoying when you have wet polymeric sand sitting on your patio.
- Polymeric jointing sand (or mortar/pointing compound based on your assessment above)
- Stiff-bristle hand brush or wire brush for cleaning joints
- Pressure washer or garden hose with a jet nozzle for flushing joints
- Garden hose with a gentle mist/shower setting for activation (polymeric sand)
- Leaf blower or soft-bristle broom for removing excess surface sand
- Cold chisel and club hammer or an oscillating multi-tool for removing old mortar
- Pointing trowel or margin trowel (for mortar applications)
- Knee pads (you will be on your knees for a while)
- Safety glasses and dust mask rated at least N95 or P100 for silica dust protection
- Rubber gloves
- A plate compactor (rentable) or rubber mallet for compacting polymeric sand into joints
- Bucket and sponge for mortar work cleanup
- Tape measure for checking joint depth before buying materials
On the dust mask: this is not optional. Cutting, grinding, or even dry-brushing old mortar and jointing sand releases crystalline silica particles that cause serious long-term lung damage. OSHA specifically identifies this hazard in concrete, brick, and sand work. Use an N95 at minimum; a P100 respirator is better if you're doing a lot of old mortar removal.
Prep the joints properly (this is the part most people rush)
Joint prep is genuinely the most important part of this job. Rushing it is the single biggest reason DIY gap repairs fail within a season or two. Polymeric sand will not bond properly over old loose material, and mortar won't adhere to dusty or wet surfaces.
Remove weeds, old filler, and loose debris
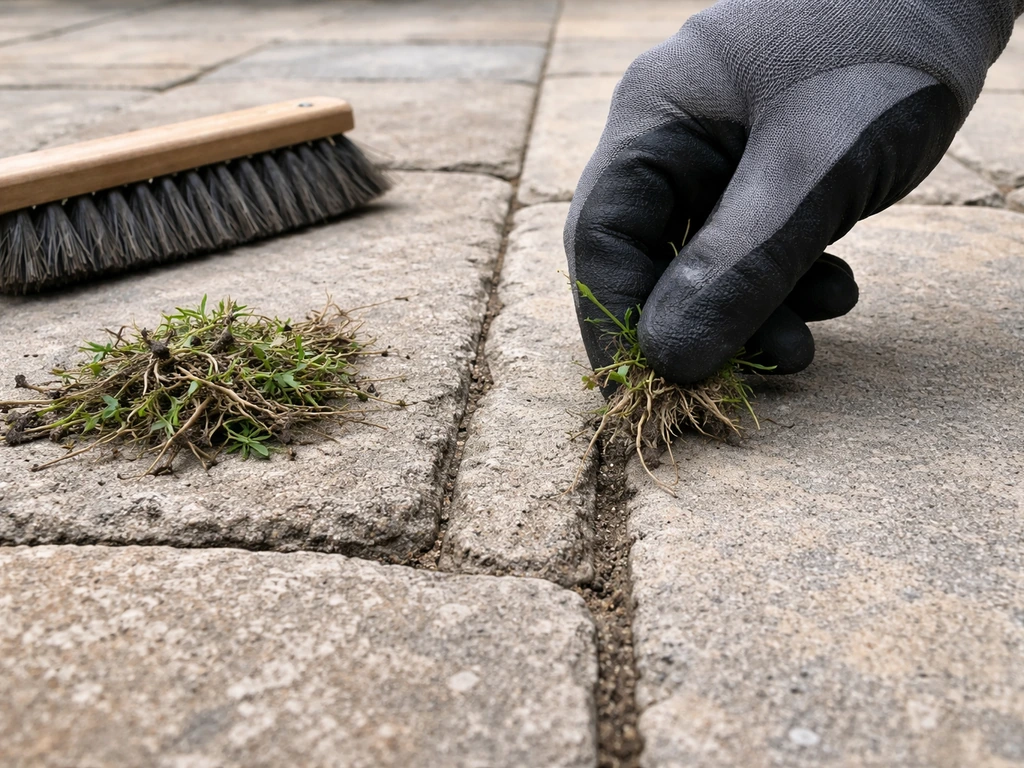
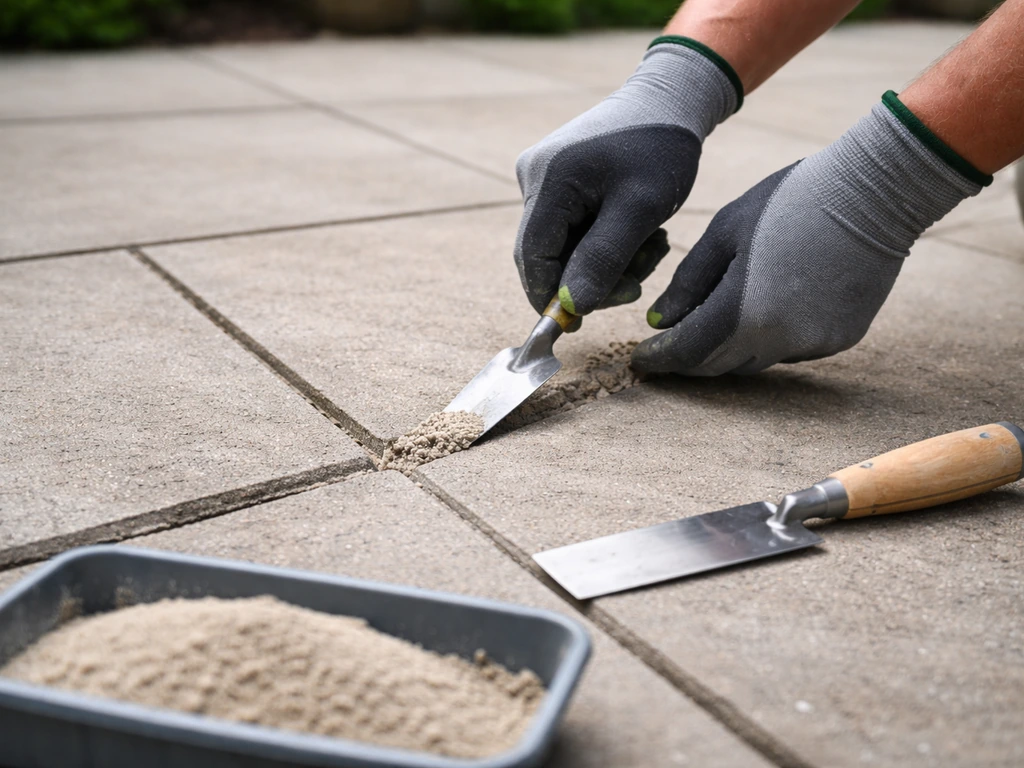
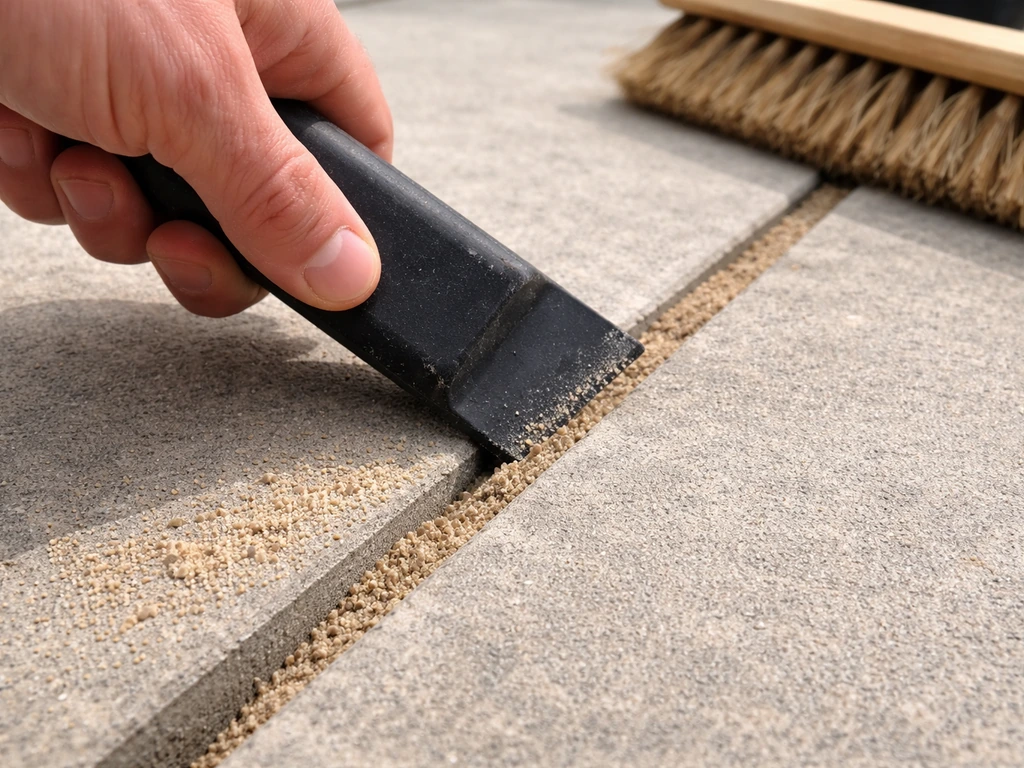
Pull weeds by hand first, getting as much root as possible. Then use a stiff brush, a cold chisel, or an oscillating multi-tool fitted with a grout-removal blade to rake out the old sand, crumbled mortar, or whatever's in the joints now. You need to get down to solid material or clean base. If you're applying polymeric sand, the joint needs to be clear enough that the new sand can reach the full 1.5-inch minimum depth.
Flush the joints and let them dry
Once you've raked everything out, flush the joints with a hose to clear dust and fine debris. If you have a pressure washer, use it carefully, directing the spray along the joint rather than hammering the slab face. After flushing, let the patio dry completely before adding any filler. Polymeric sand needs dry joints at the start; you wet it intentionally during activation, and that timing matters.
Assess the joint depth and edge condition
Before you order materials, actually measure a few joints. Stick a small screwdriver or pencil in and note the depth. If joints are consistently under 1 inch deep, polymeric sand won't perform well and a flexible pointing compound is a better fit. Also look at the slab edges: badly chipped or crumbling edges will make it hard to get a clean joint surface regardless of filler. If the edges are extensively damaged, you're looking at a more involved repair or possibly slab replacement in those areas.
How to fill gaps between patio slabs: step by step
The steps below cover the polymeric sand method, which suits the majority of patios. Once the slabs are stable, the actual jointing process is basically the same as outlined in how to joint patio slabs, including picking the right filler and keeping the joint depth consistent. If you want the best way to fill in gaps on a patio, start by choosing the right joint filler for your joint size and slab type how to fill gaps between patio slabs. Notes for mortar and old patio slabs are included where the process differs. Don't start this job if rain is forecast within 24 to 48 hours, or if temperatures are expected to drop to 32°F or below within 48 to 72 hours of application. Sakrete PermaSand’s TDS also advises protecting the installed sand from rain for about 24 hours rain is forecast within 24 to 48 hours. Both conditions can ruin the result.
- Check the weather forecast seriously. Polymeric sand needs to dry fully before rain hits it. Even light rain before the surface has dried can wash the binder out of the joints and across your patio surface, making a mess and leaving weak joints. Aim for at least 48 hours of dry, mild weather ahead.
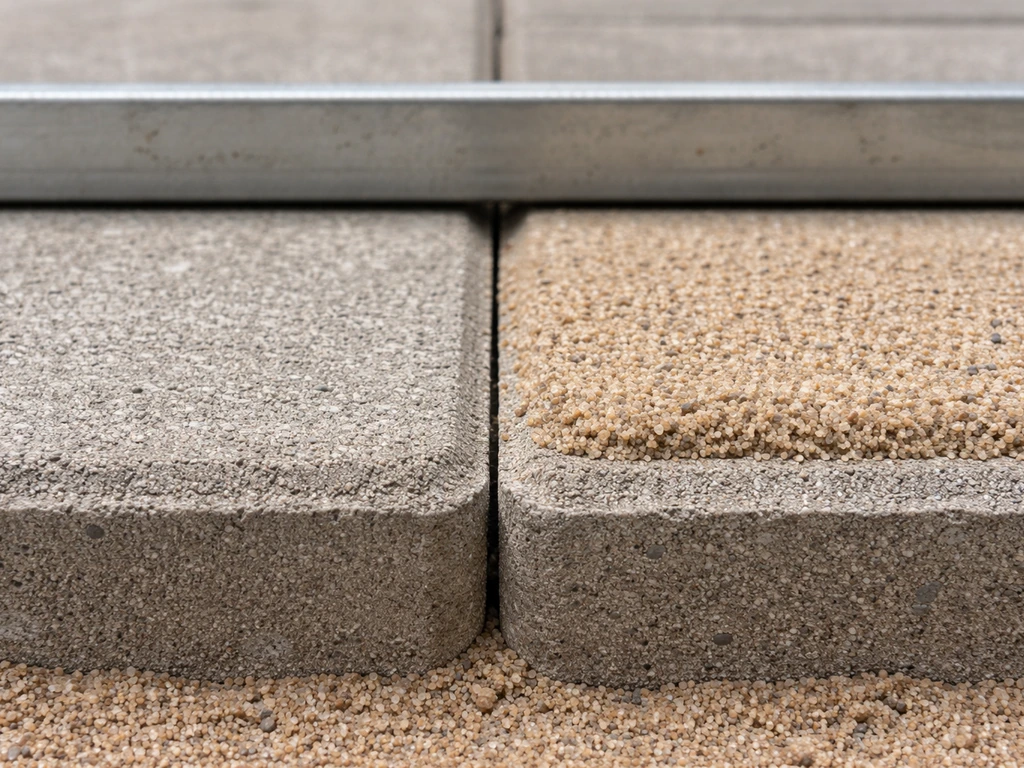
- Pour polymeric sand onto a dry section of the patio and spread it across the joints with a soft broom or brush. Work it into the joints in multiple directions so it packs in rather than just sitting on top. Don't try to do the whole patio at once; work in manageable sections of about 50 to 100 square feet.
- Run a plate compactor over the area once (or tap with a rubber mallet along joints if you don't have one). This settles the sand down into the joint so you're not leaving air pockets. Top up any joints that drop significantly after compaction.
- Use the leaf blower or a soft brush to remove all excess sand from the surface of the slabs. This step is critical. Any polymeric sand left sitting on top of the slabs when you activate it will haze and bond to the surface, which is a pain to remove. Get the slab faces clean before you touch water.
- Set your garden hose to a gentle mist or shower setting. Spray each section for about 30 seconds to saturate the joints. Do not use a jet or pressure spray at this stage; it will displace the sand and break the polymer binder before it has set. The goal is gentle, even saturation.
- Let the section sit for a few minutes, then repeat the gentle watering pass. You should see the sand darken and compact further as it absorbs moisture. The activated sand will start to firm up within minutes.
- Keep foot traffic off the area for at least 24 hours. Keep vehicles off for a minimum of 48 to 72 hours. Full cure takes up to 30 days, during which time the joints will continue to harden.
Filling gaps in old or uneven patio slabs
Old slabs with worn, chipped, or irregular joint edges need a bit more care. If joints are very uneven in width, polymeric sand will still work as long as you're within the 1/16-inch to 4-inch width range and the depth is adequate. For joints that vary wildly in depth because the old bedding has sunk unevenly in places, pack the bottom of deep sections with regular sharp sand first to bring it up to a workable depth, then top with polymeric sand for the final inch or two. This saves product and ensures consistent compaction at the surface level.
If you're using cement mortar on old slabs (common where slabs are set in a solid concrete screed rather than on a sand bed), dampen the joint before applying. Mix mortar to a firm but workable consistency, pack it in with a pointing trowel, and finish it slightly recessed below the slab surface, about 2 to 3mm down. This recessed finish sheds water away from the joint rather than pooling on it. Avoid feathering the mortar out thin at the edges; thin edges crack first. Keep mortar-filled joints damp for 24 to 48 hours while they cure by misting lightly or covering with damp hessian in warm weather.
When the sand height matters
Polymeric sand should sit about 1/8 inch below the top face of the slab (or just below the bottom of any chamfer, if your slabs have bevelled edges). If it's flush or proud of the surface, it'll get scuffed off by foot traffic and won't last. If it's too deep, the joint won't resist water and weeds effectively. Getting this right is easier than it sounds: once you compact and activate, the sand settles to a natural level. Top up as needed before the final water activation.
Curing, weatherproofing, and finishing the surface
Polymeric sand reaches initial hardness quickly but continues curing for up to 30 days. During that period, avoid pressure washing the joints, don't apply sealant yet, and try to keep heavy furniture or planters off the freshly jointed areas. After 30 days, if you want to apply a patio sealer to the whole surface, do it then. Sealing locks in the joint sand and adds a layer of surface protection against staining and water ingress.
For mortar joints, the curing window is shorter, typically 5 to 7 days to initial hardness, but mortar benefits from being kept slightly damp for the first 48 hours to avoid surface cracking from too-rapid drying. In hot or sunny weather, a light cover of damp newspaper or hessian over newly pointed joints prevents the surface from drying out unevenly.
Once fully cured, you can apply a jointing sand stabilising sealer if you want extra weed and ant resistance. These sealers soak into the joint surface and add another layer of binding. They're particularly useful on patios in shaded areas where moss and weeds tend to take hold faster. This overlaps with the broader topic of sealing and weatherproofing the whole patio surface, which is worth considering as a follow-up project.
When gaps keep coming back: troubleshooting persistent joint failure
If you've filled the gaps and they've opened up again within a year or two, the issue is almost certainly movement in the base rather than a problem with the filler itself. No surface joint repair, however well done, will hold if the slabs underneath are still moving.
Signs the problem is bigger than the joints
- Slabs rock or flex when you walk on them, even after refilling the joints
- Gaps reopen within one winter, especially following a hard frost
- Water pools on or near the patio after rain and takes a long time to drain
- Slabs have visibly dropped in one area relative to others
- Sand or fine debris appears at the joint surface after rain, indicating continued washout from beneath
- Joint filler cracks along the centre of the joint rather than at the edges (classic settlement crack)
Persistent joint failure driven by base movement means the slabs in the affected area need to come up. The bedding layer, usually sharp sand or a dry mortar mix, needs to be levelled and recompacted before the slabs go back down. This is a more involved job, but it's the only real fix. Refilling the joints repeatedly without addressing the base is just a holding pattern.
Drainage problems that keep undermining your base
If water is consistently running toward and under your patio rather than away from it, the joints will keep getting washed out no matter what you fill them with. Check that your patio has a slight fall away from the house, ideally around 1 in 60 (roughly 1.5cm for every metre of patio width). If surface water is pooling against a wall or fence and seeping under the slabs, you may need a channel drain installed at the patio edge before gap filling becomes a durable solution.
When to call a professional
Gap filling is genuinely DIY-friendly when the slabs are stable and the prep is done right. But if more than a quarter of your patio slabs are rocking, sunken, or visibly out of level, you're looking at a full relay job. Likewise, if the patio is near a retaining wall, built on fill ground, or showing signs of significant subsidence, that's not a gap-filling problem. A paving contractor can assess the base condition and tell you whether a relay or a full rebuild is warranted. Sometimes the honest answer is that gap filling will buy you one or two more years, but the patio ultimately needs redoing. Better to know that upfront than to spend time and money on repeated surface repairs.
If you're dealing with narrower tile-based surfaces or need to understand the differences between jointing compound types for different patio materials, those are areas that merit their own closer look. The methods and materials for patio tiles differ enough from standard flags and concrete slabs that it's worth treating them separately. If your patio tile joints have gaps, the same principles apply: choose the right filler for the joint width, prep the joint properly, and then compact and activate it so it locks in how to fill gaps in patio tiles. Similarly, if your joints have partially failed but the slab positions are still solid, looking into easy repair options for patio joint mortar might give you a faster solution than a full regrout. If you need help deciding what to do when the joints fail again, this guide on how to repair patio joints covers the best approach easy repair options for patio joint mortar. If you are dealing with patio jointing that keeps failing, a u-can patio jointing repair approach can help you tackle the underlying cause and choose the right jointing method.
FAQ
Can I just pour more polymeric sand on top if the joints seem to have shrunk or washed out?
Do a targeted re-rake first. Polymerics work only when the joint is properly prepped and has adequate depth. If the sand has fallen out, brush and vacuum loose material, re-measure depth, then refill and compact. If the joint is now too shallow (especially under about 1 inch), switch to a flexible pointing compound or plan to rebuild the bedding rather than repeatedly topping up.
How do I tell whether the base is moving versus the filler failing?
Look for rocking or differential height between adjacent slabs, and check whether gaps reopen in the same locations after the jointing has fully cured. If you can rock a slab by foot pressure or the gap width changes noticeably season to season, the issue is movement in the bedding or base, not the top-fill material. In that case you will need lifting and relaying, not another round of joint sand.
What’s the safest way to use a pressure washer during joint prep?
Use it along the joint direction, low pressure if possible, and avoid blasting the slab face. The goal is to remove dust from the joint void, not erode the bedding below. If you weaken the edge bedding, the new filler can wash out later even if the sand itself looks correct during application.
Why do polymeric sand joints sometimes haze over or look patchy after watering?
This usually comes from uneven joint depth, dust left in the joint, or misting at the wrong time. Make sure joints are fully raked to solid material, flush and dry completely before filling, and then activate according to the product’s timing and coverage rate. Also avoid over-watering, which can start activation in the wrong areas and leave residue on the slab face.
Is it okay to fill gaps in freezing weather if I can keep the area dry?
It’s risky. The joint filler still needs stable conditions during curing and activation. If temperatures are expected to drop to 32°F (0°C) or below within the stated post-application window, skip the job because trapped moisture can freeze and disrupt bond formation.
Do I need to remove old jointing sand or mortar completely?
Yes, to the extent that loose, crumbling, or dusty material is out of the way. You do not need to remove perfectly sound material, but polymeric sand will not lock properly over contaminants. Aim to reach clean, solid material at the bottom and sides of the joint, then flush dust thoroughly.
How deep should polymeric sand end up, and what if my joint is too deep?
For polymeric sand, target about 1/8 inch below the top of the slab surface (or just below a chamfer). If a joint is excessively deep, do not fill it in one layer and hope. Pack the bottom with regular sharp sand to bring it up to a workable depth, then finish with polymeric sand for the final inch or two so compaction and weed resistance are reliable.
Can I seal the patio right after jointing?
Usually no. Polymerics need time to harden and keep curing, and sealing too early can interfere with curing and trap moisture. Avoid sealing until the jointing has reached full cure time (often up to 30 days for polymeric sand). For mortar joints, allow the typical shorter mortar curing window first, then consider sealing only after the joints are fully set.
Will jointing compounds help if my patio sits on concrete screed or a solid bed?
Sometimes, but the right filler choice changes. Solid concrete beds often require mortar or flexible pointing rather than standard polymeric sand approaches, especially when cracks are wide or shallow. If you see large movement cracking at slab edges, start by identifying whether the slabs are actually moving, then pick the filler that matches both joint width and substrate type.
What if weeds keep coming back through the joints?
First confirm the joints are still properly compacted and not washing out again. If the patio is in shade or stays damp, consider a jointing sand stabilising sealer after the joints fully cure, because it adds extra binding and reduces weed establishment. Also check for a drainage issue that continually feeds water into the joint area, since persistent moisture undermines any joint repair.
How much joint movement is too much to fix with gap filling?
A practical rule is to watch for widespread rocking or out-of-level areas. If more than a quarter of the slabs are rocking, sunken, or noticeably out of level, gap filling is unlikely to be durable. Also treat patios near retaining walls, on fill ground, or showing subsidence signs as base problems that may require relaying.
Next Article
How to Fix Cement Patio Cracks: Diagnose and Repair
Diagnose concrete patio crack types and repair with the right sealant or patch, from prep to curing and prevention.