Most patio edging fails for one of three reasons: the base beneath it was never properly compacted, water is getting in and freezing, or the fasteners and mortar holding it in place have given up. The good news is that most of these repairs are genuinely DIY-friendly if you're willing to dig back to the actual problem instead of just patching the surface. Here's how to figure out what's wrong, fix it correctly for your edging type, and make sure it doesn't come apart again next winter.
How to Fix Patio Edging: DIY Repair Steps by Type

Talia Lang
29 Apr 2026
Quick diagnosis: what's actually wrong with your edging
Before you grab a trowel or a mallet, spend five minutes reading your edging. The way it's failing tells you exactly what caused it, and that determines how deep your repair needs to go.
- Bulging outward or pavers spreading: the edging restraint has failed or was never properly secured, and the paver field is pushing the border out
- Heaved or uneven sections (one piece higher than the next): freeze-thaw movement or a localized soft spot in the base
- Sunken or settled edging: base material has washed out or was never compacted properly
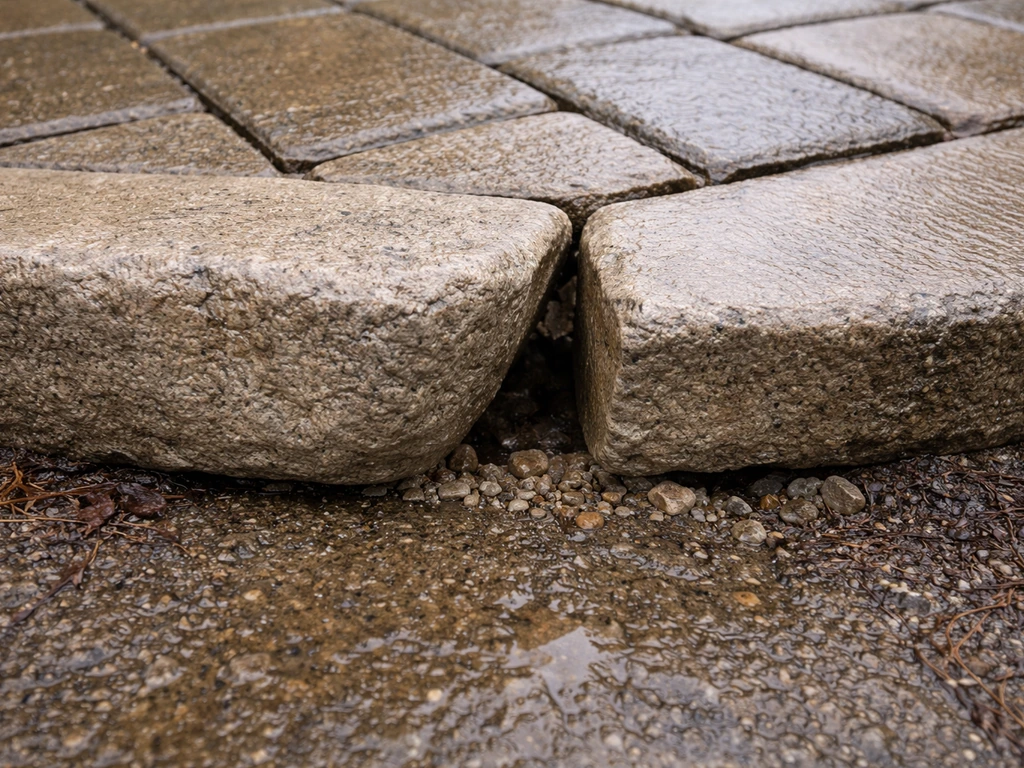
- Gaps between edging pieces: ground movement, failed mortar joints, or missing joint sand
- Crumbling mortar or cracked concrete edging: water infiltration followed by freeze-thaw cycling
- Weeds growing through joints: joint sand has eroded and organic material has taken over
- Loose metal edging with spikes pulling out: spikes were driven into soft or uncompacted soil and have worked free
Run your hand along the edging line and check two things: whether any piece rocks or moves when you push it, and whether the edging sits flush with the adjoining patio surface. A piece that rocks has a base problem. A piece that's shifted horizontally has a restraint problem. Both usually need the same fix: dig it out and start from the base.
Why patio edging fails in the first place
Fixing edging without understanding the cause is how you end up making the same repair twice. These are the four underlying problems that account for almost every failure I see.
Freeze-thaw heaving
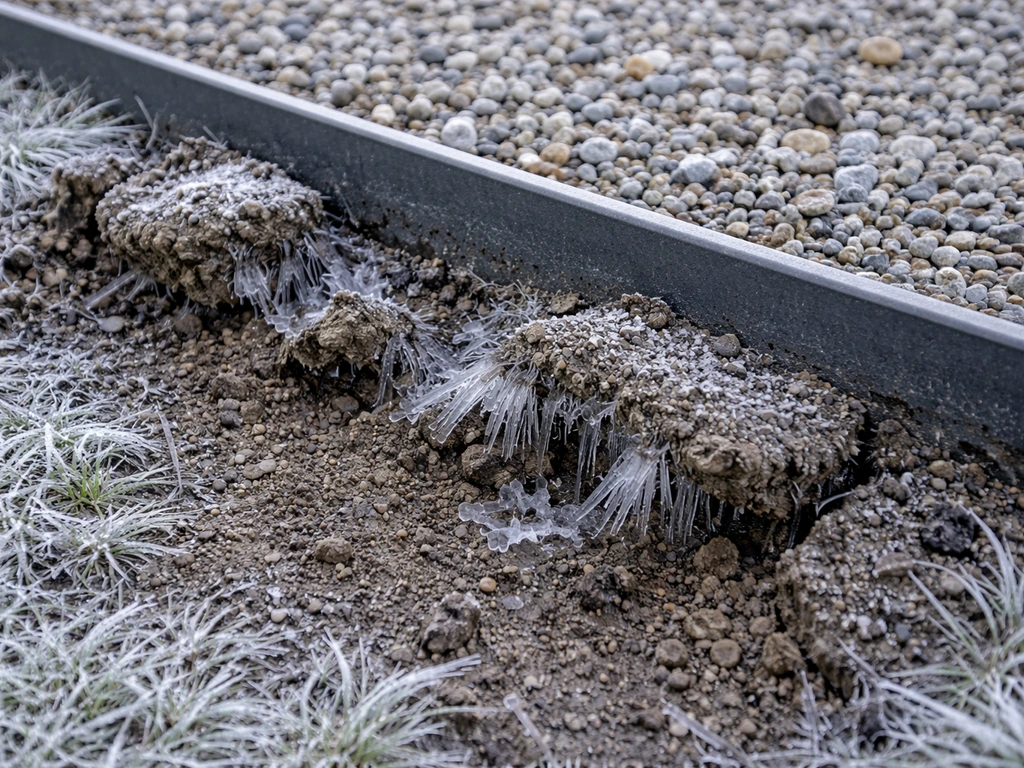
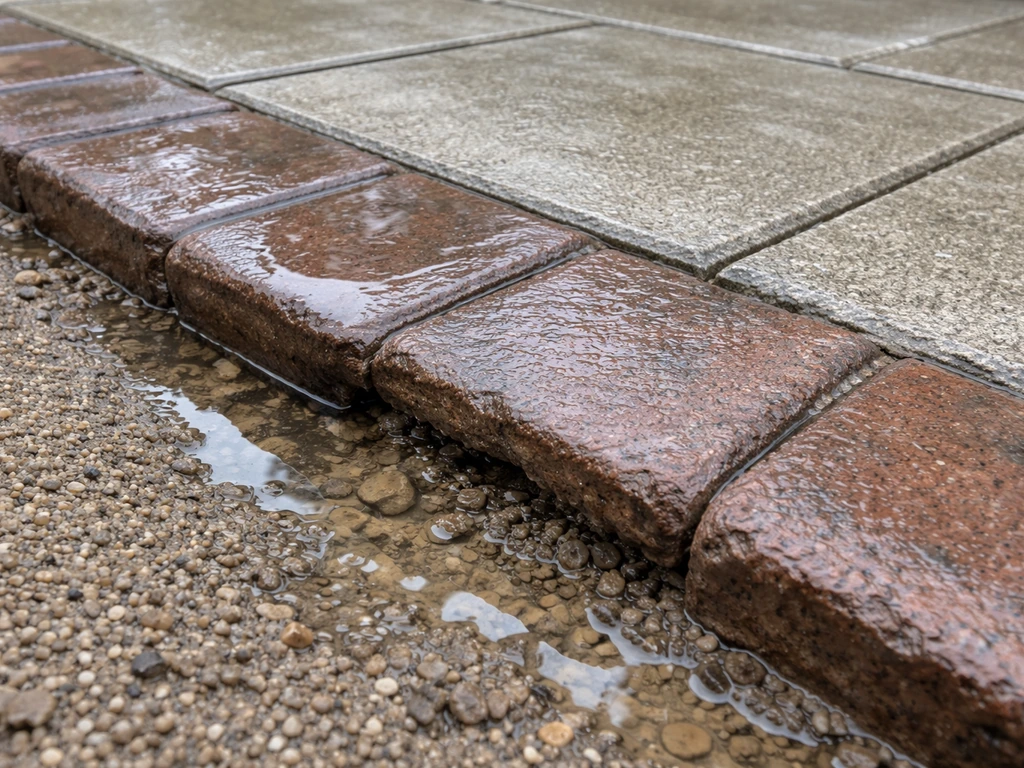
This is the most common culprit in any climate that sees freezing temperatures. When water saturates the base material or sits beneath an edging piece and then freezes, it expands and physically lifts the edging. When it thaws, the piece doesn't always settle back into exactly the same position. Do this enough times over several winters and you get a wavy, uneven edging line with pieces at different heights. Edges are especially vulnerable because roof runoff, snowmelt, and rain all tend to drain toward the patio perimeter. If your edging is the first thing to fail each spring, drainage is the reason.
Base shifting and poor compaction
Edging is only as stable as what's underneath it. If the gravel base wasn't compacted properly before installation, it will compress unevenly over time as foot traffic and weather work on it. A practical compaction check: a 10-inch spike should take at least three firm hammer strikes to drive into a properly compacted base. If it goes in with one hit, the base is soft and will keep settling. Soil backfill is never an acceptable substitute for a compacted gravel base, no matter how firm it feels when dry.
Failed mortar or sand joints
For brick and mortar-set edging, the mortar eventually cracks and lets water in, which accelerates freeze-thaw damage. For sand-set paver edging, the joint sand erodes from rain, pressure washing, or just age, which removes the lateral support that keeps pieces tight. Once the joints open up, pieces start shifting and the edging line loses its integrity.
Poor drainage
Water that has nowhere to go collects at the patio edge and saturates the base. Over time this washes out fines from the gravel, creates voids, and sets up the freeze-thaw cycle. Check whether your edging sits in a low spot, whether the patio slopes toward rather than away from the house, or whether a downspout is depositing water nearby. Fixing edging without fixing the drainage means you'll be doing this repair again.
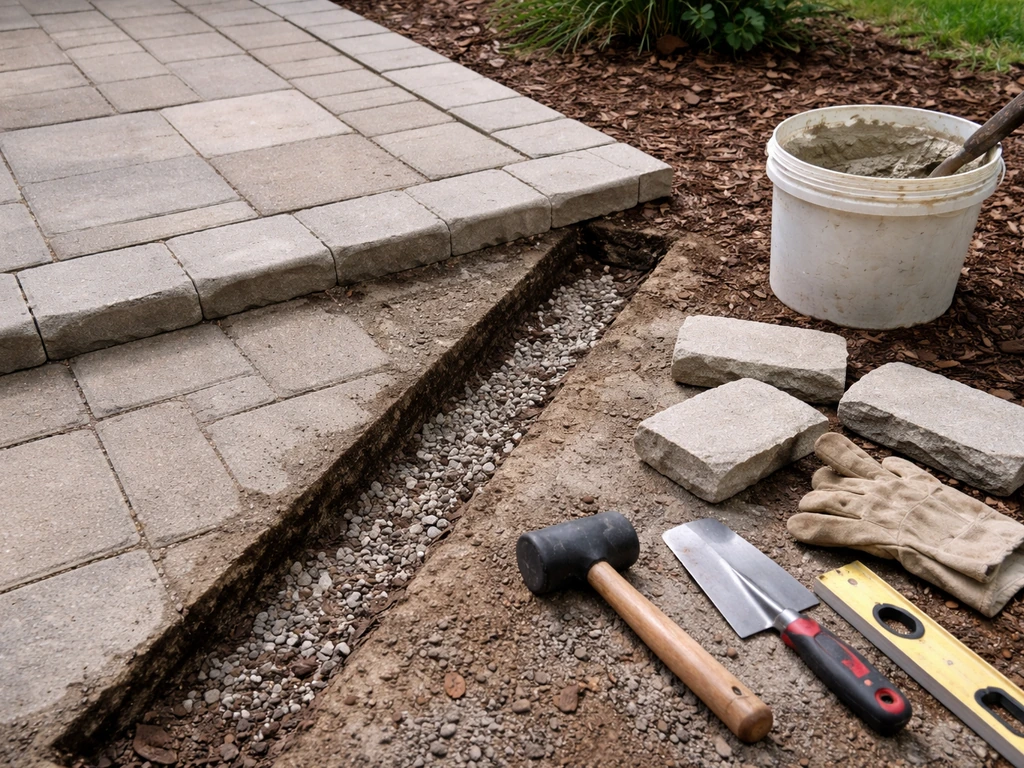
Tools and materials you'll need
The specific materials depend on your edging type, but the tools for diagnosis and base prep are the same across all of them.
| Edging Type | Base/Bedding Materials | Fasteners/Mortar | Finishing Materials |
|---|---|---|---|
| Paver or stone edging | Compacted gravel base, 1–1.5 inch bedding sand | Plastic or aluminum edge restraint, 8–10 inch galvanized spikes | Polymeric jointing sand, paver sealer (optional) |
| Brick edging | Compacted gravel base, mortar bed or bedding sand | Type S mortar for joints | Mortar, brick sealer (optional) |
| Concrete/cast edging | Compacted gravel base, concrete mix | None (poured in place) or construction adhesive for cast sections | Hydraulic cement for cracks, concrete sealer |
| Metal edging (steel or aluminum) | Compacted gravel base | 10-inch galvanized or stainless spikes, spaced ~12 inches apart | None required; edging cap or paint for cut steel edges |
Universal tools you'll need regardless of edging type: a flat spade and square-nose shovel for digging, a hand tamper or plate compactor (rent one for anything over about 10 linear feet), a rubber mallet, a level and string line, a tape measure, safety glasses, and gloves. For mortar work, add a margin trowel, a pointing tool, and a bucket for mixing.
Step-by-step repairs by edging material
Paver or stone edging
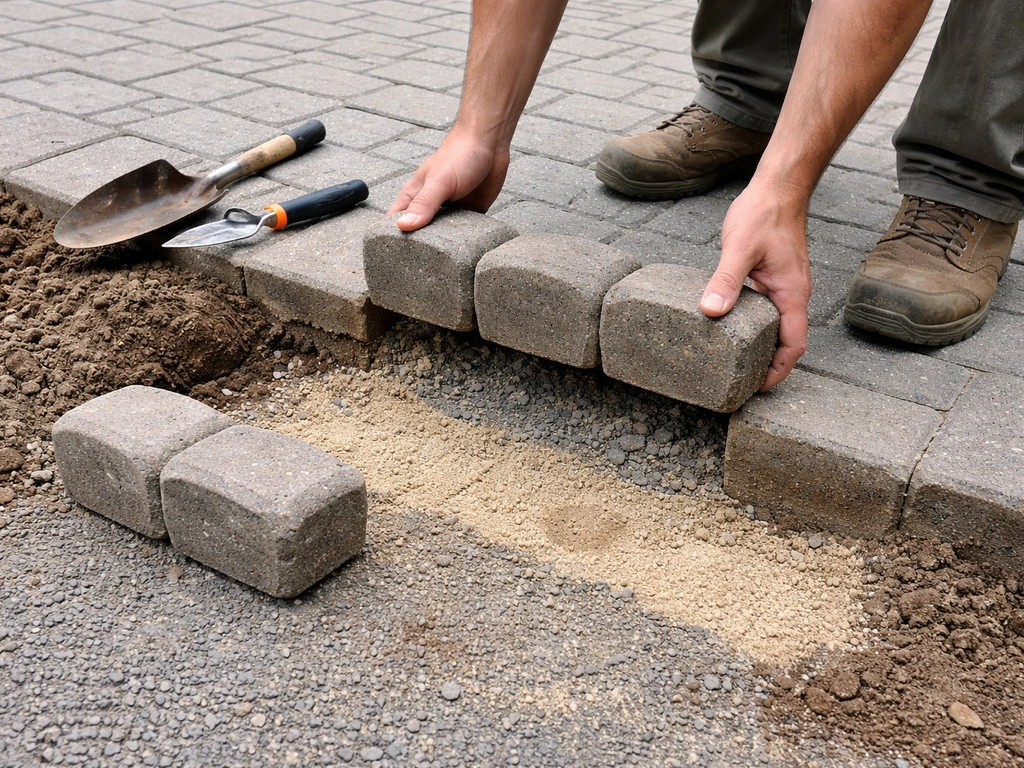
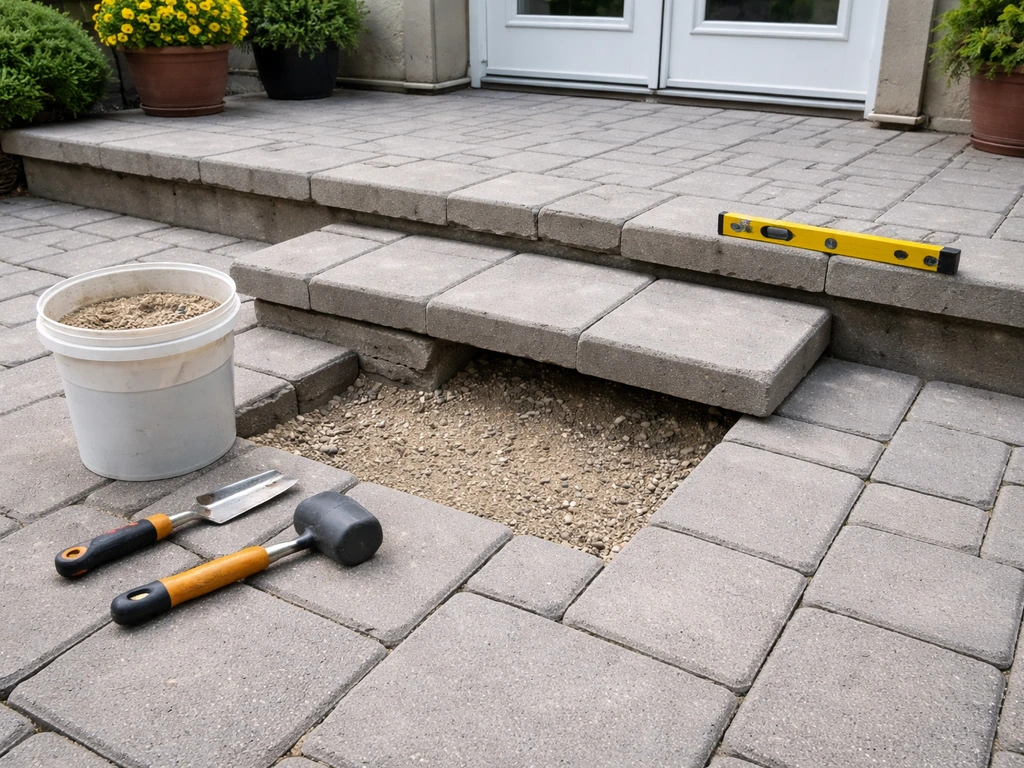
Paver edging is the most forgiving to repair because nothing is permanently bonded. The entire system is designed to be lifted, adjusted, and reset.
- Remove the affected edging pieces. Set them aside on a flat surface where they won't get damaged.
- Dig back to sound, stable base material. In most cases this means removing all the loose or wet base material and digging down until you hit firm, undisturbed ground. For freeze-thaw damage, this is often 6–8 inches below the finished surface.
- Check and improve drainage. If there's standing water or the soil is saturated, address the source before rebuilding. This might mean grading the surrounding soil away from the patio edge or redirecting a nearby downspout.
- Fill with compacted gravel. Use crushed angular gravel (not rounded pea gravel), adding it in 2–3 inch layers and compacting each layer thoroughly. Test compaction: a 10-inch spike should need three solid hammer strikes to drive in.
- Install the edge restraint on top of the compacted base, not on the bedding sand. The restraint goes directly on the compacted gravel layer.
- Drive 8–10 inch galvanized spikes through every third hole in plastic restraint or approximately every 12 inches for metal restraint. Spikes must go into the compacted base, not soft soil.
- Spread bedding sand to a uniform depth of 1 to 1.5 inches over the compacted base, screeded flat.
- Reset edging pavers or stones on the bedding sand. Use a string line stretched between two fixed points to maintain a consistent edge line. Use a level to check that pieces are flush with each other.
- Once all pieces are set, sweep polymeric jointing sand into all joints, compact lightly with a rubber mallet or plate compactor with a pad, and sweep again. Mist with water to activate the polymer binder.
Brick edging
Brick edging is usually set in a mortar bed or a sand bed with mortared joints. The repair approach depends on which system you have.
- Remove loose or cracked bricks by chiseling out the old mortar with a cold chisel and hammer. Work carefully to avoid breaking bricks you want to reuse.
- Dig back to the base. If the bricks were sand-set with mortared joints, the process mirrors the paver repair above. If they were mortar-bed set, you'll need to chip out the old mortar bed completely.
- Compact and level the base. For mortar-bed brick, bring the base gravel level, then add a fresh mortar bed (use Type S mortar, which is appropriate for ground contact) at a consistent thickness.
- Set replacement bricks. Press each brick firmly into the mortar bed with a slight twist to seat it, then tap level with a rubber mallet. Use your string line continuously to keep the edge straight.
- Allow the mortar bed to firm up (about 24 hours) before pointing the joints.
- Mix fresh Type S mortar to a stiff peanut-butter consistency and pack it into the joints with a pointing tool or margin trowel. Tool the joints smooth before the mortar fully sets.
Concrete or cast edging
Poured concrete edging and pre-cast concrete edging pieces behave differently but share the same failure modes: cracking from freeze-thaw and settling from base failure.
- For cracked poured concrete edging: if the crack is narrow (under 1/4 inch) and the edging hasn't shifted, clean the crack with a wire brush, blow out debris, and fill with a hydraulic cement or concrete crack filler. Feather the edges flush.
- For shifted or heaved poured concrete: this is a more serious repair. You'll need to saw-cut the damaged section, remove it, rebuild the base, and pour new concrete. This is where honest assessment matters — if the section is large or the whole edging run has moved, calling a concrete contractor is often the right call.
- For pre-cast or cast concrete edging pieces: remove loose pieces, dig back and recompact the base, then reset pieces on a thin mortar bed or compacted sand bed. Use construction adhesive between pieces at joints if they were originally bonded.
- Fill any remaining gaps or joints with fresh mortar, allow to cure, and then apply a concrete sealer to help shed water and reduce future freeze-thaw damage.
Metal edging (steel or aluminum)
Metal edging fails almost exclusively because the spikes pull out of soft or uncompacted soil, letting the edging bow outward or sink. The metal itself rarely breaks.
- Pull back the metal edging from the affected section. Remove all old spikes.
- If the edging has bowed, straighten it by hand or with a rubber mallet against a straight board.
- Dig back the soil or base behind the edging by 4–6 inches and compact it firmly. This is the most important step — driving new spikes into the same soft material will give you the same result.
- Reposition the edging using a string line to make sure it's straight. Re-spike with 10-inch galvanized or stainless spikes spaced about 12 inches apart, driving each spike fully into the compacted base.
- Backfill behind the edging with compacted gravel or soil, tamping firmly as you go. This helps lock the edging in place from behind.
Rebuilding the base and getting alignment right
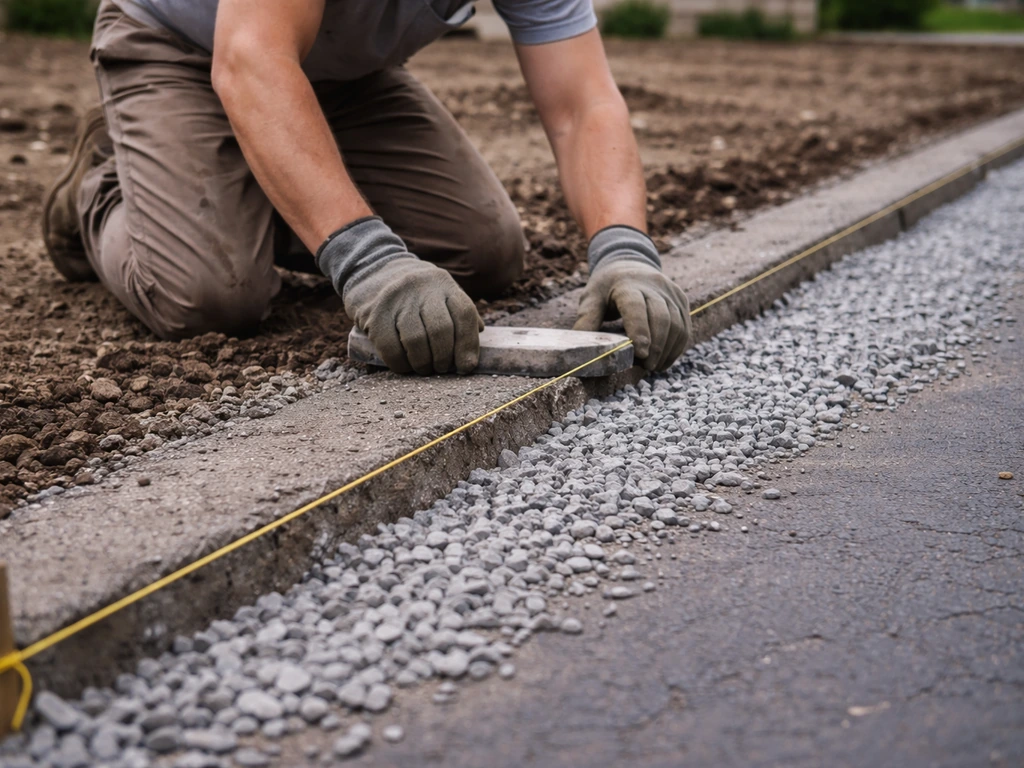
Whatever your edging material, the base rebuild is the part people want to skip and the reason the same repair fails twice. Here's what a proper base looks like from the bottom up: firm undisturbed subgrade, then 4–6 inches of compacted crushed gravel (add it in layers and compact each one), then a 1–1.5 inch screeded layer of coarse bedding sand. Edge restraints go on the compacted gravel, before the bedding sand goes down. This sequence matters because edge restraints installed on top of bedding sand will shift as the sand moves.
For alignment, a string line is not optional, it's the only way to get a straight edge run over any meaningful distance. Drive two stakes beyond the ends of your repair section and pull a string line at the finished height of the edging. Every piece gets set to that line. Check level every few pieces with a 4-foot level. A run of edging that's properly aligned looks intentional; one that's eyeballed rarely does.
Securing, re-mortaring, and sealing
Once everything is reset and level, the final steps lock it in place and protect it from water. Don't skip these just because the edging already looks good.
Joint sand and polymeric sand for paver and stone edging
Standard joint sand erodes over time and needs to be topped up periodically. Polymeric jointing sand is a better choice for edging joints because the polymer binder activates with water and hardens, reducing erosion and weed infiltration. Hardscape Magazine describes polymeric jointing sand as activated by water and hardens to help reduce erosion and weed infiltration polymer binder activates with water and hardens. Sweep it in dry, compact with a rubber mallet, sweep in a second pass, then mist the surface gently with a garden hose to activate it. Remove any excess polymeric sand from the surface before it dries or it will leave a haze that's difficult to remove.
Mortaring brick and concrete edging
Use Type S mortar for any ground-contact application. Pack it firmly into joints, tool it smooth, and keep it slightly below the paver or brick face so water sheds off rather than pooling in the joint. Let mortar cure for at least 48 hours before any foot traffic or watering.
Sealing
Sealing is optional but worthwhile on brick, concrete, and natural stone edging exposed to freeze-thaw. If you've used polymeric sand, wait at least 90 days before applying a penetrating sealer, the sand and any new mortar need time to cure fully. Once sealed, plan to reseal every 3–5 years depending on exposure and wear. For metal edging, no sealer is needed, but if you've cut steel edging, hit the cut ends with a rust-inhibiting paint to prevent rust staining on adjacent pavers.
Keeping edging from failing again
Most edging repairs that come back within a season or two were either installed on a bad base or are dealing with an unresolved drainage problem. Most edging repairs that come back within a season or two were either installed on a bad base or are dealing with an unresolved drainage problem, which is also why learning how to repair patio failures correctly matters. The prevention checklist is short but actually matters.
- Make sure the patio surface and surrounding grade slope away from the house at a minimum pitch of 1/8 inch per foot
- Keep downspouts extended well away from the patio edge, at least 6 feet
- Top up joint sand every fall before freeze season begins, sweeping in fresh polymeric sand and wetting to activate
- Clean paver joints with a leaf blower or stiff brush rather than a pressure washer, or use a pressure washer at a 45-degree angle at low pressure to avoid dislodging joint sand
- Check metal edging spikes and re-drive any that have worked loose each spring before the edging shifts
- Reseal concrete and brick edging every 3–5 years to reduce water infiltration
When to call a professional instead
There are a few situations where the DIY approach will cost you more time and money than just hiring someone. If your edging failure extends more than 10–15 linear feet and multiple sections have shifted in different directions, the base has likely failed across a large area and needs a full excavation and rebuild that's impractical without a plate compactor and dump truck access. If water is consistently pooling at the patio edge after every rain, there may be a grading or drainage problem that involves more than just the patio, incorrect overall yard grade, a failing French drain, or foundation drainage issues all need professional assessment. And if your poured concrete edging has heaved and cracked in multiple places, a concrete contractor can cut, remove, and repour sections far more efficiently and cleanly than most homeowners can. The repairs covered in this guide are genuinely DIY-able for localized damage affecting a few feet of edging. If you need a complete DIY plan, use this guide on how to repair patio deck so the base, drainage, and alignment are handled correctly. When the problem is systemic, bringing in a pro saves money in the long run.
If you're also dealing with damage to the patio surface itself, sunken pavers, cracked flooring, or failing steps, those repairs follow a similar base-first logic. If you are dealing with patio steps that have shifted, heaved, or pulled away, use the same base-first diagnosis and drainage checks before you start any reset fix patio steps. Getting the edging right is often the first step in a broader patio fix, and the same compaction and drainage principles carry through to every part of the repair. If you’re also fixing cracked or sunken patio flooring, use the same base-first logic so drainage and compaction don’t undermine the repair later fix a patio. If you need to fix a patio area too, handle the edging and the patio base together so water doesn’t undermine the repair.
FAQ
Can I fix patio edging by just resetting the visible pieces without digging up the base?
Yes, but only if you first remove every piece that has loosened and re-check the base level below it. If a section is rocking or the joint gaps are widening, surface patching on top of existing sand or mortar will usually fail again because the underlying voids stay in place.
What should I do if the edging has a small gap along the line but nothing is visibly broken?
If you see gaps, the edging is not properly restrained, so you will get sideways movement when people step nearby or when the soil shifts with moisture. In practice, that means you should dig back to the compacted gravel layer, re-set restraints at the correct elevation, and then re-install bedding sand and joints.
How can I tell if my bedding sand thickness is wrong after the first reset?
Don’t pack bedding sand or “top off” gravel without recompacting it. The sand layer should be screeded to thickness, then the edge restraints installed on the compacted gravel, so the restraints do not ride up and down as the sand eventually migrates.
How do I know whether my edging problem is drainage or just an installation issue?
Use drainage repair first if water keeps collecting at the edge after normal rain. Simple tests help: check where runoff lands from downspouts, confirm the patio slopes away from the house (not toward the edging), and look for low spots at the edging line where water consistently pools.
Will polymeric jointing sand prevent edging from moving if the base is slightly soft?
Polymeric jointing sand can be a good choice, but it is not a substitute for proper base and restraints. If you have active washout (fines leaving the gravel), the polymer sand can harden the joints while the base still voids and heaves, causing the edging to lift again.
How long should I wait before using the patio after resetting brick or mortar-set edging?
If mortar is involved, correct the water path and joint packing first, then allow full cure time. Type S mortar should cure at least 48 hours before traffic or watering, and joints should be tooled slightly below the paver or brick face so water sheds rather than pools in the joint.
Can I seal brick or concrete edging right after I finish the joints?
For sealing, wait until the mortar and any jointing sand have fully cured, and for polymeric sand specifically, wait at least 90 days before applying a penetrating sealer. Sealing too soon can trap moisture, which can worsen staining and reduce long-term performance.
My newly reset edging looks level for a few days, then sinks slightly, why?
Yes, but it usually indicates the edge restraints or base are not holding elevation. Check for voids or soft spots by lifting a nearby piece, then reset restraints and rebuild to the correct bottom-up sequence (compacted subgrade, compacted crushed gravel in lifts, bedding sand, then restraints before bedding is fully covered).
Do I really need a plate compactor for patio edging repairs?
Plate compactor rental is worth it when you have more than about 10 linear feet or when the excavation is significant, because repeated tamping without a proper compaction pattern leads to uneven settling. If you must proceed without a plate compactor, at least compact in smaller lifts and verify with the spike test.
Metal edging is bowed outward, how do I fix it correctly?
Metal edging is typically held by spikes into soil, so rust or loss of spikes may not be the primary issue, the soil failure is. Replace any pulled spikes, and if the soil under the line is soft, rebuild and compact the base, because the metal rarely fails on its own.
What are the most common reasons a patio edging repair comes back within a season?
If you want the fastest way to reduce repeat failures, focus on restoring the bottom-up layers, then lock alignment with a string line, and finally use the right jointing method for the material. The most common DIY miss is skipping the compacted gravel step or installing restraints at the wrong elevation relative to bedding sand.
When should I stop DIY and hire a pro for patio edging repair?
If multiple sections shift in different directions or the affected length exceeds about 10 to 15 linear feet, the base has likely failed over a broader area and a full excavation is usually more practical. Also consider getting help if you have consistent pooling after every rain, which can point to grading issues or foundation-related drainage.
Next Article
How to Fix Patio Steps: Loose Pavers and Concrete Repairs
DIY guide to fix loose patio steps: diagnose paver and concrete causes, reset, re-bed, anchor, and cure right.