Most patio paver problems come down to one of five things: loose or wobbly pavers, sunken or uneven sections, cracked or chipped units, missing pieces, or joint sand that's washed out and stopped doing its job. The good news is that all of these are fixable as DIY projects if you catch them before the base underneath has completely failed. The basic process is always the same: pull up the problem pavers, fix whatever went wrong underneath, put things back correctly, and restore the jointing sand. Get that sequence right and your patio will be solid for years. Skip steps, and you'll be back out there fixing the same spot next spring.
How to Fix Patio Pavers: Diagnose and Repair Steps

Talia Lang
1 May 2026
Diagnose the problem in your paver patio
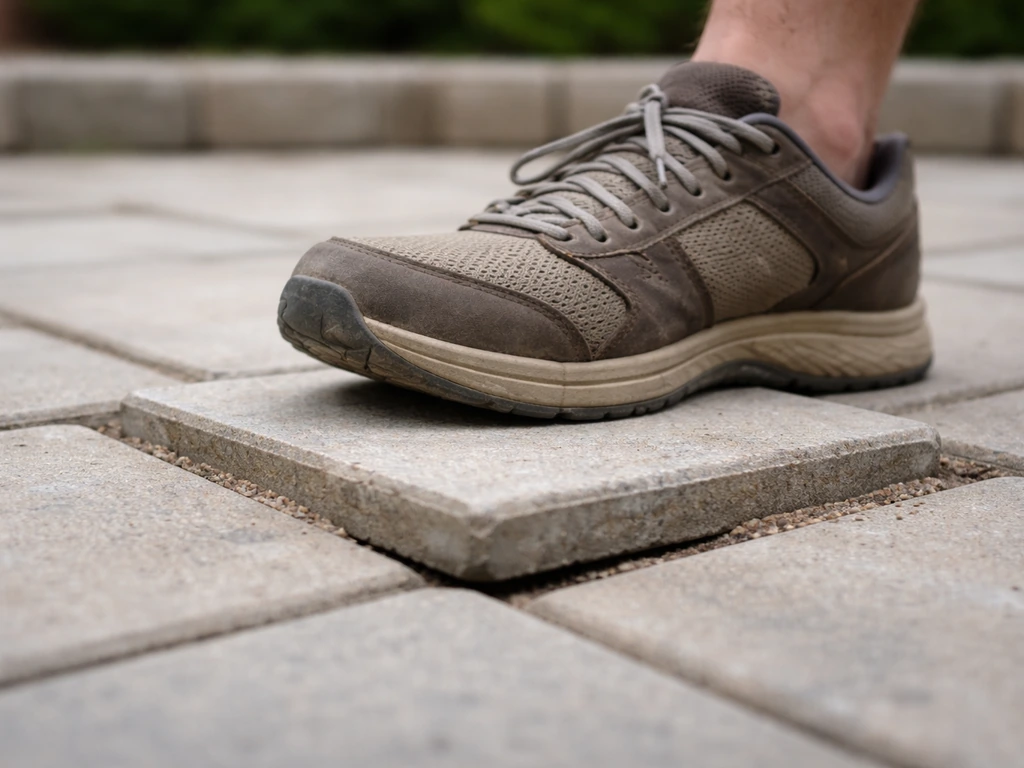
Before you grab any tools, spend ten minutes actually walking the patio and figuring out what you're dealing with. Press down on each paver with your foot. Rock it side to side. Look at the joints between pavers. What you find will tell you exactly which repair path to take.
Here's what the common symptoms actually mean:
- Pavers that rock or shift underfoot: joint sand has washed out, and the pavers have lost their interlock. The base underneath may still be fine.
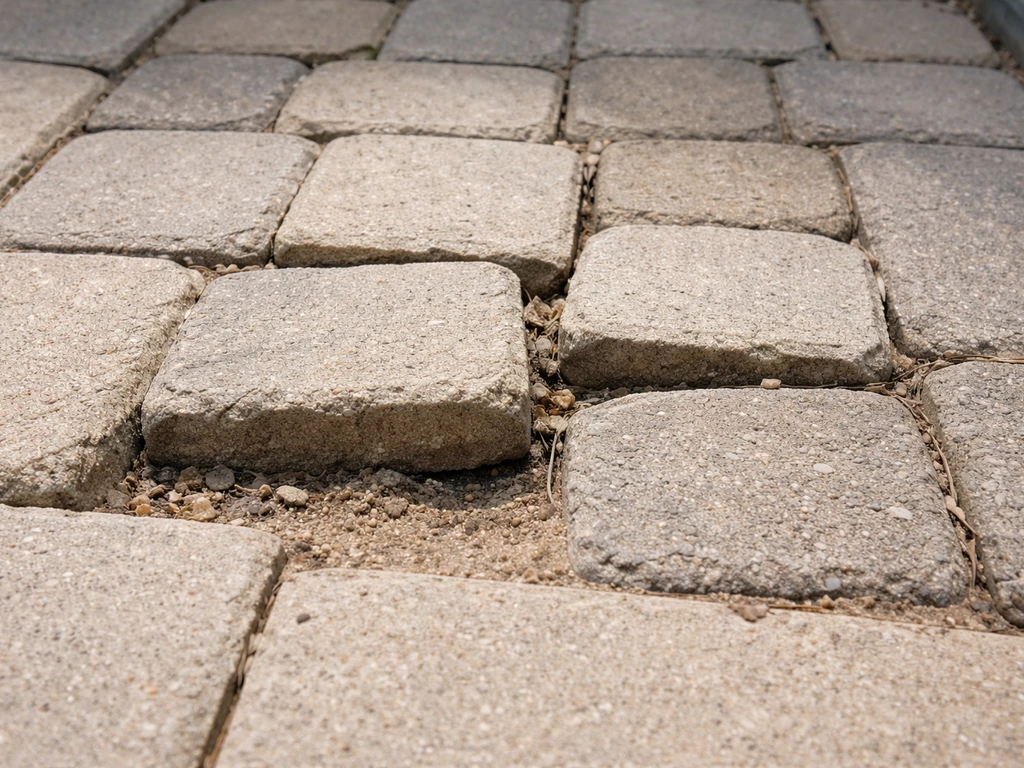
- One or more pavers sitting noticeably lower than their neighbors: the bedding sand or base material beneath that spot has eroded or settled. This is often caused by poor drainage routing water under the patio.
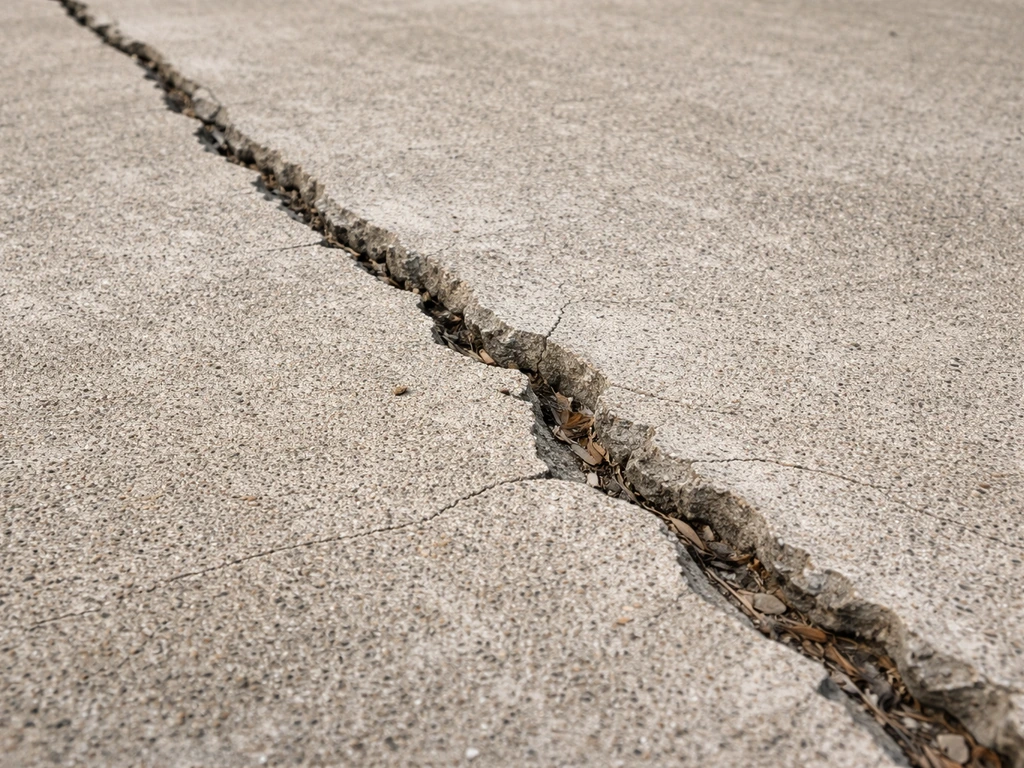
- Cracked or chipped pavers: usually impact damage or a freeze-thaw cycle combined with a soft spot underneath. A paver that cracked cleanly from top to bottom was probably sitting on an unstable base.
- Weeds growing through the joints: the joint sand is gone or nearly gone. The roots aren't what's moving your pavers, but they are a clear sign of washout.
- Sand missing from joints across a wide area: widespread joint sand failure, likely from surface water sheeting across the patio repeatedly.
- A section that's heaved upward in winter: possible frost heave, which points to drainage problems. Water is getting under the base and freezing.
One paver rocking in an otherwise solid patio is a quick fix. A whole section that's sunk two inches or more, or damage that keeps coming back in the same spot, usually means there's a drainage or base problem that needs addressing before you relay anything. Keep that in mind as you read through the repair steps below.
Tools and materials checklist for DIY repairs
You don't need a lot of specialized equipment for most paver repairs, but having the right things on hand before you start saves a frustrating mid-project hardware store run.
- Flat pry bar or flat-head screwdriver (for prying up pavers without chipping edges)
- Rubber mallet (for tapping pavers back into place)
- Chisel and hammer (only needed if you have to break out a badly damaged paver)
- Hand trowel and stiff-bristle brush
- Level (a 4-foot level is ideal for checking multiple pavers at once)
- Plate compactor (rentable from any equipment rental shop; worth it for anything larger than 2-3 pavers)
- Paver saver mat or rubber pad (to protect paver surfaces when using a plate compactor)
- Coarse bedding sand (also called concrete sand or builder's sand), enough to fill a roughly 1-inch layer under the affected area
- Compactable gravel base material (crushed stone, also called Class II or road base, for patching sunken areas)
- Polymeric joint sand (this is the good stuff for joints; it hardens when wet and resists washout and weeds)
- Replacement pavers matching your existing pattern (bring a paver to the landscape supplier for matching)
- Leaf blower (critical for clearing polymeric sand dust before activation)
- Garden hose with a shower-spray nozzle (for activating polymeric sand)
- Paver sealer (optional, but extends the life of your joint sand and protects the surface)
A note on polymeric sand: if your patio currently has regular mason's sand in the joints, upgrading to polymeric sand when you repair it is absolutely worth the extra cost. Regular sand washes out repeatedly. Polymeric sand, once activated with water and cured, hardens into a firm, water-resistant joint that dramatically reduces future washout and weed infiltration.
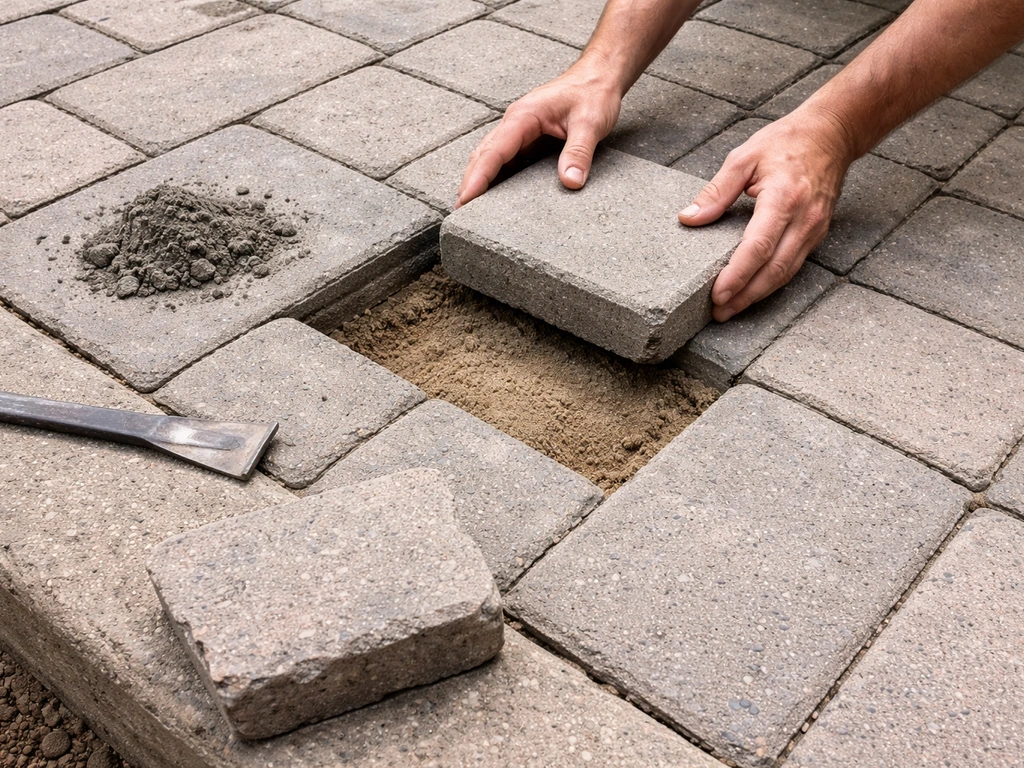
How to remove and reset damaged or loose pavers
This is the step most people rush, and rushing it causes the most damage. Take it slow.
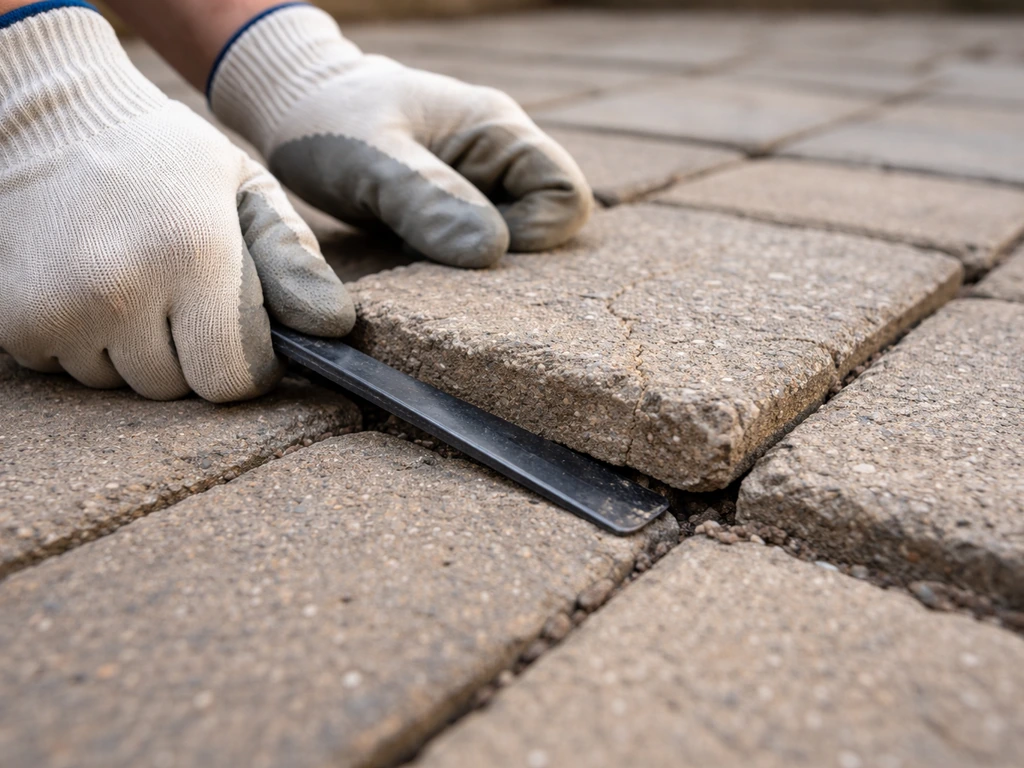
- Start at the problem paver and work a flat pry bar or flat-head screwdriver into the joint on one side. Work around all four edges before you try to lift, so you're not prying one side up while the adjacent pavers hold the other side down.
- Once you feel it loosen, lift it straight up. Set it aside somewhere it won't get damaged.
- If the paver won't budge, tap it with a rubber mallet to break the sand grip, then try again. If a paver is broken or badly cracked and you need to remove it in pieces, use a chisel and hammer to break it into manageable chunks. Be careful of adjacent pavers.
- Once the target paver is out, remove any pavers around the affected area that also feel unstable. It's much easier to do a proper fix across a small section than to do repeated single-paver repairs.
- Scrape out the old bedding sand underneath. You want to get down to the compacted base layer.
- If the pavers are just loose (not sunken), you may only need to add fresh bedding sand, re-level, and reset. Spread about 1 inch of coarse bedding sand, screed it level using a piece of conduit or a straight 2x4, and place the pavers back.
- Tap each paver into place with a rubber mallet, checking with your level as you go. Adjacent pavers should be flush within about 1/8 inch of each other.
- Once all pavers are back in, compact the area using a plate compactor with a paver saver mat underneath to avoid surface scratching.
If the pavers you removed are in good shape, just set them aside carefully. They'll go right back in. If any are cracked or chipped, this is the time to swap them for replacements.
How to fix sunken or uneven sections
A sunken section means material has shifted or washed out below the surface, and just re-sanding on top won't hold. For more on how to fix uneven flagstone patio, remember a sunken section usually needs repairs below the surface, not just re-sanding. You need to rebuild from the base up. If you suspect a sunken or uneven section, the repair starts at the base level, not just with re-sanding on top how to fix uneven patio pavers. This is more work, but it's the only repair that actually lasts. If you are dealing with a low spot in a paver patio, follow this section to lift the pavers, correct the base, then relay them properly.
- Remove all the pavers from the sunken section plus one row of pavers on every side of the depression, so you have room to work and can blend the grade properly.
- Dig down and assess the base. A properly installed paver base should be 4 to 8 inches of compacted gravel (crushed stone), topped with about 1 inch of bedding sand. If you see only a thin layer of gravel, soft soil, or standing water at the bottom of the hole, you've found your problem.
- Add compactable gravel base material to fill the depression and bring it up to the correct grade. Compact it in lifts of no more than 4 inches at a time using the plate compactor. Trying to compact a thick layer all at once doesn't work properly.
- If the soil in your area drains poorly (clay soils are the classic culprit), consider laying a woven geotextile fabric between the soil and your gravel base before you fill. This keeps the base material from migrating into the soil over time.
- Once the gravel base is compacted and at the right grade, spread your 1-inch bedding sand layer, screed it flat, and relay your pavers.
- Check levels constantly as you work. Use your 4-foot level across multiple pavers at once. The goal is a consistent, slight slope away from your house (about 1/8 inch per foot) for drainage.
- Compact the reset pavers into the bedding sand with the plate compactor and paver saver mat.
If water is consistently pooling in one area of your patio, or if the ground under the base is always wet when you dig down, fixing the pavers alone won't solve the problem. You have a drainage issue that needs to be addressed, or the same spot will sink again. See the section at the end of this article on when to call a pro.
For specific guidance on uneven patio situations, including broader sections where the grade has shifted across the whole surface, there's more detailed information in the guides covering how to fix uneven patio pavers and how to fix a low spot in a paver patio.
How to repair cracked or chipped pavers and replace missing pieces
A surface chip or small corner break that doesn't compromise the structural integrity of the paver can often be left alone or filled with a color-matched concrete patching compound. But a paver that's cracked all the way through needs to come out and be replaced. A split paver will keep moving, and the crack will grow.
- Remove the cracked paver using the pry-bar technique described above. If it's broken in multiple pieces and won't lift out cleanly, use a chisel and hammer to break it into smaller chunks for easier removal.
- Take one of your existing undamaged pavers to your local landscape or hardscape supplier and match the size, thickness, and color as closely as possible. Paver colors do fade over time, so a new paver may look slightly brighter than your existing ones at first. That's normal and it blends in over time.
- Check the bedding sand under the removed paver for soft spots or erosion and correct those before installing the replacement.
- Set the new paver in place and tap it down with a rubber mallet until it's flush with the surrounding pavers. Check with your level.
- If you have several missing or heavily damaged pavers scattered across the patio, consider whether there's a pattern to where they're failing. Clustered failures often point to a base issue in that zone, not just bad luck.
For loose pavers that aren't cracked but keep shifting or rocking, there's specific guidance in the guides on how to fix loose patio pavers and how to fix a loose patio stone, which cover the interlock mechanics in more detail. For loose pavers that keep shifting, the interlock mechanics make a big difference in how to fix them correctly how to fix loose patio pavers.
Re-sand, re-joint, and seal correctly
This step is where a lot of otherwise good repairs fall apart. Getting the joint sand right is not optional. Joints without proper sand allow pavers to shift, water to undercut the base, and weeds to establish. Here's how to do it properly. Belgards recommends building patios on a compacted granular aggregate base, typically about 4, 6 inches, then topping it with bedding sand of at least about 1 inch before setting the pavers.
Filling the joints with polymeric sand
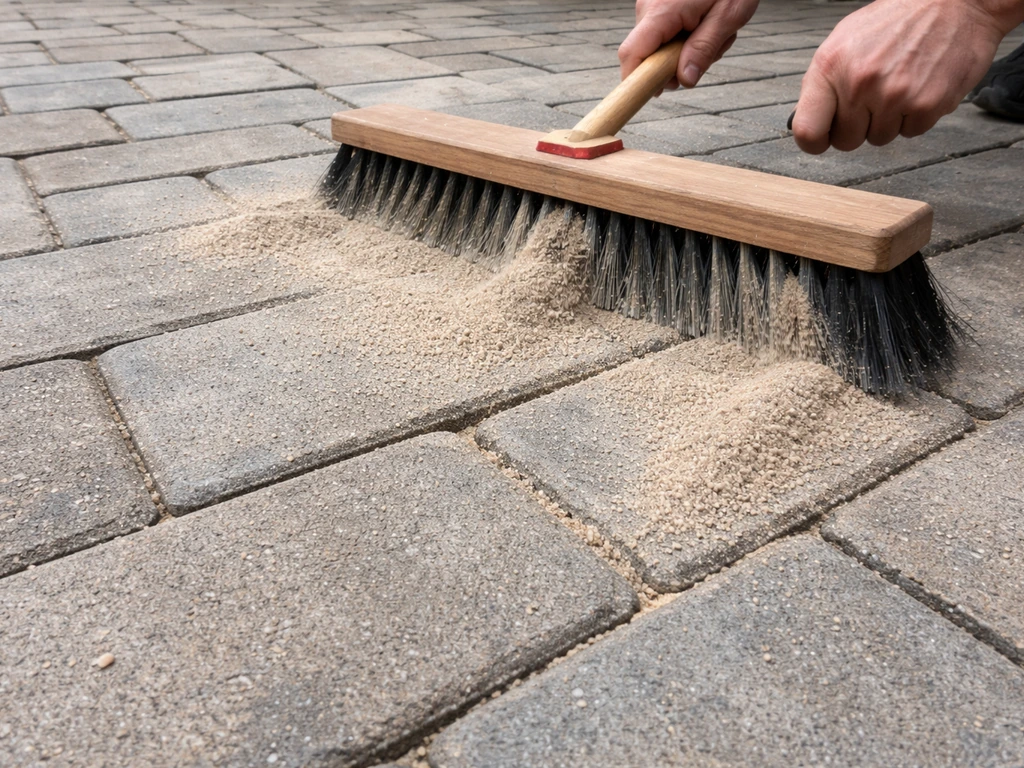
- Make absolutely sure all paver surfaces and joints are completely dry before you start. Polymeric sand cannot be applied over damp surfaces. On a warm, sunny day, let the area dry for at least an hour after any moisture exposure.
- Pour the polymeric sand over the paved area and sweep it into the joints using a stiff-bristle brush or push broom. Work it in from multiple directions to pack it into all the gaps.
- Keep filling and sweeping until the sand in the joints is filled to within 1/8 inch below the top of the paver surface (or below the chamfer on chamfered pavers). Don't overfill to the very top edge.
- This is the most important step that people skip: blow off the paver surface with a leaf blower before you add water. Remove every bit of polymeric sand dust from the paver surface and from the top of the joints. Any residue left on the surface will bond there when you wet it, leaving a white hazy film that's very difficult to remove.
- Once the surface is clean, use a garden hose with a shower-spray nozzle to wet the joints. Use a gentle, sweeping shower pattern, not a direct stream, which will wash the sand back out. Make two or three controlled passes over the area.
- After the first wetting pass, do one more gentle blow with the leaf blower to push off any water pooling on top of pavers, then do a final light wetting pass.
- Don't walk on the area for at least 24 hours, and keep it dry. Polymeric sand needs above 32°F for a minimum of 48 hours after installation to cure properly. Don't do this job if rain or a freeze is forecast within two days.
Sealing the patio
Sealing is optional but worth doing if you want to extend the life of your joint sand and protect the paver surface from staining. Wait at least 30 days after installing new polymeric sand before sealing, so the joints have fully cured. Apply a penetrating or film-forming paver sealer according to the manufacturer's instructions, typically with a pump sprayer or roller in two thin coats. A properly sealed patio also gives better slip resistance when wet, which is worth considering if your patio gets regular foot traffic.
When damage means deeper issues or it's time to call a pro
Not every paver problem is a DIY fix, and being honest with yourself here saves you from spending a weekend on a repair that won't hold. Here's when to stop and get professional help:
- The same spot keeps sinking or shifting after multiple repairs: you have a chronic drainage problem routing water under the base. This requires proper grading or a drainage solution before any paver work makes sense.
- You dig down and find standing water in the base: the soil beneath is saturated, possibly from a downspout, broken irrigation line, or inadequate grading. Fixing the pavers without fixing the water source is a waste of time.
- The entire patio has heaved, settled significantly, or is out of level by several inches across a large area: a full rebuild is almost certainly needed, and scoping that correctly is a job for a professional hardscape contractor.
- The base material has completely washed out or you find voids (empty spaces) beneath the pavers: erosion at this scale typically has an ongoing cause that needs to be identified and corrected before relaying.
- Clay soil is causing widespread movement year after year: in problem soils, proper base depth, geotextile fabric, and sometimes drainage tile are needed. A landscape contractor familiar with your soil conditions can design a base that actually works.
- You're not confident working with a plate compactor on a large section: improper compaction is one of the main causes of future failure, and it's worth hiring a pro to do the base work correctly even if you handle the rest.
For most isolated repairs, loose pavers, small sunken sections, or joint sand failure across a manageable area, this is absolutely DIY territory. Give yourself a weekend, work methodically, don't skip the compaction step, and use polymeric sand for the joints. If you do it right, the repair should last as long as the original installation, maybe longer.
FAQ
Can I just add more sand to the joints instead of lifting pavers?
Yes, but only if you’re dealing with minor joint loss or a couple of wobbly units. If the base is shifting, you’ll see repeated sinking, rocking, or joint washout shortly after re-sanding. Before you add any sand, lift a few pavers from the problem area and check for voids, loose bedding, or signs of erosion, then rebuild from the base level if needed.
How do I know if my patio pavers problem is really a drainage issue?
Do a quick water test. Lightly spray the affected area and watch where the water goes, then check after a few minutes by digging a small test spot near the joint line. If the sub-base stays wet, you likely have drainage or base issues, and fixing only the pavers or joints will not prevent the section from sinking again.
If I want to upgrade to polymeric sand, should I remove all the old sand first?
Match the product to what you have now. If your patio currently uses regular mason’s sand, you can switch to polymeric sand when you reinstall or rebuild the joints, but you must remove the old, loose sand from the joint channels first. If polymeric sand gets mixed with loose masonry sand or sits on contaminated joints, it may not bind correctly after activation.
What should I do if polymeric sand washes out or never seems to harden?
If polymeric sand does not cure, it usually comes down to poor joint cleaning, joints not being filled to the proper depth, uneven activation, or too much water before it has time to set. Make sure joints are fully packed after sweeping, then activate gently according to the product direction (usually a light mist and not a blasting hose). If it already washed out, you may need to re-lift pavers and redo the joint cleanout and re-fill.
Why do patio pavers stay loose after I reset them?
A wobbly paver often has one of two causes: insufficient bedding compaction or jointing that allowed movement. After you lift and reset, compact the bedding layer in thin lifts (not one thick pour), then maintain consistent paver spacing while relaying. Finally, over- or under-filling joints changes how tight the system locks together, so fill joints fully, then remove excess from the surface.
Is it okay to seal the patio right after reinstalling or patching joints?
Sealing is a surface-treatment choice, it does not replace good jointing. If you do seal, keep the sealer off the joint sand unless the product is designed to work with polymeric joints. Also, wait the recommended cure time for the jointing material before sealing, because sealing too early can interfere with the polymeric sand’s ability to lock up.
My patio keeps sinking in the same area, what does that usually mean?
Repair the cause first, then prevent recurrence. Look for a repeating low spot or a pattern of washout along the same line, which often indicates erosion channels or inadequate slope. If the ground under the base is constantly damp, plan for drainage improvements (grading, underdrains, or redirects) before you rebuild pavers and joints.
When should I patch a chipped paver instead of replacing it?
If a paver is cracked all the way through or shows a split corner that moves when you press on it, replace it. Filling chips can work for small surface damage that doesn’t flex, but cracked-through units continue to shift under load, so patching without replacement will fail and the crack typically grows.
If only one paver is bad, do I still need to lift more than one?
If the surrounding pavers are also rocking, assume the problem is mechanical (bedding or joint interlock), not just one unit. You can often replace the single damaged paver, but if joint sand washout or base voids are present around it, lift and reset the minimum affected area so the interlock is restored.
What’s the most common mistake people make when installing joint sand?
Don’t rush the sweep-and-activate sequence. You want to fully pack joints, sweep off excess, then activate with a controlled application so water penetrates the joints without floating sand to the surface. Let the patio dry and avoid foot traffic during the cure window, since walking too soon can loosen the jointing.
When should I stop DIY and bring in a professional?
Call a pro if you have widespread grade shift, recurring pooling, a large area of base failure, or drainage concerns that require excavation beyond a small patch. Also get help if the pavers are on a slope toward a structure, because improper grading or drainage repairs can lead to water intrusion and make the paver problem return quickly.
Next Article
How to Fix Cement Patio Cracks: Diagnose and Repair
Diagnose concrete patio crack types and repair with the right sealant or patch, from prep to curing and prevention.