You can fix most sunken patio slabs yourself by lifting or removing the slab, rebuilding a properly compacted and drained base underneath it, and resetting the slab at the correct height. The key is not just getting the slab level again but fixing whatever caused the base to fail in the first place, whether that's poor compaction, washed-out gravel, drainage problems, or freeze-thaw damage. Skip that part and the slab will sink again within a season or two.
How to Fix Sunken Patio Slabs: Step-by-Step DIY Repair

Talia Lang
19 May 2026
How to confirm the slab is actually sinking (and why)
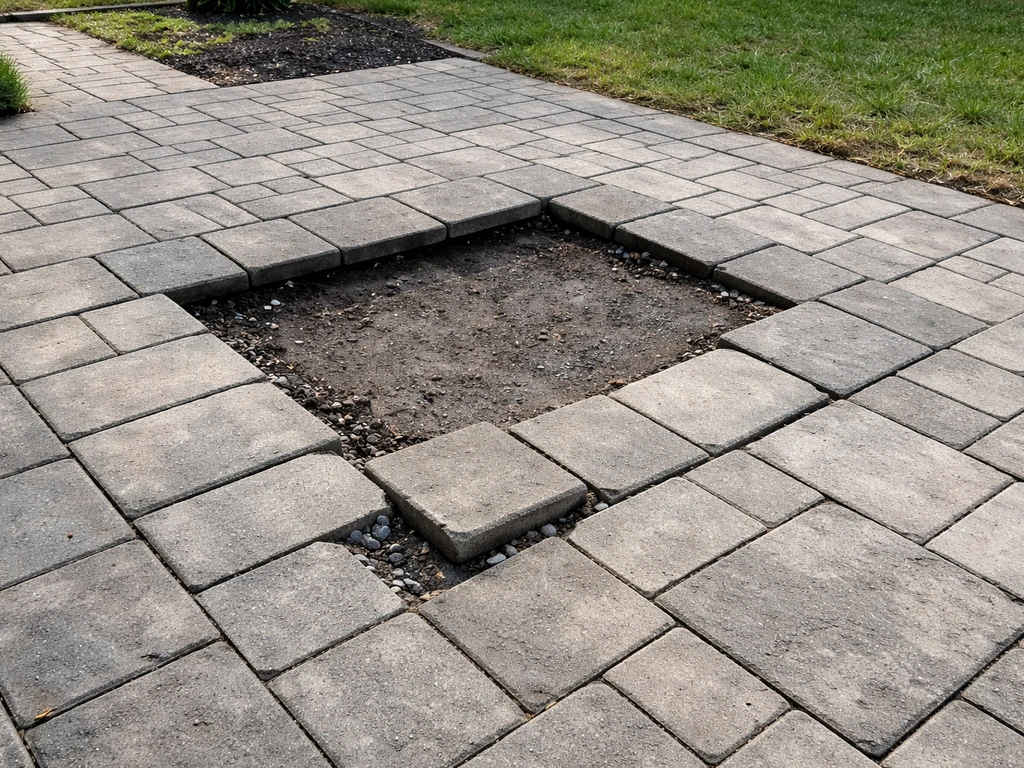
Before you start prying anything up, take ten minutes to really look at what's going on. A slab that's settled isn't always obvious from one angle. Walk the patio and look for uneven or sloping surfaces between slabs, gaps along edges or joints, water pooling in low spots after rain, and any cracks that run diagonally from corners. Those corner cracks are a classic telltale sign the slab has dropped on one end while the opposite corner stayed put.
Once you've spotted the problem area, try to figure out why it sank. The most common causes are: the base wasn't compacted properly when the patio was first built; water has been washing fine material out from under the slab over time; there are voids under the concrete from soil erosion or decomposing organic material; or repeated freeze-thaw cycles have been pushing and pulling the ground beneath it. In cold climates especially, water that gets trapped under or within a slab expands when it freezes, then leaves a gap when it thaws, and that cycle repeats until the slab starts to tilt or crack.
Tap the surface of the slab with a hammer or piece of rebar. A hollow sound means there's a void underneath. A solid thud means the slab still has contact with the base, and the problem is more about the base material settling unevenly than a complete loss of support. That distinction matters because it changes your repair approach.
Also check your drainage. Where is water going when it rains? If it's running toward the house or pooling right along the edge of the slab, that's likely the root cause. No matter how well you fix the slab, it will sink again if water keeps hammering the base. Note the drainage situation now so you can address it when you rebuild.
Tools, safety, and materials you'll need for a DIY repair
What you'll need depends on which repair approach you're taking, but here's a solid starting list for a typical lift-and-reset job.
Tools
- Pry bar or flat bar (for lifting slab edges)
- Demolition hammer or electric rotary hammer (for thick or stubborn slabs)
- Shovel and hand trowel
- Plate compactor (rent this, don't improvise)
- Level (a 4-foot or 6-foot level is ideal)
- Rubber mallet
- Hammer and cold chisel
- Garden hose or drainage routing tools
- Drill with masonry bit (if you're foam-injecting without full removal)
- Wheelbarrow
Safety gear
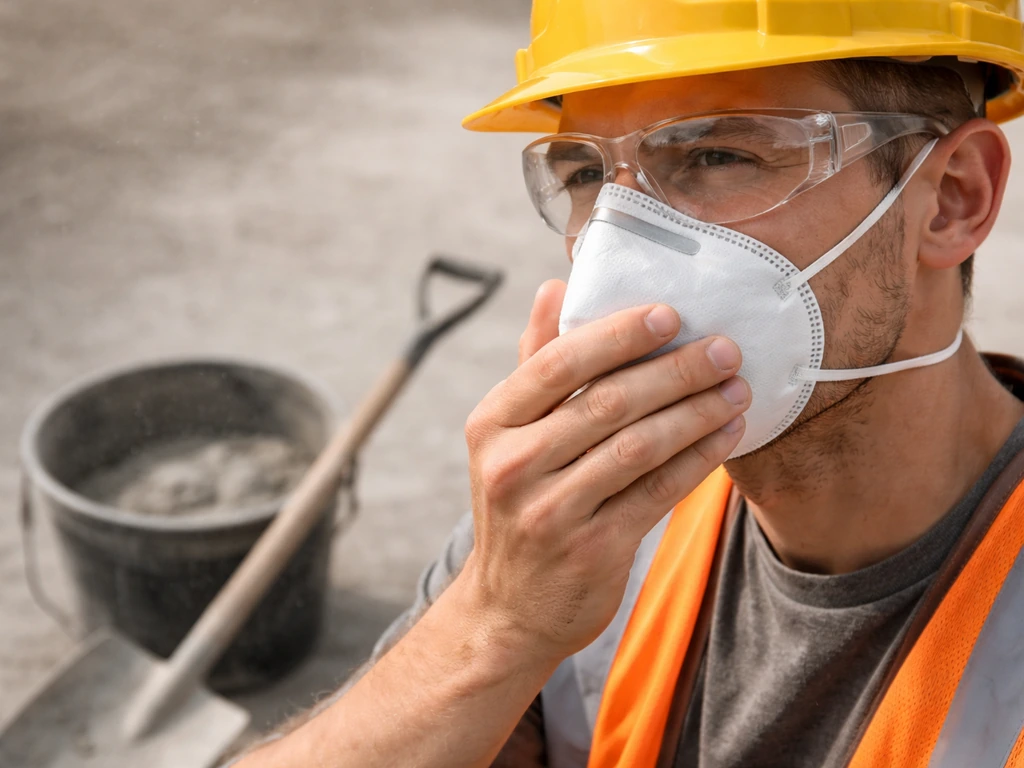
Concrete work produces fine silica dust, which is a real lung hazard. Wear an N95 respirator at minimum, not just a dust mask. Add safety glasses or a face shield (flying concrete chips are no joke), hearing protection when running the demolition hammer, heavy work gloves, and steel-toed boots. Don't skip these because you think it's just a quick job.
Materials
- Compactable gravel or crushed stone (Class II base rock or 3/4-inch crushed gravel) for rebuilding the sub-base
- Coarse sand (for a setting bed if you're re-seating the slab on sand)
- Hydraulic cement or fast-setting concrete mix (for patching cracks or edges after leveling)
- Cementitious grout or flowable fill (Portland cement mixed with water and fine aggregate, for void-filling underneath without full removal)
- Expanding polyurethane foam (for smaller voids where you don't want to do full excavation)
- Concrete sealer appropriate for your slab finish
Step-by-step: lift and reset a sunken patio slab
This approach is for slabs that have sunk significantly, have large voids underneath, or where the base needs to be completely rebuilt. It's more work upfront but gives you the best long-term result.
- Clear the area completely. Remove any furniture, potted plants, or edging material around the sunken slab. You need full access to all four edges.
- Score or break any mortar joints or caulk between the sunken slab and its neighbors. Use a cold chisel or oscillating tool. This prevents cracking adjacent slabs when you lift.
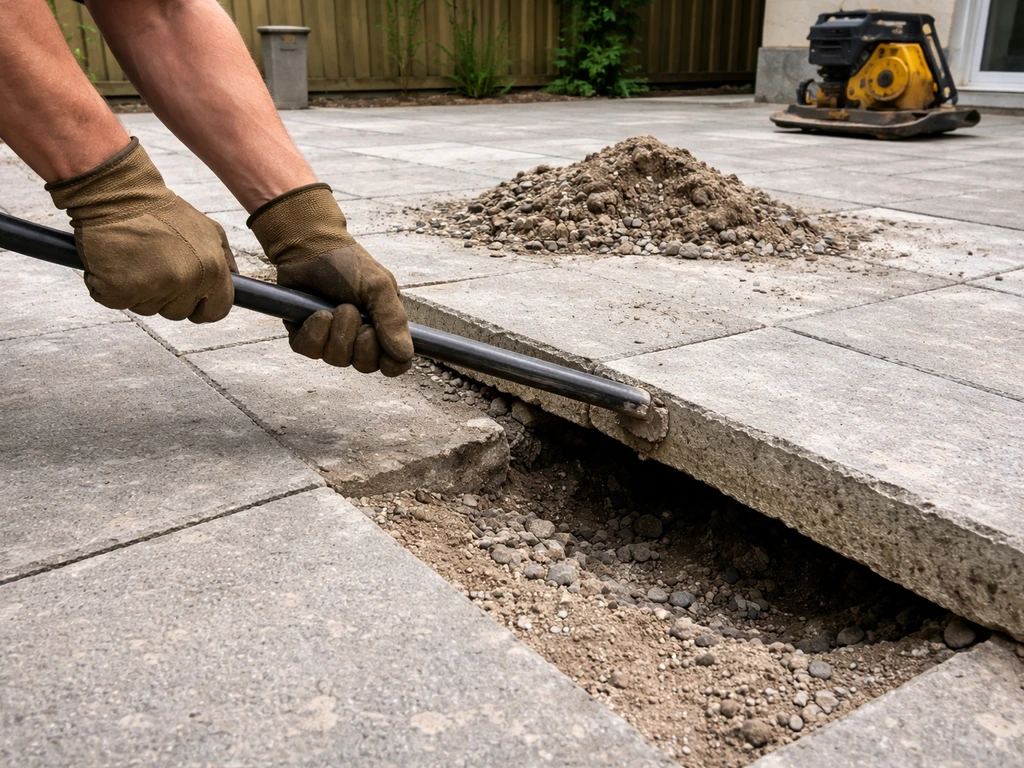
- Work a flat pry bar under one edge of the slab. Go slowly and lever it up incrementally, working around the perimeter rather than forcing one edge all the way up. For thick slabs (4 inches or more), a demolition hammer may be needed to break it into manageable pieces if it won't lift cleanly.
- Once the slab is lifted, prop it securely or remove it entirely and set it aside on a flat surface. Do not lean it at a steep angle unsupported.
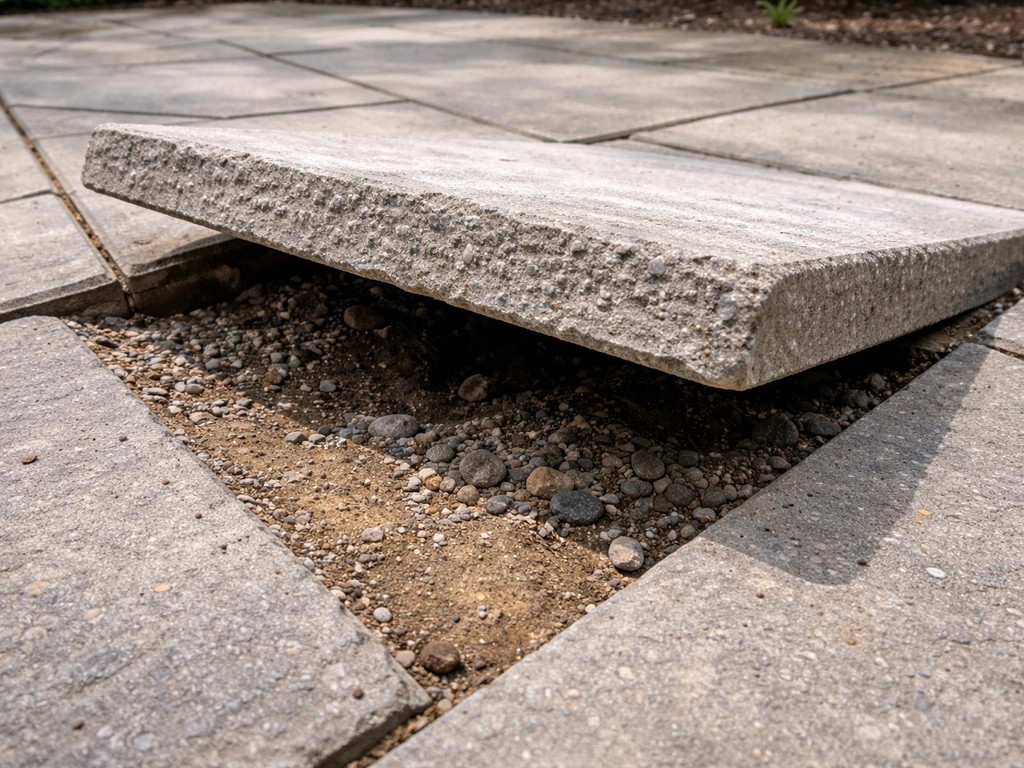
- Excavate the base. Dig out the existing base material with a shovel until you reach firm, undisturbed soil. This might be 4 to 8 inches down, sometimes more if organic material or wet clay is involved. Remove any debris, roots, or soft wet soil.
- Assess the sub-base. If the soil underneath is soft, saturated, or poorly drained, you may need to go deeper and add a gravel drainage layer before rebuilding. You're looking for firm, stable ground that doesn't compress when you press your foot into it.
- Add and compact your base material in 2-inch lifts using the plate compactor. This is the most important step. Dumping in 6 inches of gravel and running the compactor over it once is not the same as compacting it in three separate 2-inch passes. Take your time here.
- Build the base back up to a height that will put the slab's top surface flush with the surrounding patio. Account for any sand setting bed (typically 1 inch) on top of the gravel.
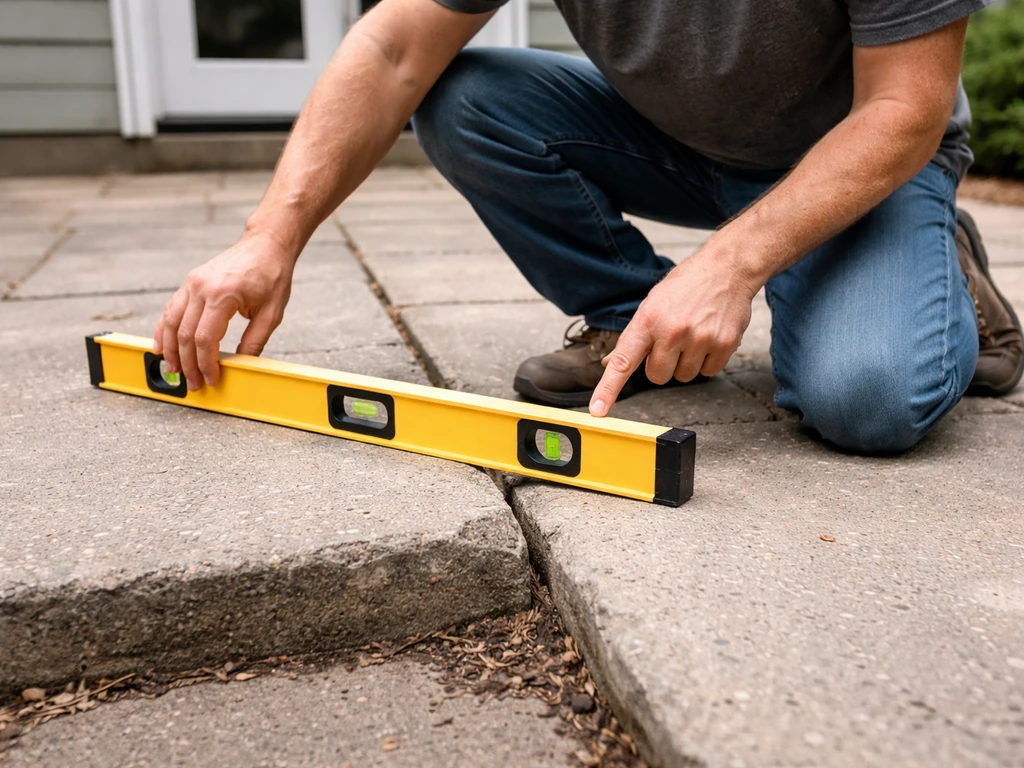
- Add a 1-inch sand setting bed on top of the compacted gravel and screed it flat using a board or screed rail. Check your level constantly.
- Reset the slab carefully onto the sand bed. Lower it straight down rather than sliding it, which would disturb the leveled sand. Check the height relative to adjacent slabs immediately.
- Tap down high corners with a rubber mallet. If one corner is low, lift carefully and add a small amount of sand underneath.
- Once the slab is level and flush, compact it lightly by walking across it and checking with your level in multiple directions.
Step-by-step: fill and re-level without full removal (void-filling)
If the slab is only slightly sunken, has hollow spots but is otherwise intact, and you don't want to lift the whole thing out, you have two good options: cementitious grout injection or expanding polyurethane foam. Both work by getting material under the slab to fill voids and [restore support](https://www. fhwa. dot.
gov/pavement/pccp/pubs/06005/06005. pdf). Grout injection can also be used to hydraulically lift the slab slightly, which is the principle behind professional slabjacking. A slab stabilization guide from ACPA also emphasizes controlling grout injection by starting at a low pumping rate/pressure and stopping when the slab begins to rise or when allowable pressure or grout flow-up limits are reached [pumping should stop when conditions occur such as slab begins to rise or allowable pressure/grout flow-up limits are reached](https://www.
acpa. org/wp-content/uploads/2019/02/Slab-Stabilization-Guide-TB018P. pdf).
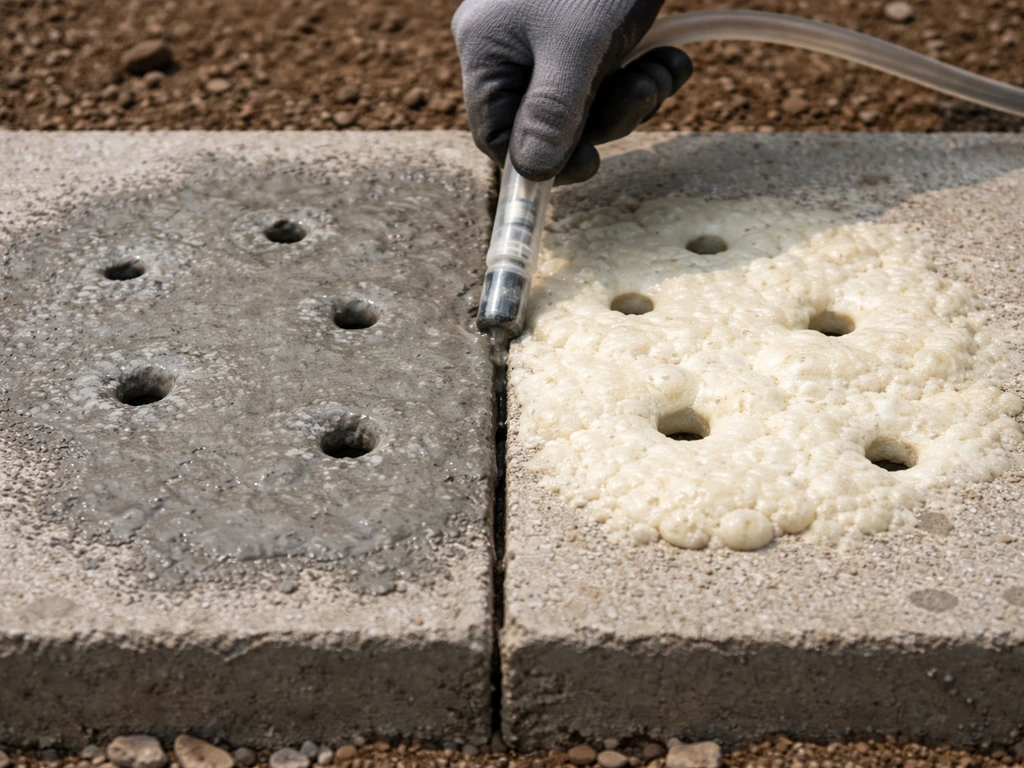
Cementitious grout method
- Drill injection holes through the slab using a rotary hammer and masonry bit. Holes are typically 1.5 to 2 inches in diameter, spaced roughly 18 to 24 inches apart in a grid pattern across the sunken section.
- Mix your grout to a fluid but not watery consistency. A standard slabjacking grout is Portland cement, water, and fine aggregate (sometimes called a flowable fill). It needs to flow smoothly under the slab to fill voids evenly.
- Insert a grout pump nozzle into one hole and begin pumping at a low pressure. Start from the lowest point and work outward. Injection pressure in professional applications runs between 40 and 75 psi, with 100 psi as an absolute maximum. If you're doing this by hand with a rented grout pump, start slow and watch closely.
- Stop pumping when you see any of these: grout begins flowing up through an adjacent hole (void is full), the slab surface begins to rise, or you hit resistance that suggests the void is filled.
- Move to the next hole and repeat. The goal is to completely fill all voids and restore contact between the slab and its base, not just partially fill them.
- Once injection is complete, let the grout set before walking on the slab. Patch the injection holes with a concrete repair mix matched to your slab color.
Expanding polyurethane foam method
Two-part expanding foam is a faster option for smaller voids and minor settling. You drill similar access holes (usually smaller, around 5/8 inch), inject the foam, and it expands to fill the void and can actually lift the slab slightly as it cures. The appeal is that it sets fast (sometimes within minutes) and doesn't require a grout pump. The downside is it's more expensive per cubic foot of void filled, and if the void is large, you may use a lot of it. It works well for isolated sunken spots but isn't ideal when the entire base needs rebuilding.
Compaction, drainage, and base repair to stop it happening again
This is the section most people skip, and it's exactly why they end up doing the same repair two years later. For more detailed options on repairs, see the guide on how to fix sinking patio. Getting the slab level again is half the job. Making sure it stays level is the other half. If you want the base to stay stable, pay attention to compaction, drainage, and the underlying support because those same factors are what most paver patio repairs target when you need to fix sinking paver patio.
Drainage is almost always involved in slab settlement. Water that runs along or beneath a slab washes out fine particles from the base, softens clay subgrade, and creates voids over time. In cold climates, trapped water also causes frost heave. The fix is to ensure water always has somewhere to go that isn't under your patio. This might mean regrading the surrounding yard slightly so water flows away from the slab, adding a gravel channel or French drain along the low edge, or extending a downspout that's currently dumping water right next to the patio.
For the base itself, the ideal setup under a concrete patio slab is 4 to 6 inches of well-compacted permeable gravel, such as 3/4-inch crushed stone. Permeable gravel lets water drain down through it rather than pooling and sitting against the bottom of the slab. Avoid using fine sand as your primary base material as it migrates and washes out easily. Always compact in thin lifts of about 2 inches at a time with a plate compactor for consistent density throughout the layer, not just at the surface.
If you found soft or clay-rich subgrade soil when you excavated, consider laying a layer of geotextile fabric before adding your gravel. It separates the gravel from the soil below and prevents the fine soil particles from migrating up into and weakening the gravel base over time.
Curing, sealing, and finishing after leveling
Once the slab is reset and level, give it at least 24 hours before walking on it and 72 hours before putting any furniture or heavy loads back on it. If you used cementitious grout for void-filling, allow a full 7 days before any significant loading. Concrete cures slowly, and stressing it too early can cause cracking right where you don't want it.
After the slab has cured, inspect the joints between your repaired slab and its neighbors. Gaps that formed during settling need to be filled with a flexible joint filler or self-leveling caulk rated for concrete. Don't just pack them with grout, which will crack again as the slabs move seasonally. A polyurethane or silicone-based joint caulk handles the normal movement much better.
If you want to seal the surface, wait until the concrete has fully cured (28 days for fresh concrete, though previously existing slabs just need to be clean and dry). A penetrating concrete sealer is the right choice for patios because it soaks into the pores rather than forming a film on top. It makes the surface more resistant to water infiltration and freeze-thaw damage without changing the appearance much. Apply it according to the product directions and reapply every 2 to 3 years as part of normal maintenance.
Finally, recheck your drainage situation after the first couple of rainfalls. Watch where water flows across the repaired area. This is much easier to address before you've put furniture back and replanted the garden around it.
When to stop DIY and call a pro
I want to be honest with you here because some slab problems are genuinely beyond a DIY fix, and trying to DIY them can make things worse or more expensive to fix later.
Call a professional if you're dealing with any of the following situations:
- The slab has dropped more than 2 to 3 inches and shows large structural cracks, especially cracks wider than 1/4 inch or cracks that run through the entire slab thickness. That slab may be compromised beyond re-leveling.
- Multiple large slabs across a wide area are all sinking. That suggests a widespread base failure or subsidence problem that requires proper assessment before any repair makes sense.
- The slab has sunk, been repaired before, and sunk again. Repeated settlement usually means there's an underlying drainage or soil problem that surface repairs aren't addressing.
- You find evidence of undermining near a foundation, retaining wall, or underground utilities. This is not a patio problem, it's a structural or civil engineering problem.
- The slab is adjacent to the house foundation and sinking toward it, which could indicate foundation settlement rather than just patio base failure.
- You have no way to safely lift or stabilize the slab without equipment or help, especially large slabs over 150 to 200 lbs that can't be safely managed by one or two people.
Professional slabjacking (sometimes called mudjacking or polyurethane foam lifting) is a legitimate and cost-effective service for slabs that are good candidates. A contractor drills small holes, injects material under controlled pressure to raise the slab precisely, and patches the holes. It's typically much cheaper than replacing the slab entirely and is worth getting a quote for if your slab is otherwise in good condition but has settled significantly.
If your patio uses individual pavers rather than poured slabs, the repair process is somewhat different since you can remove and reset individual units without lifting a full slab. Similarly, brick patios have their own quirks around mortar and base depth. If you are dealing with a fix sunken brick patio, base compaction and drainage corrections are what keep the problem from coming back brick patios. The same principles around base compaction and drainage apply across all of these, but the hands-on steps vary.
A quick look at your repair options side by side
| Method | Best for | Difficulty | Cost | Longevity |
|---|---|---|---|---|
| Full lift and base rebuild | Significant settling, large voids, base failure | High | Low–medium (mostly labor) | Best if done correctly |
| Cementitious grout injection | Moderate voids, slab still intact, minor–moderate lift needed | Medium | Medium (equipment rental + materials) | Good if drainage is also fixed |
| Polyurethane foam injection | Small isolated voids, quick fix, minor settling | Low–medium | Medium–high (foam is expensive) | Good for minor issues |
| Professional slabjacking | Significant settlement, large slabs, precision lift needed | None (pro job) | Medium (typically $500–$1,500+) | Excellent with good base repair |
FAQ
Can I fix sunken patio slabs without lifting them?
Yes, but only if the slab remains generally supported and the voids are localized. If tapping reveals many hollow areas, repeated corner cracking, or the slab rocks when walked on, a full lift, base rebuild, or professionally controlled slabjacking is usually safer. Grout-only fixes are the most common reason the slab settles again.
How do I know what “correct height” is when resetting the slab?
Don’t assume “level” means “right.” Reset the slab to the height that restores proper slope away from the house, so water drains off the patio instead of pooling. A helpful check is to mark a reference line at the surrounding slab height, then confirm your repaired section has a gentle fall for at least the width of the affected area.
What does a hollow-sounding slab usually mean for the repair plan?
Start with the sound test and then look for pattern clues. A hollow sound points to voids, but diagonal corner cracks often indicate one end lost support first. If you see both hollow spots and worsening cracks over time, plan on rebuilding the base under the depressed area rather than patching the surface.
Will grout injection alone keep a slab from sinking again?
Yes, in a limited way. Cementitious grout can fill voids and may slightly lift a slab, but it is not a good substitute for fixing drainage and base composition. If water is still finding a path under the slab (pooling, runoff from downspouts, or edge seepage), the base will keep eroding, and the slab will sink again.
When is expanding polyurethane foam not the right choice?
Be careful with expansion foam if voids are extensive or connected. Foam can work best for smaller, isolated voids, but if you suspect widespread base failure, polyurethane foam may not replace a missing structural base layer. In those cases, the more durable route is lift-and-reset with properly compacted permeable gravel and geotextile separation when needed.
What causes patio slabs to sink again after a DIY repair?
The most common mistake is under-compacting. Even if the surface looks even, weak density below allows future settlement and pumping. Use thin lifts (about 2 inches) and compact each lift until you reach consistent density with a plate compactor, not just the outer edges.
How can I tell if drainage changes are actually working?
Yes, especially if water continues to migrate through joints or along the slab edge. After repairs, watch at least a couple rain events and check for pooling, wet staining, or water tracking toward the low corner. If you still see water concentration at the repaired section, regrade the surrounding area or add a gravel channel or drain line before final caulking and sealing.
What base materials should I use under a concrete patio slab, and what should I avoid?
Prefer permeable base gravel, and keep fines out. Avoid using fine sand as the primary base because it migrates and washes out. If you have clay-rich subgrade, add geotextile fabric to separate soil from gravel, which helps prevent base breakdown that leads to voids.
Do I always need geotextile fabric under the gravel base?
Use geotextile when you excavate soft, clay-rich, or organic soil, or when you see fine material mixing into the gravel during prep. It acts as a separator so the gravel layer stays stable, especially in wet climates where fines otherwise migrate upward over time.
What should I use to fill joints after the slab is repaired?
Not always. If you see gaps between slabs or neighbors after settlement, use a flexible joint filler or a concrete-rated self-leveling caulk that tolerates movement. Avoid packing joints with rigid grout because seasonal expansion and contraction can crack it and reopen pathways for water.
How long should I wait before using the patio after the repair?
Give the concrete time to reach handling strength before you load it. Typical guidance is at least 24 hours before walking, about 72 hours before moving heavy items, and around 7 days for cementitious grout before significant loading. If temperatures are cold or very damp, extend cure time to reduce cracking risk.
When should I call a professional for slabjacking instead of doing it myself?
Yes. If the slab is generally sound but sunk significantly, professional slabjacking can be a cost-effective alternative to full demolition. Contractors can lift with controlled injection pressure and patch the access holes, which is often less disruptive than removing and rebuilding the entire patio.
Does the same repair approach work for paver or brick patios?
Sometimes. If the patio is made of pavers or brick, repairs focus on resetting individual units or correcting the base depth and compaction. Joint and bedding material choices differ, and lifting strategy is not the same as for a poured slab, so use the right approach for that material type.
Next Article
How to Fix Sunken Patio Pavers Step-by-Step
Diagnose and repair sunken patio pavers step-by-step, rebuild base and bedding, fix drainage, and prevent future settlin