You can raise a sunken patio slab by pumping a cement-based grout or polyurethane foam under it (mudjacking or foam lifting), or by carefully wedging and cribbing the edge while you fill the void beneath. If your patio slab is rocking, you'll still need to identify the void or base failure underneath so you can raise it properly and prevent the movement from coming back how to fix a rocking patio slab. Which method fits your situation depends on how far the slab has dropped, what caused it to sink, and whether the slab itself is still structurally sound. Do the diagnosis first, because lifting a slab over a washed-out void without fixing the drainage that caused it just means you'll be doing this again in two or three years.
How to Raise a Patio Slab Step by Step DIY Guide

Talia Lang
3 May 2026
When patio slabs sink: common causes to diagnose first
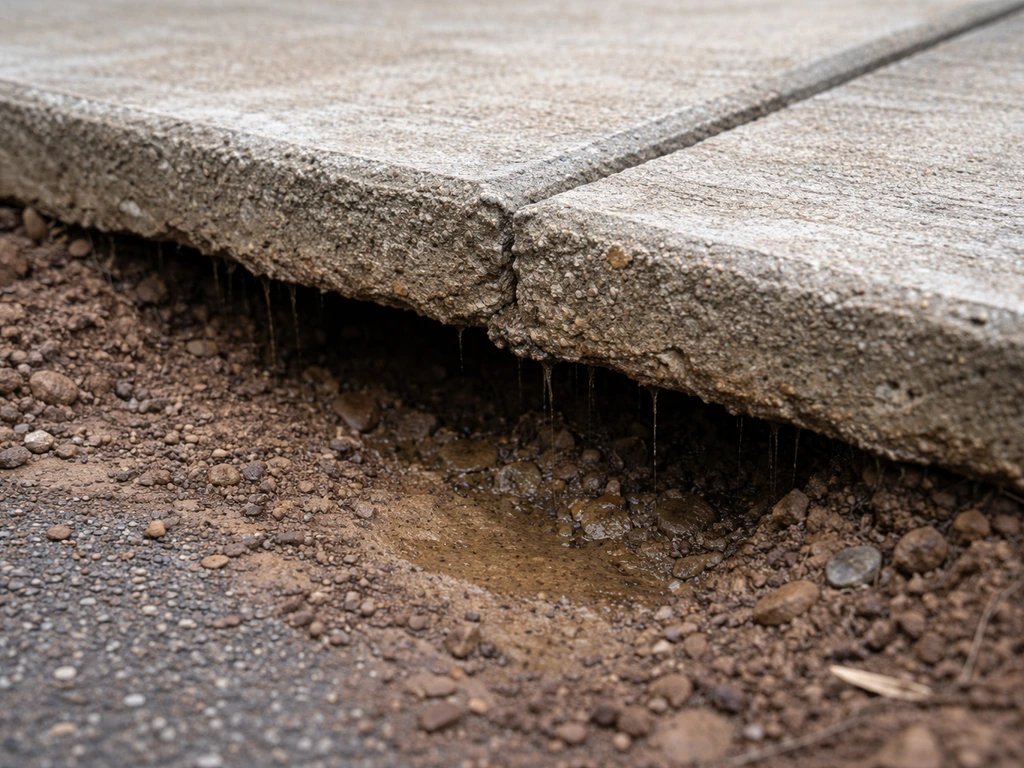
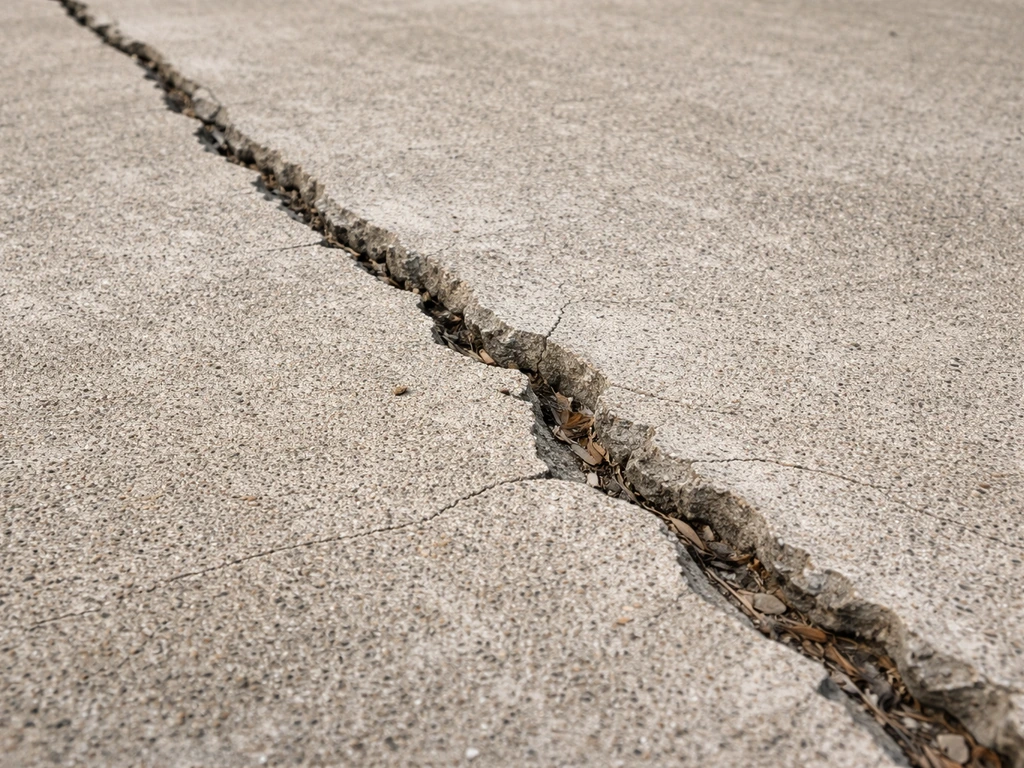
Slabs don't sink randomly. There's almost always a water story behind it. The most common culprit is soil erosion or washout under the slab, where repeated low-volume water (a downspout that dumps right next to the patio, irrigation overspray, or surface runoff) slowly carries fine soil particles away. Over time that creates a void, and once there's no support, the slab tilts or drops. You'll usually see ponding on the surface, edges that feel soft or springy underfoot, or visible gaps between the slab and adjacent surfaces. You can figure out the exact cause by checking where water is pooling or draining and by testing for hollow spots under the slabs why are my patio slabs lifting.
Freeze-thaw movement is another big one in cold climates. Water under or beside the slab expands when it freezes, heaving the slab up, then retreating when it thaws. After enough cycles the slab ends up lower than it started. Base failure, where the compacted gravel base was too thin or poorly prepared from the start, causes gradual settlement as the soil consolidates under load. You can also get corner breaks and edge drop-off when a slab loses support along one side while the rest stays put. That pattern, where one corner is noticeably lower and there are fine deposits or staining along the joint, is a classic sign of subgrade erosion.
Before you touch anything, stand on different parts of the slab and feel for flex or movement. Look for joint faulting (where one slab edge is higher than the adjacent one), cracks running diagonally from corners, and any gaps visible at the perimeter. Those clues tell you where the void is likely to be and which edge is the lowest point to start from.
How to check the damage and decide if lifting is the right fix
Grab a long straightedge or a 6-foot level and lay it across the slab in multiple directions. Measure the gap at the lowest point. A drop of an inch or two is very workable. Four inches or more starts to get complicated, and if the slab has shifted laterally as well as dropped, lifting gets harder. Then check the slab itself: run your hand along every crack and look for spalling, crumbling edges, or sections that move independently when you step on them. A slab that's cracked into multiple pieces with each piece moving separately is not a good candidate for lifting. You'd be lifting a puzzle, and pieces will bind or break further.
Tap the slab surface with a hammer or a steel rod. A hollow, drum-like sound means there's a void beneath that area. A solid thud means it still has good ground contact. Map out the hollow zones before you decide on a repair approach. If the hollow area covers most of the slab, you likely need to fill a significant void. If it's isolated to one corner or edge, targeted injection will do the job. Also check whether the drainage problem that caused this is still active. Look at downspout outlets, grade slope, and anything that might be directing water toward the slab. Fixing drainage is not optional, it's part of the repair.
If the slab is rocking rather than simply sunken, that's a related but slightly different problem that overlaps with what's covered here. Similarly, if you're dealing with a slab that has lifted above grade rather than dropped below it, the cause is usually frost heave or tree roots, and the approach changes. What we're solving here is a slab that has dropped and needs to come back up.
Tools, materials, and safety prep for raising concrete slabs

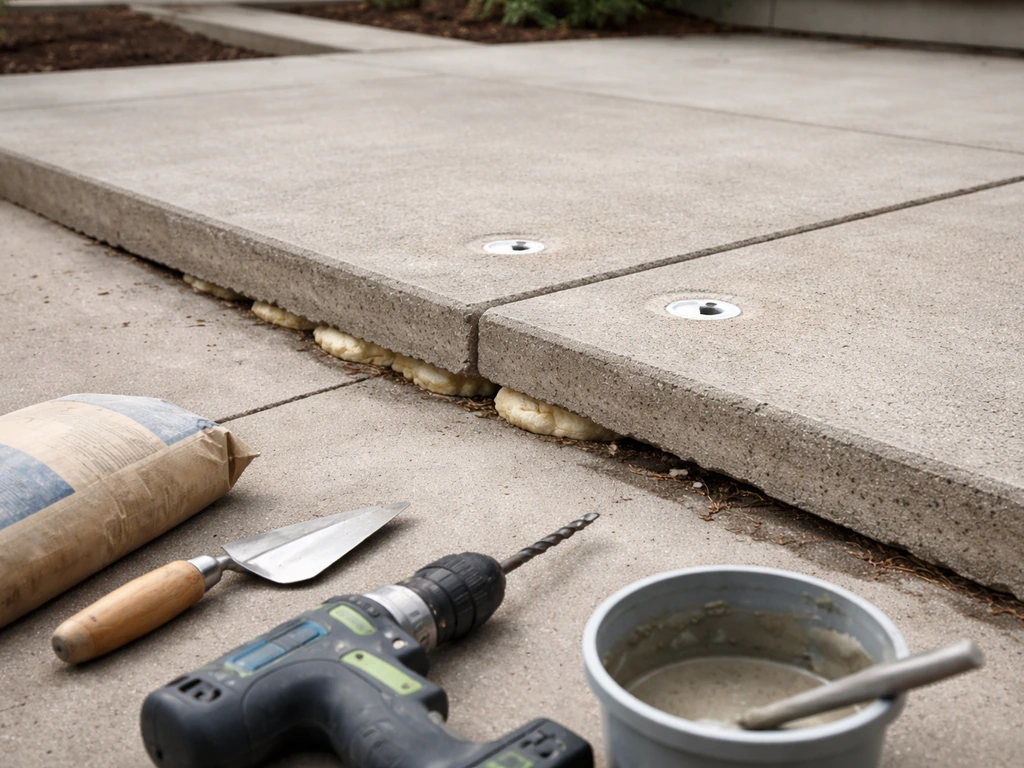
For a DIY mudjacking or injection approach you'll need a rotary hammer drill with a masonry bit (1-1/4 to 2 inches in diameter depending on your injection nozzle), a mixing setup for the grout (a bucket and paddle mixer, or a rented grout pump for larger areas), a grout or slurry mix (portland cement, fine sand, and water, or a premixed grout), a caulking gun for smaller foam-injection products, safety glasses, heavy work gloves, knee pads, and hearing protection for the drilling. You'll also want a long level, tape measure, and something to mark your hole locations.
For wedge-and-crib lifting you need a pry bar, hardwood wedges or scrap lumber cribbing (stacked in alternating directions like a log cabin for stability), and your fill material ready to go. Have hydraulic floor jacks or small bottle jacks available if the slab is heavy and prying alone won't budge it.
Before you drill anything, call 811 (the US dig-safe line) to have utilities located.
When you call 811, the national toll-free line connects you to local “Call Before You Dig” centers so utilities can be marked. Conduit, irrigation lines, and drainage pipes sometimes run under patios.
Also protect adjacent plantings by covering them with plastic sheeting since grout splatter and drilling dust will kill plants. If you're working near the house foundation, be cautious: lifting a slab that's tight against the foundation can transfer force to the house, which is not what you want. Leave a small gap or score line if needed. Plan to work in mild weather.
Drilling and grouting in temperatures below about 40°F slows cure time significantly and cold ground can hide void extent because soil is partially frozen.
Step-by-step methods to raise a patio slab
Mudjacking (pressure grouting)
Mudjacking is the most common approach for raising concrete slabs more than about half an inch. You drill holes through the slab, pump a cement-soil slurry under it, and the hydraulic pressure of the slurry fills voids and gently pushes the slab up. Here's how to do it step by step.
- Mark your hole locations starting at the lowest corner and working toward the high side. Space holes roughly 2 to 3 feet apart for a small patio slab. Holes closer to the edges and corners are more effective at lifting perimeter drop. For a rough guide, slab thickness relates to hole spacing: thicker slabs distribute pressure better so you can space holes a little wider.
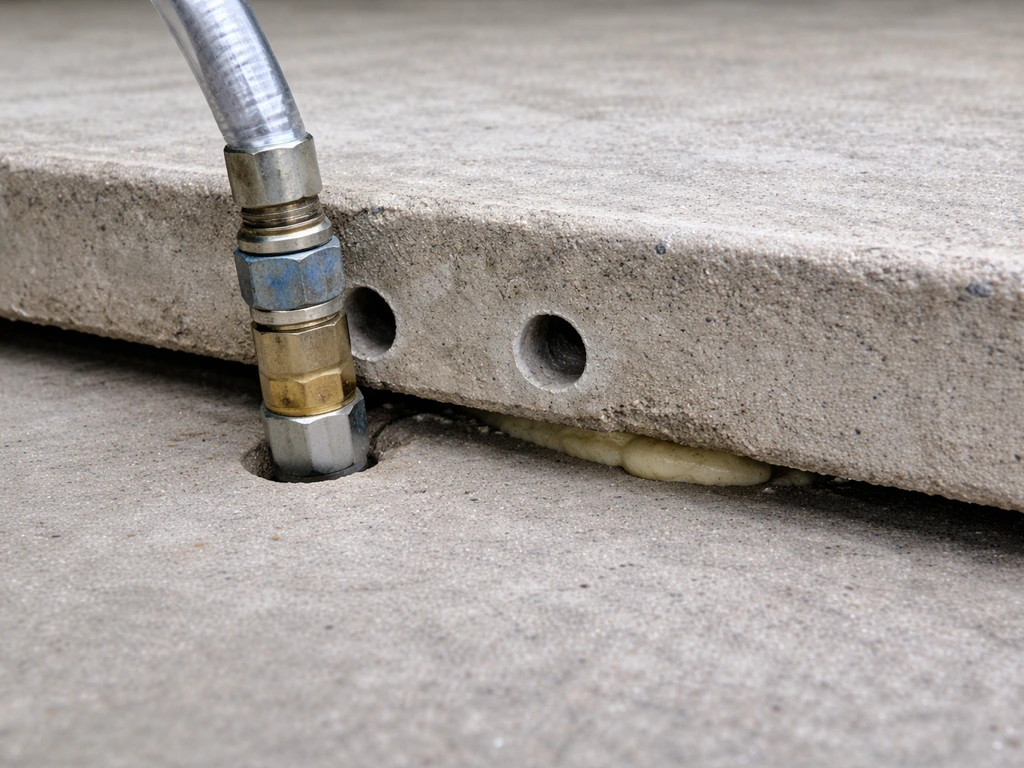
- Drill through the slab using a rotary hammer with a 1-1/4 to 2-inch masonry bit (1-3/4 to 2-5/8 inches if you're using a rented mudjacking rig, which uses larger nozzles). Drill straight through to the subgrade.
- Insert your injection nozzle into the first hole (usually starting at the lowest corner) and begin pumping slurry slowly. Watch the slab surface as you pump. It should begin to rise incrementally. Don't rush this.
- Move hole by hole, pumping in small amounts at each one rather than fully loading one hole before moving on. This distributes pressure evenly and reduces the chance of cracking the slab from concentrated uplift.
- Stop pumping each hole when slurry starts to appear at an adjacent hole (that means the void between them is filled) or when you've achieved the target height at that area.
- Check your level frequently. You're aiming to bring the slab back to its original slope, not necessarily to make it perfectly flat.
- Once the slab is at the right height, pull the nozzle and plug the hole temporarily. Move to the next hole and repeat.
- After all holes are done and the slab is at the correct elevation, let the grout cure for at least 24 to 48 hours before patching the holes.
Mudjacking is heavy work with a rented pump rig and the slurry is messy. It's genuinely DIY-able for small to mid-size slabs, but if you have more than about 100 square feet of sunken slab or multiple slabs, renting professional equipment or hiring a mudjacking contractor tends to be more cost-effective than fighting a small hand pump.
Foam lifting (polyurethane injection)
Foam lifting uses two-part expanding polyurethane foam instead of cement slurry. The holes are smaller (often 5/8 inch), the material sets in minutes rather than hours, and it's lighter so it doesn't add load to the subgrade. Consumer-grade versions are available in cartridge form for small DIY jobs. For a modest sunken section, they work reasonably well. The limitation is that foam is harder to control in a large void and more expensive per cubic foot than mudjacking slurry. The injection process is the same: drill, inject, monitor rise, stop, move to the next hole.
Wedge and crib lifting (manual edge lifting)
For a slab that's dropped only along one edge and the drop is an inch or less, you can sometimes lift it manually. Insert a heavy pry bar under the low edge and pry up while a helper shoves hardwood wedges under the edge to hold the height. Add cribbing (stacked lumber in alternating layers) to support the slab while you fill the void.
This works best when the slab is small (like a single 2x2 or 2x3 foot unit), the void is shallow, and you have good access to the edge. Once the slab is propped to the correct height, pack the void with a dry-pack mortar mix or compactable fill, remove the wedges incrementally, and let the fill settle before removing all support. This method is low-tech and free of specialized equipment, but it's limited in what it can achieve.
It's more useful for final fine-tuning after injection than as a primary lift method for a significantly dropped slab.
How to prevent over-lifting and handle cracks and voids during the lift
Over-lifting is a real risk. Pumping too much material under one spot causes that area to rise higher than adjacent sections, which creates new stress cracks and can fault the joint in the opposite direction from where you started. Professional specifications typically limit slab lift to somewhere in the range of 0.05 to 0.125 inches per injection sequence before checking alignment. For a DIY job, the practical rule is: pump a little, check with your level, pump a little more. Don't try to get the full lift in one pass at one hole.
If you notice an existing crack widening or hear cracking sounds during the lift, stop immediately. Release the injection pressure, give the slab a moment, and recheck. A crack opening slightly is often just the slab flexing back toward level. A crack that runs new and propagates is a sign you have a stress concentration, possibly a weak point in the concrete or a hidden internal fracture. Mark the crack location, reduce injection pressure, and distribute subsequent pumping to other holes further from the crack.
If grout pumps in but the slab doesn't move, you may have a very large void that needs to be filled before there's enough material to generate lift. Keep pumping slowly until resistance builds. If material bleeds out at the surface around the edges or at a distant point, you've found the extent of the void: cap those exit points with rags or hydraulic cement temporarily and continue injection. If the slab still won't move after significant material has been pumped and the void appears full, the slab may be mechanically constrained by an adjacent wall, step, or curb. In that case, stop and reassess before you pump in more material that has nowhere useful to go.
Finishing: patching, sealing, and restoring surface and slope
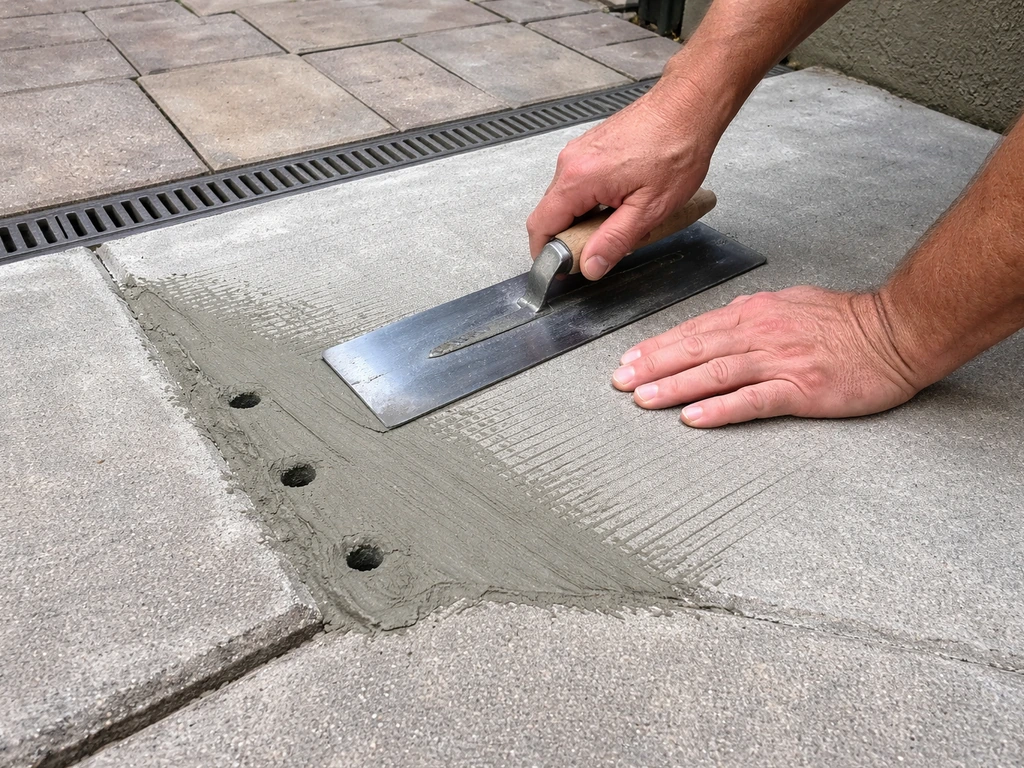
Once the slab is at the right elevation and the grout has had time to cure, patch the drill holes. Use a vinyl-modified concrete patch mix or a hydraulic cement for the drill holes. Pack the patch slightly proud of the surface, let it firm up for 20 minutes, then strike it flush with a margin trowel. Avoid feathering the patch too thin at the edges or it will pop out within a season.
Check the slope before you call it done. A patio should drain away from the house at a minimum of 1/4 inch of drop per foot of run. On a 10-foot patio that means a 2.5-inch total drop from the edge nearest the house to the outer edge. If the slab is now level but doesn't have that slope, you have a drainage problem waiting to happen. In some cases a thin concrete topping or self-leveling overlay can be used to build in the correct slope without replacing the slab.
Repair any surface cracks with a flexible polyurethane or epoxy crack filler before sealing. Then apply a penetrating concrete sealer or an acrylic sealer appropriate for exterior use. Sealer slows water infiltration into the slab and through the joints, which directly reduces the washout risk that caused the settlement in the first place. Fixing and sealing the slab helps prevent water from infiltrating and undermining the base again, which is key to keeping repairs in place prevent water washout.
Refill the perimeter expansion joints with a backer rod and polyurethane caulk if they've opened up or the old sealant has failed. Open joints are a direct water entry point to the subbase. If your patio slabs still are not sticking after you stabilize the base, the underlying drainage and bonding issues need to be addressed first patio slabs not sticking.
Address drainage or this will happen again
Regrading around the patio is not glamorous, but it's the repair that actually prevents the problem from coming back. Building codes require a 6-inch drop over the first 10 feet from the foundation, and that same principle applies to your patio's surrounding grade. Make sure downspouts outlet at least 4 to 6 feet from the patio edge, extend them further if your yard is flat. If irrigation heads are spraying the base of the patio, adjust them. Where the grade around the slab is flat or has reversed (sloping toward the house), add soil and regrade before winter.
Troubleshooting and when to stop and call a pro
Some situations are worth recognizing before you get deep into a DIY lift and end up in a worse position than when you started.
| Problem | What it likely means | What to do |
|---|---|---|
| Slab keeps sinking after lifting | Active drainage problem or ongoing soil loss | Fix drainage first, then re-lift. Mudjacking a slab over a running void is temporary at best. |
| Grout pumps in but slab won't move | Very large void, or slab constrained by adjacent structure | Fill the void fully, then reassess. Check for physical constraints before adding more material. |
| New cracks appear during lift | Stress concentration in the slab or an internal weakness | Stop, redistribute injection to other holes, reduce pressure. If cracks propagate significantly, stop the job. |
| Slab breaks into multiple pieces during lift | Slab was too deteriorated to lift; repair was not appropriate | Replace rather than lift. At this point the concrete is beyond mudjacking. |
| Slab lifts unevenly and now one edge is high | Over-injection at one hole; uneven void distribution | Stop injecting the high side. Add material carefully on the low side only and recheck frequently. |
| Settlement recurs within one to two seasons | Base failure or chronic drainage issue not resolved | Consider full removal and replacement with a properly prepared compacted base and corrected drainage. |
Call a professional if the slab is larger than about 150 to 200 square feet and has dropped more than 2 to 3 inches, if there's active plumbing or irrigation running under the slab (a broken pipe can be causing the void, and lifting won't fix that), if the slab is attached to a structure like a house foundation or load-bearing step, or if you've attempted to lift it and cracking got worse. A professional mudjacking contractor has pressure-controlled equipment that limits lift rate precisely, which dramatically reduces the risk of over-lifting. They also have void-detection experience that's genuinely hard to replicate with a hammer and your ear. For a badly deteriorated slab, replacement with a proper compacted gravel base and corrected slope is almost always the better long-term investment over multiple rounds of stabilization.
If you're not sure whether to lift or replace, get one or two contractor quotes that include their assessment of the subgrade condition. A good contractor will tell you honestly whether lifting makes sense. If every quote you get recommends replacement, listen to that. The slab is trying to tell you something.
FAQ
Can I raise a patio slab if I think water or a plumbing leak caused the sinking?
Yes, but only if you confirm the void is not being caused by an active leak. Before lifting, look for recent damp spots, running irrigation heads, or plumbing that could be under the patio. If you suspect a broken water line, pressure test or camera inspection first, because injecting grout or foam will not stop continued washout and the slab will sink again.
What if the slab is cracked, can I still lift it with mudjacking or foam?
For a cracked slab, focus on whether the slab is still one unit. If you can press on both sides of a crack and see independent movement, stop and consider professional assessment or replacement. Also pause if cracks widen during injection, because that usually indicates a weak internal area that is concentrating stress.
Does temperature affect how to raise a patio slab and the success of the repair?
Avoid lifting in freezing conditions or when the slab and surrounding subgrade are partially frozen. Cold ground can hide the true extent of the void and slows grout or foam curing, which increases the chance of uneven support or failure to lock the lift in place. Plan a window of mild weather and allow cure time before heavy use.
Should I raise the slab to be perfectly level or restore a specific slope?
Use the highest-elevation area only as a reference, not as the “finish target” for every point. If the slab has tilted, the goal is to restore drainage slope away from the house, not simply make it level in one direction. Use a long level in multiple directions and verify the slope requirement after the lift.
Why does my raised patio slab sink again even after mudjacking?
If you lift without addressing the drainage path, you will often see new settlement within a short time. Specifically check downspout discharge locations, irrigation overspray, surface runoff direction, and any low spots upstream that keep water near the patio. Regrade and relocate outlets before or immediately after lifting.
How do I prevent grout or foam from damaging plants and nearby surfaces?
To protect plants and nearby finishes, cover them with plastic sheeting and keep grout control tight. Grout splatter can stain concrete and destroy foliage, and foam can be difficult to remove once cured. Mask expansion joints and adjacent surfaces to reduce mess and to make patching cleaner.
Is it safe to raise a patio slab close to a house foundation?
If you must lift near a house foundation, do not assume “more distance” is always safe. A tight slab can transfer lift force into the structure, so keep lifting controlled, leave any intended movement gap, and stop short if you hear new stress or see misalignment in nearby joints or steps.
Can I use a thin topping or self-leveling overlay instead of mudjacking?
Yes, but don’t use overlays as a substitute for base repair if the void still exists. A thin topping can correct final slope, yet it will not fix an undermined subbase. If tapping indicates large hollow zones or the slab keeps flexing, injection or other base stabilization is still required before adding a leveling surface.
What should I do if grout keeps bleeding out at an edge while I’m lifting?
If grout flows freely into a distant exit point, you likely reached the full void perimeter, but you still need to stop at controlled lift increments. Cap the exit points temporarily as you inject so the slurry continues filling the underside uniformly, then recheck alignment between holes rather than continuing until you overshoot.
What causes mudjacking to fail when grout pumps in but the slab stays in place?
If a slab doesn’t lift after you’ve injected a significant amount, assume either (1) the void is too large to create lift without additional support, or (2) the slab is constrained by an adjacent feature (curb, step, wall, or a mechanical lock). Stop and reassess the boundary conditions before injecting more, because extra material can create high spots and new cracking.
How do I avoid over-lifting when raising a patio slab with injection?
Don’t aim for one-pass maximum lift. Inject small amounts, pause to re-measure with a level or straightedge, and then continue. A practical safety move is to mark target elevations and work hole-by-hole so you can stop immediately if the slab starts rising higher than adjacent sections.
Should I seal the slab after raising it, and what about existing joint gaps?
Yes. After curing and patching, apply an exterior-appropriate penetrating sealer, especially on porous concrete surfaces. Also recheck joint seal quality. Open or failed perimeter joints are a direct water entry route that can reintroduce washout even if the lift repair itself was successful.
Next Article
How to Fix Cement Patio Cracks: Diagnose and Repair
Diagnose concrete patio crack types and repair with the right sealant or patch, from prep to curing and prevention.