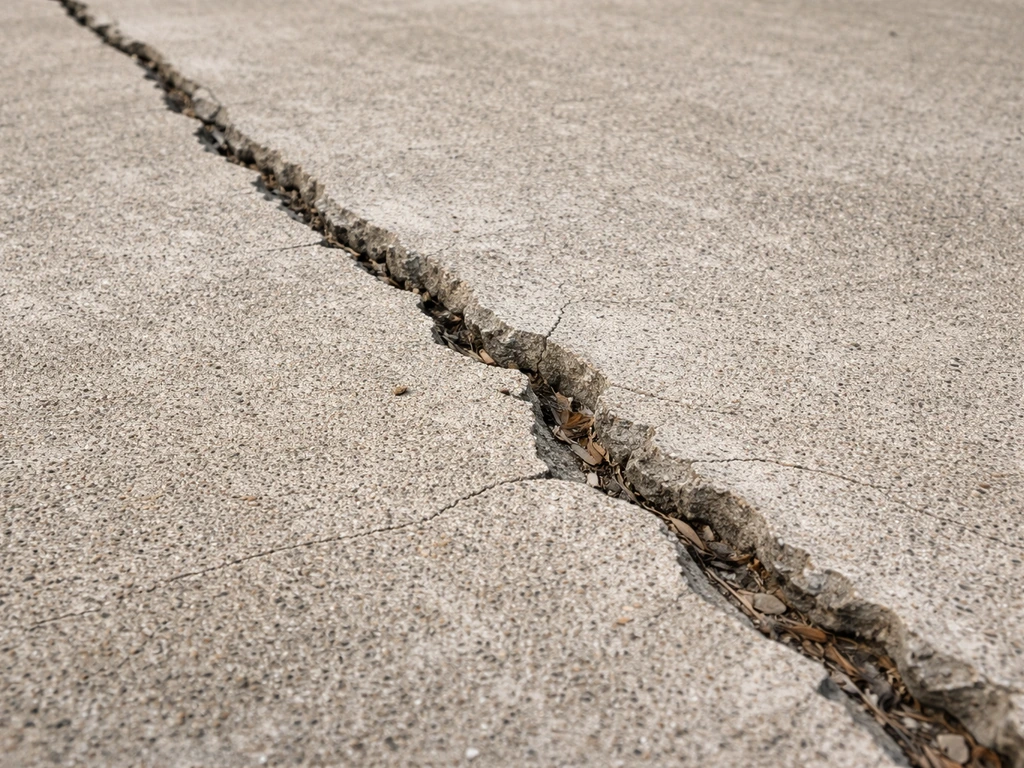
Most brick patio repairs come down to one of four problems: loose or missing bricks, cracked bricks, sunken sections, or failing joints. You can fix all of them yourself if the base underneath is solid and the damage is localized. If you keep getting the same sinking spot every season, or water is pooling toward your house no matter what you do, that's a base or drainage problem and patching over it won't hold. This guide walks you through diagnosing the real issue first, then tackling the repair the right way. Once the base is solid and drainage is addressed, you can focus on how to decorate a brick patio with furniture, lighting, and plants.
How to Repair a Brick Patio Step by Step Guide

Talia Lang
3 May 2026
Quick diagnosis: figure out what kind of damage you actually have
Before you touch anything, walk the whole patio and take stock. The type of damage tells you both what went wrong and what the fix requires. Misreading it is how people end up pulling up bricks, slapping down new sand, and watching the same spot sink again six months later.
| What you see | What it means | Repair path |
|---|---|---|
| Bricks that rock or lift easily | Sand bed has shifted or washed out; edge restraints may have failed | Re-bed bricks on fresh sand, check edge restraints |
| One or more bricks visibly cracked or broken | Impact damage, freeze-thaw cycling, or heavy point loads | Replace individual bricks |
| White chalky crust on brick surface (efflorescence) | Water is moving through the brick or mortar, carrying dissolved salts to the surface | Address moisture source; clean surface; repoint joints if mortar is failing |
| Brick surface flaking or pitting (spalling) | Moisture got into the brick and freeze-thaw cycles blew the face off | Replace affected bricks; seal to prevent recurrence |
| Crumbling or missing mortar in joints | Mortar has aged out or been undercut by water infiltration | Repoint joints (tuckpointing); repair threshold is mortar recessed more than 1/4 inch from the brick face |
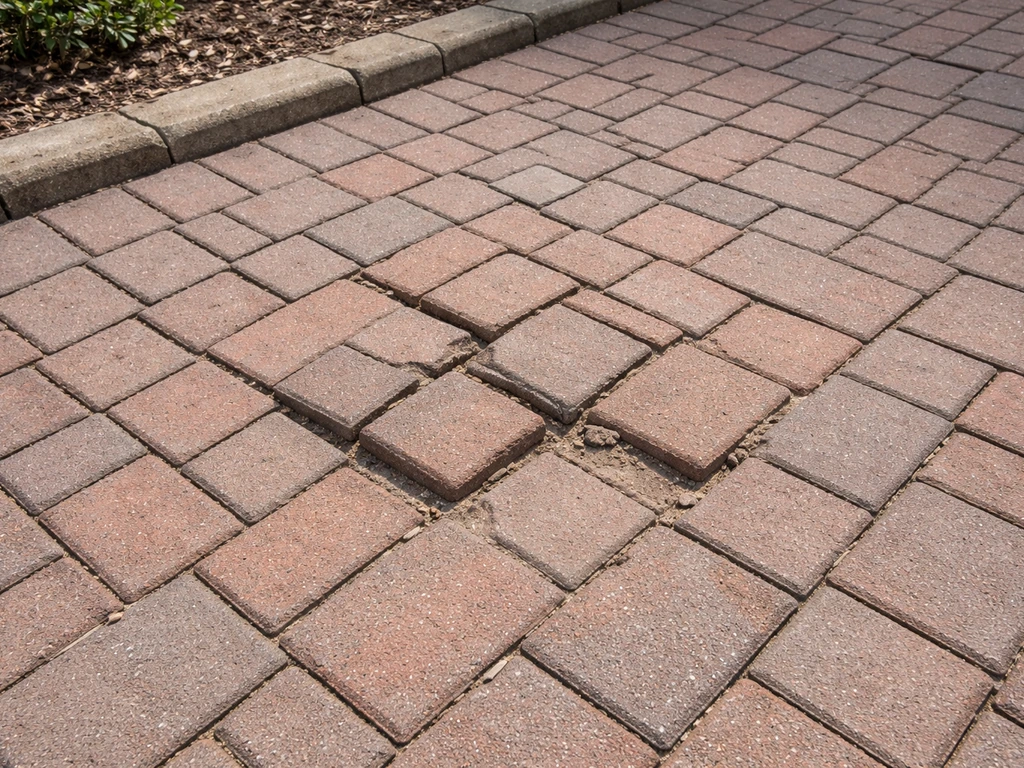
| One section of patio noticeably lower than the rest | Base layer settled, compaction failed, or soil eroded underneath | Pull up bricks, fix the base, re-bed and relay |
| Same area keeps sinking after you fix it | Underlying base installation was never correct, or there's a drainage/grade issue | Full base repair; check subgrade slope; may need a pro |
Two symptoms worth calling out separately: efflorescence (that white, chalky salt deposit) is not just cosmetic. It's a reliable sign that water is actively moving through the masonry. And spalling, where the brick face flakes off in layers, almost always means moisture got inside the brick and freeze-thaw cycles did the rest. Both mean you need to stop the water, not just fix the surface.
Safety, prep, and what tools and materials you'll need
Safety first, especially if you're cutting
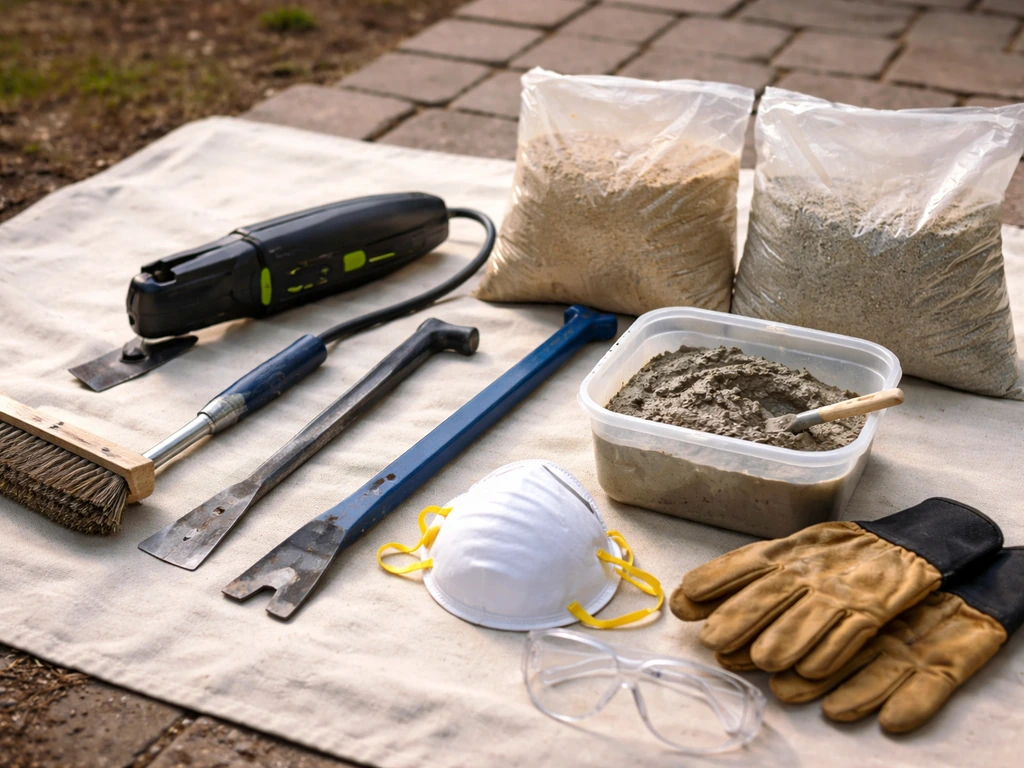
Most basic brick repairs don't require a saw, but if you need to cut a brick to fit, take silica dust seriously. Use a wet masonry saw (water applied continuously to the blade) to suppress airborne dust. At minimum, wear an N95 respirator, safety glasses, and gloves. Polymeric sand also requires some care: it's not toxic, but avoid breathing the dust when you're sweeping it, and wash skin contact off promptly. A real-world r/DIY thread also highlights that polymeric products can be tricky to keep stable over time and may require edging restraint and ongoing maintenance to avoid failure Polymeric sand also requires some care.
Prep: assess before you buy anything
Know whether your patio is mortar-set (bricks laid in mortar on a concrete or mortar bed) or sand-set (bricks laid on compacted gravel base and bedding sand with sand or polymeric sand in the joints). The repair method is different for each. Mortar-set patios are more common in older installations; sand-set and paver-style systems are more common in the last 30 years. If you're not sure, try to lift a loose brick. If there's hardened gray material underneath holding it in place, it's mortar-set. If it lifts cleanly out of a sand bed, it's sand-set.
Tools and materials to have on hand
- Cold chisel and hammer (for removing mortar from joints or lifting bricks)
- Grout saw or oscillating tool with masonry blade (for cutting out old mortar cleanly)
- Pry bar or stiff putty knife (for lifting individual bricks without damaging neighbors)
- Long straightedge or 8-10 ft screed board (for leveling the sand bed)
- Carpenter's level or 4-ft level
- Rubber mallet
- Stiff-bristle broom
- Garden hose with adjustable nozzle (set to 'shower' for polymeric sand activation)
- Pointing trowel and margin trowel (for mortar work)
- Bucket and mixing paddle or mixing tub
- Plate compactor (rental; needed for base repairs, not surface-only jobs)
- Masonry sand or polymeric sand (match what's already in the joints)
- Compactable gravel/crushed stone (for base repairs)
- Mortar mix or pre-mixed repointing mortar (for mortar-set patios)
- Replacement bricks (bring a sample to the yard to match; for older patios, used bricks from salvage yards often match better than new ones)
- Patio sealer (optional but recommended after repointing or replacing bricks)
Fixing the common stuff: loose bricks, cracked bricks, and uneven spots
Loose or missing bricks
Start by surveying the sand bed before you pull anything up. Press on surrounding bricks with your foot to feel how far the instability extends. You want to pull up a slightly larger area than just the visibly loose bricks, because the sand bed under adjacent bricks is often compromised too even if they're not rocking yet.
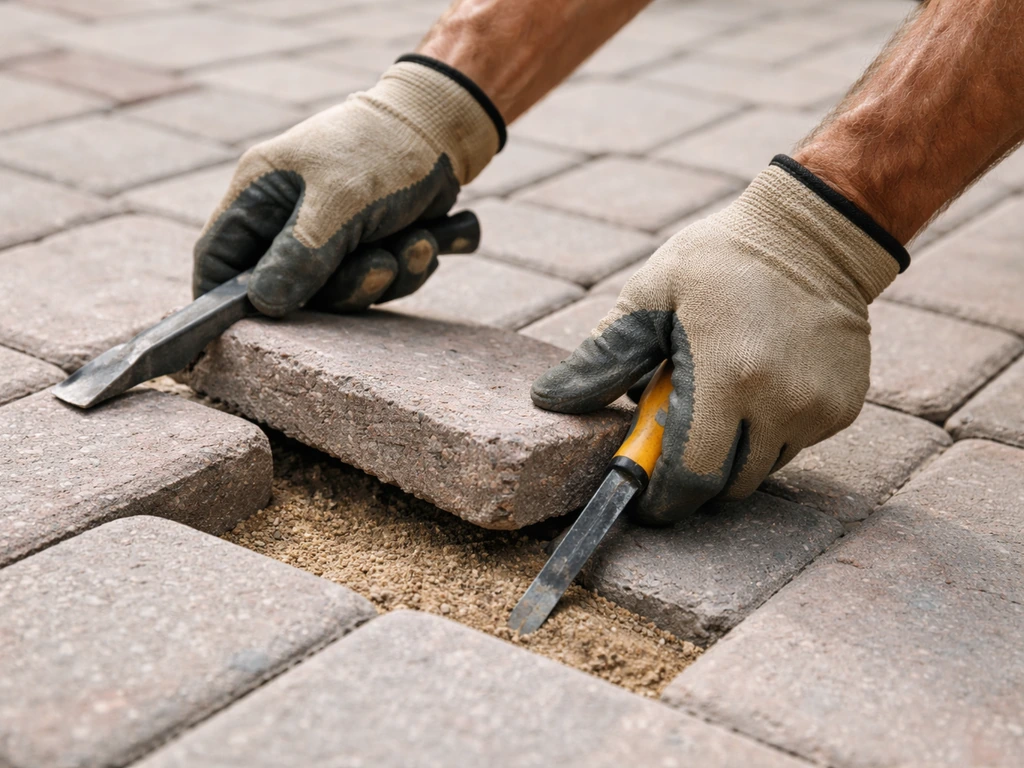
- Use a cold chisel and pry bar to lift the loose bricks carefully. Work from the center of the problem outward. Don't lever against good bricks.
- Once lifted, chip any old mortar off the edges of each brick if it's a mortar-set system. A cold chisel or stiff wire brush works fine.
- Inspect the sand bed underneath. Scoop out any soft, eroded, or contaminated sand and replace it with fresh coarse bedding sand.
- Screed the sand level using a straightedge, targeting a bed depth of about 1 inch. The goal is a firm, even surface.
- Reset the bricks in their original pattern, pressing each one firmly by hand, then tapping level with a rubber mallet. Use a level frequently.
- Re-joint with the appropriate material (see the repointing section below).
- Check that the reset section is flush with surrounding bricks and that there's still a slight slope away from any structure (1/8 to 1/4 inch per foot).
Cracked or broken bricks
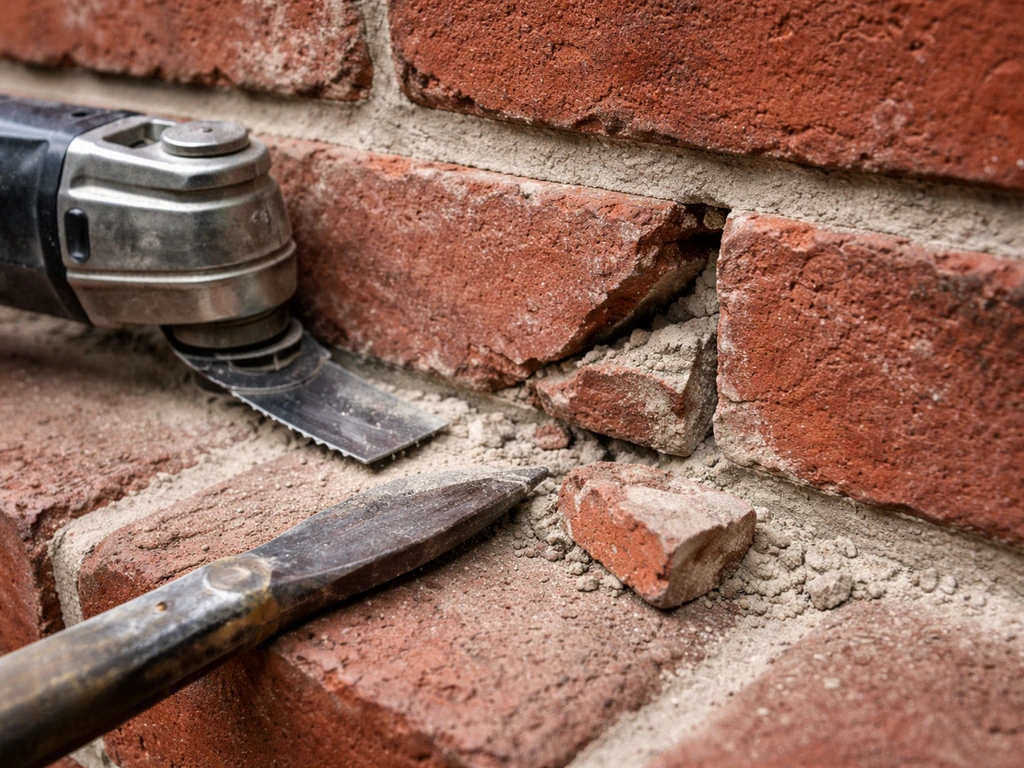
Individual cracked bricks are a swap-out job. Score around the damaged brick with a grout saw or oscillating tool to cut through the joint material, then use a cold chisel and hammer to break up the brick in place and remove the pieces. Work carefully to avoid cracking the neighbors. Clean the cavity, add or level the bedding material, then set the new brick. Matching replacement bricks matters more on older patios. New bricks are often brighter or a different texture. Salvage yards are genuinely worth checking for a closer match.
Minor uneven sections (no base failure)
If one or two bricks are sitting slightly high or low but the surrounding area is stable, you likely just have an uneven sand bed in that spot. Pull the high or low bricks, add or remove sand as needed, re-screed, and reset. This is genuinely a one-afternoon job. The key test: if the brick next to the problem spot is rock-solid and doesn't move when you push it, the fix is probably simple.
Restoring sunken or settled areas: fixing the base properly
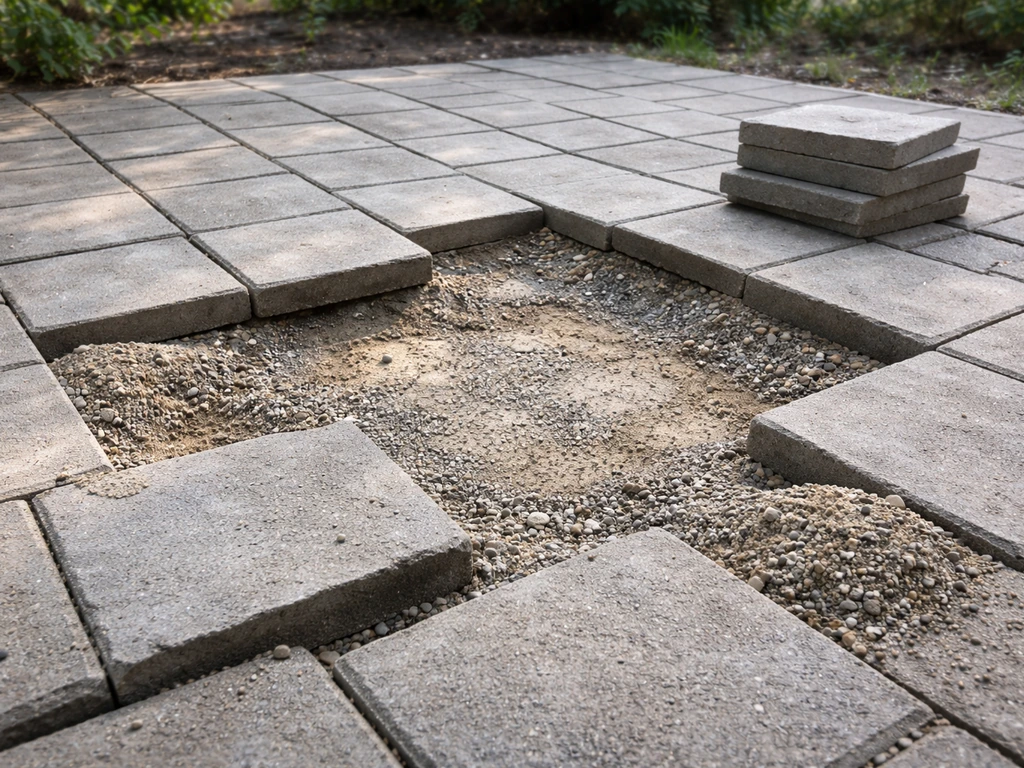
Sunken sections that keep coming back are a base problem, not a brick problem. Pulling up the bricks and adding sand without fixing what's underneath will get you the same result in 6 to 12 months. This is the repair people most often do wrong because the surface fix is faster and easier.
How to know if it's a base problem
- The same section has sunk more than once after surface repairs
- When you pull up the bricks, the sand bed underneath is clearly washed out, heavily contaminated with soil, or there's a visible void
- You can see or feel soft spots in the subgrade (the soil beneath the gravel base)
- Water pools in the sunken area after rain and takes a long time to drain
- The sunken area is near a downspout, a tree root, or the edge of the patio where erosion is more likely
How to rebuild the base correctly
For a full base repair in a localized section, the process goes deeper than most people expect. The total depth you're working with is: brick thickness + 1 inch of bedding sand + 4 to 8 inches of compacted gravel base. For a standard brick that's about 2.25 inches thick, you're excavating roughly 7 to 11 inches below the finished surface level.
- Pull up all the bricks in the affected section and set them aside.
- Dig out the compromised base material down to undisturbed subgrade. If the subsoil is soft or waterlogged, you may need to go deeper and compact the subgrade before adding new base.
- Check and correct the slope of the subgrade. It should drain away from your house at 1/8 to 1/4 inch per foot. This is the step most people skip, and it's why water keeps returning.
- Add compactable crushed stone (not pea gravel) in 2-inch layers, compacting each layer with a plate compactor before adding the next. Continue until the base brings you to about 2 inches plus your brick height below the target finished surface.
- Add 1 inch of coarse bedding sand and screed it flat and level, maintaining the slope you set in the subgrade.
- Reset bricks, check level frequently, and re-joint.
Renting a plate compactor for a day is worth every dollar here. Tamping by hand doesn't get you adequate compaction, and inadequate compaction is usually what caused the settlement in the first place.
Drainage: the part that gets ignored
If you're dealing with recurring settlement or pooling water, check where your downspouts discharge and whether any of them are dumping directly onto or near the patio. Even a correctly built base will erode if it's constantly soaking. Extending downspouts or adding a simple French drain at the low edge of the patio can solve what looks like a recurring base problem.
Repointing and re-jointing: mortar, polymer sand, cleaning, and sealing
Joint failure is one of the most common and most fixable brick patio problems. The threshold for action is straightforward: if mortar has receded more than about 1/4 inch from the face of the brick, repoint it. If you are seeing mortar gaps or joints shrinking, learning how to repoint brick patio joints is the best way to stop water intrusion before it damages the bricks repointing a brick patio. At that depth, water is actively getting into the joint, freezing in winter, and accelerating the deterioration of both the mortar and the bricks behind it.
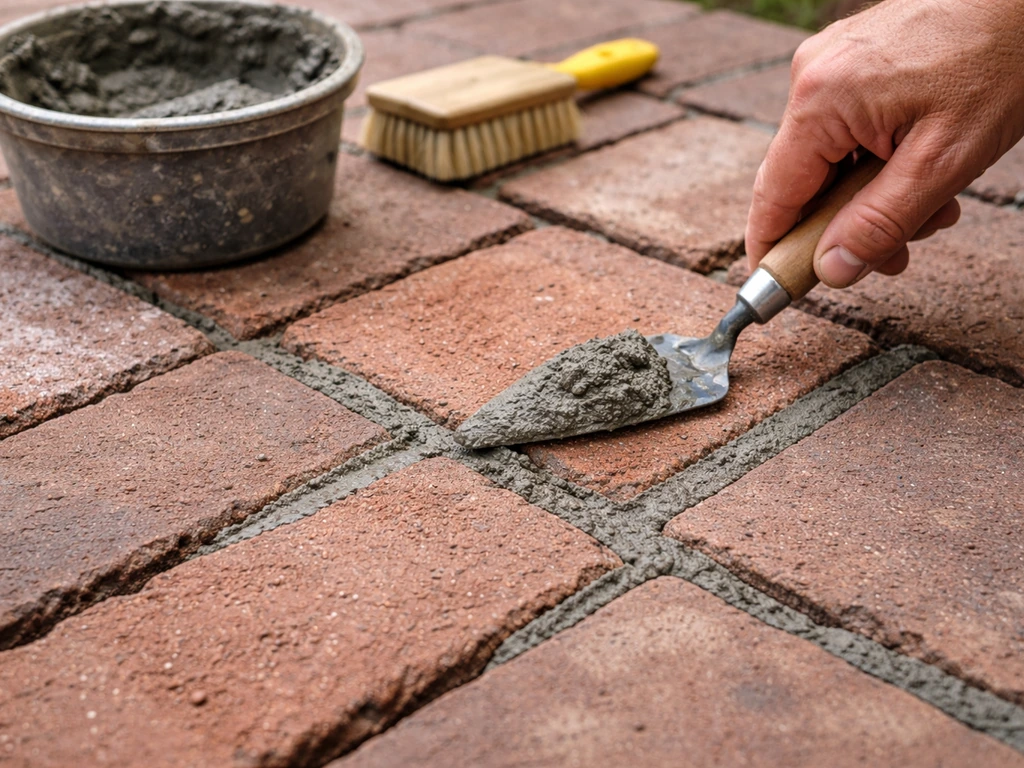
Mortar repointing (mortar-set patios)
- Use a grout saw or cold chisel to remove the old, failing mortar to a depth of at least 3/4 inch. You need fresh mortar to have enough depth to bond properly. Blow or brush out the dust.
- Wet the joint area lightly before applying new mortar. Dry brick will pull moisture out of fresh mortar too fast and weaken the bond.
- Mix repointing mortar to a firm, peanut-butter consistency. Pack it in layers if the joint is deep, pressing firmly to eliminate voids.
- Tool the joint to match the original profile before the mortar fully sets (usually 30 to 60 minutes after application).
- Keep the repaired area moist for at least three days by misting with a garden hose. This curing step is easy to skip and genuinely makes a difference in long-term durability.
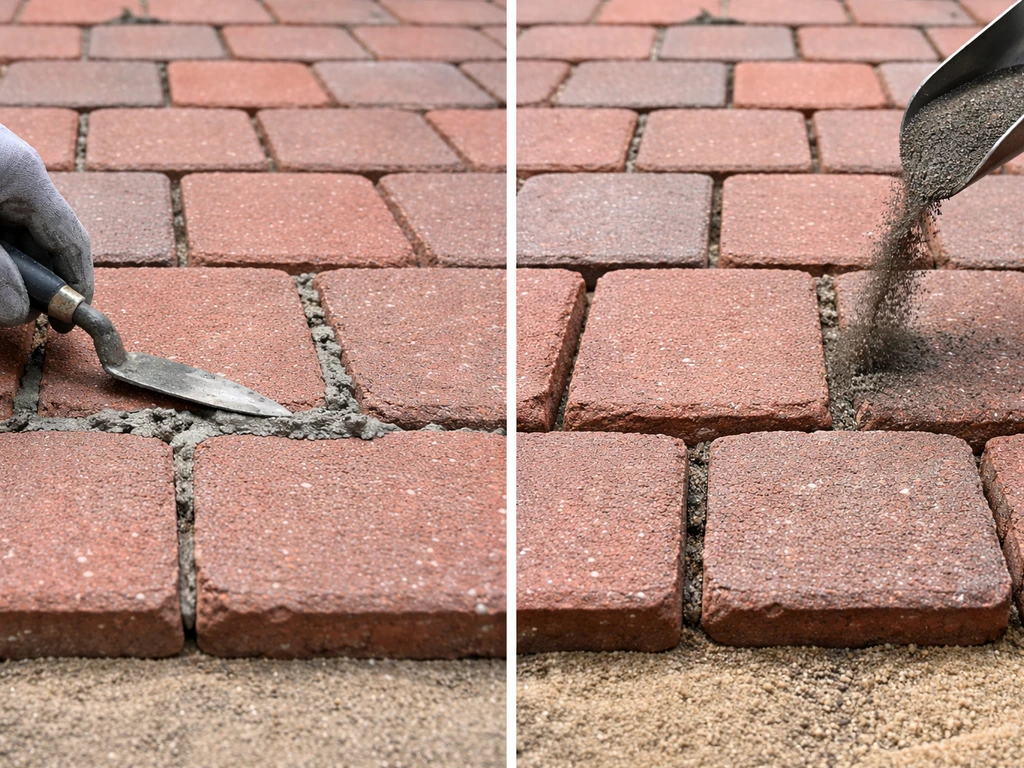
Polymeric sand (sand-set and paver-style patios)
If your patio uses sand in the joints rather than mortar, polymeric sand is the better long-term choice over plain jointing sand. It's activated by water, binds the joint firmly once cured, resists weeds and ants, and doesn't wash out as easily as plain sand. Here's how to install it correctly.
- Wait at least 24 hours after any significant rainfall before you start. The joints and bricks need to be dry for polymeric sand to install and cure correctly.
- Sweep polymeric sand across the dry surface and work it into the joints with a stiff broom. Make multiple passes.
- Blow off or carefully brush away all excess sand from the brick faces. Any polymeric sand left sitting on the surface will haze when you wet it.
- Use a hose nozzle set to the 'shower' setting and wet the entire surface evenly. This activates the polymer binders. Don't soak it; you want it thoroughly wet but not flooded.
- Allow it to cure undisturbed. Keep foot traffic off for at least 24 hours, and keep it dry during that window.
Cleaning and sealing after repair
Once repairs are complete and fully cured, clean the surface with a stiff brush and water, or a diluted masonry cleaner if you have efflorescence. If your goal is to make a brick patio look new, a thorough cleaning followed by the right sealer is one of the fastest ways to refresh the surface after repairs Once repairs are complete and fully cured. Let it dry completely before applying any sealer.
A penetrating masonry sealer helps lock out moisture and slows joint deterioration significantly. It's not mandatory, but on an older patio or in a climate with hard winters, it's a smart step. If you're considering a more comprehensive refresh, repointing and sealing is often the most cost-effective approach before going further. After the structural repairs are done, you can focus on how to paint a brick patio for a durable, even finish.
If what you want is a broader refresh, start by diagnosing whether the issue is loose joints, trapped moisture, or a base and drainage problem a more comprehensive refresh. If your patio is showing signs of widespread settlement, follow the same principles as this guide on how to resurface a brick patio, but be sure to address the base and drainage first how to resurface brick patio.
Brick patios vs brick paver patios: how the repair differs
These two terms get used interchangeably but the construction is different, and that matters for repairs.
| Feature | Traditional brick patio (mortar-set) | Brick paver patio (sand-set) |
|---|---|---|
| Base system | Often concrete slab or mortar bed | Compacted gravel base (4-8 inches) + 1 inch bedding sand |
| Joint material | Mortar | Sand or polymeric sand |
| Brick removal | Requires breaking out mortar; more labor intensive | Bricks typically lift out cleanly |
| Re-leveling method | Mortar bed adjustment or slab repair | Re-screed bedding sand |
| Joint repair | Repointing/tuckpointing with mortar | Sweep in new jointing sand or polymeric sand |
| Older patio challenges | Harder mortar, spalling more likely, harder to match bricks | Sand may have fully eroded; edges often unstable |
| DIY difficulty | Moderate to hard | Moderate |
Notes for older patio repairs
Older brick patios (20+ years) present a few specific challenges. The mortar in old joints is often harder and more brittle than modern mixes, which means it takes longer to remove cleanly without damaging the brick faces. The bricks themselves may be more porous and prone to spalling if they've been absorbing moisture for years.
Settlement on older patios is also more likely to be widespread rather than isolated, because base compaction standards and drainage practices were less consistent in older installations. Take an honest look at how much of the patio has shifted before deciding to do localized repairs versus a fuller restoration. If more than a third of the surface is affected, it may be more economical to look at a broader approach, which is worth comparing to a full redo.
If you’re considering a full redo, start with diagnosing the base and drainage so you don’t repeat the same settling problem.
For matching replacement bricks on an older patio, take a whole brick (not just a photo) to a masonry supplier or salvage yard. Color, texture, and size all vary between eras and manufacturers, and a close-but-not-right match will stand out for years.
When to stop DIYing and call a professional
Most localized brick patio repairs are genuinely DIY-friendly if you're comfortable with basic masonry work and have a free weekend. But there are situations where doing it yourself will cost you more in the long run because the underlying problem needs more than you can realistically fix with hand tools and a rental compactor.
Signs you need a professional
- The entire patio (or a large portion of it) has shifted or settled, not just one section
- Settlement keeps returning in the same spot after multiple DIY fixes
- Water consistently pools toward the house or foundation, and simple regrading hasn't solved it
- The subgrade underneath is clearly soft, saturated, or has voids even after you've dried it out
- The patio is mortar-set on a concrete slab that itself is cracked, heaved, or settling
- You're seeing structural cracks in adjacent walls, steps, or foundation elements near the patio
- The drainage issue requires new underground drainage infrastructure (French drains, channel drains, or regrading a large area)
What professional repair typically costs
Hiring a masonry contractor to repair a brick patio runs roughly $11 to $14 per square foot on average. Repointing specifically costs about $3 to $15 per square foot depending on the extent of the work and your region. For a 12x12 foot patio, a full repointing job from a pro would typically run somewhere between $450 and $2,000. That range is wide because labor costs vary significantly by market and because the condition of the existing joints affects how long the work takes. Get two or three quotes and ask each contractor specifically what's included in the base repair, not just the surface work.
If a contractor tells you the whole patio needs to come up and the base rebuilt, ask them to show you the drainage slope they're planning for the subgrade. HowtoHardscape recommends a paver patio slope typically in the range of 1/8 inch to 1/4 inch per foot (about 1% to 2%) the drainage slope they're planning for the subgrade.
A contractor who doesn't mention slope and drainage when doing a full base repair is not thinking about the long term. A common rule of thumb is to slope patio surfaces away from the foundation by about 1/8 inch per linear foot to about 1/4 inch per linear foot slope and drainage when doing a full base repair. The fix you pay for today should still be working in 15 years, not just 15 months.
FAQ
Can I repair my brick patio by just replacing the damaged bricks and patching the joints, or do I need to rebuild the base too?
For sand-set patios, reseat with fresh bedding sand and correct compaction, then lock the joints with the right material. For polymeric sand, only apply when temperatures are mild and no rain is forecast for the curing window, and mist lightly with water as directed for activation (don’t flood the joints or wash the sand out). For mortar-set patios, you should remove failing mortar to proper depth and repoint, because simply adding sand or a surface patch won’t stop water movement through joints.
What should I do if I repaired the patio once, but the same area sinks again?
If a repair keeps failing in the same spot, treat it as a drainage or subgrade issue first. Quick field checks include watching where water runs during a real rain, confirming downspout discharge is not dumping onto the patio, and checking whether the neighboring bricks feel loose beyond the obvious damaged area. If you feel rocking more widely than the cracked bricks, assume the compromised base extends farther and excavate a slightly larger section than the visible damage.
My bricks are flaking (spalling). Is repointing enough, or do I need to replace the bricks?
Spalling usually means moisture has entered the brick and freeze-thaw has degraded it. In that situation, the durable fix is to stop the water source and replace the damaged bricks, then address joints and any drainage conditions that keep the area wet. If you keep the existing spalled bricks and only patch around them, moisture can continue to work its way behind the faces and keep worsening the breakdown.
How can I tell whether my patio is mortar-set or sand-set if I don’t have a loose brick to test?
The “mortar-set” versus “sand-set” distinction affects what you do under the brick and inside the joints. You can confirm without guessing by lifting a loose brick, checking whether there is hardened mortar holding it, or whether it comes out with bedding sand. If it’s unclear because everything is partially broken down, assume sand-set is more likely if you can see compacted gravel and loose bedding, then plan your joint approach accordingly.
Do I really need a wet saw, or can I use a grinder with a mask to cut bricks?
Yes, silica dust control matters most when cutting bricks or joint lines. A wet masonry saw with continuous water at the blade greatly reduces airborne dust, and you still want eye protection and gloves. If you don’t have a wet saw and must use an angle grinder with a diamond blade, use the correct blade, cut outdoors with strong ventilation, and wear proper respiratory protection, because some grinders generate far more fine dust than people expect.
What’s the most common mistake when installing polymeric sand joints?
Polymeric sand needs the right curing conditions and it must be fully activated by the right amount of water, not just lightly misted if the joints are dry. Also, keep pedestrian traffic off the joints until cured, because walking on it before it binds can weaken the joint and invite weeds or water intrusion later. Finally, if the patio gets soaked soon after installation, joints can wash out, so plan the work around weather.
How far around a cracked or loose brick should I dig out?
A practical way to decide the repair size is to test stability by foot pressure around the damaged zone, not just visually. If adjacent bricks shift or feel hollow, excavate beyond the problem spot so you rebuild the base under the area that has lost support. This reduces the “patch over weak sand” failure mode that shows up months later.
Can I clean and seal the patio immediately after repairs, or do I need to wait?
You should clean and repair in a way that doesn’t trap moisture in the wrong places. After work is complete, let everything cure fully, then scrub with water and a stiff brush, use a diluted masonry cleaner only if efflorescence is present, and rinse thoroughly. Applying sealer to damp masonry can reduce performance, so confirm the patio is completely dry before sealing.
How do I know when joint failure is serious enough that I should repoint?
Look for the joint-depth cue. If mortar has receded roughly 1/4 inch from the brick face, water can reach deeper layers and freeze-thaw can accelerate deterioration, so repointing is the right time to act. Smaller cosmetic gaps might not be urgent, but receding mortar and visible shrinkage are a strong warning that the joints are no longer doing their job.
What questions should I ask a masonry contractor so they fix the real cause, not just the surface?
If you’re calling a contractor, ask specifically what drainage measures they are including for a full base repair, including the intended subgrade slope and how water will be directed away from the patio. Also ask whether they will rebuild downspout discharge paths or recommend changes like extending downspouts or adding drainage at the low edge. If they only talk about lifting bricks and replacing sand without addressing water movement, you’re at risk of repeating the same settlement or efflorescence problems.
How do I get replacement bricks that actually match, especially for older patios?
For localized repairs on older patios, matching bricks matters more than most people think because color and texture differences become obvious as the patio ages. Bring a whole brick to a supplier or salvage yard, not a photo, and confirm size so the new piece fits the existing bond. If the exact match is hard to find, blending with the least noticeable orientation and choosing bricks from the same batch or era can reduce long-term visual mismatch.
Next Article
How to Fix Cement Patio Cracks: Diagnose and Repair
Diagnose concrete patio crack types and repair with the right sealant or patch, from prep to curing and prevention.