To revamp patio slabs properly, you need to work through a clear sequence: diagnose the actual problem, strip away anything that's failing, repair the concrete underneath, then resurface and seal. Skip any of those steps and you'll be back out there patching the same spots in a year. Most concrete patios can be genuinely transformed with DIY effort, but the right approach depends entirely on what's wrong with your slabs right now, so that's where we start. If you’re ready to start an overhaul, this guide walks you through how to update patio slabs step by step DIY effort.
How to Revamp Patio Slabs: Step-by-Step Repair and Resurfacing

Talia Lang
5 May 2026
Quick diagnosis: what's wrong with your patio slabs
Before you buy a single product, spend 20 minutes actually looking at your patio. The problems you can see on the surface often tell you exactly what's happening underneath, and misreading them leads to wasted money. Get down close, run your hand across the slabs, and walk the whole area slowly.
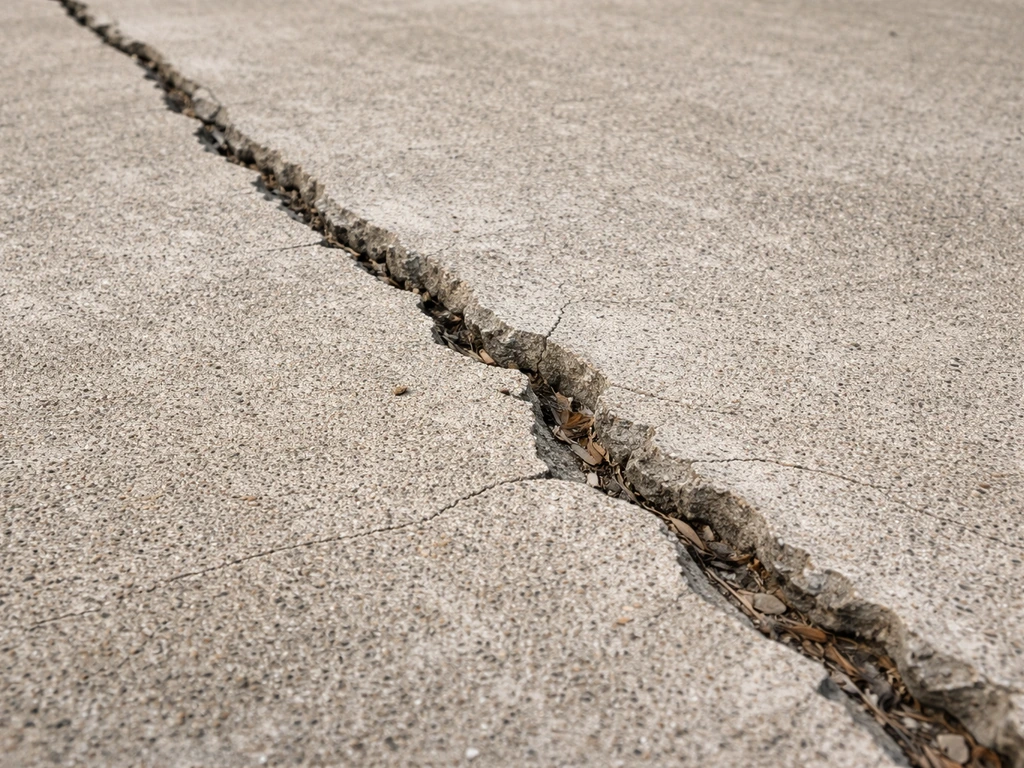
The first thing to check is cracking. Hairline surface cracks that are thinner than about 1/16 inch (roughly 1.6 mm) and sit flat with no step between them are almost always cosmetic shrinkage cracks. They formed when the concrete cured and dried, and they're not going to get worse on their own. You can fill them or resurface over them without worrying about structural issues.
The single most important thing to check is displacement: does one side of a crack sit higher or lower than the other? If you can feel or see a step when you run your hand across the crack, or you can measure an elevation difference with a straightedge, that crack is telling you the slab has moved. One side has settled into the base while the other hasn't. That's a fundamentally different repair from a surface crack, and it means you need to deal with the ground beneath the slab, not just the surface.
Beyond cracking, look for these common problems and note which ones apply to your patio:
- Spalling: the surface is flaking, pitting, or popping off in chunks, usually from freeze-thaw cycles or deicing salt damage. The concrete below is often still sound.
- Staining: oil, rust, mold, algae, or general weathering darkening the surface. Purely cosmetic but needs the right cleaner for each type.
- Failing sealant or coating: peeling, flaking, or bubbling film on the surface from a previous seal job. Anything that's lifting has to come off completely before you do anything else.
- Low spots and pooling: water sitting on the slab after rain instead of draining away. Can be drainage design, settling, or both.
- Sunken sections: a whole slab panel sitting lower than its neighbors, often with soil visible in the gap around the edges. This is base failure or erosion underneath.
Write down exactly what you're dealing with. The rest of this guide maps each problem to the right fix. Trying to use one approach for all of them is where most DIY patio projects go wrong.
Safety and prep: tools, protection, and site setup
Patio repair involves grinding, chemical strippers, and dusty concrete work, so don't skip the PPE. At minimum you need safety glasses, nitrile gloves, and a dust mask rated N95 or better. If you're using an angle grinder or a diamond blade grinder for surface prep, add hearing protection and ideally a half-face respirator, because concrete dust contains silica and that's genuinely harmful over time.
Here's the core tool and supply list you'll want to have ready before starting any patio revamp:
- Stiff-bristle or wire brush (for scrubbing and cleaning out cracks)
- Pressure washer (1500-3000 PSI covers most cleaning jobs)
- Angle grinder with a diamond cup wheel (for grinding high spots, removing coatings, and opening cracks for repair)
- Cold chisel and hammer (for hand-chipping spalled or loose concrete)
- Straightedge or long spirit level (for checking flatness and drainage slope)
- Crack filler (polyurethane or epoxy injection for moving cracks; cement-based filler for static ones)
- Concrete patching compound or hydraulic cement for spalls and low areas
- Concrete resurfacer bag mix (if you're doing an overlay)
- Stiff squeegee or gauge rake (for spreading resurfacer)
- Pump sprayer (for applying cleaners and some sealers)
- Concrete sealer appropriate to your chosen finish (see the sealing section below)
- Painter's tape and plastic sheeting to protect edges, walls, and landscaping
Set up your site before you open anything. Cover any plants, furniture, or walls adjacent to the work area. If you're using chemical strippers or acid-based cleaners, wet down any surrounding soil or landscaping beforehand to protect roots. Check the weather forecast: you want at least 48 hours of dry weather and temperatures between about 50°F and 90°F (10°C to 32°C) for any concrete repair or sealing work. Cold or wet conditions will ruin cure times and bond strength.
Cleaning and removing failing coatings or weak surfaces
Clean concrete isn't optional. Patches, resurfacers, and sealers all bond to the slab surface, and if that surface has dirt, oil, algae, or old peeling sealer on it, the new material won't stick and you'll be peeling it off within a season. This step is one of the most important in the whole project.
General cleaning and degreasing
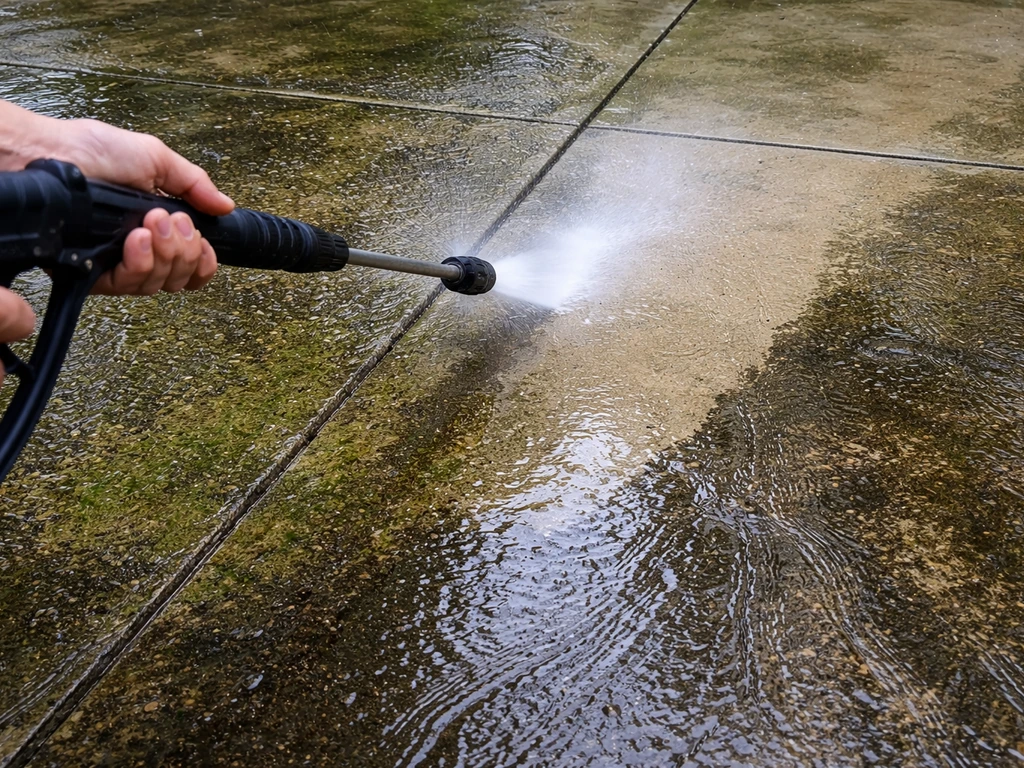
Start with a pressure wash at around 2000-3000 PSI. This removes loose dirt, algae, light staining, and any material that was already about to fail. After rinsing, let it dry and see what's left. Oil stains need a dedicated concrete degreaser applied before or after pressure washing. Rust stains respond to oxalic acid-based cleaners. For heavy organic staining (mold, algae, dark green or black areas), a diluted bleach solution (roughly 1 part bleach to 10 parts water) scrubbed in and rinsed well usually works. Let each cleaner dwell for 10-15 minutes before scrubbing.
Removing old sealers and coatings
If you have an existing coating that's peeling, flaking, or bubbling, it has to come off completely. There is no shortcut here. Applying anything over a failing coating just traps the problem underneath and adds another layer that will eventually fail the same way. First, try mechanical removal: a floor grinder or angle grinder with a diamond cup wheel will strip most coatings efficiently.
For film-forming sealers that are still partially adhered, a chemical stripper formulated for concrete sealers (check the label for your sealer type: solvent-based strippers for solvent-based sealers, water-based strippers for acrylic sealers) can save grinding time. Apply the stripper, let it dwell, then scrub and pressure wash. You may need two passes. When you're done, the surface should look like bare, uniform concrete with no shiny or waxy spots.
Etching for bonding
If you're applying a resurfacer or sealer and the concrete surface is very smooth (like a power-troweled finish), you'll get better adhesion by acid etching or mechanical profiling. Muriatic acid diluted to about 10:1 with water, applied with a plastic watering can and scrubbed in, then thoroughly rinsed, opens the concrete's pores and gives new material something to grip. Alternatively, a 40-grit diamond cup wheel on a grinder achieves the same thing mechanically. Whichever you use, the surface should look slightly rough and uniform, like fine sandpaper, before you proceed.
Repair choices: crack repair, patching spalls, and leveling low spots
Once the surface is clean and stripped back, you can see exactly what needs fixing before you resurface or seal. Work through repairs in this order: structural issues first, then surface damage, then minor cosmetics.
Hairline and static surface cracks
For cracks under 1/16 inch with no displacement, you can fill them with a concrete crack filler or even bridge over them with a resurfacer if the crack is tight enough.
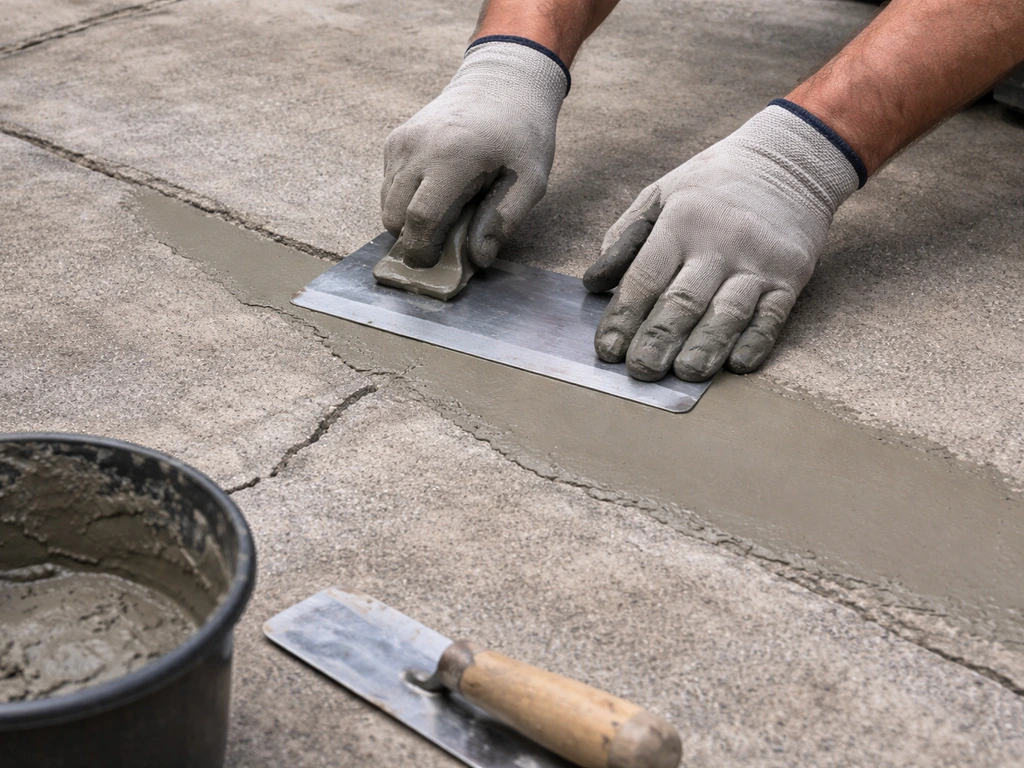
Widen the crack slightly with a grinder or oscillating tool to create a clean channel (called a chase), blow out the dust, and fill with a flexible polyurethane sealant for cracks that are in a moving or exposed environment, or a cement-based crack filler for stable indoor or covered areas.
For cracks wider than about 1/16 inch, Miracote’s manufacturer guidance indicates they should be mechanically prepared to suit the injection and repair workflow [Widen the crack slightly with a grinder or oscillating tool to create a clean channel (called a chase)](https://miracote. com/wp-content/uploads/MEMC-CT1-11. 25. 19.
pdf). Feather the filler flush with the surrounding surface.
Structural or displaced cracks
If one side of a crack sits higher than the other, patching the crack alone won't solve anything. The slab has moved because the base or subgrade shifted, and it may keep moving. For a step difference of less than about half an inch where the slab is otherwise stable, grinding down the high side to reduce the trip hazard and patching the crack can be a workable intermediate fix.
But if the settlement is significant or ongoing, you need to address the cause before any surface work makes sense. That means either mudjacking (pumping a grout or polyurethane foam beneath the slab to re-level it), or in bad cases, breaking out and replacing the section entirely. This is the one scenario where calling a professional is often the smarter call.
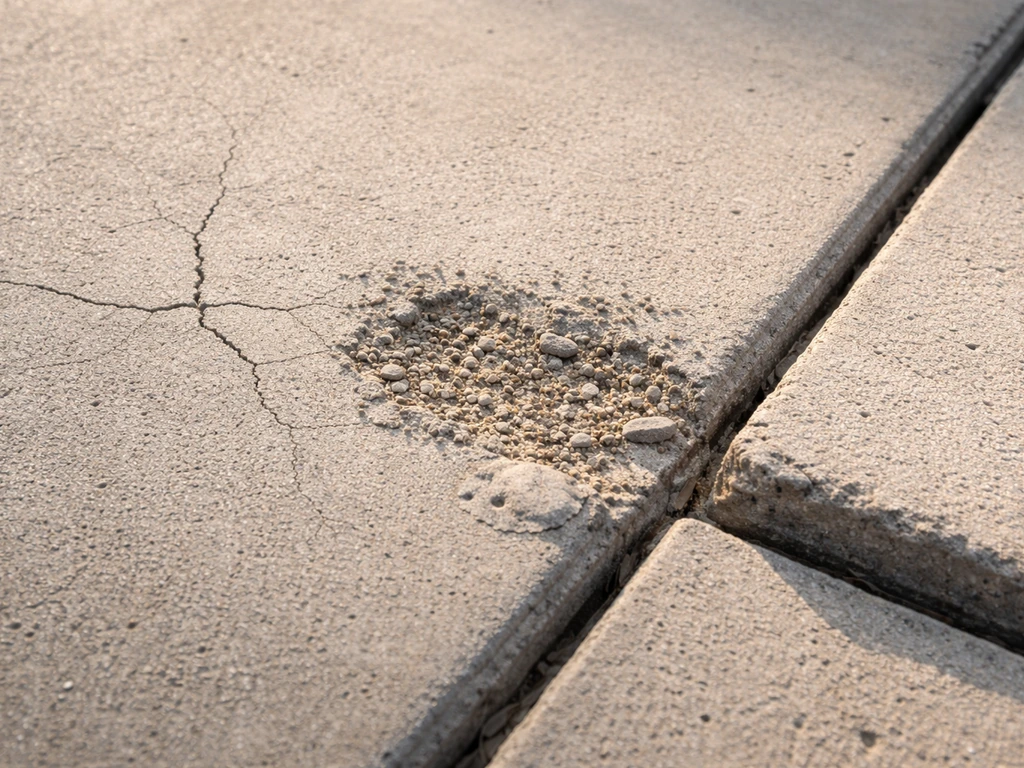
Spalling and surface pitting
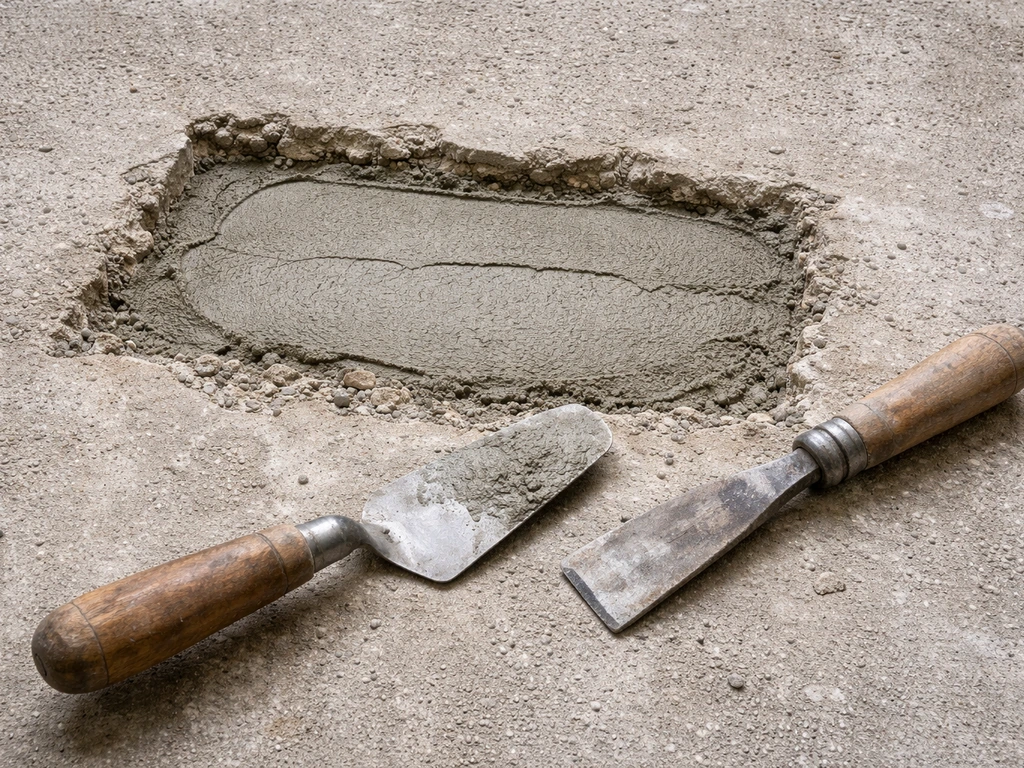
Spalls are areas where the surface layer has popped off, leaving rough, pitted concrete beneath. The key rule with spalling repairs is depth: shallow spalls (under about 1/4 inch deep) can be patched with a polymer-modified cement patching compound. FHWA notes that selecting and performing proper [partial-depth spall repairs](https://www. fhwa.
dot. gov/Pavement/concrete/repair02. cfm) can help reduce further deterioration. For spalls deeper than 1/4 inch, the repair material needs mechanical support, and you should undercut the edges of the spall slightly with a grinder to create a lip that holds the patch in place.
Mix your patching compound to a stiff, workable consistency, press it firmly into the spall, and finish it flush with a margin trowel. Don't feather thin at the edges or it'll pop off.
Low spots and pooling water
Standing water on a patio is both annoying and damaging over time. If the low spot is less than about 3/8 inch deep, you can fill it with a self-leveling concrete underlayment, which flows into low areas and cures flat. For depressions deeper than that, use a patching mortar built up in layers (no single layer thicker than about 1/2 inch for most patch materials, check the product spec). Always check that your patio slopes at least 1/8 inch per foot (ideally 1/4 inch per foot) away from the house. If the whole patio pitches toward the house, that's a drainage design problem and patching low spots won't fix it.
Resurface or replace: when to patch vs grind/overlay vs rebuild
This is the decision most people agonize over, and honestly it comes down to how much of the slab is compromised. Here's a straightforward way to think about it:
| Condition | Best approach | Realistic cost/effort level |
|---|---|---|
| Isolated cracks and spalls, sound slab overall | Spot patch then seal | Low, good DIY option |
| Widespread surface damage, spalling over 30%+ of area, old coatings | Full resurfacing overlay (2-4mm thick) | Medium, DIY-capable with prep |
| Significant displacement, active settling, multiple sunken panels | Mudjacking/slab lifting then resurface, or full replacement | High, often needs a pro |
| Structurally sound but heavily stained or dated look | Strip, clean, decorative overlay or stain plus seal | Low to medium, good DIY project |
| Slab is crumbling, base has failed, drainage is wrong | Full removal and repour | High, recommend professional |
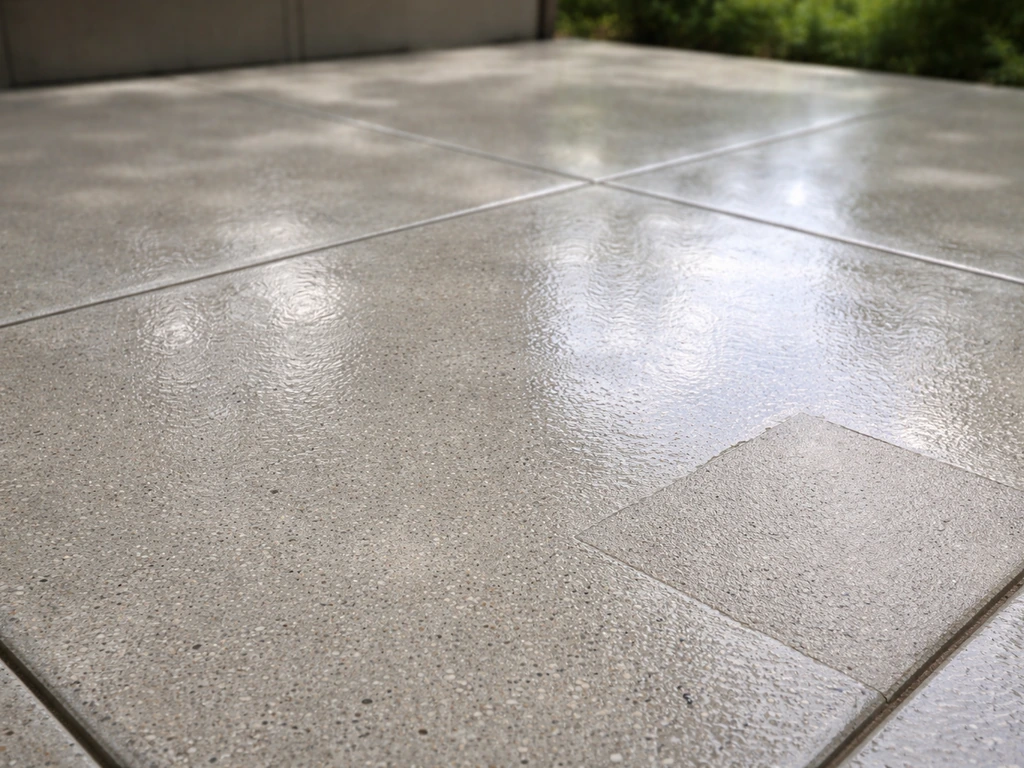
A concrete resurfacer overlay is one of the most cost-effective transformations you can make to a damaged but structurally sound patio. Products like Quikrete Concrete Resurfacer or similar polymer-modified overlays go on at about 1/8 to 1/4 inch thick, bond chemically to clean concrete, and can be broomed, stamped, or finished smooth. They cover minor surface defects, unify a patchy appearance, and give you a fresh surface to seal.
If you are trying to brighten up patio slabs instead of rebuilding, a resurfacing overlay is often the most cost-effective transformation when the slab is still structurally sound. Mix to a pourable but not runny consistency, dampen the slab surface (not wet, just damp), and work in sections of about 50-100 square feet at a time so it doesn't set before you finish.
If you're looking at ways to refresh rather than completely rebuild, a resurfacing overlay is usually the sweet spot between minimal patch jobs and full replacement. If you want a simpler refresh, focus on cleaning, fixing any damaged spots, and then applying a resurfacer or sealer for a like-new finish that protects your patio slabs refresh rather than completely rebuild.
If the slab has significant displacement and you're considering slab lifting, polyurethane foam injection (sometimes called polyjacking) is faster and less messy than traditional mudjacking, and it cures in about 15 minutes versus 24 hours. It's more expensive per job but often worth it for access and speed. Neither method is typically DIY territory because it involves drilling into the slab and working with pressurized injection equipment.
Sealing and finishing: protect the slab and choose the right product
Sealing is the step that protects everything you've just done, and the type of sealer you choose changes both the look and the performance of the finished patio significantly. There's no universal best sealer, it depends on what you want.
| Sealer type | Finish look | Protection level | Reapplication frequency | Best for |
|---|---|---|---|---|
| Penetrating/silane-siloxane | No change (invisible) | Good moisture and freeze-thaw resistance | Every 3-5 years | Natural concrete look, cold climates |
| Acrylic film-forming | Slight sheen to high gloss | Good surface and stain protection | Every 1-3 years | General patios, resurfaced slabs |
| Epoxy coating | High gloss, can add color/flake | Excellent abrasion and chemical resistance | Every 3-5 years with prep | Garage-adjacent or high-traffic areas |
| Polyurethane topcoat | Satin to high gloss | Excellent UV and abrasion resistance | Every 2-4 years | Decorative overlays, colored concrete |
For most standard DIY patio revamps, a penetrating silane-siloxane sealer or a good-quality acrylic sealer is the practical choice. Penetrating sealers are nearly foolproof to apply (roll or spray on, let it absorb, wipe any excess), don't change the look, and protect against the main enemies of concrete: water, freeze-thaw cycles, and salt. Acrylic sealers bring a bit of sheen and make the surface easier to clean, but they sit on top of the concrete and will eventually peel if water gets underneath, so surface prep is critical.
Application timing matters. New concrete or resurfaced slabs need to cure fully before sealing. For Portland cement-based resurfacers, that's typically 28 days for full cure, though many products can be lightly sealed after 7 days if temperatures have been consistent. Always check the product spec. Apply sealer in two thin coats rather than one thick coat, using a roller or pump sprayer, with the second coat applied perpendicular to the first. Thick applications trap air and turn milky or white. Temperature during application should be between 50°F and 90°F with no rain in the forecast for at least 24 hours.
Prevention and maintenance: drainage, base stability, and long-term upkeep
Most patio problems that bring people to this kind of repair project have one root cause: water getting somewhere it shouldn't. Either it's pooling on the surface, running into the base layer underneath, or eroding the subgrade over years. Fixing the symptoms without addressing drainage just means you'll be doing this again in five years.
Check that your patio drains away from the house at a minimum slope of 1/8 inch per foot, and ideally 1/4 inch per foot. Look at where rainwater goes when it leaves the slab edge. If it's running against a foundation, over a planting bed with no outlet, or pooling along a fence line, you need to redirect it. Simple fixes include re-grading adjacent soil to slope away, adding a channel drain at the low edge of the patio, or extending a downspout so it discharges past the patio entirely.
Base and subgrade stability is the other big factor. Concrete slabs over poorly compacted fill, sandy or clay-heavy soil, or areas with tree roots nearby are prone to settlement. If you've had sunken slabs, ask yourself why the base moved. Tree root intrusion, underground water movement, and poorly compacted original fill are the most common culprits. After lifting or replacing a section, filling the void beneath with compacted gravel (or in extreme cases, flowable fill grout) gives the slab something stable to sit on.
For long-term maintenance, here's a realistic schedule that keeps a revamped patio in good shape:
- Every spring: clean the surface with a pressure wash or stiff brush and check for new cracking, settlement, or sealer failure.
- Every 1-3 years (depending on sealer type and climate): reapply sealer. Don't wait until it's visibly failing. A quick water bead test tells you: if water no longer beads on the surface, it's time to reseal.
- Immediately after noticing them: seal any new surface cracks before water gets in and cycles through freeze-thaw over winter.
- Avoid deicing salts entirely on sealed or resurfaced concrete. Use sand for traction instead. Chloride-based ice melters are one of the fastest ways to destroy a concrete surface.
- Keep planters and furniture with metal legs off bare or wet concrete to prevent rust staining. Use rubber or plastic pads underneath.
If you've worked through this whole process and the patio looks solid and freshly sealed, you've genuinely extended its life significantly. The key is not letting small problems (a hairline crack, a patch of peeling sealer, a low spot collecting water) sit for another season. If your patio slabs are already showing signs of wear, this is the same mindset as knowing how to renew patio slabs and then sealing them correctly. Catching things early is what separates a patio that lasts another 20 years from one that needs a full rebuild in five.
FAQ
Can I revamp patio slabs without removing the old sealer or coating?
Usually not. If the existing coating is peeling, bubbling, or even partially losing adhesion, resurfacing or sealing over it traps the failure and creates another layer that can fail soon after. The safe approach is to remove anything that is not firmly bonded until you reach uniform bare concrete, then etch or profile for adhesion.
How do I tell if a crack is cosmetic or a sign of slab movement?
Run a straightedge across the crack and check for an elevation step. If one side sits higher or lower, or you can feel a lip when you drag your hand across, treat it as displacement. Cosmetic shrinkage cracks that are tight and flat can typically be filled or covered without needing to address the base.
What should I do if I find soft or hollow-sounding areas under the slabs?
Hollow or soft areas often mean the slab has lost support due to voids, washout, or subgrade instability. In that situation, patching and resurfacing the surface can mask the problem while it keeps expanding. Plan for lifting or removal of the affected section, then rebuild the base with compacted aggregate before you overlay.
Is it better to use acid etching or a grinder for prepping smooth power-troweled concrete?
Both can work, but choose based on your constraints. Acid etching is faster for small areas and tight spaces, while mechanical profiling (such as 40-grit diamond) gives more consistent surface texture and avoids chemical handling. Either method should leave a slightly rough, uniform surface that looks like fine sandpaper before you apply resurfacer.
Can I patch spalls without undercutting the edges?
For deeper spalls, no. If the spall is deeper than about 1/4 inch, thin feathered edges tend to break off. Undercut to create a lip and mechanical hold, then patch and finish flush so the repair has something to grip.
What’s the correct way to deal with standing water on a patio?
Start by measuring depth and checking the slope away from the house. If pooling is shallow (around 3/8 inch or less), a self-leveling underlayment can work. If depressions are deeper, use patching mortar in layers, but if the whole patio pitches toward the house or a fence line, fix drainage or you will keep re-patching the same low areas.
How thick can a resurfacer overlay be for a typical patio revamp?
Most polymer-modified overlays are designed for thin coats, commonly around 1/8 to 1/4 inch. If you need significantly more height, build it with proper base repairs and patching first, or use a product system intended for thicker applications. Overbuilding in one pass can increase shrinkage cracking and cause poor bond.
Should I wait for full cure before sealing, and what if I need to use the patio sooner?
For Portland cement-based resurfacers, full cure is typically 28 days, though some products allow light sealing earlier if temperatures stayed stable. If you must shorten the timeline, follow the product’s spec rather than a generic rule, because sealing too early can trap moisture and lead to milky appearance or early peeling.
How can I avoid sealer turning milky or white?
The most common causes are applying too thick, sealing in high humidity or cool temperatures, or sealing before the surface has fully dried after cleaning and patching. Stick to two thin coats, keep application within the recommended temperature range, and confirm the slab is dry and uniformly prepared.
What’s the easiest mistake that ruins adhesion for resurfacers and sealers?
Skipping surface cleaning and prep. Dirt, algae, oil, and old failing sealer reduce bond, so your new coating can delaminate within a season. Also make sure the substrate is not wet when it should be damp (for overlays) and that any chemical residue is rinsed and neutralized per the product directions.
Is slab lifting or polyjacking ever a good DIY project?
Generally, no. Both methods require drilling and pressurized injection equipment and can worsen damage if the process is wrong. DIY is best for surface-level fixes, but when there is significant displacement and ongoing movement, professional assessment is usually the smarter choice.
When choosing a sealer, what’s the practical difference between penetrating silane-siloxane and acrylic?
Penetrating sealers absorb into the concrete and typically do not change appearance much, they also tend to be more forgiving because they do not form a film that can fail at the edges if prep was imperfect. Acrylic sealers add sheen and can be easier to clean visually, but they sit on top and are more sensitive to thorough prep because water can get underneath if adhesion is weak.
Next Article
How to Fix Cement Patio Cracks: Diagnose and Repair
Diagnose concrete patio crack types and repair with the right sealant or patch, from prep to curing and prevention.