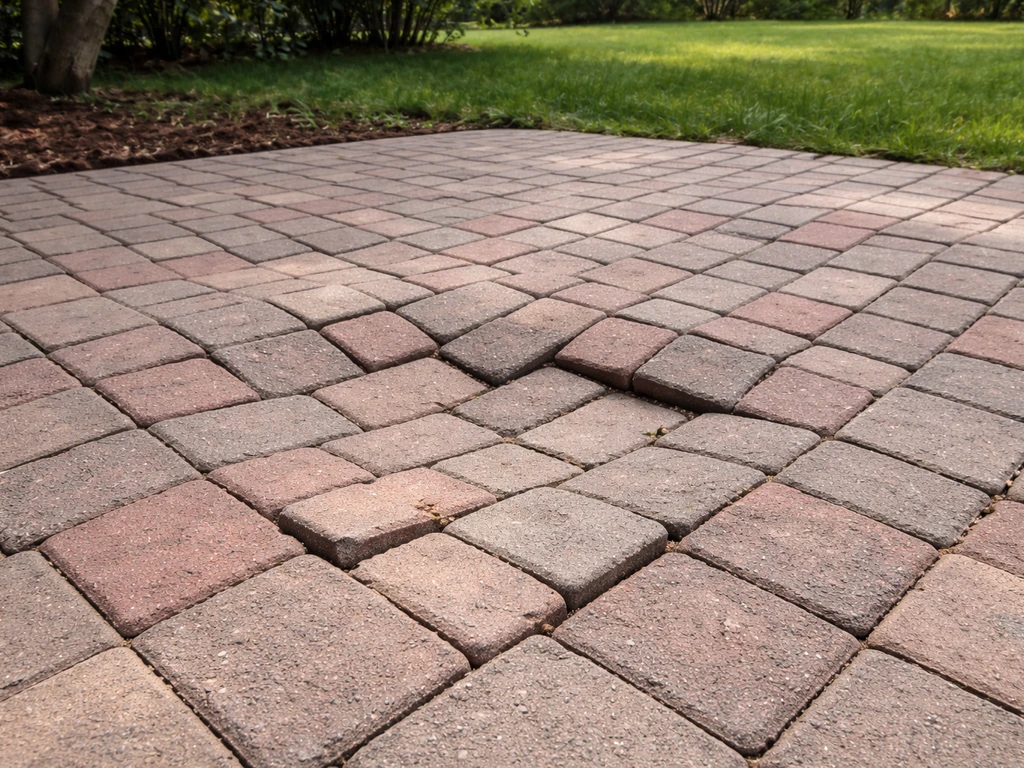
A sinking brick patio is almost always a base or drainage problem, not a brick problem. The bricks themselves are fine. What's failed is the material underneath them, and until you fix that, any repair you do on top will sink again within a season or two. The good news is that most cases are totally DIY-able if you're willing to pull up the affected bricks, address what's actually wrong below, and put everything back correctly.
My Brick Patio Is Sinking: DIY Diagnosis and Repair Steps

Talia Lang
11 May 2026
Why your brick patio is sinking in the first place
There are a handful of root causes, and identifying yours matters because the fix is completely different depending on which one you're dealing with. Throwing new sand over sunken bricks without knowing why they sank is exactly how people end up with the same problem six months later.
- Poor drainage and grading: This is the single most common culprit. When water has nowhere to go, it pools under the patio, saturates the base, and washes out the bedding sand. Over time, voids form and bricks drop into them.
- Inadequate base compaction: If the gravel base (or the soil under it) wasn't compacted properly during installation, it will compact itself under load and foot traffic, just unevenly. Soft spots turn into low spots.
- Bedding sand migration: The 1-inch layer of sand that bricks sit on can wash away or migrate sideways when edge restraints are weak or missing, especially after heavy rain.
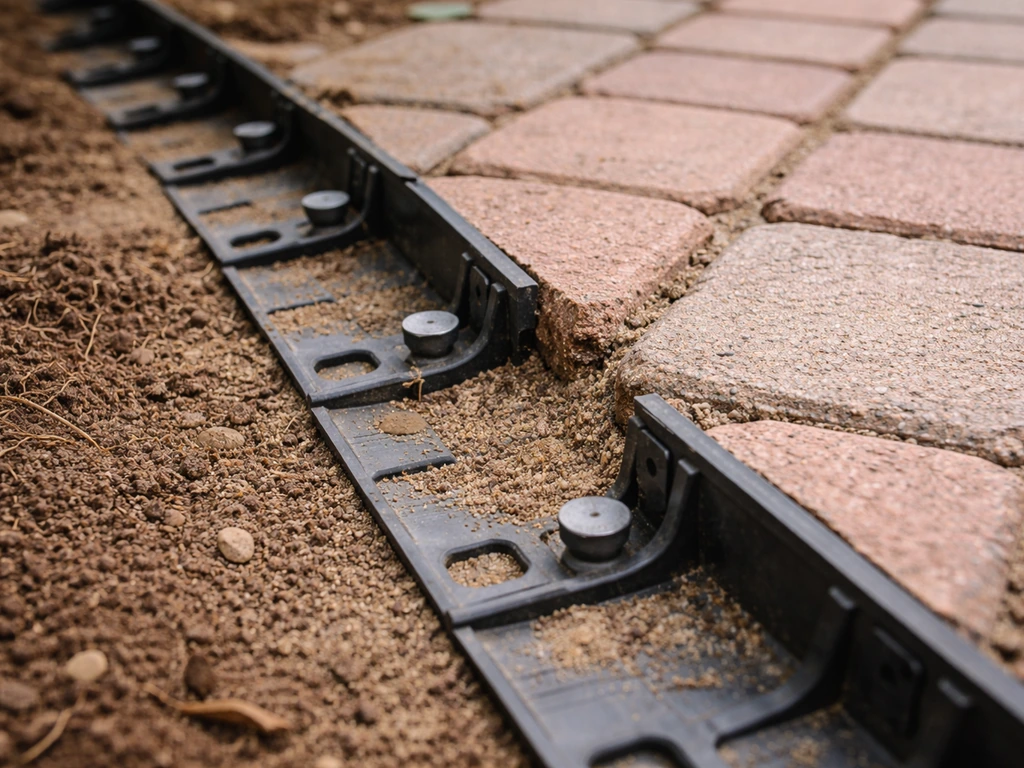
- Missing or failed edge restraints: Without solid plastic or metal edging pinned every 12 inches, the outer bricks drift outward, the joint sand escapes, and the whole system loosens and drops.
- Freeze-thaw cycles: Water gets under the patio, freezes, expands, heaves bricks up, then thaws and leaves them lower than before. This pattern repeats every winter.
- Tree roots: Roots growing under the patio push bricks up in some spots and create voids in others as the root system changes over time.
- Soil erosion or void formation: Underground pipes, old organic fill, or soil that wasn't stabilized before installation can create voids that develop slowly over years.
- Washout under the base: A particularly heavy storm event can scour material right out from under the gravel base layer if drainage wasn't set up to handle the volume.
How to figure out exactly what went wrong
Before you touch anything, spend 15 minutes diagnosing. Walk the whole patio and look for patterns. Sinking in one corner usually points to drainage. Sinking along edges points to failed restraints and bedding sand loss. Sinking in a broad, gradual bowl shape points to base or subgrade compaction failure. Random scattered dips often indicate tree roots or underground voids.
The probe test for voids
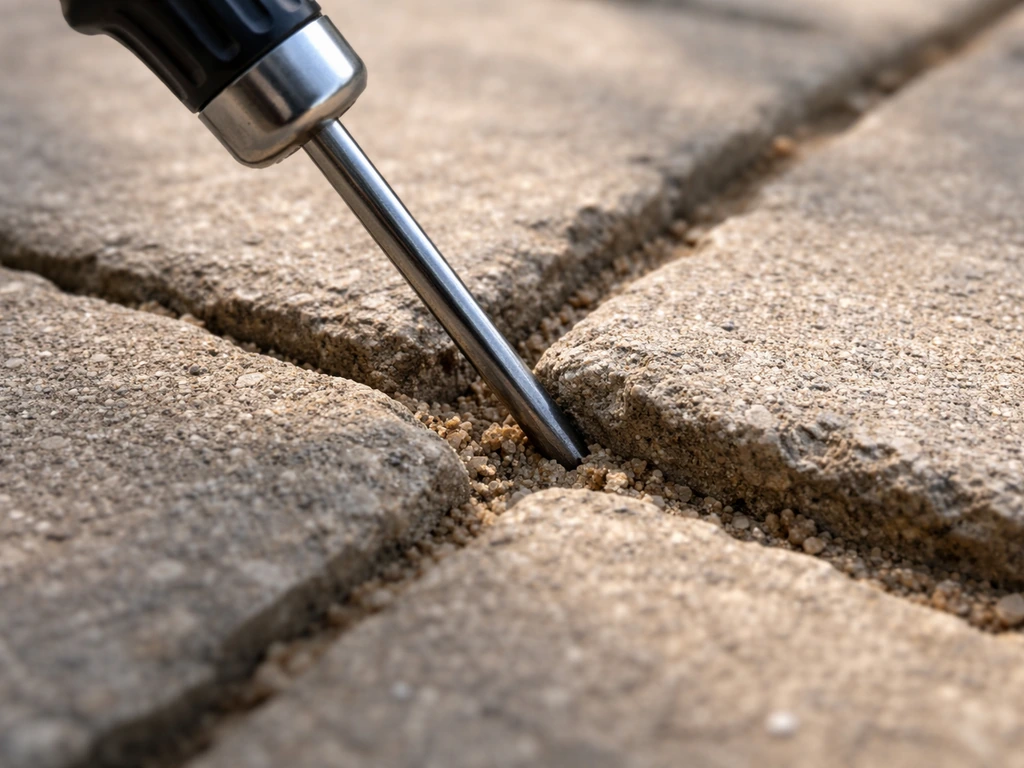
Take a screwdriver or a thin metal rod and probe the gaps between bricks in the sunken area. If it slides down more than an inch easily, your bedding sand has migrated or washed out. If bricks rock or wobble when you step on them or press them by hand, there's a void underneath. Install-It-Direct explains that geotextile or filter fabric is placed between native soil and the compacted aggregate base to help prevent soil migration and base contamination, which can lead to settling and voids under pavers void underneath. Solid bricks with no wobble but still sitting low usually mean the whole base has settled, which is a different (bigger) repair.
The slope and drainage check
A properly installed patio should slope away from the house at a minimum of 1/8 inch per foot, ideally 1/4 inch per foot. Set a 4-foot level on the patio surface and measure the gap at the downhill end. If water is running toward the house, or the patio is completely flat, drainage is likely contributing to your sinking. Also check whether there are any spots where water clearly pools after rain. Those wet patches are almost always directly above your worst base damage.
Edge restraint and joint sand inspection
Walk the perimeter. Check if plastic edging is still pinned down or if it has popped up or moved. Look at the joints between bricks. Are they wide and empty, or do they still have sand in them? A SiteOne-hosted Probst specification sheet for edge restraint installation calls for steel landscape spikes to be spaced every 12 inches on rigid applications blank" rel="noopener noreferrer">spikes spaced every 12 inches on rigid applications. Open joints with no sand mean the interlock is gone, and bricks can now move freely. If you see gaps wider than about 1/4 inch and the restraints have shifted, that's a major contributor to the sinking, especially along edges and corners.
Stop and stabilize before you start digging
If the sunken area is near a door threshold, steps, or a retaining wall, take photos and mark the extent of sinking with chalk or spray paint before doing anything else. Sinking near a foundation or structural element can sometimes indicate a more serious drainage or soil issue that goes beyond patio repair. Don't assume it's just a cosmetic fix in those locations.
What not to do: Don't just add polymeric sand over sunken bricks and call it done. Don't pour concrete on top of low spots. Don't add a layer of sand over the existing surface and re-lay bricks on top without addressing the base. All three of these are very common mistakes that temporarily hide the problem while guaranteeing it comes back worse. The only lasting fix is getting under the bricks and correcting what failed.
If you have a large area that's sinking, say more than 50 to 100 square feet, or if you see cracking or movement at a wall or step structure, stop and assess whether this is a minor repair or a partial (or full) rebuild. Both are covered below.
Fix for minor dips: lift, reset, rebed, and recompact
If your sunken area is localized, say a few square feet or a single section, and your probe test shows missing or migrated bedding sand rather than full base failure, this is a manageable afternoon job. This is essentially the same process described in more detail in guides on how to fix sinking patio stones, applied here to brick specifically.
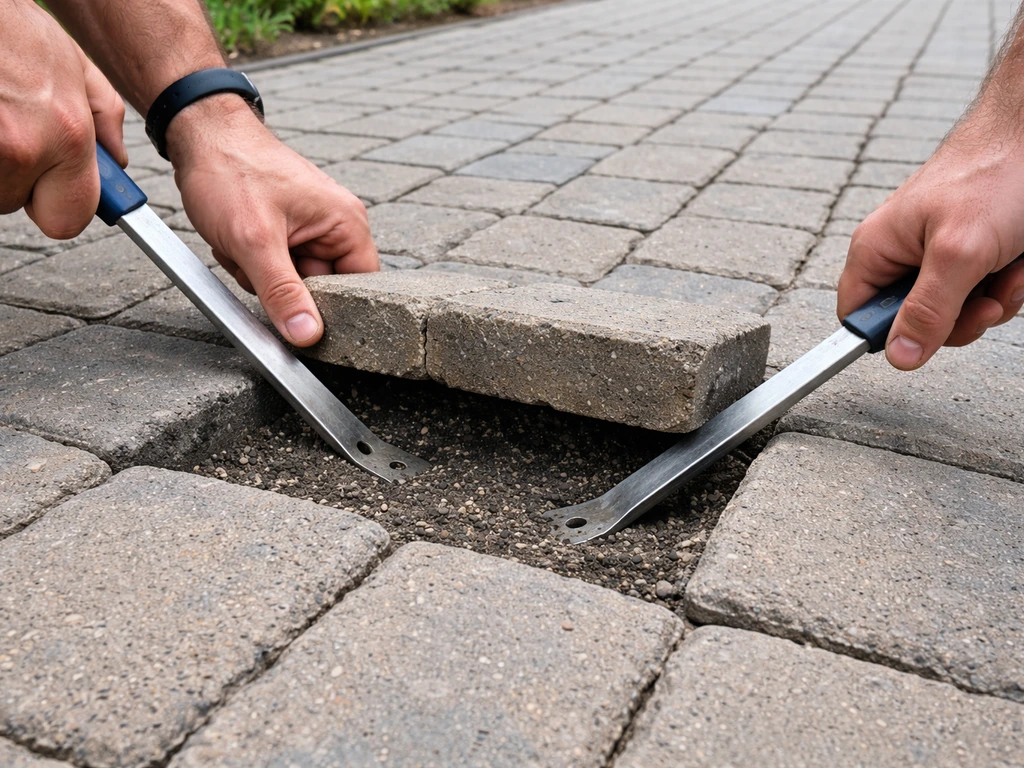
- Pull the affected bricks: Use two flat pry bars or brick pullers (or just a stiff putty knife and some patience) to pry bricks up starting from the lowest or most exposed edge. Stack them nearby in the order you removed them so you can put them back the same way.
- Excavate and inspect the bedding sand: Scrape out the existing sand layer. If it's wet, dark, or has algae in it, that's a sign water has been sitting here. Remove all of it and inspect the gravel base below.
- Check and repair the base: If the gravel base is intact and compacted (firm, doesn't shift when you push on it), you can proceed. If it's soft, rutted, or has obvious voids, add compactable gravel (crushed stone, typically 3/4 inch clean crush) and tamp it firmly with a hand tamper or plate compactor.
- Recheck slope: Before adding new sand, set a straight edge across the area and confirm the slope is correct (1/8 to 1/4 inch drop per foot away from the house). Adjust the base gravel now, not later.
- Add fresh bedding sand: Use coarse, washed concrete sand (also called bedding sand). Spread it in a 1-inch layer. Use screed pipes or a straight edge to level it to a consistent thickness. Do not use fine play sand or polymeric sand at this stage.
- Reset the bricks: Lay them back in their original pattern, pressing each one down firmly. Check with a level as you go. If a brick is too high, remove some sand under it. If it's low, add a little sand and re-set.
- Compact and re-sand the joints: Use a plate compactor (rent one for about $60 to $80 a day) or a rubber mallet to firmly seat all bricks. Then sweep polymeric sand into the joints, mist with water per manufacturer instructions, and let it cure. Polymeric sand hardens and resists washout better than regular sand.
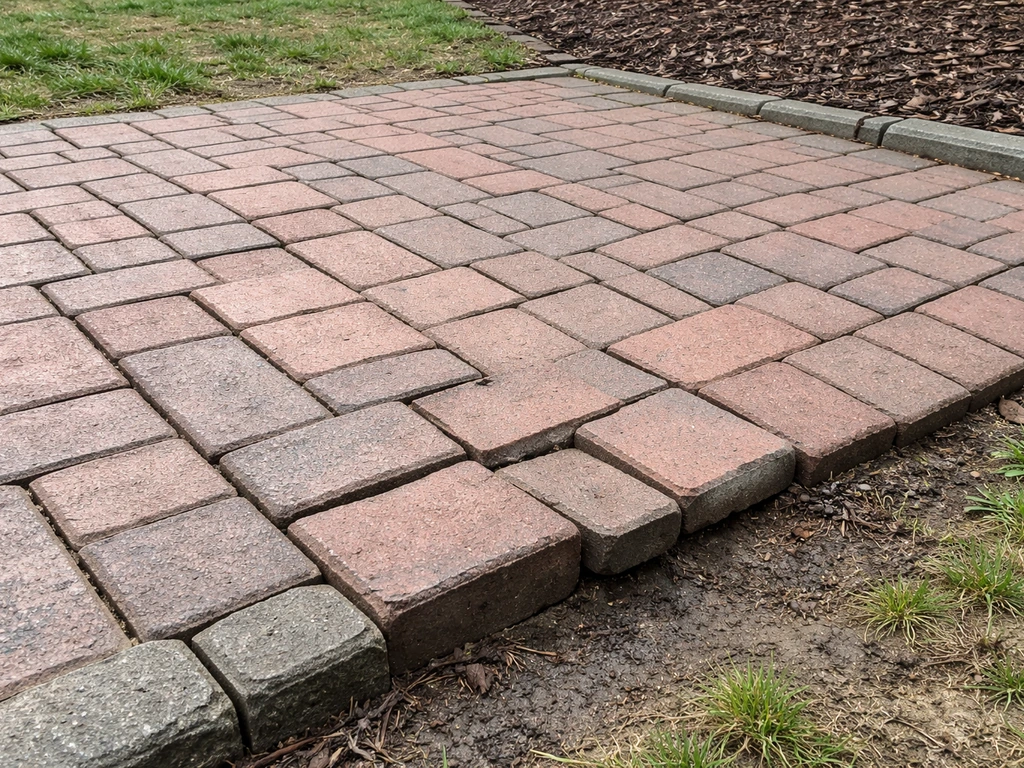
- Reinstall and pin edge restraints: If the edging shifted or was missing, install plastic paver edging along the perimeter now and pin it with 10-inch spikes every 12 inches.
Fix for major sinking: rebuild the base and bedding
If you pull up bricks and find soft, rutted gravel, or no gravel at all, or if the sinking covers a large portion of the patio, you're looking at a base rebuild. This is more work, but it's the only repair that will actually last. Trying to patch over a failed base is how patios end up getting repaired three times in five years.
The process for leveling a sunken patio at this scale is essentially a partial or full re-installation. If you want a direct, step-by-step walkthrough for how to level a sunken patio, follow the repair sequence for minor dips versus major sinking. Strip all the bricks from the affected area and stack them carefully, checking each one for cracks or spalling while you have them out. Damaged bricks should be set aside and replaced.
- Excavate down to subgrade: Remove all existing base material from the affected area. You want to get down to undisturbed native soil. A standard patio base should be 4 to 6 inches of compactable gravel for residential use.
- Address soil problems first: If the subgrade is soft, organic, or was previously disturbed fill, you may need to excavate another few inches and add more gravel. Optionally, lay a layer of geotextile filter fabric directly on the soil before adding gravel. This prevents soil from migrating up into the base over time and causing future sinking.
- Add and compact gravel in lifts: Don't dump 6 inches of gravel and compact it all at once. Add 2 to 3 inches, compact with a plate compactor, then add another 2 to 3 inches and compact again. Each pass should make the surface visibly firm.
- Recheck grade: Use a long straight edge, stakes, and a line level or laser level to confirm the correct slope before proceeding. Getting grade right at this stage is critical and takes more care than you'd expect.
- Install edge restraints before laying sand: Pin plastic or metal paver edging in its final position now, before the bedding sand goes in. Restraints installed after the fact are always less secure.
- Optionally add filter fabric between base and bedding: If drainage is a known issue or you're in an area with fine soils that migrate easily, a layer of geotextile between the compacted gravel and the bedding sand adds extra insurance.
- Screed a fresh 1-inch bedding sand layer: Same as the minor repair, use coarse washed concrete sand, screed it level, and don't disturb it as you work.
- Lay bricks, compact, and seal joints: Same final steps as above. Compact firmly, sweep polymeric sand into joints, and wet-cure per the product instructions.
Fix the drainage, or this will happen again
Drainage is not optional. If water is draining toward the patio, underneath it, or pooling on its surface, whatever repair you've just done will fail eventually. This is the single most important step that DIYers skip because it's less satisfying than laying bricks, and it shows up as repeat sinking within one to three years.
There's a whole topic to dig into when it comes to how to drain a sunken patio properly, but here are the core things to address during your repair. First, confirm the surface slope (minimum 1/4 inch per foot away from structures). Second, look at where the runoff goes after it leaves the patio. If it's hitting a fence, a garden bed, or dead-ending against a low spot in the yard, it may be saturating the soil under the patio from the sides. French drains, channel drains, or re-grading the surrounding landscape can redirect that water.
If downspouts from your gutters are discharging near or onto the patio, extend them at least 6 feet away with a downspout extension or bury a 4-inch perforated pipe to carry that water to a better discharge point. A single 2-inch rainstorm can push hundreds of gallons of water off a typical roof, and if it's all landing next to your patio, no base will hold up long-term.
Tools, materials, and how to put it all together
What you'll need
| Item | What It's For | Notes |
|---|---|---|
| Flat pry bars (2) | Lifting bricks without breaking them | Cheap, reusable, essential |
| Hand tamper or plate compactor (rental) | Compacting base gravel and seating bricks | Rent plate compactor for large areas |
| Coarse bedding sand (bags or bulk) | 1-inch screed layer under bricks | Do not use fine or play sand |
| Compactable gravel / crushed stone | Base layer rebuild | 3/4-inch clean crush or road base |
| Polymeric sand | Joint fill that resists washout | Follow cure time exactly |
| Plastic paver edging + 10-inch spikes | Perimeter restraint | Pin every 12 inches |
| Geotextile filter fabric (optional) | Prevent soil migration into base | Worth it in wet or clay-heavy soils |
| 4-foot level + string line | Checking slope and grade | A long straight edge also works |
| Rubber mallet | Hand-seating individual bricks | Standard weight, 2-3 lbs |
| Stiff broom | Sweeping sand into joints | Nothing fancy needed |
| Garden hose with mist setting | Activating polymeric sand | Follow product instructions carefully |
Realistic workflow and time expectations
A minor repair covering 10 to 20 square feet can be done in a single day by one person with basic tools. A base rebuild on a larger section (50 or more square feet) is a two-day job minimum, and you'll want a helper. Give yourself a full week before resuming heavy use of the patio to let the polymeric sand cure fully. Avoid using a leaf blower or pressure washer on freshly installed polymeric sand for at least 24 to 48 hours after application.
- Day 1 morning: Remove bricks, excavate, assess and repair base layer, re-establish grade
- Day 1 afternoon: Compact base, install edge restraints, screed bedding sand
- Day 1 late afternoon: Lay bricks, do initial compaction pass with plate compactor
- Day 2: Sweep polymeric sand into joints, compact again, apply final sand layer, mist and cure
- Days 3 to 7: Light use only, avoid heavy water exposure until joints are fully hardened
When to call a pro (and what to ask them)
Most brick patio sinking is DIY-able if you're comfortable with physical labor and have a free weekend. But there are situations where calling a professional hardscape contractor or even a geotechnical engineer is the right call, and recognizing them early saves you money in the long run.
- Sinking near the foundation wall or under a doorway threshold: This can indicate the foundation soil is being eroded or that there's a drainage issue close to the structure. A hardscape contractor or a structural engineer should evaluate this before any patio repair happens.
- Widespread sinking across most of the patio (more than half the surface area): At this scale, a full tear-out and reinstall with a properly engineered base is almost always more cost-effective than patching. Get quotes from two or three contractors.
- Sinking that keeps coming back after previous repairs: If you've already reset bricks twice and they keep sinking, the subgrade itself is failing. This needs either soil stabilization, better drainage infrastructure, or a redesigned base system, all of which benefit from professional assessment.
- Visible separation or cracking at a retaining wall or step structure: These are structural elements, and sinking near them can indicate lateral soil movement or wall failure that a patio repair alone won't address.
- Suspected underground pipe leak or void: If probing reveals very deep or very soft spots in unexpected locations, you may have a broken irrigation line, a failing drainpipe, or a subsurface void. Get a plumber to scope the area before you rebuild.
When you do call a pro, ask them specifically: What is causing the sinking (bedding, base, subgrade, or drainage)? What base depth and material do you recommend for my soil conditions? Will you address drainage as part of this scope? What's your warranty? A good contractor will answer all of these without hesitation. If they just want to re-lay the top bricks without digging deeper, find someone else.
How to keep this from happening again
Once your patio is repaired and draining correctly, maintenance is simple but worth doing. Re-apply polymeric sand to joints every 3 to 5 years or whenever you notice them thinning out. Check and re-pin edge restraints every spring. Clear debris from the patio surface regularly so water doesn't pool on it. Keep downspouts directed away from the patio. And if you notice one or two bricks starting to sink again, pull them up and fix them immediately rather than waiting for the problem to spread. Early fixes stay small. Ignored fixes become weekend-long projects.
FAQ
Can I just add sand and re-level my brick patio if only a small section is low?
Yes, but it usually means the real failure is still underneath. If you want to level temporarily, lift a few bricks from the worst low spot and do a probe check for washed bedding sand or a void. If bricks wobble, stop there and plan a base or void correction, because re-sanding alone will re-settle.
Is polymeric sand a good solution for my brick patio sinking problem?
You should not use polymeric sand as the first fix. It can help lock joints after the base is stable, but if water is migrating or bedding sand has washed out, polymeric sand can hide the joint gaps while the underlying void keeps growing.
How can I tell if drainage problems are causing my patio to sink?
If the patio is flat or slopes toward the house, you need to correct drainage and grade first. Use a 4-foot level to measure the downhill end gap, confirm the slope minimum (at least 1/8 inch per foot), and then verify where the water goes after rain. If runoff ends up soaking soil at the patio edges, the base can fail even if the patio “looks” level.
What if my sinking patio looks random instead of in one corner or along the edges?
Yes. Tree roots can create random dips and a “patchy” pattern, especially in the middle of the patio or near a nearby trunk. If you probe and feel hard resistance changes, or you see gaps appearing in clusters, plan to remove enough material to assess root presence and voids, then rebuild the base with proper compaction.
Does the absence of cracks mean my patio base is okay?
Don’t rely on cracking alone to judge severity. Many sinking patios fail progressively, and bricks can dip without obvious cracks until the base has moved enough to break joint integrity. If you see repeated low points after rain, wobbling bricks, or joints that have lost sand, treat it as active ground movement, not just cosmetic settling.
My downspout empties near the patio, could that still be the cause even if the patio bricks look intact?
It depends on how far the water is traveling and what it’s soaking. If downspouts discharge within about 6 feet of the patio, or you see wet soil along the patio edges after storms, extend the downspout or reroute it. A perforated drain pipe can work, but it still needs a safe discharge point, not a dead-end spot where water comes back toward the patio.
My patio sinks near a door threshold or retaining wall, should I handle that the same way as the rest of the patio?
Often yes, especially along door thresholds or steps where settlement can be worse. Take photos, mark the outline of the low area, and check for any movement between the patio and the threshold. If the sinking aligns with a structural element, consider getting a pro because foundation-related drainage or soil conditions can be outside a standard patio repair scope.
How do I know whether the bedding sand is the issue versus the base or subgrade?
If you’re unsure, use a simple rule of thumb from the probe test. If the probe slides down more than an inch easily in the joint gaps, bedding sand has likely migrated or washed out, which calls for localized rebuild work. If bricks rock due to a void, you need to remove and correct what’s beneath, not just refill joints.
What size sinking area is realistic for DIY versus something that likely needs more work?
If the affected area is roughly under 10 to 20 square feet and bricks are mostly intact, it can be manageable in a single day. If you’re dealing with a broad bowl shape, widespread movement across 50 to 100 square feet, or base rebuild indicators like soft rutted gravel or missing bedding, plan for multiple days and a helper.
How long should I wait before walking or using my patio after repairing it?
Stop using the patio while the repair cures and stabilize it during the first period. Plan to wait a full week before heavy use when polymeric sand was installed, and avoid leaf blowers or pressure washing on fresh polymeric joints for at least a day or two. Also keep foot traffic off the repaired section immediately after installation to prevent joint disturbance.
I re-sanded the joints before, and the patio started sinking again soon. What should I check first?
If the joints thin out repeatedly within a couple years, it can be a sign that water is still finding a route under the bricks. In that case, don’t just re-fill joints. Re-check slope, look for pooling, inspect edge restraint pinning, and verify downspouts and runoff paths before doing another maintenance re-sand.
When is it smart to call a contractor instead of continuing with DIY?
Yes, but use the right criteria. Call a professional early if you see sinking that’s spreading quickly, cracking or movement at steps, walls, or near a foundation, or if you discover extensive voiding during removal. Ask whether they will diagnose bedding, base, subgrade, and drainage separately, and whether drainage corrections are included in the contract scope.
What’s the best way to handle the first signs of sinking before it spreads?
If you see one or two bricks starting to dip again, pull them up immediately and probe the area before it becomes a larger void. Early fixes are easier because you can often correct localized bedding loss or minor base settling without disturbing the entire surrounding field.
Next Article
How to Fix Cement Patio Cracks: Diagnose and Repair
Diagnose concrete patio crack types and repair with the right sealant or patch, from prep to curing and prevention.