If your patio is uneven, the fix depends entirely on why it's uneven and what it's made of. A couple of rocking pavers you can reset in an afternoon. A concrete slab that's sinking toward your foundation is a different conversation. A concrete slab that is sinking toward your house often points to drainage trouble or failing base support and needs the right cause-based repair patio is sinking. Before you buy anything or start digging, spend 20 minutes diagnosing the problem first, because the wrong fix on the wrong cause just means you're doing it twice.
My Patio Is Uneven: DIY Diagnosis and Repair Steps

Talia Lang
29 Apr 2026
Is it a minor annoyance or a real trip hazard?
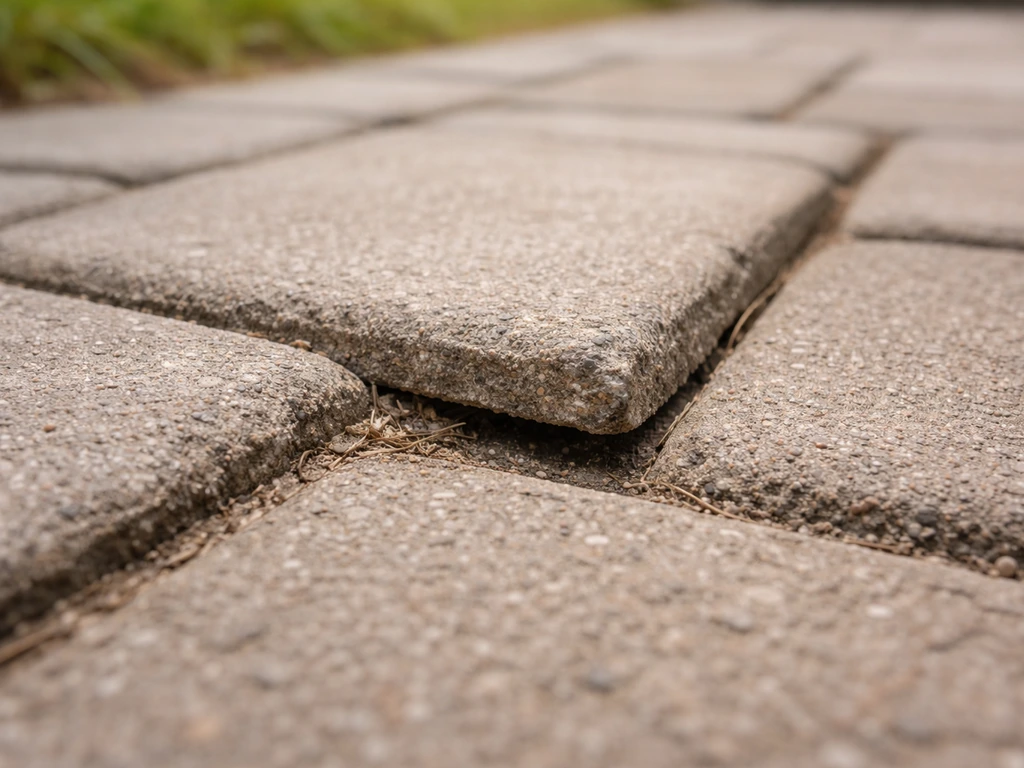
Walk the entire patio slowly and note what you feel underfoot. A slight wobble in one or two pavers is a minor maintenance issue. A paver that rocks more than about 1/4 inch, a concrete edge that's lifted enough to catch a toe, or a low spot that holds standing water after rain is a trip hazard and a drainage problem rolled into one. These need attention now, not someday.
The rough triage is simple. Minor unevenness means individual spots that move, tilt, or sit slightly high or low, but the overall patio structure is sound. Serious unevenness means a section of the patio has shifted, sunk, or heaved as a whole, the problem covers more than a few square feet, and you can see a pattern rather than random spots. If you're seeing widespread movement or your patio slopes noticeably toward the house, that's a drainage and structural issue that goes beyond resetting a few stones. A patio that slopes toward the house is a red flag that the drainage and base are likely failing, so it needs the right cure, not just leveling.
Find the cause before you pick the fix
Unevenness doesn't just happen. Something caused it, and if you don't address the cause, the repair fails. Here are the four main culprits.
Base settling or poor original installation
This is the most common cause. The material under your patio, whether it's crushed stone, gravel, or just soil, compressed or shifted after installation. This usually shows up as gradual, widespread sagging, low spots in the middle of the patio, or sections that feel spongy. If the base wasn't properly compacted when the patio was built, it was going to settle eventually. The fix here means addressing the base, not just the surface.
Drainage and water infiltration
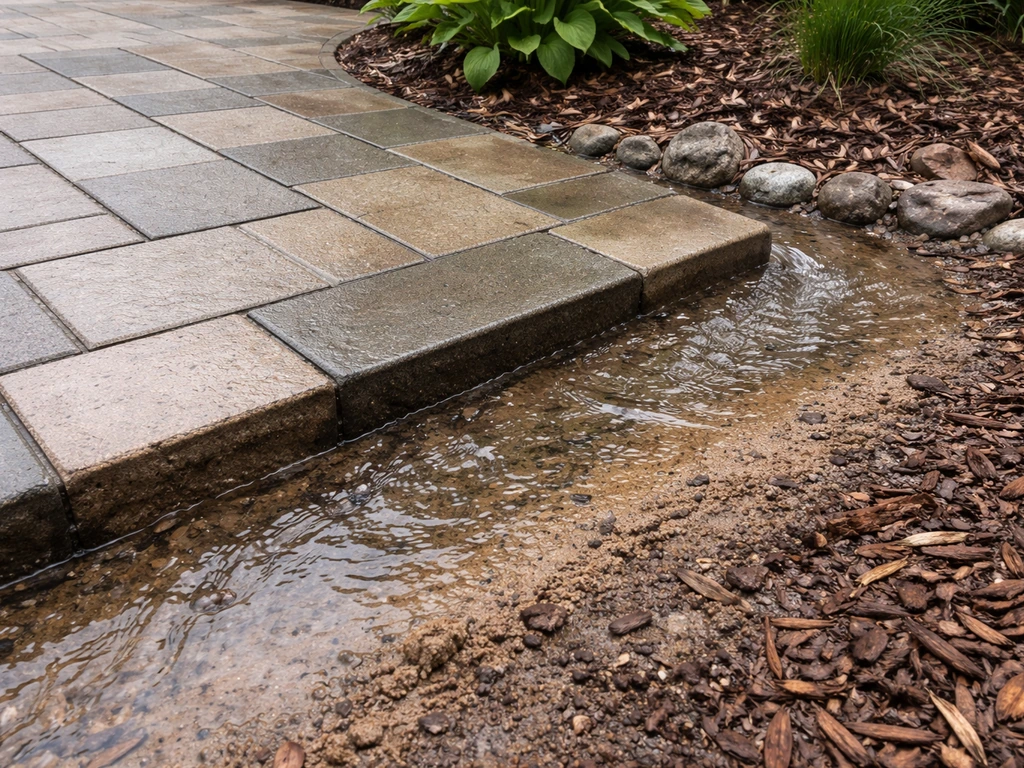
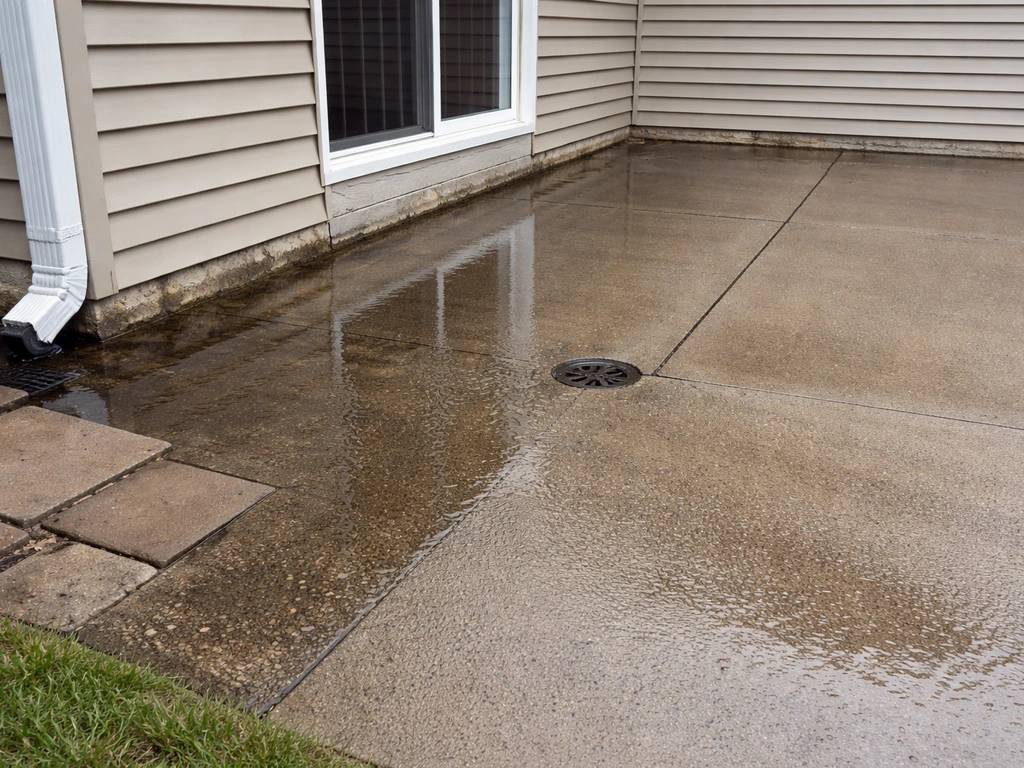
Water under a patio erodes bedding sand, softens soil, and washes out the material that's supposed to support everything above it. If you see low spots forming along edges or near downspouts, or if water ponds on the surface rather than running off, drainage is probably involved. A patio that slopes toward the house instead of away from it is an especially serious version of this problem, because that water is heading straight for your foundation.
Frost heave
In climates with freezing winters, water in the soil beneath the patio freezes and expands, pushing the patio surface up. Frost heave requires two things: freezing temperatures and water. When the ground thaws, that section may drop back down, or it may stay elevated if the base shifted. You'll recognize frost heave by upward bulging of pavers or sections of slab, often in a localized area, that appears or worsens after winter. Free-draining base materials reduce frost movement because they limit the water available to form ice lenses in the first place.
Failed mortar, joint sand, or edge restraints
For paver and brick patios specifically, joint sand that has washed out lets pavers migrate and tip. Failed mortar under a set stone lets individual stones rock. Loose or missing edge restraints let the whole field spread outward, which causes the middle to drop. Check the edges of your patio: if the border pavers are spreading apart or pulling away from a restraint strip, that spreading is likely causing problems inside the field too.
Does your patio type change the repair?
Yes, significantly. Each material type has its own failure modes and repair approaches.
| Patio Type | Common Failure Mode | DIY Repairability | Key Limitation |
|---|---|---|---|
| Concrete slab | Cracking, sinking, spalling surface | Moderate for surface patches; low for slab movement | Full-depth cracks and slab settlement usually need professional equipment |
| Interlocking pavers | Rocking, sinking, spreading, sand loss | High — individual units can be lifted and reset | Widespread base failure means full relay is needed |
| Brick | Similar to pavers; mortar joints can fail | Moderate — mortared brick is harder to reset than dry-laid | Mortar joints require matching and curing time |
| Natural/irregular stone | Rocking, settling, mortar failure | Moderate for dry-laid; harder for mortared | Irregular shapes make re-leveling more time-consuming |
The general rule: if your patio is made of individual units (pavers, brick, stone), you have more DIY options because you can remove and replace pieces without demolishing the whole surface. A poured concrete slab is monolithic, so your options are patching the surface, grinding high spots, or calling someone with mudjacking or slab-lifting equipment.
Measure it before you fix it
Don't just eyeball the problem. Knowing exactly how far off your patio is will help you choose the right repair and tell you whether the slope is headed in the right direction.
Check the slope
A patio should slope away from the house at roughly 1/4 inch per foot of distance. So a 10-foot-deep patio should drop about 2.5 inches from the house edge to the outer edge. To measure this yourself, run a string line from the house wall to the far edge of the patio and use a line level to get the string level. Then measure from the string down to the patio surface at the far end. That measurement is your drop. Too little drop means water isn't draining away from the house. Drop in the wrong direction means water is running toward the foundation, which is a problem worth fixing properly.
Map the problem areas
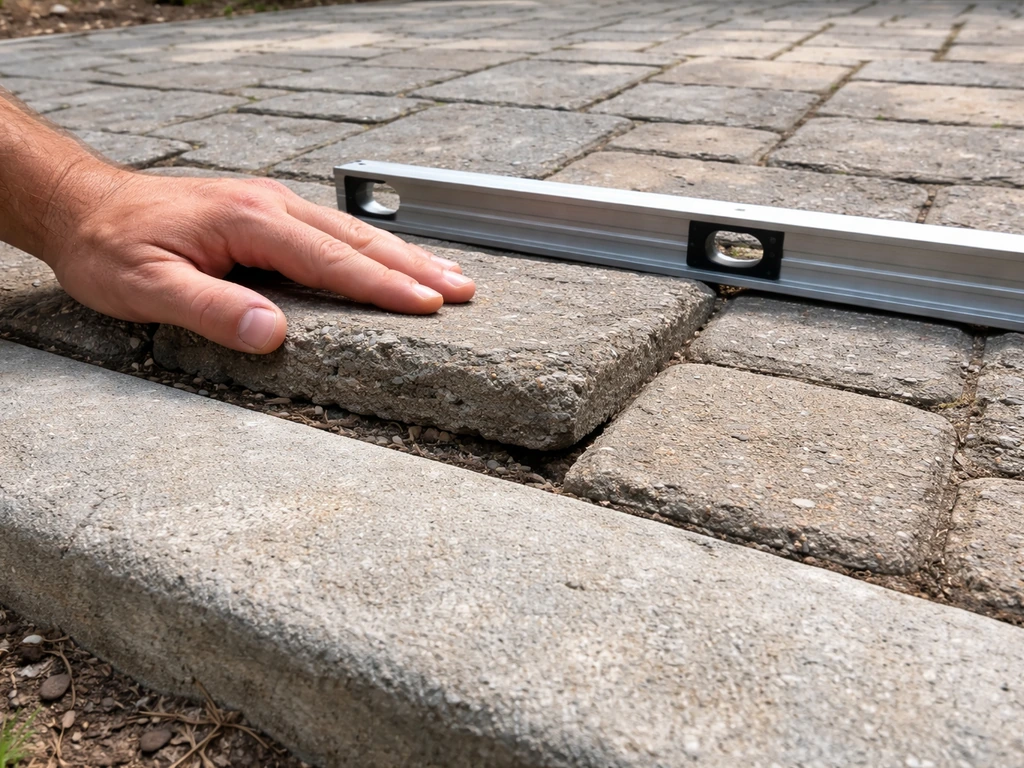
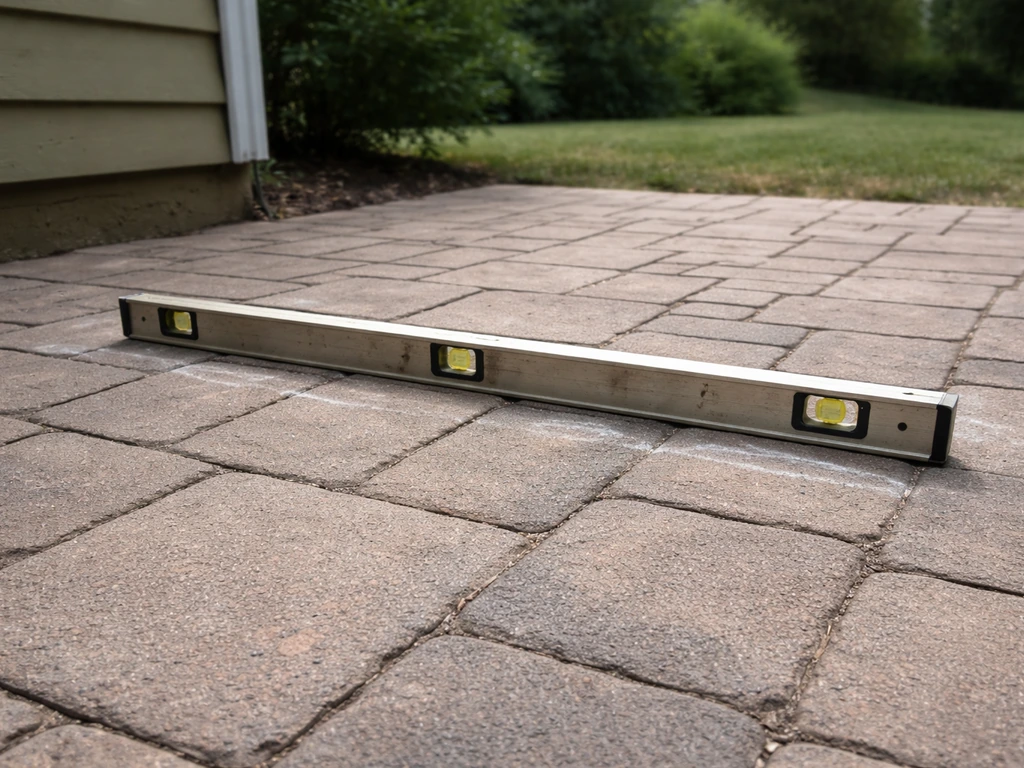
Lay a long straightedge or a 4-foot level flat on the patio surface and slide it around. Where it rocks or where you can see daylight under it, mark those spots with chalk. Do this in a grid pattern so you build a picture of where the highs and lows actually are. This takes 10 minutes and tells you whether you're dealing with a few isolated spots or a pattern that suggests base movement across a larger area.
If you're trying to plan repairs, tiling a patio math problem helps you estimate how many pavers you will need based on your mapped highs and lows tells you whether you're dealing with a few isolated spots or a pattern that suggests base movement. Rocking pavers that aren't under the straightedge are also worth noting: press down on each corner to see how much they move.
Check drainage flow
After a rain (or just run a hose on the patio for a few minutes), watch where the water goes. It should sheet off toward a lawn, drainage ditch, or permeable area away from the house. If water sits in puddles that don't recede within a few hours, you have a drainage problem. If you’re dealing with a patio drainage problem, the goal is to reroute water away from the surface and the house, not just level the patio.
If you want to keep patio from flooding, rerouting runoff away from the surface and the house is usually the key step. If you want to keep patio from flooding, focus on correcting the slope and rerouting runoff away from the house. If water runs toward the house wall, you have a slope problem. Both issues should be corrected as part of any repair, not patched over.
DIY fixes for minor unevenness
If your mapping shows isolated spots and the overall structure is sound, you can usually fix these yourself in a day or less.
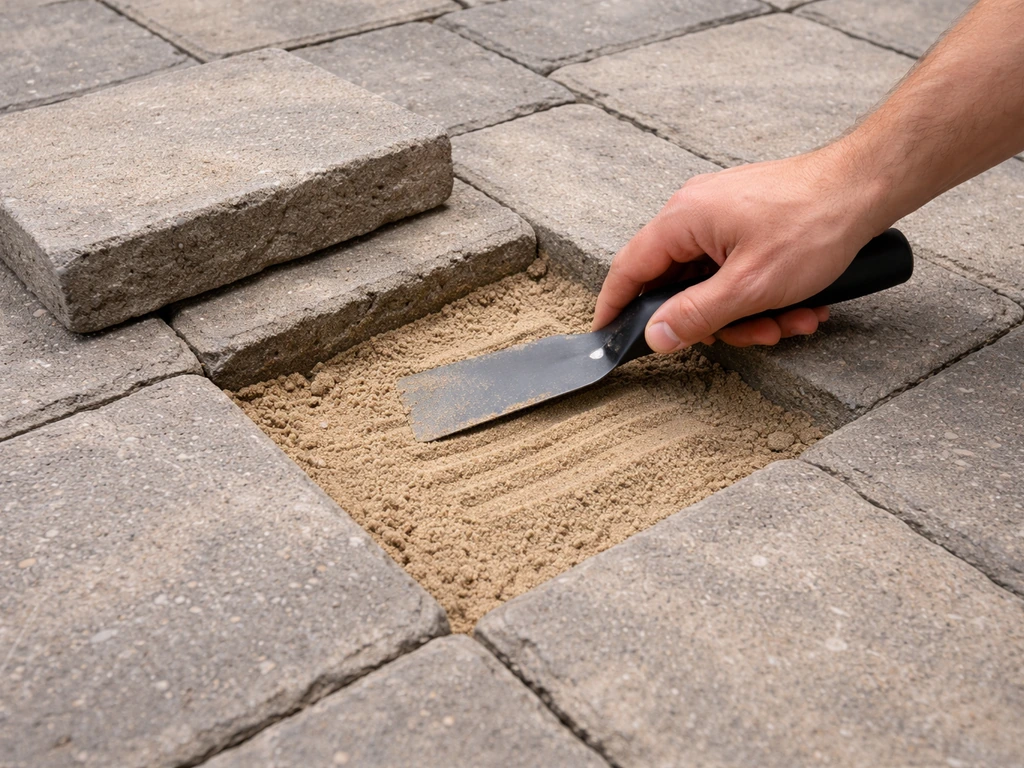
Resetting individual pavers or stones (dry-laid)
- Use a flathead screwdriver or pry bar to pop out the rocking or sunken paver. Remove it carefully and set it aside.
- Scrape out the bedding sand underneath. If it looks eroded or thin, that's your cause.
- Add dry coarse sand and screed it flat with a straight board so the paver will sit at the correct height. A nominal 1-inch bedding sand depth is standard, but adjust based on what the surrounding pavers show.
- Set the paver back in place, check it with your level, and tamp it down gently with a rubber mallet.
- Refill the joints with polymeric sand, sweeping it into the gaps and tamping until the sand sits about 1/8 inch below the top of the paver surface (at the chamfer, not flush with the top face).
- Mist the area lightly with water to activate the polymeric sand binders. Follow the manufacturer's cure time before heavy foot traffic.
Polymeric sand is worth using over regular sand here because it resists washing out and resists ant and weed intrusion. Regular sand will just erode again. Keep the joint fill just below the paver surface, not flush with it, which is what the manufacturer guidelines consistently recommend.
Patching minor concrete surface issues
For a concrete slab with localized surface spalling, scaling, or popouts but no significant cracking or movement, a partial-depth patch is appropriate. For partial-depth repairs, the Pavement Preservation guideline specifies work for distress limited to the upper one-third to one-half of slab thickness and stresses selecting the repair based on the depth of the damage a partial-depth patch is appropriate.
This means [removing only the deteriorated top layer of concrete down to sound material. ](https://www. fhwa. dot.
gov/pavement/concrete/repair01. cfm) The key constraint here is depth: partial-depth repair only works when the damage is in the top third of the slab thickness. If your slab is 4 inches thick, that means the good concrete starts no deeper than about 1. 3 inches down.
If you chip away at a spall and find crumbling concrete deeper than that, you're dealing with more than a surface issue.
- Use a cold chisel and hammer or angle grinder to remove all loose, flaking, or deteriorated concrete from the affected area. Cut a clean perimeter edge around the patch area so the patch has a defined boundary to bond to.
- Blow out dust and debris, then dampen the area (don't leave standing water).
- Mix a concrete resurfacer or fast-setting repair mortar per the manufacturer's instructions. For shallow surface patches, a polymer-modified resurfacer bonds better than plain concrete mix.
- Apply the patch material, tamp it into the area, and screed it flush with the surrounding surface.
- Seal the perimeter of the patch once cured. This is often skipped but it's important: sealing the edges of a concrete patch helps prevent water infiltration and delamination at the joint.
- Keep foot traffic off for at least 24 hours, longer in cool weather.
Be honest with yourself about what patching actually fixes. It restores the surface appearance and stops further spalling in that spot. It does not fix a crack that goes through the full slab thickness, and it doesn't do anything about a slab that has moved or settled. Patching a slab that's still sinking is temporary at best.
DIY rebuilds for serious unevenness
If your problem area covers more than a few square feet, if the whole section has sunk or heaved, or if you found that the bedding or base underneath is washed out, you need to do more than spot-fix. This is a half-day to full-day job depending on area size, but it's very doable for most homeowners on a paver or brick patio.
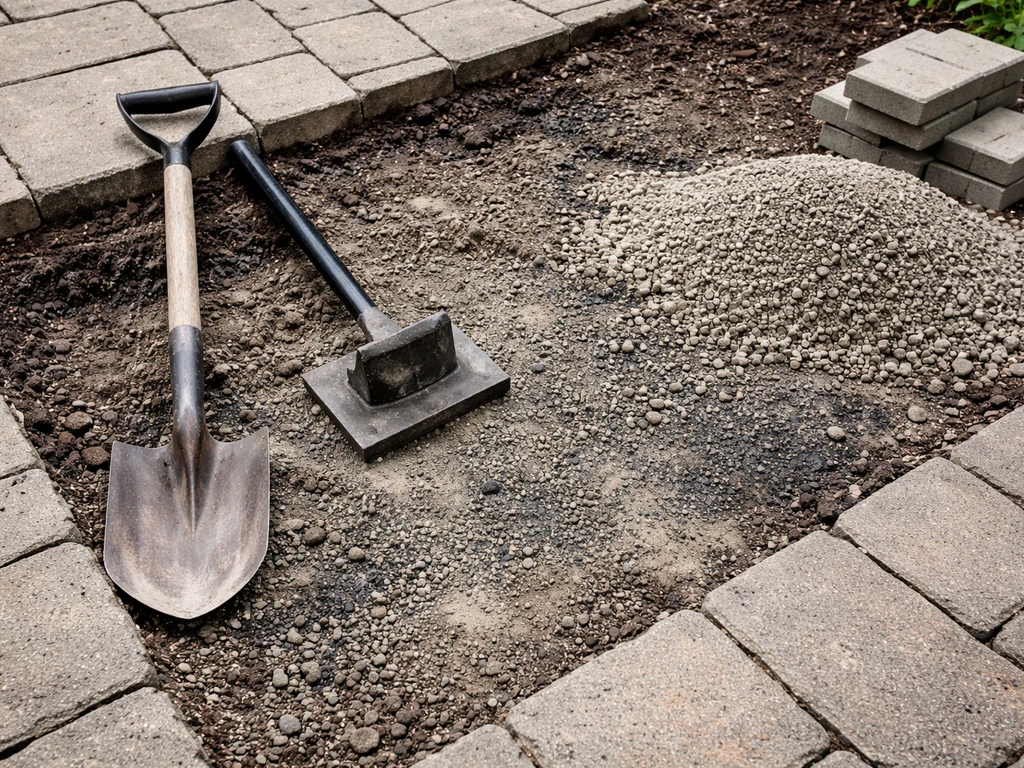
Relaying pavers over a rebuilt base
- Remove all the pavers in the affected section. Stack them carefully nearby. Note how they were oriented before you pull them up.
- Dig down and expose the base material (typically crushed stone or gravel). If it's been washed away or is mixed with soil, remove it completely.
- Identify and fix the drainage issue before replacing anything. If water was pooling here, you need to regrade this area so it sheds water away from the house at 1/4 inch per foot. Skipping this step means you're building the problem right back in.
- Add fresh compactable base material (3/4-inch crushed stone is typical) in layers of no more than 3 to 4 inches at a time. Compact each layer with a plate compactor. Do not skip compaction — uncompacted base is the number one cause of patio settling.
- Screed a 1-inch layer of coarse bedding sand on top of the compacted base. Don't walk on or compact this layer; it stays loose so you can fine-tune paver height.
- Relay the pavers, checking with a level as you go and using your string line to verify the slope is correct.
- Once all pavers are set, compact the entire area lightly with the plate compactor (use a rubber pad or paver protection mat to avoid surface damage).
- Sweep polymeric sand into all joints, compact again, sweep again to top off any gaps, then mist to cure.
What about sunken concrete?
A concrete slab that has sunk or heaved as a whole is not a DIY fix in the traditional sense. The options are mudjacking (pumping a slurry beneath the slab to lift it), foam lifting (similar concept using expanding polyurethane), grinding down a high edge so it's no longer a trip hazard, or full removal and replacement. Of these, grinding a raised edge is something a homeowner can do with an angle grinder or concrete grinder to reduce the immediate trip hazard. Everything else involves either specialized equipment or a full demo. If your concrete slab is sinking toward the house, that's worth addressing sooner rather than later because of the water management implications for your foundation.
Fix the drainage or fix it twice
The most common mistake in patio repairs is treating the symptom (uneven surface) without addressing what caused the movement (water and drainage). If you’re wondering how to fix patio drainage problems in detail, start with the water flow check and then choose the repair that matches the cause. Here's how to handle both together.
Regrading for proper slope
When you're rebuilding a section of base, this is the time to correct the slope. Regrade the compacted base layer so the finished surface will drain at 1/4 inch per foot away from the house. Check this with your string line and tape measure before you screed the sand layer. It's much easier to adjust the base grade at this stage than to try to compensate with uneven bedding sand later.
Proper base depth and compaction
The standard base for a residential paver patio is 4 to 6 inches of compacted crushed stone. In areas with cold winters and significant freeze-thaw cycles, a deeper base using free-draining aggregate (clean crushed stone, not stone dust or soil-contaminated material) helps limit frost heave because it doesn't retain water the way finer materials do. This is the single most impactful thing you can do to prevent future unevenness.
Edge restraints and joint sand
Make sure edge restraints are properly pinned at the correct height. Loose edges let the patio spread over time, which causes the center to drop. Use polymeric sand in joints rather than regular sand. The polymeric binders prevent washout from rain and irrigation, which is what keeps bedding sand in place and pavers from migrating. Fill joints so the sand sits at about 1/8 inch below the paver surface, not flush, and not lower than the chamfer at the bottom of the paver edge.
Should you seal?
Sealing is not always necessary or helpful. On concrete, a good penetrating sealer can reduce water infiltration and slow freeze-thaw damage to the surface. On pavers, sealing after polymeric sand installation can help lock in the joint sand and reduce staining. What sealing won't do is fix a drainage problem or prevent movement caused by a bad base. Seal after you've fixed the underlying issues, not instead of fixing them.
When to stop and call a professional
There's no shame in calling a pro for certain patio problems. Some situations are genuinely beyond what DIY tools and materials can address.
- A concrete slab has sunk more than an inch or two, especially if it's near the house — this likely needs mudjacking or foam lifting, which requires specialized equipment.
- A full-depth crack runs through the entire slab thickness, not just the surface. Patching only the top won't stabilize the crack, and it will reopen.
- The patio is heaving every winter and settling back unevenly each spring, which suggests a systemic drainage failure under the base that needs proper excavation and drainage installation.
- Water is consistently running toward the house no matter how you try to regrade the surface — at that point you may need a French drain, channel drain, or professional regrading to redirect the water.
- Widespread base failure covers the entire patio: if every section is moving and the base has failed across the whole area, a full tear-out and rebuild is usually more cost-effective than patching section by section, and a contractor can do it faster with proper equipment.
- You're seeing cracks in the house foundation wall or gaps where the patio meets the house — that's a structural concern that needs professional evaluation, not a patio repair.
A realistic timeline for a DIY paver reset of a small section (up to 50 square feet) is one full day for someone who hasn't done it before. A base rebuild over a larger area is a solid weekend job. Concrete patching of surface spalls is a few hours. If the job is bigger than that, or if any of the warning signs above apply, get a quote from a hardscape contractor before you invest more time in a repair that won't hold.
The good news is that most patio unevenness is fixable at the DIY level if you catch it early, fix the actual cause, and don't skip compaction or drainage correction. The patios that end up needing full professional rebuilds are almost always ones where smaller problems were ignored or patched over instead of properly addressed the first time.
FAQ
How can I tell if my patio issue is just a few bad pavers or a failing base beneath them?
Use a straightedge in a grid, then compare with hand-testing. If only isolated tiles rock or show gaps, it usually points to local bedding or joint washout. If many adjacent stones dip together, you see consistent low areas across a section, or the surface feels spongy, the base likely shifted and you should plan for base rework, not just resetting pavers.
What’s the quickest way to check whether water is draining away from my house the right way?
After a rain, mark where the water first appears (near joints, edges, or downspout runs). Then watch the direction it travels over the first 10 to 20 minutes, not just where it ends up after several hours. If it consistently creeps toward the house wall or pools for hours, slope and drainage corrections must be part of the repair plan.
Is it safe to use a level and a few measurements instead of doing the full string-line slope check?
It helps, but it’s not enough for decision-making. A level on a small spot can lie to you because a patio can have multiple highs and lows. The string-line method across the full depth catches the overall slope, which is what determines whether runoff targets the foundation.
If my pavers are uneven, should I add more bedding sand under them, or pull them up and redo the base?
If stones lift out and the base underneath is firm with no signs of washout, you can often fix with re-screeding bedding sand and resetting the pavers. If you find soft, eroded aggregate, sand that turns to mud, or voids under sections, the bedding alone will compact back down and the problem will return, so plan a base rebuild.
Can I replace missing joint sand with regular sand to save money?
Regular sand is more likely to wash out with rain or irrigation, which lets pavers migrate and joints open again. If you’re resetting pavers and want the repair to last, polymeric sand is the safer choice for joint stability, and you should keep it slightly below the surface so it can lock properly.
How do I know whether frost heave is the cause versus settlement from poor compaction?
Frost heave usually shows up as localized upward bulging that appears or worsens after winter, then may partially settle after thaw. Poor compaction or drainage problems tend to create gradual, broader sagging over time. If the unevenness tracks with freeze-thaw cycles and concentrates in a small zone, frost heave is more likely.
What should I do if water ponds on top of the patio but the slope measurement looks correct?
Look for a hidden low channel created by base failure or edge restraint problems. Even if the overall slope is close, a sub-area can collect water if joint sand has washed out, a section has dropped as a whole, or water is diverted by grading changes near the perimeter. Re-check the grid straightedge mapping and confirm runoff pathways after a rain.
How deep can I patch a concrete slab spall before it becomes a deeper problem?
Partial-depth patching works only when sound concrete remains within the top third of the slab thickness. If the slab is 4 inches thick, you should not have to remove more than about 1.3 inches to reach stable material. If you find deeper crumbling or movement, patching only treats the surface and won’t address structural settlement.
When is it better to choose slab lifting or replacement instead of patching raised or sunk concrete?
If the slab section is moving or you notice heaving or sinking across more than a few square feet, patching is usually temporary. Slab lifting methods (mudjacking or foam lifting) can address elevation over a larger area when the base can be treated, while replacement becomes more appropriate when damage suggests extensive base failure or widespread movement.
Will sealing prevent future unevenness or only help with appearance?
Sealing can reduce water infiltration and slow surface deterioration, but it will not fix the underlying cause of unevenness such as washed-out bedding sand, poor drainage, or a failing base. If slope or drainage is wrong, sealant may make the surface last longer while the movement continues below.
What edge restraint problems should I look for during diagnosis?
Check whether perimeter stones or border pavers are spreading apart or pulling away from any restraint strip. If the edge has gaps or the border appears higher or lower than it used to, that can allow the field to spread and the center to drop. Correcting edge restraint height and stability is essential before you focus on the middle.
What’s the most common DIY mistake that causes patios to become uneven again?
Repairing the visible uneven surface without fixing drainage and the base cause. If you level or reset without correcting runoff direction, restoring base support, and using the right joint fill for the material type, the patio typically shifts back as water continues to wash out bedding and joints.
If I find unevenness near a downspout, is rerouting the downspout enough?
It can be a major part of the fix, but also evaluate where the water lands relative to the patio edges. A downspout splash block that sends water onto the pavers or into the joint line can still undermine bedding and soil. Consider directing runoff farther away, and confirm post-rain behavior to ensure water leaves the patio area and does not re-enter near the house side.
When should I stop DIY and get a contractor quote?
If your mapping shows widespread movement, the patio slopes noticeably toward the house, you see spongy ground or evidence of washed-out base, or you’re dealing with concrete slab sections that have sunk or heaved as a whole. Also get help if the job would take longer than a weekend, because partial repairs that don’t match the true cause often cost more later.
Next Article
Patio Drainage Problem: DIY Troubleshooting and Fixes
DIY guide to diagnose and fix patio drainage problems like pooling water, clogged drains, sinking slabs, and damp spots