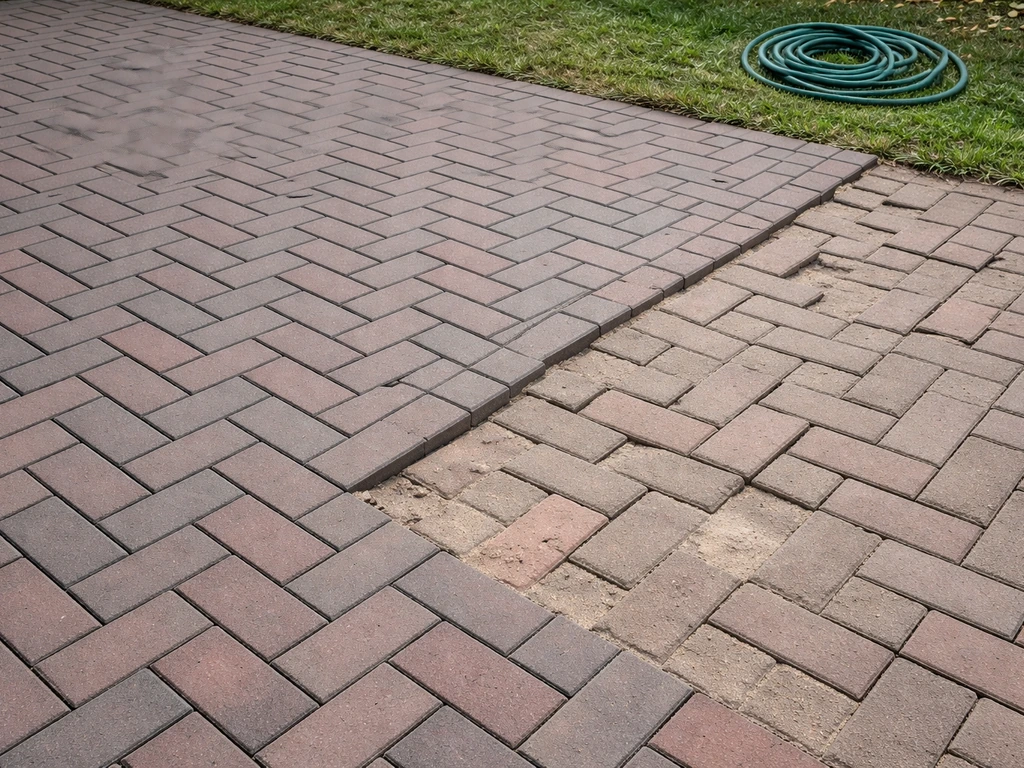
Most brick patio problems fall into one of four categories: loose or shifting bricks, deteriorated mortar joints, base settlement or drainage failure, and weed infiltration. If you see weeds pushing through the joints, that usually means the joint material washed out and you will need to address the joint and drainage so it does not come back weeds through joints.
Fix Brick Patio: Step-by-Step Repairs and Prevention

Talia Lang
29 Apr 2026
Each one has a clear fix, and the repair you need depends entirely on what caused the problem in the first place. A broken cement patio often points to deeper settlement, base, or drainage issues that need fixing before you can restore the surface. Diagnose correctly, use the right materials, and most repairs are straightforward weekend DIY work. Skip the diagnosis or cut corners on base prep, and the same problem comes back within a season.
Quick Diagnosis: What's Actually Wrong With Your Patio
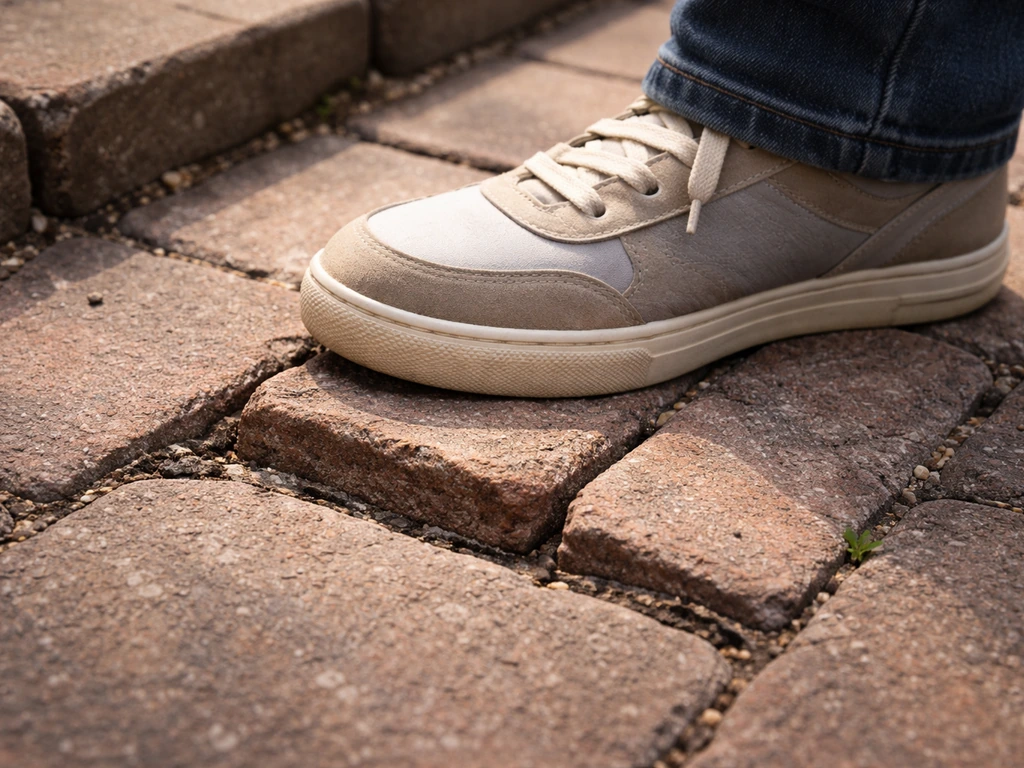
Before you grab any tools, walk the patio and figure out which failure type you're dealing with. Press on bricks with your foot and note any movement. Look for joints that are crumbling, missing, or full of weeds. Check whether individual bricks are sitting high or low relative to their neighbors, and whether whole sections have tilted or sunk.
A single rocking brick almost always means the sand bed beneath it has shifted. A whole section that's dropped or tilted usually points to a base or drainage problem underneath. Mortar that's crumbling along the joint face but not affecting the brick's position is a surface repair. Weeds pushing through joints means joint material has washed out and organic debris has accumulated.
Pay attention to the edges of the patio too. If the perimeter is spreading, a good related option is learning how to edge a brick patio so proper restraints keep the system contained. Joints that are widening along the perimeter, or bricks that are spreading outward, typically mean your edge restraints have failed or were never properly installed. Loss of lateral restraint at the edges lets the whole patio slowly migrate outward over time. That's a different fix from a sunken center section caused by water washing out the subbase.
- Rocking or loose individual bricks: sand bed displacement, usually from water infiltration or freeze-thaw
- Sunken or tilted section: base compaction failure or drainage washing out the subbase
- Crumbling, missing, or hollow mortar joints: freeze-thaw cycling, water intrusion, age
- Weeds pushing through joints: joint material loss, organic matter accumulation
- Bricks spreading at edges: failed or missing edge restraints
- Surface chips, spalling, or flaking: freeze-thaw damage to the brick face itself
Safety and Tools Checklist Before You Start
Brick and mortar work involves silica dust, which is a real respiratory hazard. OSHA requires controls whenever you're cutting or grinding silica-containing materials like brick or concrete. The ICPI interlocking pavers technical specifications also recommend using appropriate breathing and eye protection for joint sand stabilizers and sealers, following the manufacturer’s instructions [OSHA requires controls whenever you're cutting or grinding silica-containing materials like brick or concrete. ](https://www.
poolinspections. com/manuals/decks/icpo-tech-specs-for-interlocking-pavers. pdf). At minimum, wear an N95 respirator any time you're cutting bricks, grinding out old mortar, or running a saw.
If you're using an angle grinder to remove mortar joints, use a shroud with dust collection attached. When cutting bricks with a saw, wet-cut whenever possible: running water to the blade substantially reduces airborne dust. Work in a well-ventilated area and keep bystanders clear.
| Tool / Material | What It's For |
|---|---|
| N95 respirator (minimum) | Protection from silica dust during cutting and grinding |
| Safety glasses and work gloves | Eye and hand protection from chips and sharp edges |
| Pry bar or flat screwdriver | Lifting individual bricks without damaging edges |
| Rubber mallet | Seating bricks without cracking them |
| 4-ft level or string line | Checking flat plane and proper slope |
| Cold chisel and hammer | Hand-chipping out old mortar |
| Angle grinder with shroud + dust collection | Mechanical mortar removal from joints |
| Wet-cut circular or masonry saw | Cutting replacement bricks to size |
| Stiff brush and garden hose | Cleaning joints before repointing |
| Polymeric jointing sand or Type N mortar | Re-filling joints depending on patio type |
| Coarse builder's sand or paver sand | Resetting the bed under sand-set bricks |
| Plate compactor or hand tamp | Compacting sand bed and base material |
| Protective rubber pad for compactor | Prevents surface etching on bricks during compaction |
| Straight board (screed board) | Leveling sand bed before relaying bricks |
How to Clean, Reset, and Re-Lay Loose or Shifting Bricks
This is the most common repair on a sand-set patio, and it's very doable in an afternoon. The goal is to lift the problem bricks, correct the sand bed, and relay them so they sit flush and stable. If you also have a broken cement patio, the right approach depends on whether the failure is from cracking, lifting, or underlying drainage problems. If your patio also has a broken brick patio section, the process is still about lifting and relaying, but you will need to address whether the movement is coming from cracking, lifting, or drainage issues.
- Mark any loose or uneven bricks with chalk so you don't miss them during repair.
- Use a pry bar or flat screwdriver at the joint edge to pop each brick up. Work carefully to avoid chipping neighboring bricks.
- Set the lifted bricks aside and clean the bottom face of each brick and the exposed sand bed. Remove debris, old joint material, and any organic matter that has accumulated.
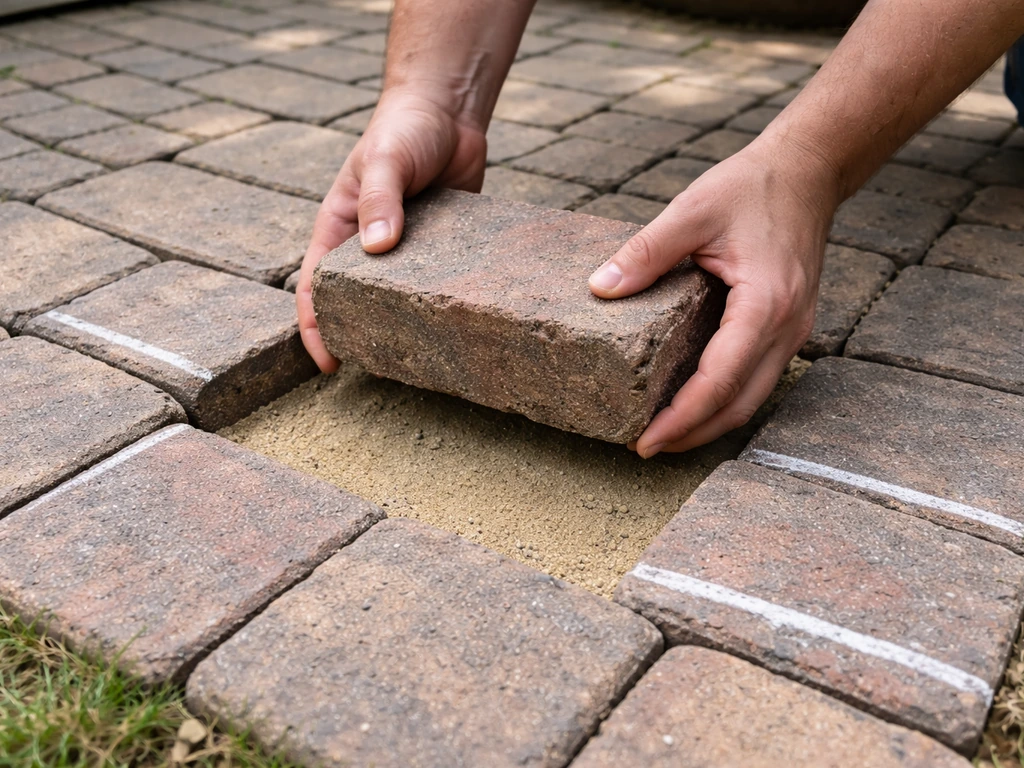
- Inspect the sand bed. If it's compacted unevenly, add or remove coarse paver sand to bring the area level. Use a straight screed board to smooth the surface.
- Check drainage slope: a properly built patio should fall away from the house at roughly 1/8 to 1/4 inch per foot. If water is pooling, this is the moment to correct that slope by adjusting the sand bed.
- Press each brick back into place firmly and seat it with a rubber mallet. Make sure each brick sits tight against its neighbors with consistent joint spacing.
- Once all bricks are relaid, sweep polymeric jointing sand across the surface, working it into all joints with a stiff broom. Compact the area lightly with a hand tamp or plate compactor (use a rubber pad between the compactor and brick face). Sweep and compact again until joints are full.
- Activate polymeric sand by misting with water according to the manufacturer's instructions. Don't oversaturate. Allow to cure before foot traffic.
If you're repairing a mortar-set patio rather than a sand-set one, the process is similar for lifting bricks, but you'll need to chip out the old mortar bed with a cold chisel before you can remove the brick, and you'll relay it on a fresh mortar bed. That's more involved but still DIY territory for small sections.
Repairing Mortar Joints: Repointing the Right Way
Repointing (also called tuckpointing) is the process of removing deteriorated mortar from joints and filling them with fresh material. Done properly, it stops water intrusion and extends the life of the patio significantly. Done wrong, it traps moisture and accelerates the deterioration it was supposed to fix.
How Deep to Remove Old Mortar
The minimum rake-out depth is about 2 to 2.5 times the width of the mortar joint. As a practical baseline, joints should be cleaned to a depth of at least 1/2 inch, and deeper is better for a durable bond. Shallow scraping and just skim-coating over old mortar will fail quickly. Use a cold chisel and hammer for careful hand work, or an angle grinder with a mortar-removal bit for larger areas. If using a grinder, always attach a shroud with dust collection to control silica dust.
Preparing and Applying New Mortar
Choose the right mortar type. For most residential brick patios, Type N mortar is a good general choice: it's flexible enough to handle minor movement and works well in moderate climates. For colder climates with hard freeze-thaw cycles, ask your masonry supplier whether a different mix is warranted. Do not use a mortar that's harder and stronger than the bricks themselves, as it can cause the brick face to spall during freeze-thaw.
Before applying new mortar, dampen both the raked-out joint and the surrounding brick. This slows the mortar's hardening rate so it cures properly rather than drying too fast and cracking. Work the mortar into the joint in layers if the joint is deep, compacting each layer before adding the next. Tool the finished joint surface (a slightly concave profile sheds water well) while the mortar is still workable, typically within 30 to 60 minutes of application.
Weeds and Joint Sand on Sand-Set Patios
If your patio uses sand joints rather than mortar, weeds are a chronic problem once joint material washes out. Polymeric jointing sand is significantly more weed-resistant than regular sand because it binds when activated with water, resisting both washout and weed germination. It's not a permanent fix if your drainage is poor, but it's a major upgrade from plain sand. Clean joints thoroughly of all organic material before refilling, otherwise you're just burying the seed source. If weeds are a recurring battle, the underlying fix is keeping joints full and considering a mortar joint system on the next full reset.
Fixing the Base: Leveling, Drainage, and Subbase Rebuilding

When an entire section of patio has settled, tilted, or sunk, adjusting the top sand layer usually isn't enough. For a level brick patio, you typically need to correct the base and drainage first, then rebuild the layers so the surface sits flat adjusting the top sand layer. You need to dig down and fix what's underneath. This is the most labor-intensive repair category, but it's also the most important one: ignoring base problems means any surface repair will fail again within a year or two.
What a Proper Base Looks Like
A well-built pedestrian brick patio sits on a compacted aggregate base that's typically 4 to 6 inches thick (more in cold climates or soft soils), topped with a 1-inch layer of bedding sand. The base material should be compacted in lifts, not dumped in all at once. If water has been washing out fine particles from your base over time, the base thins and the bricks above settle. This is exactly what happens when drainage is poor or when there's no proper slope away from the house.
The Subbase Repair Process
- Remove all bricks from the affected section and set them aside carefully. Label or photograph the pattern if needed.
- Excavate and inspect the base material. If it's soft, wet, or has voids, you need to remove it and recompact the subgrade.
- Add new compactable aggregate base material (typically crushed stone or gravel) in 2 to 3-inch lifts, compacting each lift with a plate compactor before adding the next.
- Check and correct drainage slope at the base level. The surface should slope away from the house at 1/8 to 1/4 inch per foot minimum.
- Add 1 inch of bedding sand on top of the compacted base and screed it smooth.
- Relay bricks on the prepared surface, maintaining proper joint spacing.
- Compact the finished surface with a plate compactor (use a rubber pad), sweep joints full of polymeric sand, and re-compact.
Edge Restraints and Lateral Spreading
If your patio lacks solid edge restraints, bricks at the perimeter will gradually migrate outward no matter how well you reset the interior. Proper edge restraints, whether plastic paver edging spiked into the ground or a concrete border, are what keep the whole system contained. If you're doing a base repair or full section reset, add or repair edge restraints at the same time. This is a common omission that causes repeat failures.
Crack and Settlement Fixes, and How to Stop the Problem From Repeating
Settlement cracks in mortar joints, or bricks that keep sinking after you reset them, are symptoms of ongoing movement. The crack itself isn't the problem: the movement underneath is. Before repointing any cracked joints, monitor them for a few weeks to determine whether they're still actively moving. An active crack that you fill with mortar will just crack again.
Water is the primary driver of repeat failure. Freeze-thaw cycling in cold climates is particularly destructive: water infiltrates joints or the base, freezes, expands, and physically forces bricks apart or pushes the base material out of position. Year after year of this progressively destroys both the surface and the subbase. The prevention strategy is straightforward: keep joints full and sealed, maintain drainage slope, ensure water drains away from the patio perimeter, and fix any edge restraint failures before they allow joint sand to wash out.
- Maintain a minimum 1/8-inch-per-foot slope away from the house on all patio surfaces
- Keep all mortar joints or sand joints full: refill any gaps at the start of each season
- Use polymeric sand in sand-set patios to resist washout and weed growth
- Inspect and reattach or replace edge restraints that have moved or degraded
- Clear any drain outlets or channels near the patio regularly so water isn't backing up
- Avoid using de-icing salts on brick patios in winter: they accelerate spalling and mortar deterioration
- Seal brick surfaces every 2 to 3 years if the patio faces heavy weather exposure
Common mistakes that cause repairs to fail: adding sand on top of a problem base without digging down, using mortar that's too hard for the brick type, shallow mortar removal before repointing, skipping edge restraints on reset sections, and not correcting drainage slope when relaying bricks. These are exactly the shortcuts that bring homeowners back to the same repair a year later.
When to Hire a Pro, and What It Should Cost
Most small repairs, resetting a few loose bricks, repointing deteriorated joints in a limited area, or refilling joints with fresh polymeric sand, are genuinely DIY-friendly. The work is physical but not technically complex as long as you use the right materials and don't skip base prep.
Hire a contractor when: the settled area covers more than a quarter of the patio, the subbase failure involves poor drainage that requires regrading the yard, the patio is mortar-set and needs extensive brick removal and rebedding, or you're dealing with structural issues close to a house foundation. A contractor should also handle any situation where you've reset the same section twice and it keeps failing, because something in the base or drainage is still wrong and needs a professional eye.
| Repair Type | Typical DIY Cost | Typical Pro Cost |
|---|---|---|
| Refill joints with polymeric sand (full patio) | $30–$80 materials | $200–$500 labor + materials |
| Reset 5–10 loose bricks | $20–$50 materials | $300–$600 |
| Repoint mortar joints (per sq ft) | $5–$10 materials | $10–$20 per sq ft labor + materials |
| Small section base repair + relay (25–50 sq ft) | $100–$300 materials | $600–$1,500 |
| Full patio base rebuild + relay | $400–$1,000+ materials | $2,000–$6,000+ depending on size |
| Full patio replacement (new installation) | Significant DIY labor | $8–$25 per sq ft installed |
Professional brick patio repair averages around $1,200 nationally for moderate-scope work, with smaller spot jobs running as low as $300. Mortar repair specifically tends to run $10 to $20 per square foot when a contractor is involved. Contractors typically price by scope rather than strictly by square foot, so get quotes that specify whether the price includes base work, not just surface reset. A 'lift and relay' quote that doesn't include base repair is often not a complete fix for a settling patio.
If you're weighing a large repair against full replacement, the tipping point is usually the condition of the base and edging. If the base is sound and drainage is adequate, repair makes sense. If the patio was built with insufficient base depth, poor drainage design, or no edge restraints, a full teardown and rebuild done correctly will outlast repeated patch repairs by decades. That decision overlaps with broader questions about how to fully rebuild or remove a patio, which are separate projects from spot repair. For full replacement, you can follow a dedicated guide on removing a brick patio before rebuilding the base and surface how to remove a brick patio.
FAQ
My brick patio has one rocking brick, should I repoint first or lift it?
If a single brick rocks, don’t start by scraping and repointing. Rocking usually means the bedding sand under that unit shifted, so you’ll typically need a partial lift-and-relay (remove the brick, correct the sand bed and support, then reset flush). Repointing can help joint edges, but it won’t stop a loose sublayer from moving again.
Can I just add more sand to fix a sunken section of my brick patio?
Yes, but only after you stabilize the base problem. Filling a low spot with sand on top of a settled area often creates a new “soft” spot, because the base underneath remains out of level. For any section that’s dropped, tilted, or continues sinking, dig down and rebuild the bedding and base layers so the surface sits flat.
What’s the risk of using a stronger mortar than my brick is designed for?
Generally, avoid matching mortar strength to “stronger is better.” Mortar that is significantly harder than the brick can cause spalling on the brick face during freeze-thaw. If you’re unsure, ask your masonry supplier for a mortar designed for brick masonry joints in your climate, then follow the joint depth and tooling details so the bond forms properly.
Should I fix edge restraints only if the patio perimeter is cracking?
You can, and it’s often the best way to keep the patio from going out of level later. If you’re lifting bricks for any section repair, inspect the perimeter and restore edge restraints at the same time, using the same concept as your original build (spiked paver edging or a concrete border). Missing or weak restraints let movement migrate outward even after a good relaying.
How long should I wait to see if a mortar joint crack is still active before I repoint?
Monitor for active movement before sealing and before you repoint. A crack that is still widening or shifting after reset is a symptom of ongoing base or drainage movement, and mortar will fail again. Take photos from the same angle on a few different days (and weeks) to confirm whether change is continuing.
Will polymeric jointing sand permanently stop weeds in brick joints?
For sand joints, weeds typically return when joint material washes out or organic debris remains in the joint. If weeds are recurring, first confirm drainage and slope, then clean joints fully (remove roots and debris) before refilling. Polymeric jointing sand helps resist washout and germination, but it won’t compensate for a failing base or poor water shedding.
Can I replace only the joint material without lifting bricks?
If the patio tiles or bricks are set in sand and only the joints are deteriorated, you may be able to remove and replace joint material without lifting every brick. However, if bricks are sitting unevenly, rocking, or the joints are severely washed out, you’ll usually need to lift sections to restore the bedding and rebuild joint stability.
What’s wrong with quick patch products that claim to stabilize loose brick patios?
If your goal is to prevent repeat settling, slurry-based “patches” or glue-like fixes are rarely the right approach for brick-set patios because they don’t rebuild the compacted aggregate and bedding layers. The durable repair typically restores the layers beneath the brick (base, then bedding) and restores restraints (edges) so the system can’t migrate.
Do I really need to worry about silica dust for a small repointing job?
After you cut or grind mortar joints, controlling silica dust matters, especially if you’re doing multiple cuts. Use a respirator suitable for nuisance dust at minimum, and if you’re using power tools, use a shroud with dust collection. Also keep work upwind and away from people who are not wearing protection, since airborne dust can linger.
How do I tell whether my repair needs drainage rework instead of only mortar or sand replacement?
If drainage is poor, the “right” repair is usually base correction and water management, not just repointing or relaying. Look for a consistent slope away from the house, ensure water isn’t pooling at the patio perimeter, and address any failing edge restraints that allow joint sand to wash out.
When should I stop DIY repairs and call a contractor after I’ve already reset the area once?
Yes, but it depends on how much the patio has moved. When a section repeatedly fails after a reset, it usually indicates the base isn’t being rebuilt correctly, drainage slope is off, or edge restraints are still insufficient. That’s a good trigger to get a contractor involved, particularly if you’ve already “lifted and relayed” the same area twice.
Next Article
How to Level a Brick Patio Step by Step
Diagnose and fix an uneven brick patio: regrade base, reset bricks with bedding sand, resand joints, ensure drainage.