A broken brick patio is almost always one of three problems: the surface bricks themselves are damaged or loose, the mortar joints have failed, or the base underneath has shifted and settled. If you notice that type of base problem, the key is to focus on how to level brick patio correctly before you reset the bricks base underneath has shifted and settled. Figure out which one you're dealing with first, because the repair path is completely different for each. Surface fixes take an afternoon. Base failures mean lifting bricks, rebuilding the foundation, and resetting everything correctly. If you want a lasting result, follow a clear plan for how to brick patio repairs based on whether the base or the surface is failing. Get the diagnosis right and you'll fix it once instead of three times.
Broken Brick Patio Repair Guide: Diagnose and Fix Damage

Quick diagnosis: what 'broken' actually tells you
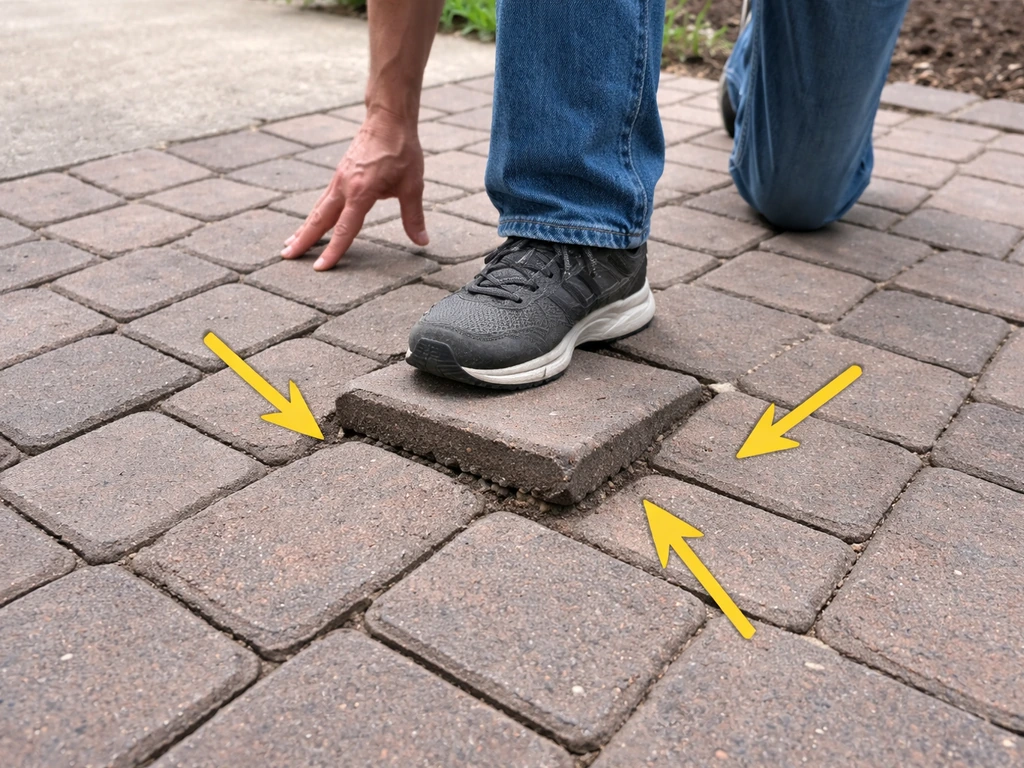
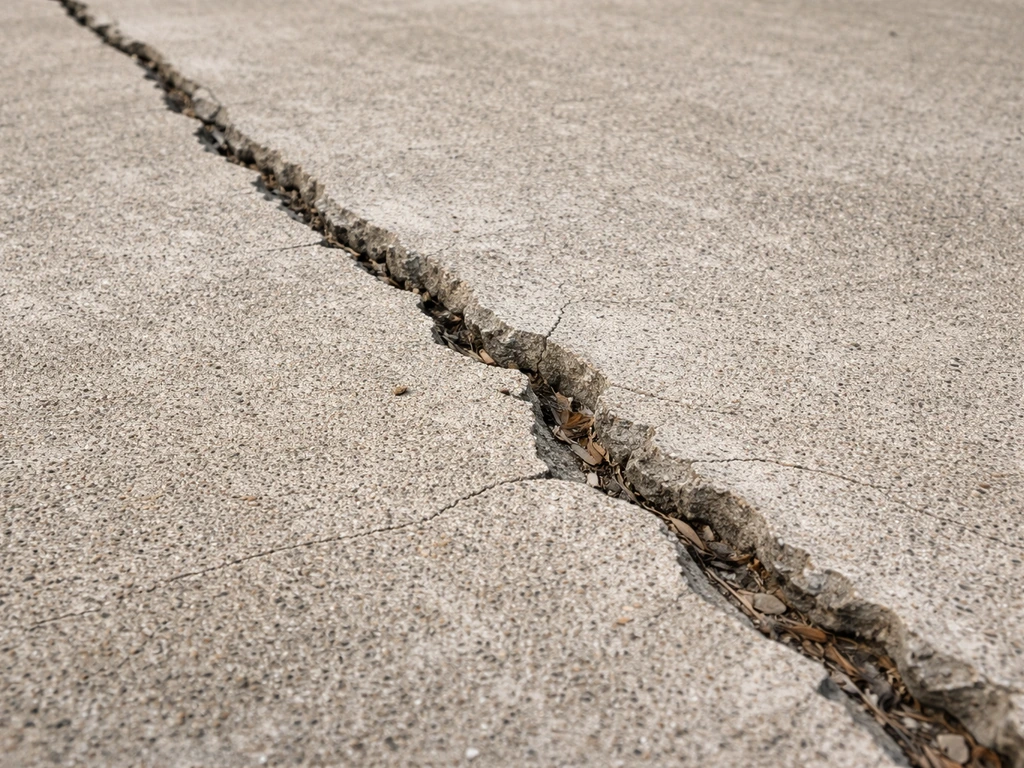
Walk the whole patio and look for a few specific things. Rocking or loose bricks that move when you step on them usually point to base failure or a washed-out sand bed underneath. A hollow sound when you tap a brick (use your knuckle or the handle of a screwdriver) means the brick has separated from its bed and is no longer fully supported. Crumbling, cracked, or missing mortar in the joints is a surface-level problem that doesn't always mean the base is bad. Sunken areas or sections that have dropped noticeably below surrounding bricks almost always mean the base or subgrade has eroded or compacted unevenly. Displaced edge bricks are often a drainage or edging-restraint failure. And if you see new cracks, shifting pavers, or crumbling mortar showing up right after winter, freeze-thaw damage is the culprit: water infiltrates the brick or joint, freezes, expands, and physically breaks the bond or the brick itself. NIH (ORF) technical bulletin explains that freeze-thaw deterioration in concrete and brick assemblies is tied to water presence and freezing conditions, which drive the damaging mechanisms blank" rel="noopener noreferrer">freeze-thaw damage is the culprit.
After your visual pass, check the water story. Stand near the patio during or right after rain and watch where water goes. Water pooling on or running toward the house instead of away is both a cause and a symptom. Poor drainage erodes the soil and base underneath, causing bricks to sink and cave. If the drainage pattern is wrong, fixing the bricks without fixing the slope means you'll be back out here doing this again in two years.
| What you see | What it likely means | Repair path |
|---|---|---|
| Rocking or wobbly bricks | Sand bed displaced or base settled | Remove bricks, fix base, reset |
| Hollow sound when tapped | Brick separated from bed | Remove, re-bed on fresh sand |
| Crumbling or missing mortar joints | Mortar failure (surface level) | Re-point joints |
| Sunken section (1+ inches below grade) | Base or subgrade failure | Full base rebuild required |
| Cracked brick faces after winter | Freeze-thaw damage | Replace damaged bricks, address drainage |
| Displaced edge bricks | Edge restraint or drainage failure | Reset edges, improve drainage |
Tools and materials checklist before you start
Having everything on hand before you pull a single brick saves you the frustrating mid-project hardware store run. The exact list depends on your repair type, but this covers all the scenarios described in this guide.
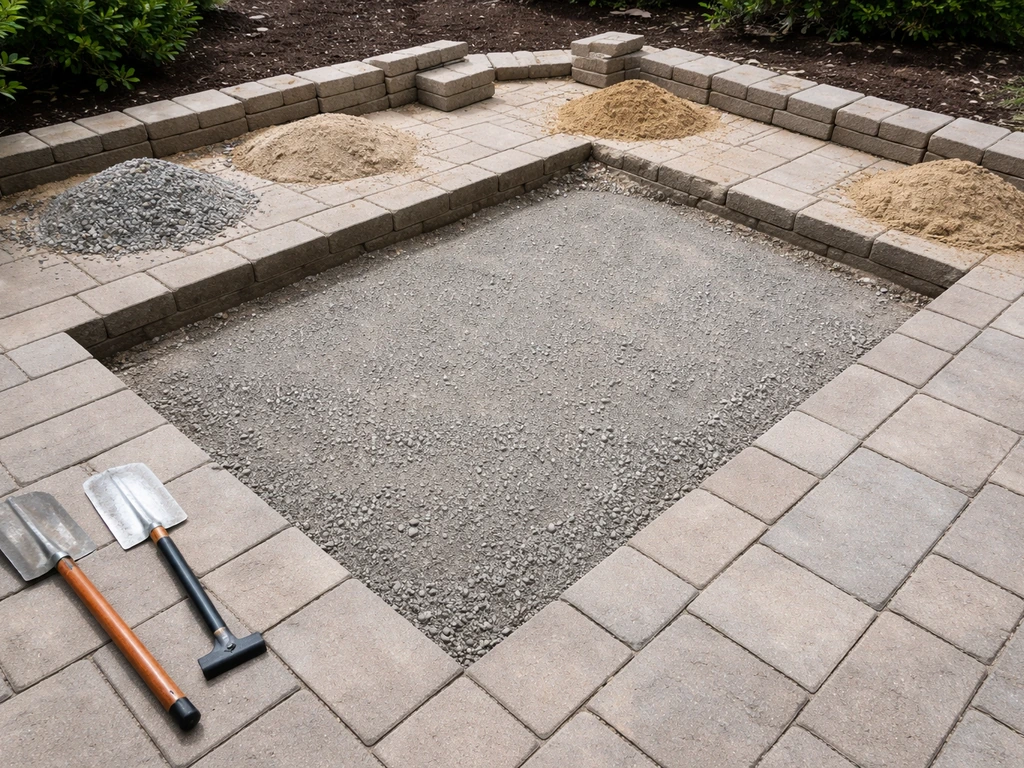
- Flat pry bar or brick chisel (for lifting bricks without breaking neighbors)
- Rubber mallet
- Cold chisel and hammer (for breaking out old mortar)
- 4-inch angle grinder with masonry blade (for cutting out stubborn mortar joints, optional but helpful)
- Hand tamper or plate compactor (essential for base repair)
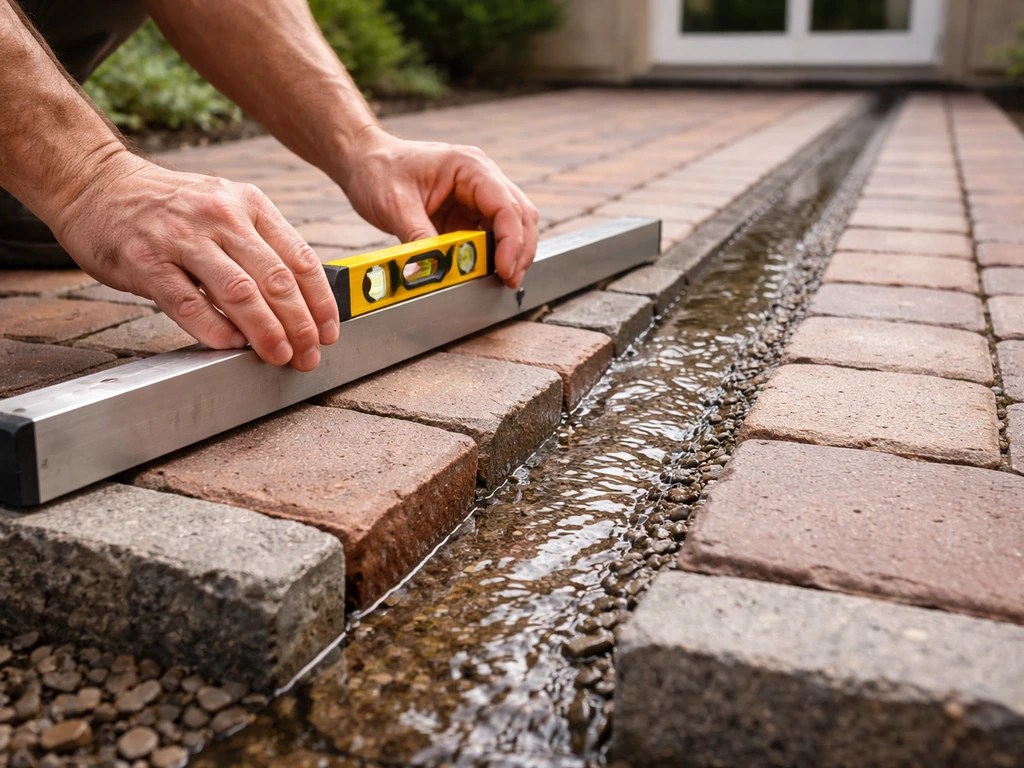
- Level (2-foot minimum, 4-foot preferred)
- Stiff-bristle brush and wire brush
- Garden hose with mist/spray setting
- Bucket and margin trowel or pointing trowel
- Safety glasses and work gloves
- Compacted gravel or crushed stone (for base repair, depth should be 4 to 6 inches)
- All-purpose sand or paver base sand (for bedding layer, about 1/2 inch depth under bricks)
- Polymeric jointing sand (for dry-laid patio joints, Quikrete HardScapes or Sakrete PermaSand are solid options)
- Mortar mix or lime-based repointing mortar (for mortared patios)
- Replacement bricks that match existing (bring an original brick to the masonry supplier for color/size matching)
- Plastic sheeting or burlap (for covering fresh mortar during curing)
Fixing surface-level problems: loose bricks, cracked mortar, and small sections
Resetting loose or hollow bricks (dry-laid patios)
For a dry-laid patio (bricks set in sand with no mortar between joints), resetting loose bricks is genuinely a DIY-friendly job. Number the bricks in the affected area with chalk or tape before you pull them, so you can put them back in the right order and orientation. Use a flat pry bar at the joint edge to lift bricks without chipping them. Once they're out, scrape the old sand bed clean, add fresh all-purpose sand, and rake it to roughly a half-inch depth. Tamp lightly, set the bricks back in place, and check them against the level. Add or remove sand until they sit flush with the surrounding surface. Once everything is seated, sweep polymeric jointing sand into the joints, mist it according to the manufacturer's directions (Sakrete advises stopping water when the joints won't absorb any more), and keep it dry for at least 12 hours. To avoid displacing sand or causing runoff, Hardscape Magazine advises applying polymeric-sand activation with a very fine mist and stopping when the joints reach the target wetting level (around 75% saturation as a cue) mist it according to the manufacturer's directions (Sakrete advises stopping water when the joints won't absorb any more). At around 70°F, polymeric sand bonds within 24 hours but may need longer in cooler or humid conditions.
Patching cracked or spalled bricks
A brick that is cracked all the way through, or one where the face has spalled (popped off in a layer), should be replaced rather than patched. Surface cracks from freeze-thaw can look minor but the brick has already been compromised internally. Pry the damaged brick out carefully, clean the opening of loose debris and old sand, and set a new brick that matches in size and color as closely as possible. A good masonry supplier can help you match existing brick if you bring a sample.
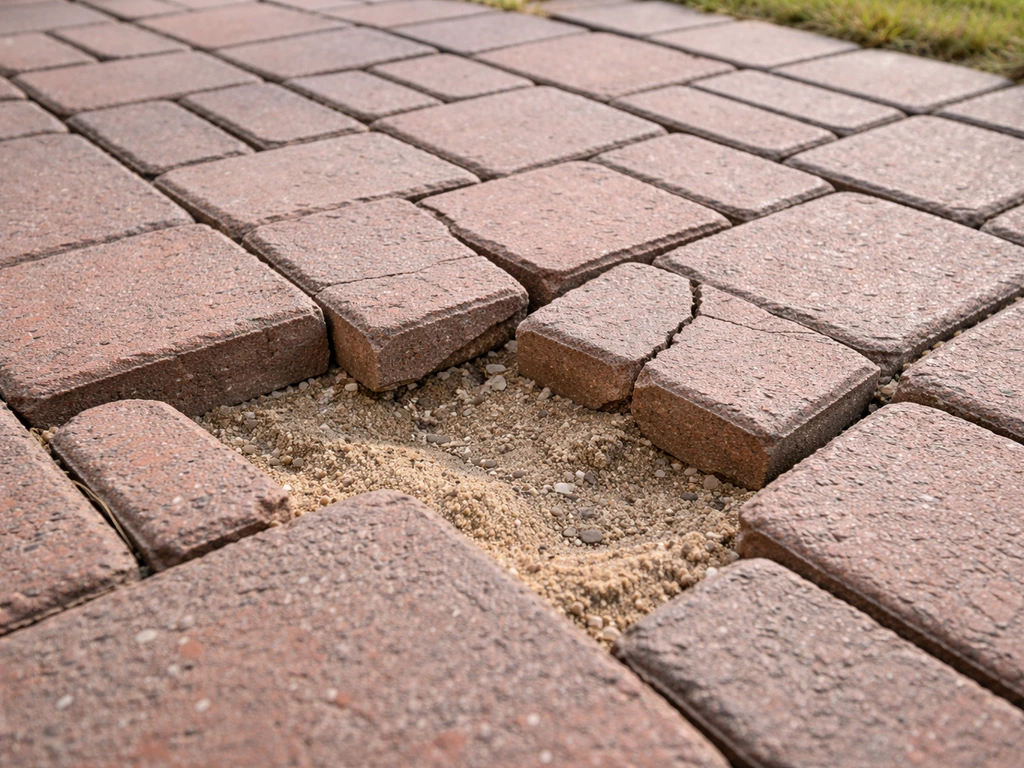
Repairing sunken and rocking areas: rebuilding from the base up
This is the more involved repair, but skipping it and just re-leveling the bricks on top guarantees the problem comes back. If you are also dealing with a patio that needs to be fully removed and rebuilt, follow our step-by-step guidance on how to remove a brick patio safely Fixing a sunken and rocking areas. If a section has sunk more than an inch, or if bricks rock because the material underneath has shifted, the base is the problem. Re-laying bricks on a bad base just delays the inevitable.
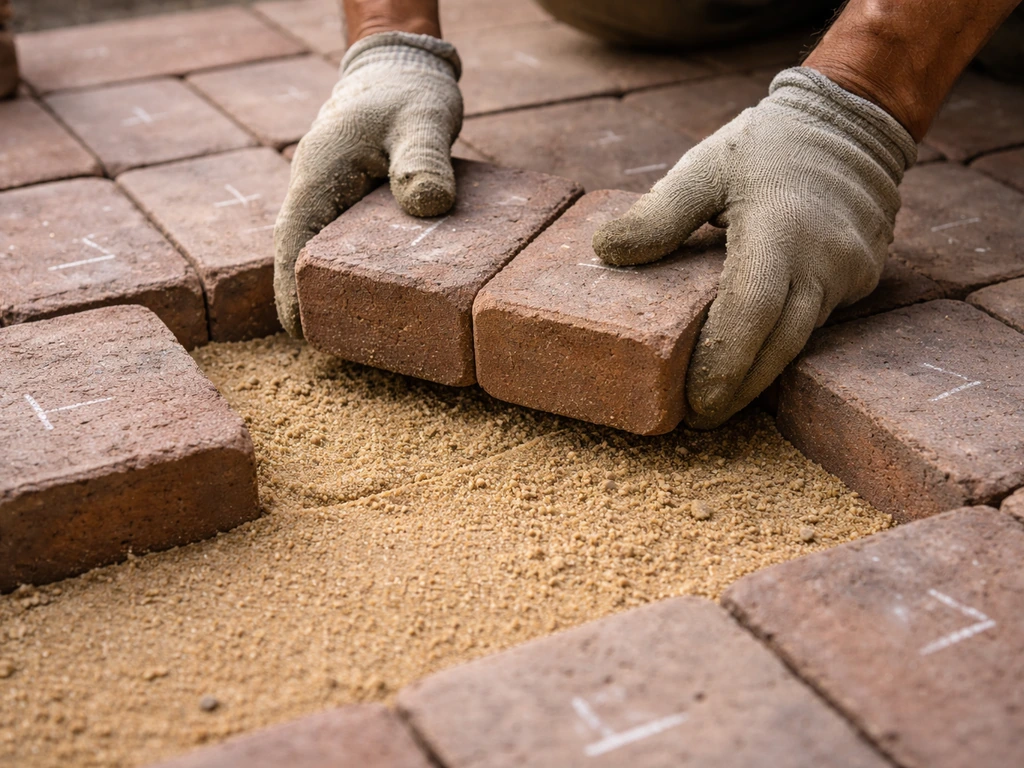
- Mark and number all the bricks in the affected area plus one row beyond it on each side. Removing a slightly larger section gives you better access and helps you blend the repair.
- Lift bricks with a flat pry bar and set them aside on a flat surface in the order you removed them.
- Excavate the area down to the gravel base. Assess what you find: if the gravel base is thin (less than 4 inches), washed out, or poorly compacted, this is your problem.
- Add compacted gravel or crushed stone to bring the base back to 4 to 6 inches of depth. Add it in 2-inch layers and compact each layer with a hand tamper or plate compactor. This step cannot be rushed.
- Spread a 1/2-inch layer of all-purpose sand or paver base sand over the compacted gravel. Do not compact this layer; it needs to stay loose so you can fine-tune brick height.
- Reset bricks in their original order. Check frequently with a level and adjust the sand bed under individual bricks as needed. The goal is to match the elevation of the surrounding undisturbed patio.
- Once all bricks are in and level, sweep polymeric sand into joints, activate with a mist, and allow to cure.
One important note: even bricks near a sunken area that look level are sitting on the same compromised base. It is worth pulling a slightly larger section than you think you need to inspect and address the base properly, rather than doing a minimal patch that fails in the same spot six months later.
Re-pointing mortar joints: how to do it right
Cleaning out old mortar
The most common repointing mistake is applying new mortar over old crumbling mortar instead of removing the bad material first. New mortar bonded to crumbling old mortar will fail quickly. Use a cold chisel and hammer or an angle grinder with a masonry blade to rake out joints to a depth of at least 3/4 inch, ideally 1 inch. Blow out dust with compressed air or use a stiff brush to clean the joint cavity. The remaining mortar must be solid, not crumbly, before you apply anything new.
Mixing and matching mortar
Mortar matching matters more than most people realize. Using a mortar that is harder or more rigid than the original can actually cause brick damage because it prevents the normal thermal movement of the patio. For older brick patios, a lime-based mortar (1 part portland cement to 3 parts lime, plus sand) is usually the right choice. It is slightly softer than modern portland-heavy mixes, which means movement and stress get absorbed by the joint rather than the brick face. For a starting mix, the GSA recommends bar sand or beach sand over crushed sand where possible. Match the color by testing a small batch on a hidden area and letting it dry fully before committing, since mortar color changes significantly as it cures.
Applying mortar and curing
Dampen the joint cavity with a mist of water before applying mortar; a bone-dry joint pulls moisture out of fresh mortar too quickly and weakens the bond. Pack mortar into the joint in layers using a pointing trowel, pressing firmly to eliminate air pockets. Tool the joint to match the existing profile (concave, flush, or whatever the original was) before the mortar stiffens completely. Keep fresh mortar out of direct sun and wind, and cover it with plastic sheeting or damp burlap for the first 24 to 48 hours to slow the cure and prevent cracking. Avoid walking on or disturbing the repaired area for at least 24 hours, and keep it dry for 72 hours if possible.
Replace yourself or hire a pro? How to make the call
Most homeowners can handle individual brick resets, small sunken sections up to a few square feet, and mortar repointing on accessible joints. The repair becomes contractor territory when any of the following apply.
- The sunken or broken area is large (roughly 50 square feet or more). At that point you are essentially rebuilding the patio, and a plate compactor and professional-grade grading equipment make a real difference in the outcome.
- The base failure is tied to a drainage or grading problem that requires regrading around the patio, installing French drains, or rerouting downspouts.
- Structural walls, steps, or the patio is attached to the house foundation and there is any sign of foundation movement.
- Historic or specialty brick that is difficult to match and easy to damage with the wrong tools or mortar type.
- You have already tried a DIY repair and the same area has failed again, which usually signals an underlying drainage or soil problem that needs professional diagnosis.
On cost: professional paver repair for a 100-square-foot sunken area typically runs $500 to $2,500 depending on the extent of base work required. If your repair area is small and the base looks solid once you start digging, DIY is clearly the better value. If the estimate from a mason is lower than the cost of renting equipment and buying materials for a large-scale repair, the math tips toward hiring help.
How to keep your patio from breaking again
Drainage and slope
The single biggest cause of repeat brick patio failure is water that has nowhere to go. If your goal is to fix brick patio problems that keep coming back, focus on the water, base, and drainage so the repair actually holds repeat brick patio failure. If weeds are already sprouting through the joints, you will also want to follow a proper weed-control routine so they do not return after the repair how to weed a brick patio. When you have a broken cement patio, these same factors determine whether the surface repairs actually last water, base, and drainage. The patio surface should slope at least 1/8 inch per foot away from the house or toward a designated drainage point. To get the edging right, make sure you install solid edge restraints and leave appropriate gaps so your bricks stay aligned as they move. If the patio is flat or slopes inward, water sits, infiltrates the base, and erodes it over time. This is a grade correction, and it is worth doing properly during a base repair rather than papering over it with a surface fix.
Edge restraints
Edge bricks tend to migrate outward over time, especially without a solid restraint. Plastic or metal paver edging spiked into the base keeps the perimeter locked in place. Without it, the whole patio slowly spreads, joints open up, and water and weed roots find their way in.
Expansion gaps and joint fill
Brick expands and contracts with temperature changes. Joints filled with polymeric sand accommodate that movement better than rigid mortar in a dry-laid patio. If you have a mortared patio, expansion joints at regular intervals (especially where the patio meets the house) are critical. Missing or cracked expansion joint material is a direct cause of patio cracking. Keeping those joints filled and flexible is ongoing maintenance, not a one-time fix.
Weed control and sealing
Weeds in patio joints do real damage. Root growth physically displaces bricks and breaks down joint material. Polymeric sand is one of the best defenses because it hardens into a semi-flexible mass that most weed seeds cannot easily penetrate. For sealing: a penetrating paver sealer helps resist water infiltration and freeze-thaw damage, but timing and conditions matter. Apply sealer only when temperatures are above 50°F, there is no rain forecast for 24 hours, and the patio surface is completely dry. Sealing over damp bricks or polymeric sand that has not fully cured causes haze and whitening that is difficult to correct.
DIY mistakes that lead to repeat failures (and how to verify your fix worked)
- Skipping base compaction: adding sand or gravel and not tamping it leads to settlement within months. Compact every layer before adding the next one.
- Using the wrong mortar: high-portland mortar on older or softer brick is too rigid and causes spalling. Match mortar hardness to the brick.
- Repointing over crumbling mortar: new mortar fails quickly when it does not bond to sound old mortar. Remove at least 3/4 inch of the old joint.
- Activating polymeric sand in the wrong conditions: applying it before rain, in high humidity, or in direct sun causes incomplete curing, surface haze, or joints that wash out on first rain.
- Ignoring drainage: any repair done without fixing the slope or drainage issue that caused the damage will fail in the same way.
- Pulling too few bricks: doing a minimal patch on a larger base problem leaves the rest of the compromised base in place. Go a little wider than the obvious damage.
To verify your repair worked, come back after the first rain event and look for any pooling on or near the repaired section, check that no bricks have rocked or shifted, and tap each reset brick to confirm it sounds solid rather than hollow. If everything passes those three checks after a rain, you have done it right. If a brick rocks or sounds hollow again, the base still needs attention. Do not just relay it on top of sand again; dig down and find out why the support is still inadequate.
FAQ
How can I tell if a broken brick patio issue is mostly the bricks, the joints, or the base?
Before you remove any bricks, check whether the problem is “support loss” or “joint loss” by tapping several bricks across the same area. If only specific bricks sound hollow, replace those units or reset them. If most bricks in a section feel loose or the whole area rocks together, the base or sand bed is likely washed out or uneven, and you should plan on lifting and rebuilding that zone.
What should I do if the mortar joints are crumbling but the bricks aren’t moving?
If you see joint mortar crumbling but the bricks are otherwise solid, rake out and remove all weak, friable material first, then repoint. A fast test is to rub the old mortar with your finger or a stiff brush, if it powders easily you should remove it to solid material rather than patching over it.
Why does polymeric sand sometimes fail or wash out after rain?
For polymeric joint sand, the key is getting the surface dry and the joints fully filled before misting. If you mist too early or the joints are already damp, the sand can haze or not fully lock up, leading to weak joints that wash out. Mist gradually per label directions and stop when the joints stop absorbing, then keep the patio dry for the recommended cure window.
Is it ever okay to re-level only the top sand layer on a sunken broken brick patio?
If the patio dips more than about an inch, don’t attempt a “top-leveling” reset. That amount usually means the subgrade has eroded or settled unevenly, so lifting bricks and correcting the base, then resetting, is the durable approach.
How do I match replacement bricks so the repair doesn’t look obvious?
When matching an existing brick, bring a labeled sample to a masonry supplier and compare not only color but also thickness and face texture. Slight differences can show up after installation because new brick can accept mortar and weather differently than older brick.
Should I repair only the visibly broken section, or remove a larger area?
Yes, but do it carefully: pull a slightly wider section than the obvious damage. Even bricks that look level nearby can be resting on the same compromised base, so a narrow fix can reopen once temperatures and water cycling move the unsupported area again.
What’s the most common mistake when repointing a broken brick patio?
A common mistake is raking out joints too shallow. Follow the minimum depth guidance (at least 3/4 inch, ideally 1 inch) so new mortar has enough bonding area. If you leave weak leftover material, the new mortar can release over time.
Why does mortar hardness matter for a brick patio repair?
Use the same mortar type philosophy as the original system: softer lime-based mortar is often better for older patios because it allows normal movement. Avoid using a much harder, more rigid mix, since it can transfer stress to the brick and accelerate cracking.
Can I apply paver sealer right after repairing cracked or repointed joints?
Don’t seal if you are still actively curing polymeric sand or fresh mortar. Sealer timing matters because trapping moisture or applying over uncured material can cause hazing or uneven performance. Wait until the joints are fully cured and the patio is completely dry, and only apply when temperatures and weather conditions meet the label requirements.
How do I troubleshoot if my repair looks good at first, but fails again after the next rain?
Instead of guessing, use the tap test and a targeted water observation after rain. If repaired bricks become hollow or rock again, the base support is still inadequate, and you need to dig down to identify what’s washing out or compacting unevenly, then correct the slope or drainage path.
What should I do about weeds in the joints before or after fixing a broken brick patio?
Yes. If you find weeds rooted in joints, pull them and remove as much root mass as possible, then improve joint filling and joint stability so they have less chance to re-establish. Even if the repair is perfect, recurring weeds can pry bricks loose and break down joint material.
How to Fix Cement Patio Cracks: Diagnose and Repair
Diagnose concrete patio crack types and repair with the right sealant or patch, from prep to curing and prevention.