To edge a porcelain patio properly, you need to do three things at once: protect the tile's brittle perimeter from chipping, lock the edge pieces down with full mortar coverage so they don't rock or lift, and seal every joint so water can't get underneath and freeze. The right sequence is: choose your edging profile, prep the substrate, dry-fit and cut your pieces, set them in a polymer-fortified thinset with at least 95% mortar contact, grout the field joints, and finish the perimeter with a flexible sealant over backer rod rather than hard grout. That combination handles both the structural and waterproofing side of the job. If you need to replace damaged patio tiles, the process starts with carefully removing the old tiles, checking and repairing the substrate, and then resetting new tiles with the right thinset and grouting replace patio tiles.
How to Edge a Porcelain Patio: DIY Step-by-Step Guide

Choosing the right edging for a porcelain patio
This is the decision that shapes everything else, so spend a few minutes on it before you buy anything. The three main approaches are: metal trim profiles, a bullnose or drop-edge porcelain tile border, and a poured or cast concrete edge cap. Each one suits a different situation.
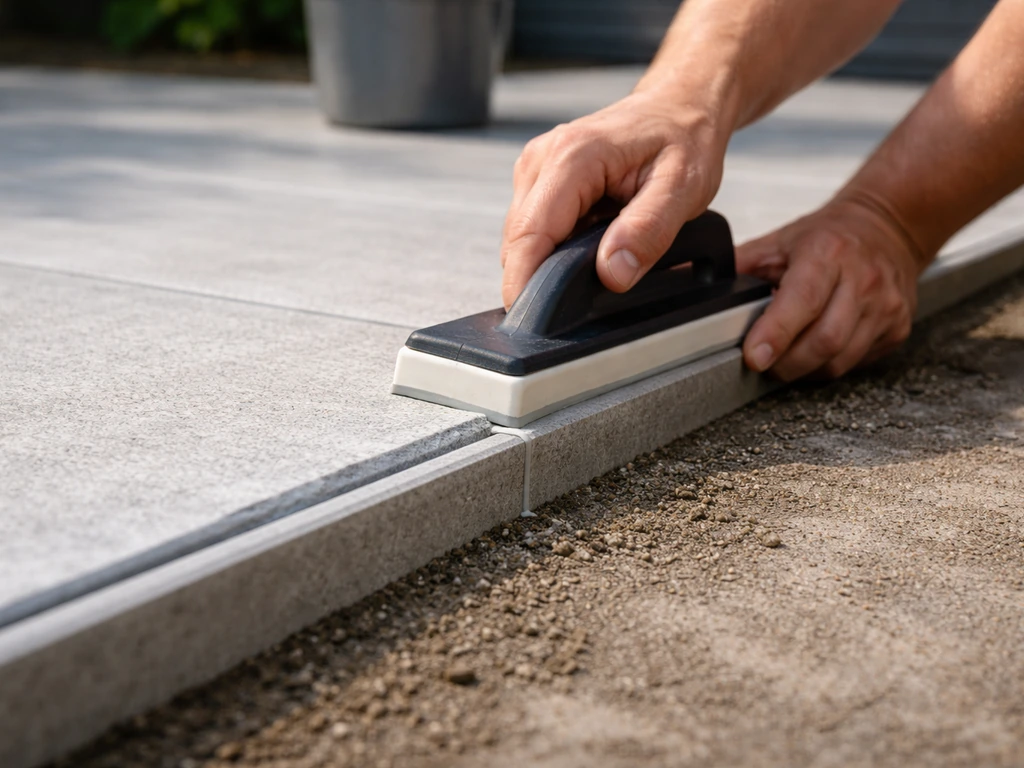
Metal trim profiles, specifically aluminum or stainless edge profiles like Schluter JOLLY or SCHIENE-STEP, are the most practical and forgiving option for most DIYers. blank" rel="noopener noreferrer">JOLLY is designed for outside tile edges and corners; it uses a built-in joint spacer that gives you a uniform 1/16" to 1/8" joint automatically. SCHIENE-STEP works at step nosings and level transitions. Both anchor into the thinset bed alongside the tile and protect the raw porcelain edge from chips and impact. For a perimeter that meets a lawn, gravel, or a step, these profiles are hard to beat.
Bullnose or drop-edge tiles are the traditional approach, tiles with one factory-finished, rounded edge are set at the perimeter so the edge you see is the glazed face of the tile, not a raw cut. The catch is that matching bullnose tiles are getting harder to find in modern large-format porcelain. If your tile manufacturer doesn't offer a matching bullnose, you're either cutting and polishing edges yourself (doable but time-consuming) or going with a profile. If you’re not using a bullnose and need to trim those edge pieces yourself, this guide on how to cut porcelain patio tiles walks through the same wet-saw and edge-protection basics so your perimeter comes out clean cutting and polishing edges yourself.
Concrete or masonry caps, basically a poured or cast edge built up alongside the slab, work well for thick, raised patios, but they add significant complexity. If your patio is a ground-level slab with tile over it, a metal profile or bullnose is almost always the better call. Save the concrete edge cap for raised decks or retaining wall situations.
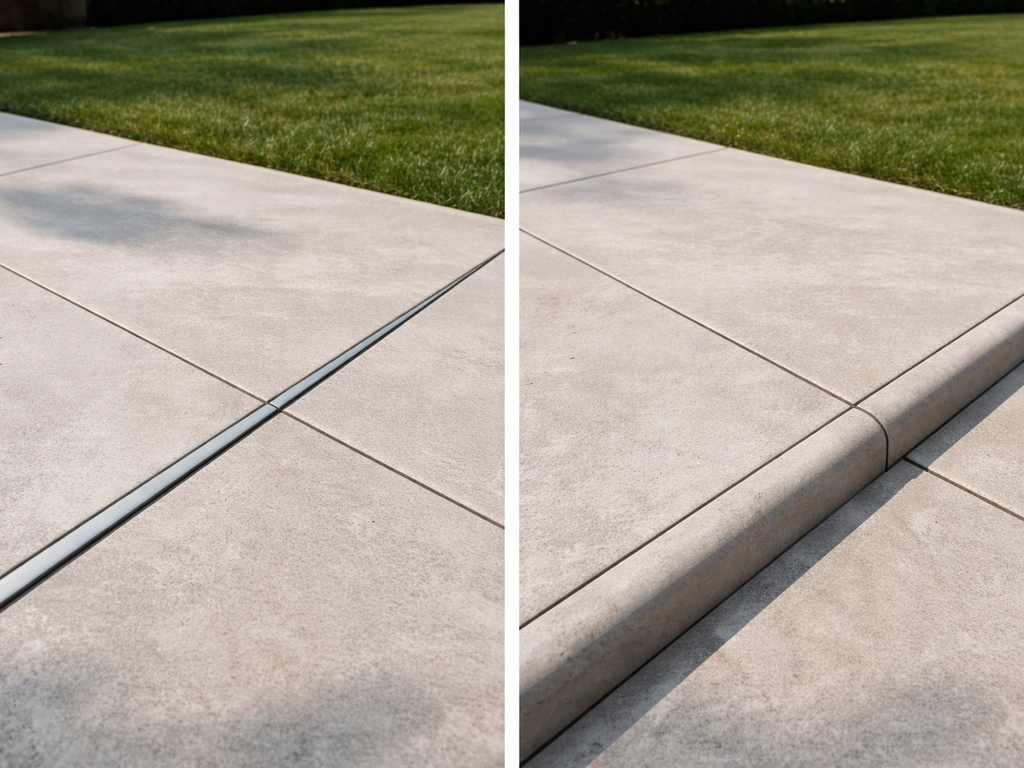
One more thing to decide here: what happens at perimeter movement joints. Anywhere the patio tile meets a wall, door threshold, step riser, or a fixed building element, you need a perimeter joint, not more grout. Schluter DILEX-BWA is a good product for this, it has a 3/16" soft CPE movement zone built in and a rigid PVC anchoring leg you bed into the mortar. At expansion joints mid-slab (over control joints in the concrete), use DILEX-STF or a similar aluminum expansion profile. These joints exist because the tile and the building move at different rates, and hard grout at those transitions will crack, every single time.
Tools, materials, and prep
What you'll need
- Wet tile saw with a continuous-rim diamond blade rated for porcelain
- Angle grinder with a dry-cut porcelain diamond blade (for tight spots)
- 4-foot level and a long straightedge
- Tape measure, pencil, chalk line
- Notched trowel: 1/4" x 3/8" square- or U-notch for setting tile to DITRA or standard slab
- Margin trowel and mixing paddle
- Rubber mallet and tile spacers
- Grout float and sponges
- Caulk gun
- Polymer-fortified thinset mortar (LATICRETE 254 Platinum or Custom FlexBond are both solid choices for exterior porcelain)
- Unsanded or sanded grout matched to your joint width
- Flexible polyurethane sealant for perimeter joints (Sikaflex-1A or equivalent meeting ASTM C920)
- Closed-cell backer rod in the appropriate diameter for your joint width
- Your chosen edge profile (JOLLY, SCHIENE-STEP, DILEX-BWA, or bullnose tiles)
- Tile sealer rated for exterior porcelain
Prep and layout
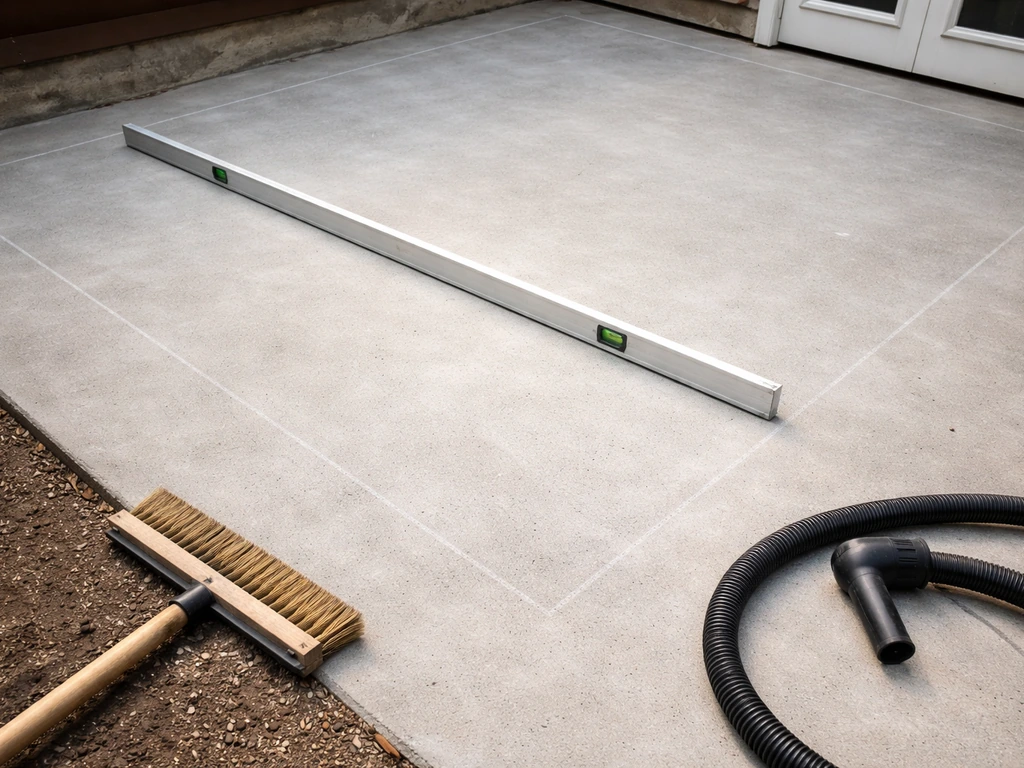
Before you touch a tile, check your substrate. The slab needs to be structurally sound, clean, and sloped correctly, exterior patios should pitch at least 1/8" per foot (ideally 1/4") away from the house for drainage. If the slab is sunken or has a low spot near the perimeter, that's a problem you need to fix before tiling, not after. A sunken edge means water pools there, which accelerates edge lifting and grout cracking. If you're dealing with a sunken or heaved slab, read through the repair guides on this site before proceeding, tiling over an unfixed base just delays the failure.
Sweep and vacuum the slab. Check for any oil stains, efflorescence, or loose concrete, grind or scrape those off. Then snap chalk lines for your tile layout, starting from the center of the patio and working outward so the cut pieces end up at the edges (where your edge profile will cover them anyway). Dry-fit the entire run of edge tiles and profiles before you mix any mortar. This is the step most people skip, and it's the reason most edge jobs end up with ugly gaps and off-cuts.
Check level across the edge zone with your 4-foot level. The edge should be consistent, if adjacent tiles will be at different heights, you'll get lippage (one tile edge sitting higher than the other), which is a trip hazard and looks terrible. If part of the slab is low, you can build up with additional mortar, but you're limited. Most thinset manufacturers recommend a maximum bed depth of about 3/4" in a single pass before you need to use a floor-leveling compound instead.
How to cut and fit porcelain edge pieces
Porcelain is harder and more brittle than ceramic, and the edge is the most vulnerable part of any cut. Always use a wet saw with a continuous-rim diamond blade specifically rated for porcelain, not a segmented or turbo blade, which are more aggressive and chip the edge. The water cools the blade and flushes away slurry, which is what keeps the cut clean. A steady, consistent feed rate matters more than speed. If you rush it, you crack or chip the edge.
For L-shaped corners, you have two options: miter the corner at 45 degrees so both tiles meet at the point (cleaner look, harder to execute), or butt one tile against the other and use a corner profile piece to cover the joint. If you're using JOLLY profiles, the profile handles the corner visually, so a square cut is fine. For bullnose installations at corners, a 45-degree miter on both pieces looks much better than a blunt butt joint.
After cutting, dry-fit everything before committing to mortar. Hold your edge profile pieces in place, mark where they land, and confirm your joint spacing. JOLLY and SCHIENE-STEP both have built-in spacers that give you 1/16" to 1/8" joints automatically, which takes some of the guesswork out. For bullnose tiles, use the same spacers you used in the field. Check that the profile top surface will sit flush with the tile face, if it's sitting proud or low, adjust your mortar bed thickness now.
Setting the edge: thinset, mortar, and transition joints
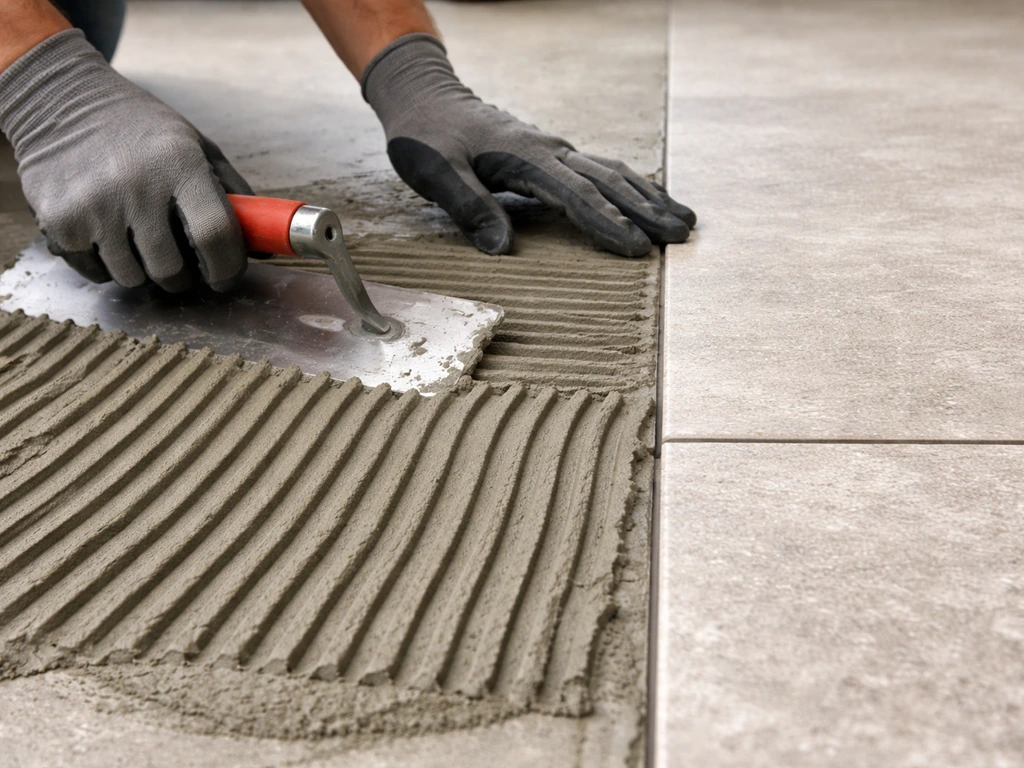
Mix your thinset according to the manufacturer's directions, it should be the consistency of peanut butter, not watery. For exterior porcelain, use a polymer-fortified thinset that meets or exceeds ANSI A118.4 or A118.15. Both LATICRETE 254 Platinum and Custom FlexBond meet this standard and work well in outdoor conditions. Avoid premixed mastic adhesives outside, they don't cure properly when exposed to moisture and will eventually fail.
Spread mortar on the substrate using your notched trowel at a consistent angle, then back-butter the tile or profile anchoring leg as well. For exterior use, you need at least 95% mortar contact, that means no voids, no hollow spots under the tile. Voids are where water gets in, freezes, and pops the tile off. Back-buttering (applying a skim coat to the back of the tile before setting it) is the most reliable way to hit that coverage target. Press the tile firmly in place, give it a slight twist to collapse the trowel ridges, and check it with a level.
When setting a metal edge profile like JOLLY or SCHIENE-STEP, apply thinset over the anchoring leg as you would for a tile, Schluter specifically calls for full coverage over that leg to support the tile edge bearing on it. Set the profile first, then set the adjacent tile so it nestles into the profile's integrated spacer. This locks the profile in place and gives you a neat, consistent joint.
At perimeter movement joints, anywhere the tile meets a wall, threshold, or fixed building element, do not fill the joint with thinset or grout. Install your DILEX-BWA or equivalent profile there, and leave the soft movement zone open for flexible sealant. At expansion joints over concrete control joints, install your DILEX-STF or similar aluminum expansion profile and fill the gap with flexible sealant, not grout. The industry standard here is TCNA EJ171, which covers how and where to place movement joints. The basic rule: any joint that needs to absorb movement gets sealant, not grout.
Grouting, sealing, and weatherproofing the edge
Let the thinset cure fully before grouting, typically 24 hours minimum, longer in cold or humid weather. Check the bag for your specific product's requirements. Once cured, remove any spacers and clean out the joints with a grout saw if needed.
Mix your grout to the consistency specified on the bag, and work it into the joints with a rubber grout float held at a 45-degree angle. For joints under 1/8", use unsanded grout; for wider joints, use sanded. Work in manageable sections, and clean the tile surface with a damp sponge before the grout hazes over. At the edge profile joints, the grout should fill up to but not over the profile's top lip.
Now for the perimeter and transition joints: these get flexible sealant, not grout. Before applying sealant, install closed-cell backer rod into the joint gap. The backer rod should be slightly larger than the joint width so it compresses slightly when pushed in.
A TCNA EJ171-focused white paper also emphasizes that backer rod needs to be flexible and that undersized joints below minimums can undermine movement-joint intent even when sealant is used backer rod should be slightly larger than the joint width so it compresses slightly. The reason for backer rod is to ensure the sealant only bonds to the two sides of the joint, not the bottom, a sealant bonded to three surfaces can't flex properly and will tear.
Sikaflex-1A (or any ASTM C920-rated polyurethane sealant) is a good choice here, it's rated for plus or minus 35% joint movement and holds up outdoors. Smooth the sealant with a wet finger or a caulk tool, and let it cure per the manufacturer's directions before any water exposure.
For overall weatherproofing, apply a penetrating tile sealer to the entire patio surface, including the grout joints, once the grout has cured (usually 72 hours). Choose a sealer rated for exterior use on porcelain. This won't make the surface waterproof by itself, but it significantly slows water intrusion through the grout and reduces efflorescence over time. Reapply every two to three years, or whenever water stops beading on the surface.
Pay special attention to where the patio meets a door threshold. This joint sees constant foot traffic and temperature-driven movement, which makes it one of the first places grout cracks and water gets in. Always use flexible sealant here, never grout, and make sure the finished tile surface slopes away from the threshold so water doesn't pool against it.
Common mistakes and how to fix them
Lippage (uneven tile edges)
Lippage is when adjacent tiles sit at different heights, leaving a ridge you can catch your foot on. It usually happens because the substrate wasn't level to begin with, the mortar bed was inconsistent, or large-format tiles weren't back-buttered. If the lippage is minor (under 1/16"), you may be able to grind down the high edge with an angle grinder and a diamond-cup wheel, then reseal. If it's more than that, the tile needs to come up and be reset with a corrected mortar bed. Prevention is much easier than the fix.
Gaps opening up at the edge
If you filled perimeter joints with grout and they're now cracking open, that's the joint doing what movement joints are supposed to do, absorbing movement that the slab or building is generating. The fix is to rout or chisel out the cracked grout, clean the joint thoroughly, install backer rod, and fill with flexible sealant. Don't re-grout it. It will crack again, typically within one season.
Edge tiles cracking or popping loose
This almost always comes down to one of two causes: insufficient mortar coverage leaving voids where water got in and froze, or missing movement joints that allowed stress to build up and pop the tile. If the patio edge tiles are already cracking or coming up, you will need to remove the affected pieces, correct the mortar coverage, and add proper movement joints before resetting Edge tiles cracking or popping loose.
Carefully remove the affected tiles (a cold chisel and oscillating tool help a lot here), scrape the substrate clean, and check the back of the tile. If the mortar only covered 50–60% of the tile back, you found your problem. Reset with full coverage and proper perimeter joints.
If tiles are cracking rather than popping loose, check whether the slab itself has a control joint running beneath them, that crack in the slab will transfer up through the tile unless you've used an uncoupling membrane like DITRA between slab and tile.
Water pooling at the edge
If water is running toward the edge and sitting there rather than draining away, the patio slope is either insufficient or pitched the wrong direction. This accelerates every other failure mode. You can correct minor slope issues with a self-leveling overlay if the tile isn't laid yet. If the tile is already down, the options are more limited, sometimes a drain channel at the perimeter helps, or you can regrade the surrounding ground to help water move away faster. Don't ignore it. Standing water at the edge will eventually work under the tiles regardless of how well you sealed the joints.
Grout cracking in field joints
Hairline cracks in field grout are common and often cosmetic, but cracks that open and stay open indicate movement in the substrate. If this is happening at regular intervals across the patio, the concrete slab likely has control joints you've tiled over without an uncoupling membrane or movement joint above them. The long-term fix is to re-tile with a proper uncoupling membrane. For now, rout out the cracked joints and fill with a grout-matching sanded caulk, which is flexible enough to handle minor movement without re-cracking as fast.
When to call a pro, and what DIY really costs you if it goes wrong
Most of what's described in this guide is genuinely DIY-able if you're comfortable with tools and willing to take your time. But there are a few situations where calling a professional tile installer is the smarter move.
- The slab has significant structural cracks, is heaving, or has sunk more than 1" in any section — tile work on a structurally compromised slab will fail regardless of how well you set the tiles
- You have widespread drainage problems that require regrading or installing a drain system — this is usually a landscaping or concrete contractor job, not a tile job
- The patio is large (over 200 sq ft) and you haven't tiled before — the margin for error on large jobs compounds fast, and remediating a bad large install is expensive
- The edge meets complex features like stairs, multiple level transitions, or glass door thresholds with manufacturer waterproofing requirements
- You're seeing efflorescence or moisture coming up through the slab from below — that's a hydrostatic pressure issue that needs to be addressed at the slab level before any tile work begins
On cost: a professional tile installer typically charges $10 to $20 per square foot for labor on exterior porcelain, with edge work and complex cuts often billed separately at a higher rate. If you DIY and make significant errors, wrong mortar coverage, missing movement joints, no backer rod at perimeter joints, you're looking at tearing out and resetting the edge within two to three years, which can cost more than hiring a pro upfront would have. The material costs alone for a redo, plus the wasted labor, add up fast. Getting the movement joints and mortar coverage right the first time is where most of the DIY risk actually lives.
If you're dealing with cracked or damaged tiles elsewhere on the patio, the edging work often uncovers underlying problems that affect the field tiles too. If you are seeing cracking beyond just the edge, this guide on fixing cracked patio tiles can help you identify the real cause and choose the right repair approach. Guides on fixing cracked patio tiles, cutting porcelain correctly, or replacing individual tiles can help you sort out whether the edge issues are isolated or part of a bigger pattern across the whole surface.
| Situation | DIY-able? | Notes |
|---|---|---|
| Solid slab, adding edge profile to new tile install | Yes | Follow mortar coverage and movement joint specs carefully |
| Replacing a few loose or chipped edge tiles | Yes | Check mortar coverage on removed tiles to diagnose root cause |
| Adding perimeter sealant to existing installation | Yes | Remove old grout from movement joints first; use backer rod |
| Slab with active cracks or heaving | No | Structural repair needed before tile work |
| Widespread drainage problem causing pooling at edge | Probably not | May need regrading or drain installation first |
| Large complex install with multiple level transitions | Possibly | Honest assessment of your tile experience required |
FAQ
Should perimeter joints at the wall, threshold, or step be grouted or sealed?
If you are using a metal edge profile, keep the sealant off the profile’s top lip and grout, grout only the field joints, then use backer rod plus flexible sealant in the perimeter movement joint below the tile edge. If you instead try to grout a perimeter joint, it will crack when the slab expands and contracts.
How do I prevent the edge from creating a trip height at doors or steps?
Dry-set one full run and check it against the existing height at the doorway, where you’re most likely to need a clean transition. If your edge tiles end up higher than the adjoining surface, water can pool at the threshold line even if the joint is sealed correctly.
What saw blade should I use, and what’s the most common cutting mistake that ruins porcelain edges?
Use a blade rated for porcelain with a continuous rim, then confirm the saw has enough water flow to keep the cut cool and the slurry moving away. A common mistake is using a turbo or segmented blade because it feels faster, but it chips the tile edge and undermines the protection the edging system is supposed to provide.
How can I tell if I’m actually getting 95% mortar coverage at the edge?
For metal profiles, aim for full thinset contact over the anchoring leg and back-butter the profile if it has a leg that can trap air. If you only spread mortar on the substrate, voids under the leg can create rocking, and once the edge rocks, the perimeter joints and sealant start failing.
Can I fix a slightly low slab edge by adding more mortar under the profile later?
If you need to level a low edge, do it before setting the profile, do not try to correct the height by overpacking grout or sealant. For thinset, respect the max single-pass bed depth, otherwise you risk shrinkage or weak bond, and the edge can drift later.
Which is better for L-shaped corners, mitering tiles or using corner profile pieces?
If you have an L-corner and you want a clean look, mitering at 45 degrees usually looks best, but it demands very accurate cuts and tight dry-fit. If your corner details are tricky or you are not confident in the angles, a corner profile is more forgiving and usually reduces the chance of visible gaps.
Do I need to change grout or sealant choices if my perimeter joint width varies?
Not necessarily, but you should treat the grout line thickness and the sealant bond behavior as the priority. Make sure you match grout type to joint width, and for sealed joints ensure backer rod is the right diameter so sealant bonds to the sides only, otherwise it tears prematurely under movement.
What should I do if my perimeter grout is cracking right along the edge?
If grout is cracking open at perimeter joints, remove it and do not re-grout, movement joints are designed to flex using sealant. Rout to remove loose material, clean the gap thoroughly, install backer rod slightly larger than the joint, then apply ASTM C920-rated flexible sealant and keep it dry during cure.
If the tile edge keeps failing, how do I know whether it’s a movement-joint problem or an uncoupling problem?
Before you re-set any edge tiles, check whether the slab has an uncoupling need by looking for a control joint pattern transferring upward. If the slab crack aligns with tile grout cracking across the field, the fix is usually adding an uncoupling membrane or redesigning the movement-joint strategy, not just replacing edge tiles.
When should I seal the patio, and can I do it if the slab is still damp?
Plan your sealing timeline around cure and weather, grout usually needs about 72 hours outdoors before sealing. Also avoid sealing if the patio is staying damp, trapped moisture under a sealer can worsen efflorescence or prevent proper bonding of subsequent coatings.
If the patio slope is wrong near the edge, can I fix it after tiling without tearing everything up?
Yes, but only if the substrate is stable and you correct the slope at the right time. If tile is already set, an overlay is not a simple fix, you may need localized drainage changes or rework the layout, because standing water at the perimeter will keep undermining the edge over time.
How to Cut Porcelain Patio Tiles: DIY Step-by-Step Guide
Step-by-step DIY on cutting porcelain patio tiles with wet saw, cutter, or grinder for straight cuts and pipe openings.
