The most reliable way to cut porcelain patio tiles without chipping is with a wet tile saw fitted with a continuous-rim diamond blade rated for porcelain. Go slow, keep the water flowing, and let the blade do the work. That one setup handles 90% of what you'll encounter on a patio project. The rest of this guide covers how to prep your cuts, handle tricky shapes, and fix the mistakes that happen along the way.
How to Cut Porcelain Patio Tiles: DIY Step-by-Step Guide

Talia Lang
12 Jun 2026

What makes porcelain patio tiles so tricky to cut
Porcelain is denser and harder than ceramic tile, which is exactly why it holds up so well outdoors. That same hardness is what makes cutting it unforgiving. The tile absorbs and resists cutting force in a way that causes chips along the edge or, worse, a crack that runs straight through the middle of a tile you needed for the job. The glaze on the face side is also brittle, so even a blade that cuts through the body cleanly can still tear up the surface right along your cut line.
Patio-format porcelain tiles add another layer of difficulty. Outdoor tiles tend to run large, often 18x18 inches or bigger, and thicker than indoor tile, sometimes up to 20mm for high-traffic patio use. More material means more friction, more heat buildup in the blade, and a longer cut where something can go wrong. A manual snap cutter that works fine on 12-inch ceramic will crack a thick porcelain tile unpredictably. Understanding that upfront saves a lot of ruined tiles.
Choose the right tools and blade for your cut type
Not every cut needs the same tool. Here is how to match the tool to the job.
| Tool | Best for | Porcelain-friendly? | Notes |
|---|---|---|---|
| Wet tile saw | Straight cuts, rip cuts, large format tiles | Yes, best option | Use a continuous-rim diamond blade rated for porcelain; keep water running throughout |
| Angle grinder with diamond blade | Curves, notches, L-shapes, tight spaces | Yes, with care | Use a dry-cut continuous-rim diamond blade; go slow to avoid overheating |
| Manual snap/score cutter | Thin ceramic; occasional light porcelain | Marginal | Unreliable on thick or large-format porcelain; avoid for patio tile |
| Oscillating tool with diamond blade | Small cutouts, tight notches | Yes, for small work | Slow but precise; good for pipe holes under 2 inches |
| Rotary tool (Dremel) with diamond bit | Small holes, grout removal, detail work | Yes, limited | Not practical for full cuts; useful for corners and outlet holes |
Picking the right blade
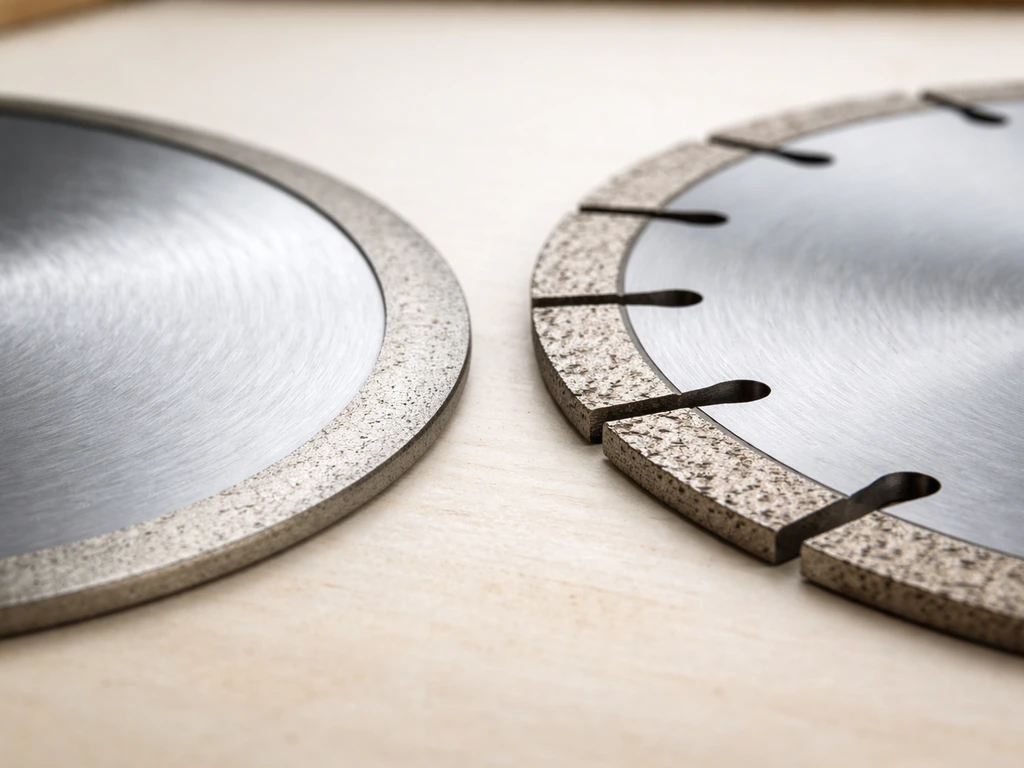
For the wet saw, use a continuous-rim (also called smooth-rim) diamond blade, not a segmented blade. Segmented blades are designed for concrete and masonry and will chip the glaze on porcelain. Look for a blade specifically labeled for porcelain or hard tile. A 7-inch or 10-inch blade works for most patio tiles. Spend a little more here: a cheap blade overheats faster, wears out mid-project, and chips more. A decent porcelain-rated blade costs around $30 to $60 and is worth every cent.
For an angle grinder, the same logic applies: continuous-rim, porcelain-rated, and no larger than the guard allows. A 4.5-inch diamond wheel is the standard size for a grinder and gives you enough control for curved cuts without the blade catching.
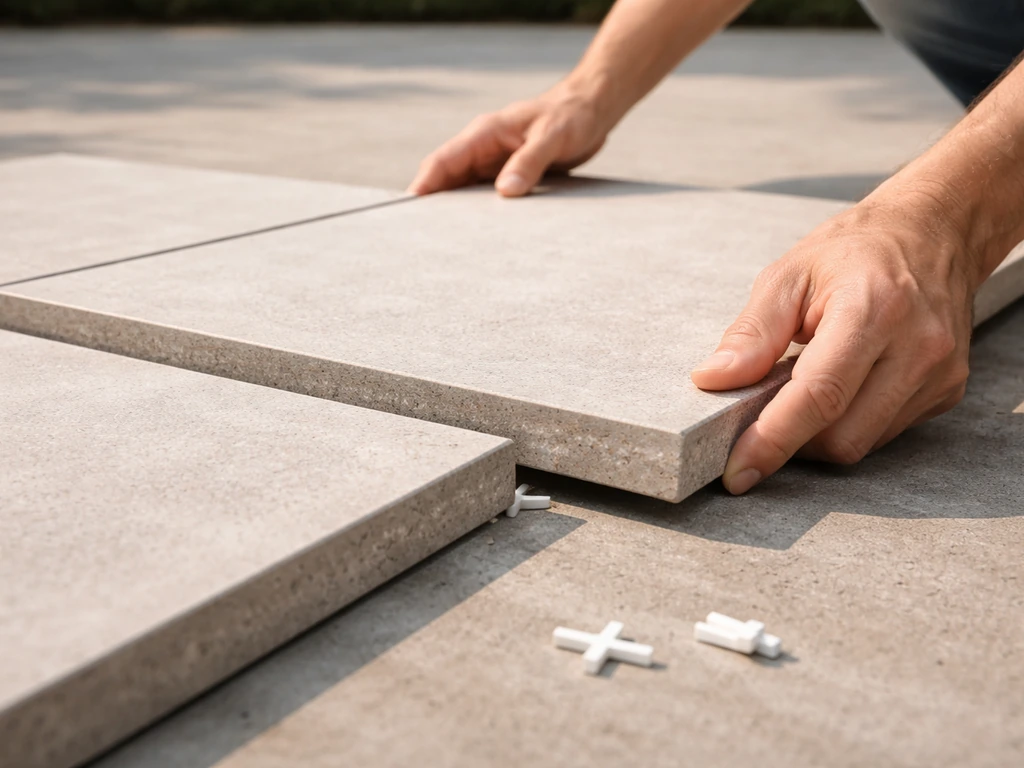
How to measure, mark, and set up the tile before cutting
Good cuts start with good markings. Measure the space where the tile needs to fit, transfer that measurement to the tile, and mark it clearly. Use a pencil or fine-tip marker, not chalk, which smears and throws off your line.
One practical trick worth using every time: blank" rel="noopener noreferrer">apply a strip of blue painter's tape directly over the cut line before you mark it. Defusco Industrial Supply also recommends drawing the cut line on the tape so micro-chips are held in place for a cleaner edge blank" rel="noopener noreferrer">apply a strip of blue painter's tape directly over the cut line. Draw your cut line on the tape itself, then cut right through it. The tape holds micro-chips against the glaze during the cut, which gives you a noticeably cleaner edge. It sounds fussy but it takes about 20 seconds and it genuinely works, especially on the face side of the tile.
Before you cut, also draw a small arrow on the tile pointing from the piece you need toward the waste portion. This is a simple habit from finish tile work that prevents a very common mistake: picking the tile up, rotating it without thinking, and cutting the wrong side. When you are juggling measurements across a whole patio, it matters.
For wet saw cuts, set the fence or guide to your measurement and do a dry-run pass with the saw off to confirm the tile will track straight. Secure any freehand pieces firmly. Porcelain does not forgive a tile that shifts mid-cut.
Step-by-step: straight cuts and trimming edges
Straight cuts and edge trims are the bread and butter of any patio tile project. For a practical, step-by-step walkthrough of edging and finishing those outside borders, see how to edge porcelain patio. Whether you are fitting tiles around a border, cropping a row to meet a wall, or trimming pieces to finish an edge, the wet saw is your go-to.
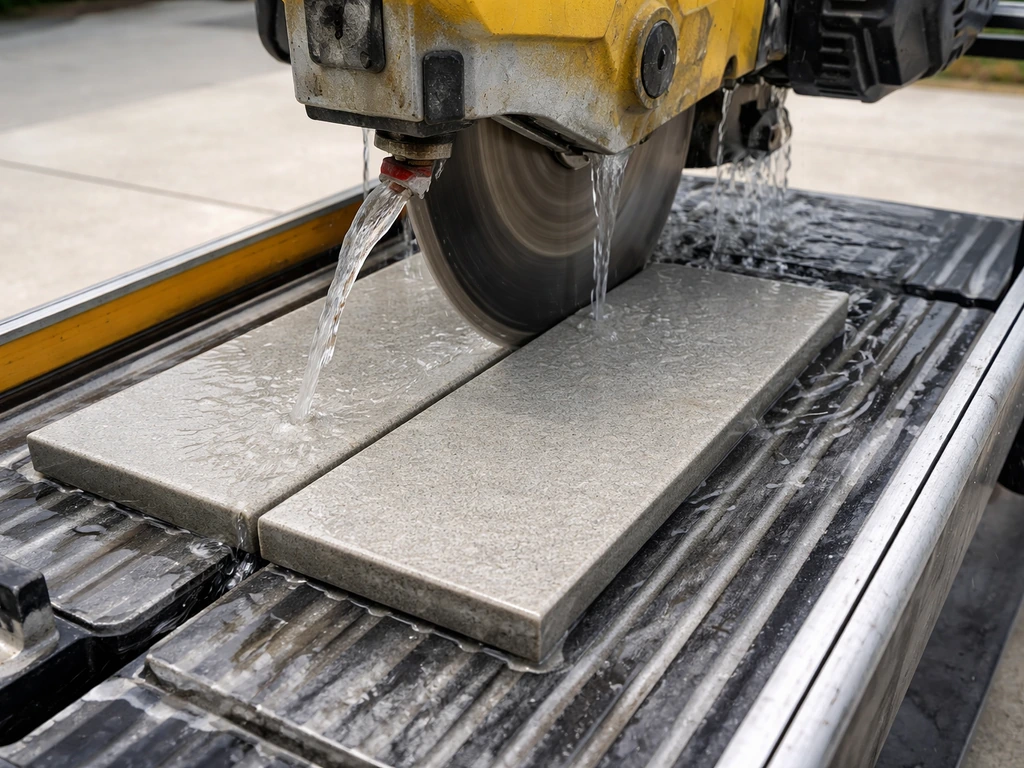
- Set up your wet saw on a stable surface outdoors or in a space where water spray and tile dust are manageable. Fill the reservoir and confirm the water pump is running before you start.
- Install a continuous-rim diamond blade rated for porcelain. Check that it spins in the correct direction (arrow on blade matches arrow on saw guard).
- Measure and mark your cut line on the tile. Apply painter's tape over the cut line and redraw the line on the tape.
- Set the rip fence or miter guide to your measurement. For angled cuts, adjust the miter gauge to the angle you need.
- Turn on the saw and let it reach full speed before the tile touches the blade.
- Feed the tile into the blade with steady, even pressure. Do not force it. If the saw is straining or slowing, you are pushing too fast.
- Keep your fingers at least 3 inches from the blade at all times. Use a push stick or scrap tile to guide the last few inches of the cut.
- Let the blade coast to a stop before removing the cut pieces.
- Peel off the painter's tape and inspect the edge. Minor roughness can be smoothed with a rubbing stone or diamond hand pad.
For very long rip cuts on large-format patio tiles, have a second person support the outfeed end of the tile so it does not droop and bind the blade partway through. A drooping tile is one of the most common causes of a cracked cut on big pieces.
Step-by-step: cutting holes and odd shapes
Patio projects sometimes require cuts that are anything but straight. Notching around a post, cutting an L-shape to fit a corner, or opening a hole for a conduit or outdoor outlet are all jobs that the wet saw alone cannot handle.
L-shapes and notches
- Mark the notch or L-shape on the tile with tape and a marker as described above.
- Make the two straight cuts on the wet saw up to (but not past) the corner of the notch. Stop each cut right at the corner intersection.
- For the connecting cut, use an angle grinder with a continuous-rim diamond wheel. Score along the remaining line slowly, using multiple light passes rather than one deep plunge.
- The notch piece should break free cleanly. If it does not, use the grinder to finish the connection rather than forcing it.
Circular holes for pipes or conduit
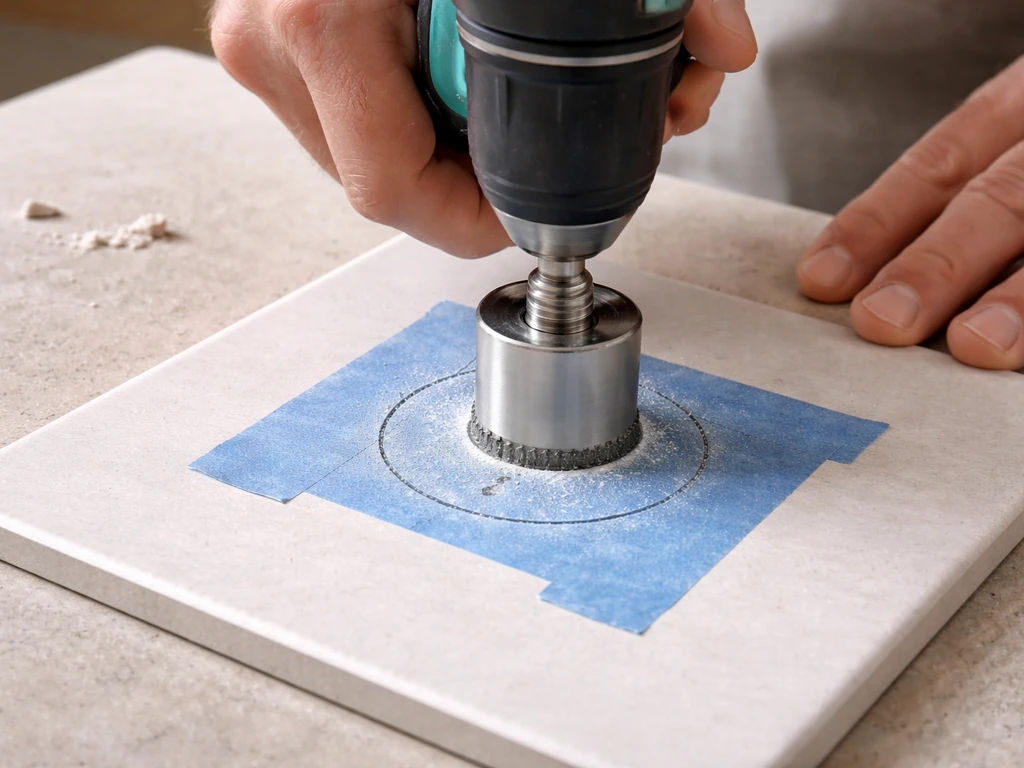
- Mark the center of the hole on the tile. Apply painter's tape over the area and re-mark.
- For holes up to about 1.5 inches, use a diamond-tipped hole saw in a drill at low speed with water cooling (a sponge kept wet around the hole works). Keep the drill as perpendicular as possible.
- For larger holes, use an angle grinder to cut a series of straight lines in a star pattern inward from the perimeter of your circle, then carefully break out the segments. Smooth the edge with a diamond hand pad.
- Work slowly. Porcelain generates a lot of heat in one spot, and rushing a hole saw or grinder cut will crack the tile from the center outward.
Curves and irregular shapes
True curves, like fitting a tile around a curved planter or a rounded step, are advanced cuts. The angle grinder is the practical tool here: make a series of straight relief cuts from the edge of the tile to just inside your curve line, creating narrow tabs of waste material. Then snap or grind away each tab and grind the remaining edge smooth. It is slower than it sounds, but it works. If you have more than a few curved cuts on a project, renting a tile saw with a curved cutting guide is worth considering.
Avoiding chips and fixing imperfect cuts
Even with the right tools and blade, chips happen. Here is how to minimize them and what to do when they occur.
Preventing chips before they happen
- Always use painter's tape on the cut line. This is the single most effective chip-prevention step.
- Cut with the face side of the tile up on the wet saw. The blade exits through the bottom, which is where tearout typically occurs. Keeping the face up protects the visible surface.
- Do not rush the feed rate. Slower and steadier produces a cleaner edge than fast and aggressive.
- Check that your blade is not worn out. A dull blade requires more force and causes more chipping. If the blade is glazed over (shiny metal showing at the rim), dress it by making a few cuts through a soft abrasive block.
- Keep the water flowing. Running the saw dry, even briefly, overheats the blade and causes erratic cutting that chips the glaze.
Fixing and hiding imperfect cuts
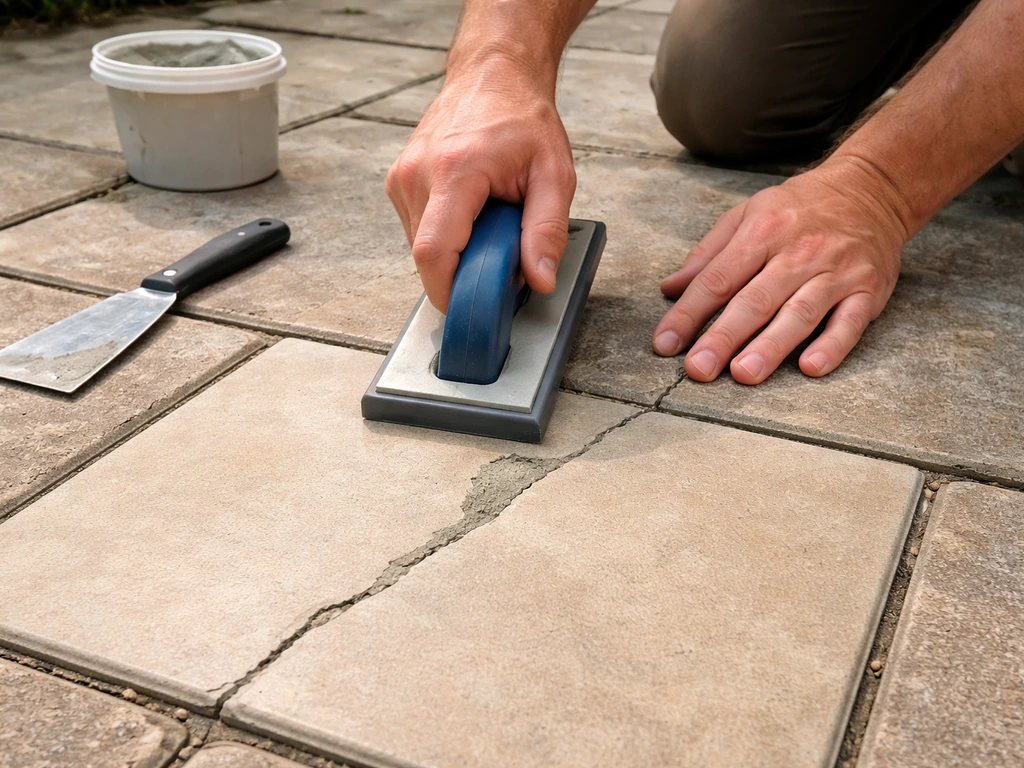
Small chips along a cut edge that will be covered by grout or hidden under a wall base are not worth stressing over. Fill them with sanded grout or tile caulk that matches your grout color and move on. For a visible edge, a diamond hand-rubbing stone (also called a tile rubbing stone) can knock down rough spots and small chips in a minute or two. Wet the stone and work it in a circular motion along the edge.
If a cut edge will be permanently exposed, such as along a step nosing or a finished border, consider using a tile edge profile (a metal or PVC trim strip) to cap it. This hides any imperfections and gives the edge a clean, finished look. It is honestly a better solution than trying to get a perfectly smooth cut edge on exposed porcelain anyway.
A tile with a crack running from the cut line into the body of the tile is not salvageable for structural use. If you already have cracked patio tiles, the next steps are to assess the damage, remove the broken tile safely, and reinstall or repair it correctly how to fix cracked patio tiles. Set it aside.
If the crack is minor and the tile is in a low-stress area, you can fill the crack with color-matched epoxy, but be honest with yourself about whether that repair will hold outdoors through freeze-thaw cycles. If you are wondering how to fix patio tiles that have chips, cracks, or uneven edges, start by identifying whether the damage is structural or cosmetic. For anything structural or visible, replace the tile.
Safety tips and when to call a pro
Basic safety on every cut
- Wear safety glasses every time. Porcelain fragments are sharp and travel fast.
- Add a dust mask rated N95 or better. Porcelain dust contains silica, which is a real respiratory hazard with repeated exposure.
- Wear hearing protection when using an angle grinder. Sustained grinding on hard tile is loud enough to cause damage over the course of a project.
- Wear cut-resistant gloves when handling cut tile. Freshly cut porcelain edges are razor sharp.
- Never use an angle grinder without the guard in place.
- Keep bystanders, especially children and pets, away from the cutting area.
- Wet saw water gets contaminated with tile slurry quickly. Do not let it drain directly into storm drains; let it settle and dispose of the solids in the trash.
When to bring in a professional
Most straight cuts and simple edge trims on a standard patio project are DIY-friendly if you have access to a wet saw (rental runs about $50 to $80 a day at most equipment yards). But there are situations where calling a pro makes real sense.
- You are working with very large format tiles (24x48 inches or larger). These require a large-format wet saw, and the tiles are heavy and awkward to handle safely alone.
- The project involves a high volume of complex cuts, like fitting tiles around multiple curved features, built-in planters, or irregular patio shapes. The time and rental cost can add up to more than a tile setter's labor.
- You have already cracked two or three tiles attempting cuts. Porcelain tile is expensive. If something is consistently going wrong, stop and figure out why before you ruin more material.
- The cutting is part of a larger structural repair, such as replacing tiles over a cracked or sunken slab. In those cases, the cutting is the least of the problem, and the underlying repair needs to be addressed correctly first.
- You are dealing with tiles already installed that need to be cut in place. In-place cuts with an angle grinder on an outdoor patio are doable but more complex, especially near existing grout lines, edges, or embedded features.
If your project involves more than just cutting tiles, such as replacing broken tiles, fixing cracked ones, or repairing the underlying surface, the cutting is one piece of a bigger job. If you already have damaged patio tiles, the repair process is similar: remove the broken pieces, clean the substrate, and set replacement tiles correctly replace patio tiles. Getting the cuts right matters, but so does making sure the tiles have something solid and level to sit on once they are cut and laid.
FAQ
Can I cut porcelain patio tiles with a snap cutter or scoring tool instead of a wet saw?
Usually no. Thick outdoor porcelain and large-format tiles often crack unpredictably with manual snap systems, even if they score cleanly. If you try anyway, only score lightly once, then support the tile fully during the snap, and expect more breakage than with wet cutting.
Why does my cut edge look chipped even when I use a diamond blade?
Most edge tearing comes from two issues, blade type mismatch (segmented wheels tend to chip glazed faces) or cutting too fast without enough water on a wet saw. Another common cause is marking and cutting through the glaze aggressively, use blue tape over the line and keep steady feed pressure.
What is the best way to prevent the tile from cracking while feeding it into the saw?
Support the full tile, especially the outfeed side for large pieces, and avoid letting the tile hang over the table edge. Also, do not force the tile into the blade, let the blade reach the material gradually, and stop if you hear grinding chatter.
How deep should I make the cut on a wet saw for porcelain?
Run the cut until the tile separates completely, do not try to cut only a shallow groove and then snap it. Porcelain needs consistent full-depth scoring from the blade because partial cuts can initiate cracks that spread during handling or installation.
Do I need to cut from the front or the back to reduce visible chips?
For most porcelain, the cleanest face finish comes from taking a wet-saw pass while keeping the face side up, so micro-chips are less noticeable. If you must grind a curve with an angle grinder, make relief cuts from the side that is least visible when installed.
How do I handle outlet or conduit holes without breaking the tile?
Do not attempt freehand drilling with an unplanned layout. Mark the hole location accurately, then rough out the opening by wet-saw notching or controlled grinder work, leaving a small amount of material to smooth. Use a diamond hole saw rated for porcelain if you need a clean round opening.
What should I do if the blade starts to overheat or the cut slows down?
Let the blade cool and reduce feed rate, overheating causes glazed-face damage and faster wear. On wet saws, verify the water is reaching the blade continuously, and if you notice dry spots, adjust the water feed before continuing.
Is it worth renting a tile saw with a curved guide if I only have one or two curved cuts?
If you only have a couple of curves, the relief-cut method with a grinder is usually more economical and flexible. Rent the curved-guide setup when you have multiple similar curves or when the curve radius is tight enough that grinder tab finishing would leave a rough edge visible on an exposed perimeter.
How can I tell if a chip will be cosmetic or a bigger problem?
If the chip is only on the surface edge and does not grow inward, grout coverage or an edge profile usually solves it. If you see a crack line that extends into the tile body from the cut, treat it as structural risk, replace the tile rather than relying on grout or caulk.
What PPE and setup mistakes matter most for porcelain cutting?
Use eye protection and respiratory protection, even on a wet saw because fine mist and splash can still irritate eyes and lungs. Also keep gloves that you can grip with, secure the tile firmly, and avoid standing directly in line with the blade path in case of kickback or misfeed.
Next Article
How to Fix Cracked Patio Tiles Step by Step DIY Guide
Step-by-step DIY to fix cracked patio tiles: diagnose tile and base issues, then repair or replace safely for lasting re