Uneven patio pavers are almost always caused by a failed bedding layer, a shifting gravel base, or water washing out the material underneath. The good news is that pavers are meant to be pulled up and reset, so this is one of the more DIY-friendly patio repairs you can tackle in a weekend. The key is diagnosing how deep the problem goes before you start prying anything up, because a surface-level shimming job won't hold if the base underneath has moved or washed out.
How to Fix Uneven Patio Pavers: Step-by-Step DIY

Talia Lang
16 May 2026
Quick diagnosis: why your pavers are uneven
Before you grab a pry bar, take 10 minutes to walk the patio and figure out what you're actually dealing with. The cause shapes the entire repair, and getting this wrong means you'll be pulling the same pavers up again in two years.
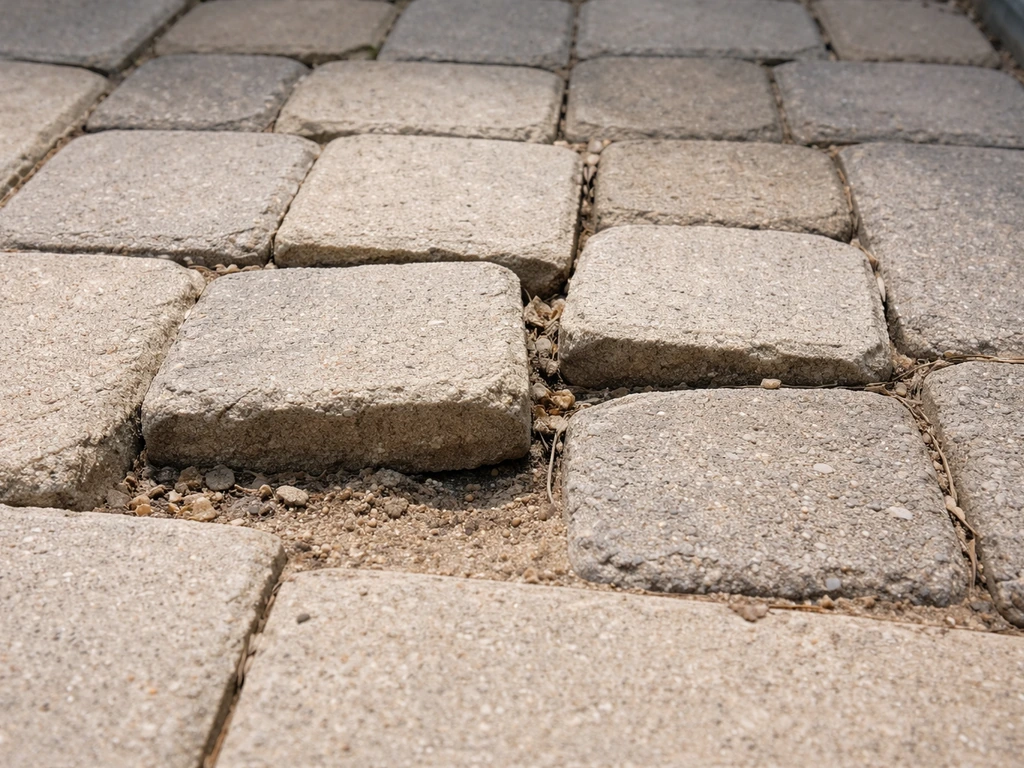
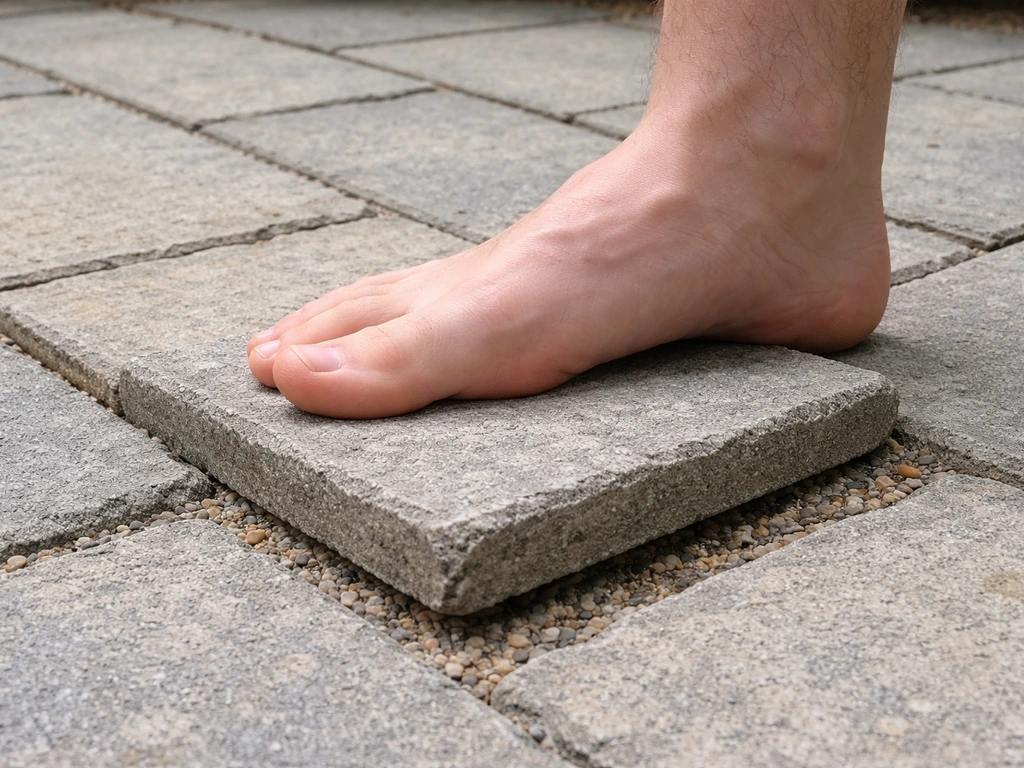
Press down on each uneven paver with your foot. A paver that rocks means the bedding sand beneath it has shifted or eroded. A paver that sits noticeably lower than its neighbors usually means the base material underneath has settled or washed away. The same diagnostic steps also apply when you're figuring out how to fix uneven flagstone patio areas, so start by checking what has shifted beneath the surface. A paver that's pushed upward in winter but settles back down in spring is classic frost heave, which happens when water accumulates in the base and freezes. And if you've got a whole section drifting and spreading apart, look at your edge restraints, because loose or missing edging lets the whole field of pavers migrate outward over time.
Also check your joints. Wide, eroded joints where you can see bare gravel or gaps bigger than a finger-width mean joint sand has washed out. That's not just a cosmetic issue: once joint sand is gone, pavers lose lateral support and start rocking and sinking. Water then finds an easy path straight down into the base, which accelerates the whole problem. A large share of paver patio repairs trace back to this exact chain of events.
Standing water anywhere on the patio after rain is another red flag. It means your slope has failed, your drainage has failed, or both. If water sits longer than a few minutes after moderate rain, you have a drainage problem that needs to be corrected as part of the repair, or the unevenness will come back.
| Symptom | Most likely cause | Repair depth needed |
|---|---|---|
| One or two pavers rocking | Bedding sand shifted or thin spot underneath | Surface reset, rebed |
| Sunken section (3+ pavers) | Base material settled or washed out | Remove pavers, rebuild base and bedding |
| Pavers pushed up (especially in winter) | Frost heave from water in base | Remove pavers, fix drainage, rebuild base |
| Pavers spreading apart | Loose or failed edge restraints | Reset edge restraints, re-compact |
| Widespread low spot with standing water | Poor drainage slope or base failure | Excavate, regrade, full rebuild |
Safety, tools, and materials checklist before you start
This repair doesn't require exotic equipment, but having the right stuff before you start saves multiple trips to the hardware store mid-job.
Safety gear
- Heavy work gloves (pavers have sharp edges and weigh 8–15 lbs each)
- Safety glasses when using a maul or chisel
- Steel-toed boots if you're moving a lot of pavers
- Knee pads for bedding work
Tools
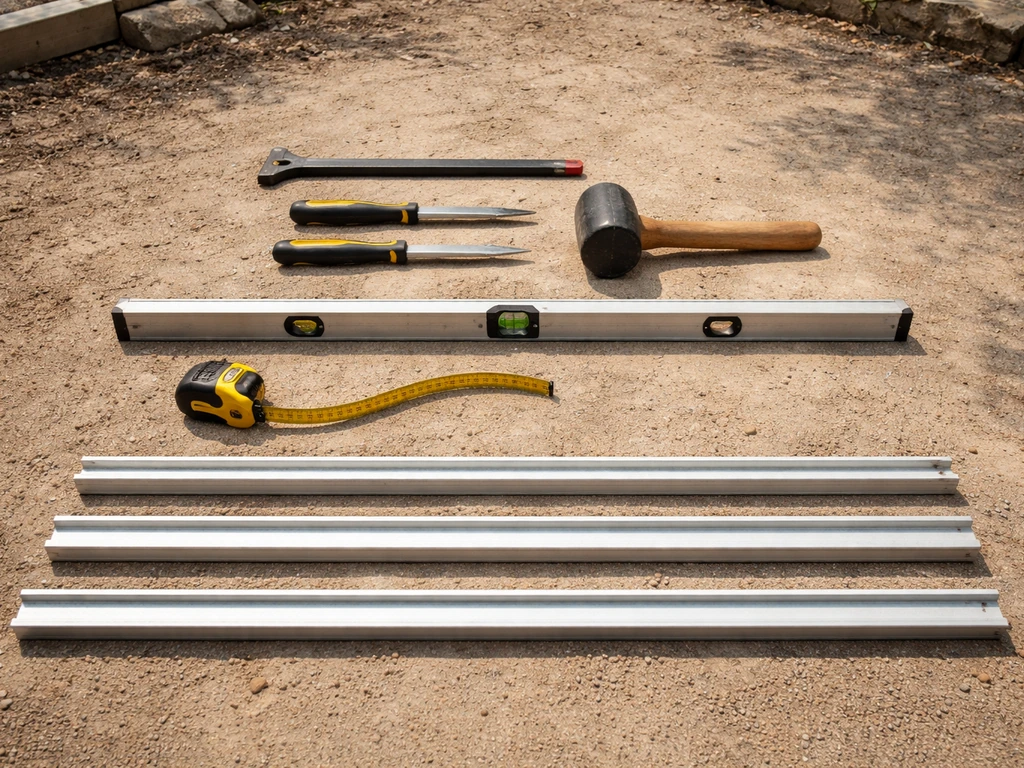
- Flat pry bar or two wide, flat screwdrivers to lift pavers without chipping edges
- Rubber mallet
- Long level (4-foot is ideal) and a tape measure
- Screed rails (sections of 1-inch PVC pipe or metal conduit work fine)
- Straight 2x4 for screeding sand
- Hand tamper or plate compactor (rent a plate compactor for any job larger than 20–30 sq ft)
- Garden hose or watering can
- Broom and leaf blower for cleanup
Materials
- Coarse washed concrete sand (also called bedding sand) for the 1-inch setting layer
- Crushed gravel (3/4-inch compactable base material) if rebuilding the base
- Polymeric jointing sand for refilling joints after reset
- Edge restraint spikes if any edging has pulled loose
- Paver sealer (optional, but recommended over polymeric sand once it cures)
- Geotextile fabric if you're excavating clay soil
Step-by-step fix: resetting individual pavers that rock or sit high/low
This method works when only a few isolated pavers are off and the surrounding area feels solid when you walk on it. If a whole section has dropped or if the base feels soft and spongy underfoot, skip to the base rebuild section below.
- Mark the affected pavers with chalk before you start so you don't lose track of the repair zone.
- Slide a flat pry bar into the joint at the edge of the first paver and gently lever it up. Try to lift straight rather than prying sideways, which can chip the edge of the adjacent paver. Once the first one is out, the rest in the section lift out easily by hand.
- Set the removed pavers nearby in the same orientation they came out, so you can put them back in the same pattern.
- Look at the sand underneath. You're looking for thin spots, voids, or areas where sand has been washed or compacted down unevenly. Scoop out the old bedding sand from the affected area.
- Set two screed rails (1-inch diameter PVC pipe works perfectly) parallel across the area, about 12 inches apart. These act as depth guides.
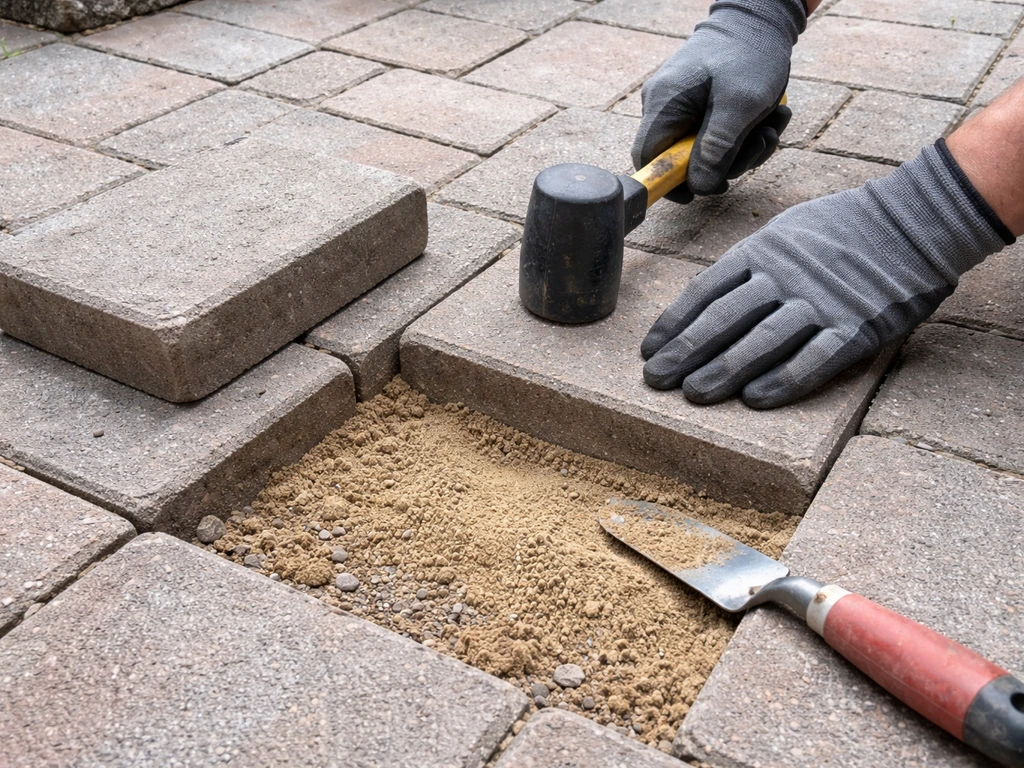
- Pour fresh coarse bedding sand and drag your 2x4 across the rails to screed it flat and level at exactly 1 inch deep. The ICPI installation standard and most major paver manufacturers specify 1 inch as the target bedding depth. Do not compact the bedding sand before laying pavers — the pavers get compacted into it during the final step.
- Remove the screed rails and gently fill in the rail grooves with a little extra sand, smoothed by hand.
- Set the pavers back in place by hand. They should sit slightly high (about 1/8 to 1/4 inch) compared to surrounding pavers at this point — that's normal.
- Use a rubber mallet and your 4-foot level to check height as you go. Adjust by adding or removing small amounts of bedding sand. Take your time here — this is where the final level is set.
- Once all pavers are back in place, run a plate compactor over the section (or use a hand tamper for small areas). This drives the pavers down into the bedding sand to their final height and locks them in place.
- Fill joints with polymeric sand (instructions in the finishing section below).
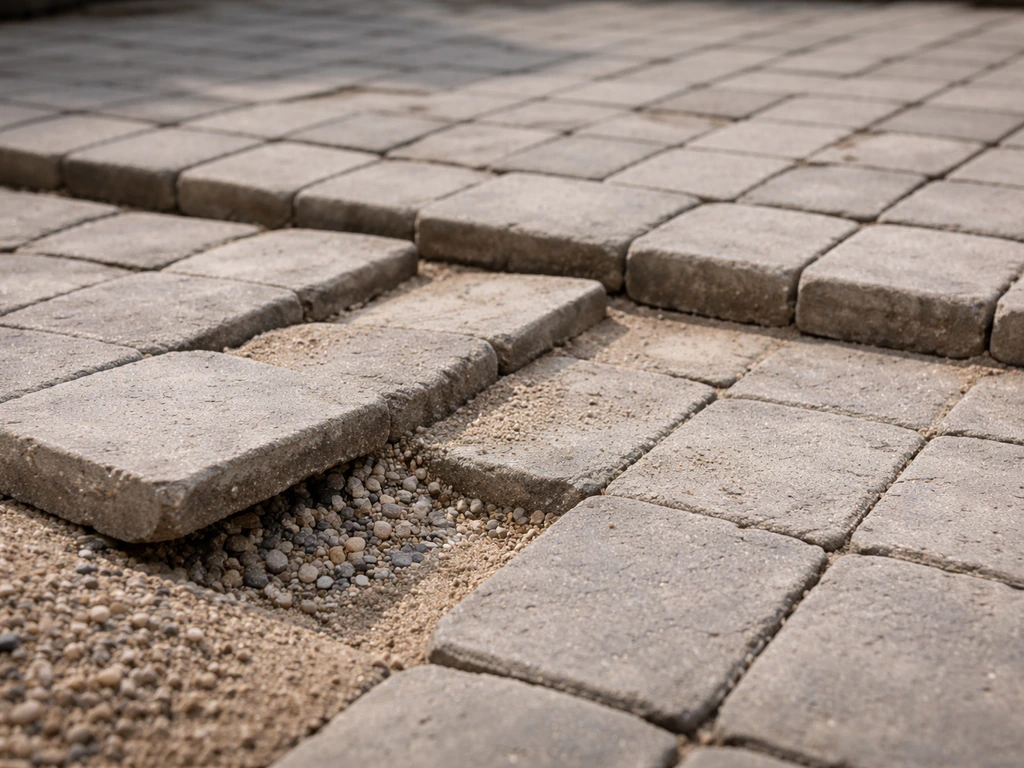
Fix the base: how to rebuild when a whole section has sunk
If you've got a sunken section, the problem is below the bedding layer. Resanding on top of a failed base is a waste of time. You need to excavate, find out what happened, fix it, and rebuild. It's more work, but it's the only repair that actually lasts.
- Remove all pavers in and around the affected area, extending at least one paver row beyond where the problem is visible. Problems in the base tend to be wider than the surface symptoms suggest.
- Dig out the old bedding sand and expose the gravel base beneath it. For most residential patios, you're looking for 4–6 inches of compacted gravel base under the sand layer.
- Inspect the base material. If it looks muddy, waterlogged, or mixed with soil, that material needs to come out. Scoop it out until you reach solid, undisturbed subgrade or firm native soil.
- If you're in clay-heavy soil or had water infiltration problems, lay a layer of geotextile landscape fabric over the subgrade before adding new base material. This prevents fine soil from migrating up into the gravel over time.
- Add fresh compactable base gravel (3/4-inch crushed stone) in layers no more than 3–4 inches thick. Compact each layer with a plate compactor before adding the next. Run 3–4 passes per lift to get full compaction. Skipping this step is exactly how the problem started in the first place.
- Build the base back up to the correct depth so that when you add 1 inch of bedding sand and set the pavers, everything ends up at the right finished height relative to surrounding pavers and any adjacent structures.
- Once the base is compacted and firm, screed your 1-inch bedding layer and reset pavers using the same method described in the individual paver reset section above.
One specific issue worth calling out: if your base failed because of tree roots pushing up from underneath, you have a decision to make. Cutting surface roots and resetting usually works short-term, but if large roots are involved, the heaving will return. This is one of those situations where it's worth thinking honestly about whether that tree and that patio can coexist long-term.
Drainage and slope: fix this now or redo the repair in two years
Water is the single biggest reason paver patios fail. Poor drainage doesn't just cause standing water, it causes washout, frost heave, and base settlement. If your slope is wrong, no amount of base work will fix the problem permanently.
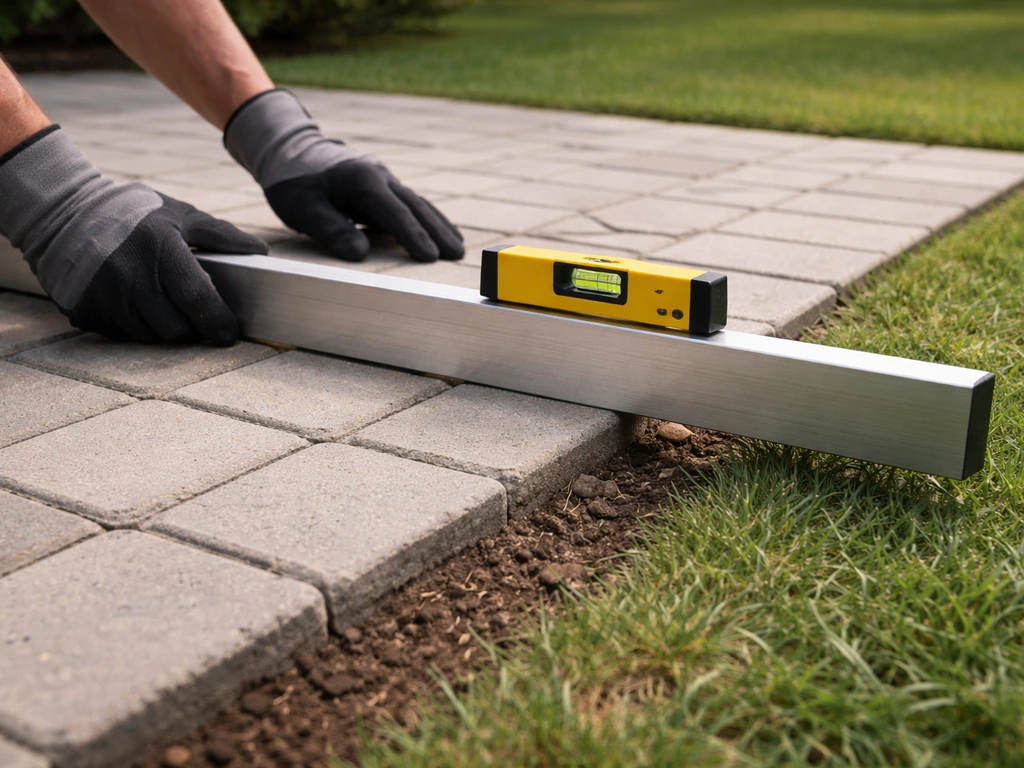
The standard target is a minimum 2% slope away from your house, which works out to 1/4 inch of drop per foot. So a 10-foot patio needs to drop at least 2.5 inches from foundation to outer edge. A 1% slope (1/8 inch per foot) is the absolute minimum that will move water. Anything flatter than that and water will pond.
When you're rebuilding a section, use your level and a tape measure to verify slope as you set the base and bedding layers. If the whole patio has gradually lost its slope over the years due to settlement, a full-section rebuild is the real fix. Adding material to the low end while leaving the high end untouched can work for minor corrections, but if the grade reversal runs toward the house, take it seriously. If the patio has a low spot, you will usually need to adjust the base and bedding so the area is properly supported and drains correctly low spot in a paver patio. Water running toward a foundation is a much bigger problem than an uneven patio.
Also look at where water comes from. Downspouts that empty onto or near the patio, runoff from a lawn that's higher than the patio edge, or a patio that sits in a natural low spot all put extra hydraulic pressure on the base. Extend downspouts away from the patio, or add a channel drain at the patio edge if runoff is unavoidable. Fixing the patio without fixing the water source is a short-term repair at best.
Finishing and stabilization: joint sand, compaction, and sealing
Once your pavers are reset and leveled, the finishing steps are what make the repair hold. Skipping or rushing these is how people end up with a repair that looks good for one season and then starts rocking again.
Leveling tolerances
Run your 4-foot level across the reset area and across the transition to undisturbed pavers. A height difference of 1/4 inch or less between adjacent pavers is acceptable. More than that is a trip hazard and means you need to pull a paver and add or remove a small amount of bedding sand.
Filling joints with polymeric sand

Wait until the paver surface is completely dry before applying polymeric sand. This is important: polymeric sand activates with water, and sweeping it onto damp pavers causes it to clump and smear on the surface, which is a mess to clean up. Pour the sand over the patio and sweep it across the surface in multiple directions, working it down into the joints until they are completely filled. You want the sand to sit about 1/8 inch below the paver surface (or below the bottom of the bevel on beveled-edge pavers). Then run your plate compactor over the entire surface one more time. This final compaction settles everything and drives the polymeric sand fully into the joints. After compacting, sweep off any remaining loose sand from the paver faces and then lightly mist the surface with water to activate the polymer binders. Follow the specific timing instructions on your bag of polymeric sand for the misting step, as products vary.
Sealing: useful but not required
Sealing is not required for a paver patio to perform well, and most major paver manufacturers are upfront about that. But sealer does slow joint sand erosion, makes the surface easier to clean, and can enhance color if that matters to you. If you want to seal, wait at least 30 days after applying polymeric sand so it has fully cured. Use a penetrating or film-forming paver sealer designed for the paver type you have, apply it on a dry day above 50 degrees, and avoid over-application, which traps moisture and causes a cloudy, peeling surface.
When to stop DIYing and call a professional
Most individual paver resets and even moderate base repairs are well within reach for a competent DIYer with a weekend and some rented equipment. But there are a few situations where pushing forward on your own is likely to cost you more in the long run. If you still have trouble after the basic resetting steps, you may need to move into a deeper base rebuild workflow to fix uneven patio slabs for good.
- The unevenness is widespread across the majority of the patio, not isolated to a section. At that point you're essentially rebuilding the whole patio, and a professional can do that faster and with better equipment.
- Water is draining toward your house foundation despite your repair attempts. This is a grading and drainage problem that may involve more than the patio itself.
- The same section has sunk or heaved multiple times. Recurring failure in the same spot almost always means there's a drainage problem or soil instability you haven't identified yet.
- You find soft, unstable subgrade soil (the patio base sits on soil that feels like it has no bearing capacity). This can indicate a high water table, buried organic material, or other site conditions that need professional assessment.
- Significant cracking of concrete pavers alongside sinking suggests compressive failure or major base movement that goes beyond a standard reset.
- You're dealing with a very large patio (500+ sq ft) with multiple failed sections. The equipment, material costs, and labor involved often tip the economics toward hiring out.
If your situation is more about loose individual pavers rather than sinking, or if you're dealing with a related material like flagstone or brick, the repair approach shares the same core principles but has some differences worth knowing about. If you need to fix loose patio bricks, the key is to diagnose the base and joints first, then reset or rebuild so the stones have proper support. The underlying logic is always the same though: find out why the paver moved, fix the cause, and reset it properly. If you’re dealing with loose patio stones, the fix usually starts by checking the base and re-leveling the pavers, then topping up joint sand how to fix a loose patio stone. If your brick patio is uneven, the same diagnosis-first approach helps you choose whether to reset pavers or rebuild the base. Patch-and-pray repairs don't hold.
FAQ
Can I just add more sand under the pavers without pulling them up?
If the paver is rocking, sunken, or the surface has dropped, you generally need to lift and reset. Pouring sand under a settled area from above usually creates soft spots and does not rebuild edge or base support, so the pavers can sink again. If only one corner is high or low and the paver is not rocking, spot shimming after lifting and re-compacting bedding is more reliable than trying to fill voids without excavation.
How do I tell whether the problem is bedding sand vs the gravel base?
Do a simple spot test after removing one suspect paver. If the bedding sand is loose, washed, or you can scoop it easily, the bedding layer likely failed. If the base feels uneven, hollow, or soft/spongy, or the sub-base shows washout channels, the base has failed. Also check how far the void extends under neighboring pavers, if it extends more than a paver-width, plan on base work rather than resanding.
What if the pavers are lifting in winter but fine in summer?
That pattern strongly suggests frost heave or trapped moisture. The fix is not just leveling, it is stopping water from accumulating in the base by restoring proper slope, repairing joint loss that lets water funnel downward, and ensuring edge restraints hold the field in place. If you see damp base material when you lift a paver during a thaw, you likely have a drainage or water source issue that must be corrected.
My joints look fine, but pavers still rock. Why?
Rocking usually means the paver lacks lateral support, which can happen even with visually narrow joints. Common causes include uneven bedding thickness, a base that has settled in spots, or a transition area where the pavers meet a rigid surface (like a stoop or foundation) without an expansion gap. When you lift a rocking paver, verify bedding is consistent and check adjacent pavers for gaps or a subtle low spot under them.
How much unevenness is too much to ignore?
A small height difference between adjacent pavers can be acceptable, but use a mobility rule of thumb. If a straightedge or level shows a noticeable trip point, or if a shoe catches on the edge, lift and correct it with a small bedding adjustment. Consistently exceeding a quarter-inch difference between neighbors usually signals bedding/base movement that will worsen if you keep walking on it.
Do I need to use a plate compactor after resetting pavers, even if they feel solid?
Yes, compaction is what locks the bedding and joint sand into a stable configuration. Hand-tamping may leave voids and uneven thickness. Run the compactor after you place the bedding and after polymeric sand has been swept in, then re-check level across the transition to undisturbed pavers.
Can I use regular sand instead of polymeric sand in joints?
You can, but regular joint sand will wash out more easily under heavy rain or bad drainage. Polymerically setting sand helps resist erosion and keeps pavers laterally supported longer, especially where water runoff is a concern. If you choose regular sand, plan for more frequent top-ups and be extra strict about correcting slope and drainage so joints do not repeatedly wash out.
What if it rained right after I misted polymeric sand?
Treat it like a potential activation and washout risk. If significant rain hit immediately after misting, the polymer binders may not set properly, and you can end up with joint smearing or weak joints. Wait for the surface to dry fully, then inspect joints. If joints look washed out or sandy on the surface, you may need to repeat the drying, cleaning, and resealing process for the joint sand according to the product instructions.
How long should I wait before walking on the patio after polymeric sand?
Most products require time for activation and curing. Avoid heavy foot traffic until the surface is set and joints are holding, and follow the bag’s specific timing. As a practical approach, keep traffic light for at least the first day, and only resume normal use after curing time has passed and the joints are not loosening when you lightly probe them.
Should I seal the pavers immediately after polymeric sand?
No, sealing too soon can trap moisture and interfere with proper joint performance. Wait at least a full curing period (commonly 30 days) before sealing, unless the sealer and polymeric sand manufacturer instructions say otherwise. If your area has frequent rain or cool evenings, extend the waiting time to ensure everything is thoroughly dry and cured.
When do I need a full base rebuild instead of a resand reset?
Choose a base rebuild if the base feels soft or spongy, if a whole section has dropped, if water continues to pond after adjustments, or if you find washout channels or significant voids under the bedding. Resanding over a compromised base will usually fail quickly because the underlying movement is still happening. A base rebuild is also the right move when the patio has lost its overall slope through long-term settlement.
What are the warning signs that tree roots will keep ruining the patio?
If you lift a paver and see active root growth, repeated heaving in the same spot, or roots are large enough to lift multiple pavers or create recurring high points, short-term cutting and resetting may not last. The longer-term decision depends on whether you can safely manage the roots and whether drainage will remain stable after reset. If the roots are aggressive, consult a professional about root management and evaluate whether the patio location and grading can realistically coexist with the tree.
Citations
Common recommended patio slope is about 1/8 to 1/4 inch per foot (roughly 1%–2% fall) to shed water.
https://howtohardscape.com/paver-patio-slope-for-drainage/
A stated fall-away target is about 1/4 inch per foot (2% fall) to direct water away from buildings.
https://shunshelter.com/article/how-to-grade-for-a-paver-patio
Belgard specifies bedding sand should be at least 1-inch deep, spread evenly and leveled/screeded, before setting pavers.
https://www.belgard.com/plan-design/installation-beyond/installation/
A referenced installation PDF describes using compacted base material, then screeding the sand setting bed to a uniform depth of about 1 inch before pavers are installed.
https://www.paversupply.com/wp-content/uploads/2020/06/PaverInstallation.pdf
Bell’s polymeric sand instructions include sweeping polymeric sand into joints (filling them completely) and then compacting by passing a plate vibrator over the entire surface; they also caution not to sweep polymeric sand over damp pavers.
https://www.bellindustries.com/help-advice/polymeric-sand-installation/
Techniseal’s technical sheet specifies sweeping polymeric sand into joints so it fills them down to their full depth, then running a plate compactor over the entire surface to fully compact the joints.
https://www.techniseal.com/pub/media/catalog/product/pdf/tds_smartsand_us_pro_en.pdf
Unilock recommends installing jointing sand so it sits about 1/8 inch below the bottom of a beveled paver edge (or about 1/8 inch below the paver surface for non-beveled pavers).
https://contractor.unilock.com/product/joint-sand/
Unilock states sealing is not required for their paver systems on grade (and also notes jointing sand guidance and compaction approach).
https://contractor.unilock.com/installation/paver-installation/how-to-install-patio-on-grade/
This guide describes compacting base in lifts (example given: 3–4 passes per lift with a plate compactor) and notes a 1-inch bedding layer is standard; it also mentions using geotextile over subgrade in clay soils.
https://blog.harborsoils.com/paver-base-gravel-guide/
Unilock’s overview specifies a typical system concept: compacted gravel base, then a 1-inch sand (or tiny stone chips) layer on top, smoothed/leveled; edge restraints are used to prevent shifting.
https://unilock.com/construction-101/
This guide states every paver patio must have a minimum 2% slope (1/4 inch per foot) away from the home’s foundation for surface drainage.
https://www.blcyardworks.com/built-to-last-the-unseen-essentials-of-a-blc-patio-project/
Belgard’s product installation guide notes that the washed concrete sand is screeded between screed rails and also specifies not to compact the sand setting bed before laying pavers.
https://www.belgard.com/wp-content/uploads/2025/05/Product-Installation-Guide_WEB_BEL24-D-298050.pdf
The PDF describes an overall sequence including excavation/compacting base material, then screeding the sand setting bed to a uniform depth (commonly about 1 inch).
https://www.paversupply.com/wp-content/uploads/2020/06/PaverInstallation.pdf
Rochester Concrete Products flags standing water as a red flag and links water issues to joint sand erosion/widening and subsequent loss of system integrity (leading to settling and movement).
https://rochestercp.com/proper-paver-base
This guide attributes sinking/tilting to movement caused by poor grading/drainage design and also notes joint sand loss (including polymeric joint sand washing out) can contribute to outward drift and low spots.
https://envisioninggreen.com/landscape-care/why-is-my-paver-patio-sinking-and-how-to-fix-it/
Bovees states paver systems can be lifted/re-set in localized areas and that areas pushed upward are often associated with tree roots, while repeated frost heave in the same area can indicate a drainage problem allowing water to accumulate in the base.
https://bovees.com/patio/surfaces-and-materials/pavers/how-to-fix-sunken-pavers/
Frost heaving is explained as being caused by ice lens formation during freezing in susceptible soils/base materials (an engineering description of the mechanism behind heaving).
https://pavementinteractive.org/reference-desk/design/design-parameters/frost-action/
Bell emphasizes that the surface must be dry before sweeping polymeric sand over it, and includes steps for sweeping and plate/vibrator compaction to lock joint sand.
https://www.bellindustries.com/help-advice/polymeric-sand-installation/
The ICPI manual discusses bedding sand placement principles and notes pre-compaction of bedding sand is not typically done (instead, pavers are compacted into the bedding during final installation).
https://apgmidatlantic.com/wp-content/uploads/resources/ICPI%20Tech%20Specs/Resource%20Guide/ICPI%20Installation%20Manual.pdf
Unilock states edge restraints are crucial for stability and describes installation positioning for plastic edging (e.g., sitting about 1/2 inch below the top of the pavers).
https://unilock.com/construction/installing-paver-edge-restraints/
A regional repair guide claims joint failure and erosion are behind a large share of paver patio repairs (and advises excavating failed base/bedding materials when sinking occurs).
https://www.reandsonslandscaping.com/post/paver-patio-repair
Unilock’s maintenance guide states common causes found during repair include water retention in base material, washed-out bedding or joint sand, or loose edge restraints that allow pavers to move apart; it also notes pumping/poor drainage can be addressed by removing units, repairing the base, and resetting.
https://contractor.unilock.com/wp-content/uploads/sites/2/2021/09/Paver-Maintenance-Guide.pdf
Next Article
How to Fix Patio Pavers: Diagnose and Repair Steps
Learn how to diagnose and repair loose, cracked, or sunken patio pavers with correct base leveling and joint sand restor