Redoing a brick patio means tearing out what's there, fixing the real problem underneath, and rebuilding from the ground up with a properly compacted base, correct drainage slope, and quality materials so the surface stays level and solid for years instead of sinking again next spring. If the patio is still mostly solid, resurfacing can be a quicker option, but it only works when the base and drainage issues are corrected first resurfacing a brick patio. If you skip the base work and just relay the bricks on top of a failed subgrade, you'll be pulling them up again in two seasons. The right approach takes a weekend or two, some rented equipment, and a clear plan before you lift the first brick.
How to Redo a Brick Patio: Step-by-Step DIY Guide

Talia Lang
18 May 2026
Start here: what's actually wrong with your patio
Before you rent a plate compactor or order gravel, spend 20 minutes doing a real assessment. Walk the entire patio surface and look for these specific failure patterns, because each one tells you something different about the root cause.
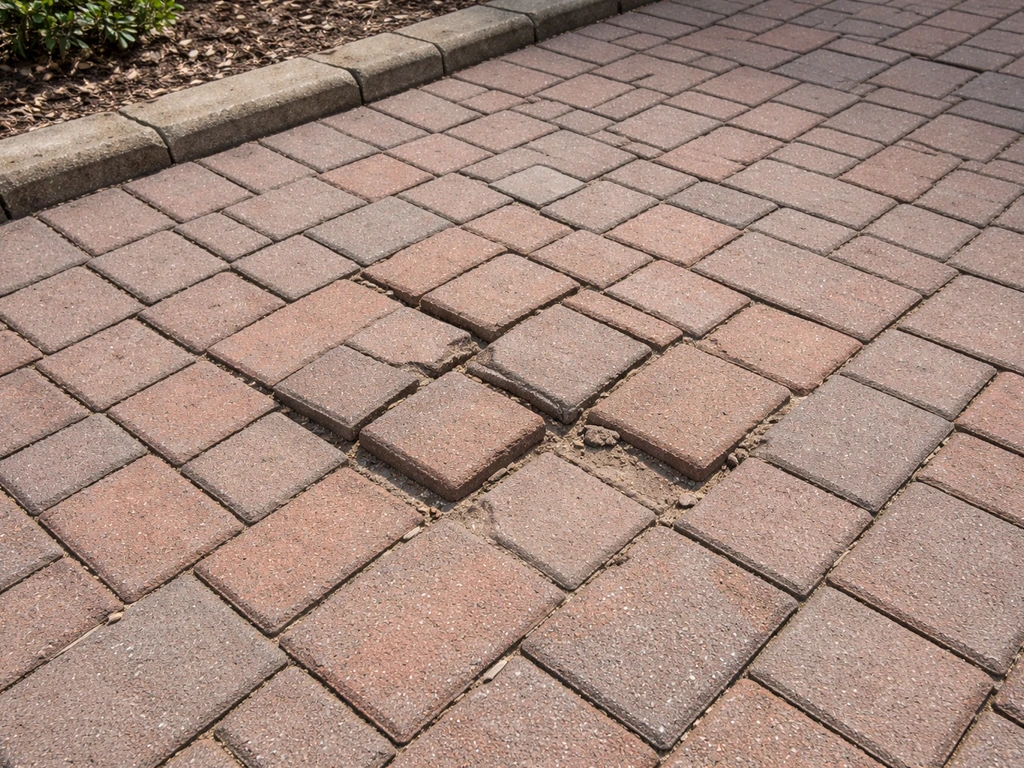
- Sunken or low spots: usually caused by inadequate aggregate depth, inconsistent compaction, or water repeatedly softening the subgrade underneath. The surface settles where the base gave way.
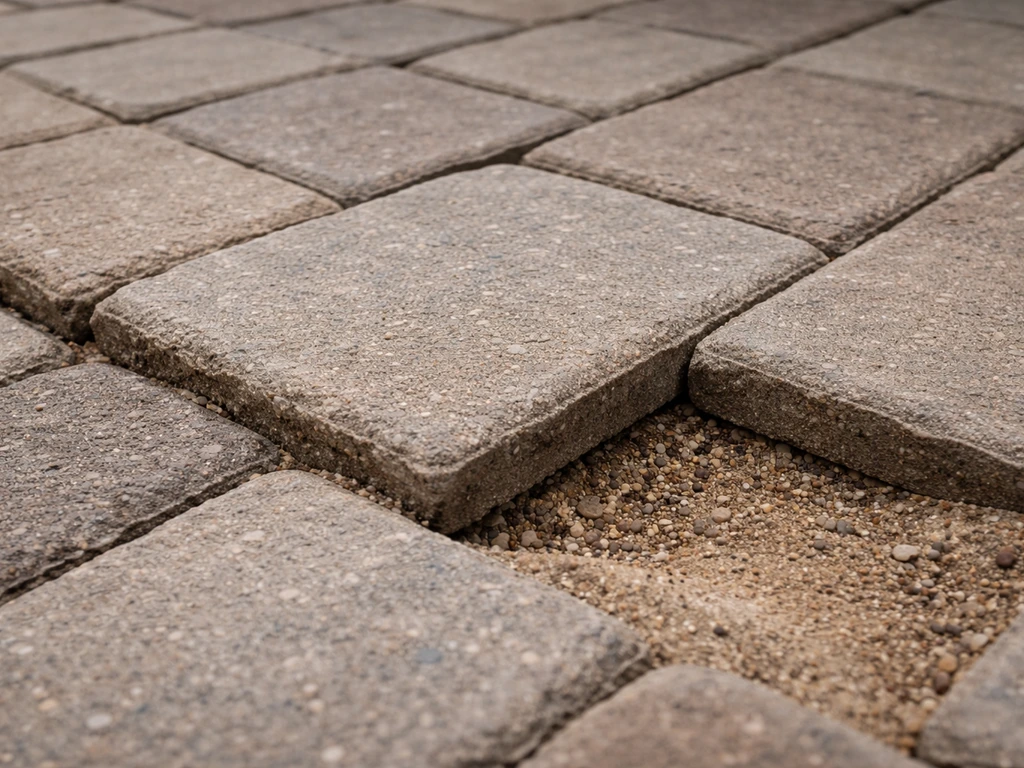
- Loose or rocking bricks: if individual bricks wobble, the bedding sand has washed out or was never properly screeded, or edge restraints are missing and the whole field has shifted laterally.
- Standing water after rain: water pooling on the surface is a reliable sign the grade is wrong or the drainage design is broken. Water problems always start below the surface.
- Weed growth through joints: joint sand has washed out, which means water is also moving through those joints and softening the base over time.
- Widespread cracking or spalling: could be freeze-thaw damage on the brick face itself, or point-loading from an uneven base beneath.
- Efflorescence (white hazy deposits): water is migrating upward through the brick, carrying mineral salts. This is a moisture symptom, not a cosmetic one.
The most important thing to figure out at this stage is whether the failure is localized or widespread. A couple of sunken bricks in one corner might just be a repair job. If you decide a repair is possible, follow the right sequence: remove the loose bricks, fix the base and slope, then reset and joint the area so it stays solid repair a brick patio. But if you're seeing low spots, standing water, and loose bricks scattered across the whole patio, that's a base and drainage failure, and the only real fix is a full redo.
Redo vs. repair: how to make the call
There's real money and effort at stake here, so it's worth being honest about what you're looking at. The guiding principle used by hardscape pros is simple: if the base is still intact and only a small area has shifted, you can often remove those bricks, correct the grade in that spot, and reset them. This is essentially how to repoint a brick patio when only a small section has shifted and the base is still sound reset them. But if multiple areas keep moving, water is pooling, or the base has failed across a significant portion of the patio, patching is just delaying the inevitable. You need to solve the root cause, not the symptom.
| Situation | Best approach | Rough DIY cost |
|---|---|---|
| 1-4 sunken bricks, solid base nearby | Spot repair: remove, add/re-compact base, reset | $20-$80 in materials |
| One section (up to ~20%) sunken or loose | Partial redo: remove section, fix base and drainage in that zone, rebuild | $150-$400+ depending on size |
| Widespread sinking, standing water, loose bricks across patio | Full redo: complete tear-out, base rebuild, new drainage slope | $500-$2,000+ DIY materials for average patio |
| Repeated failures after past patches | Full redo with professional drainage assessment | Pro quote needed |
If you've already patched the same spots twice and they keep sinking, stop patching. That's your sign the drainage design or subgrade is fundamentally broken. A full redo is the only thing that will actually solve it. You might also want to think about whether the existing bricks themselves are worth reusing: if they're in decent shape, cleaning and relaying them saves money. If they're cracked, spalling badly, or you want to change the pattern, budget for new material.
Tools, materials, and protecting what you're not replacing
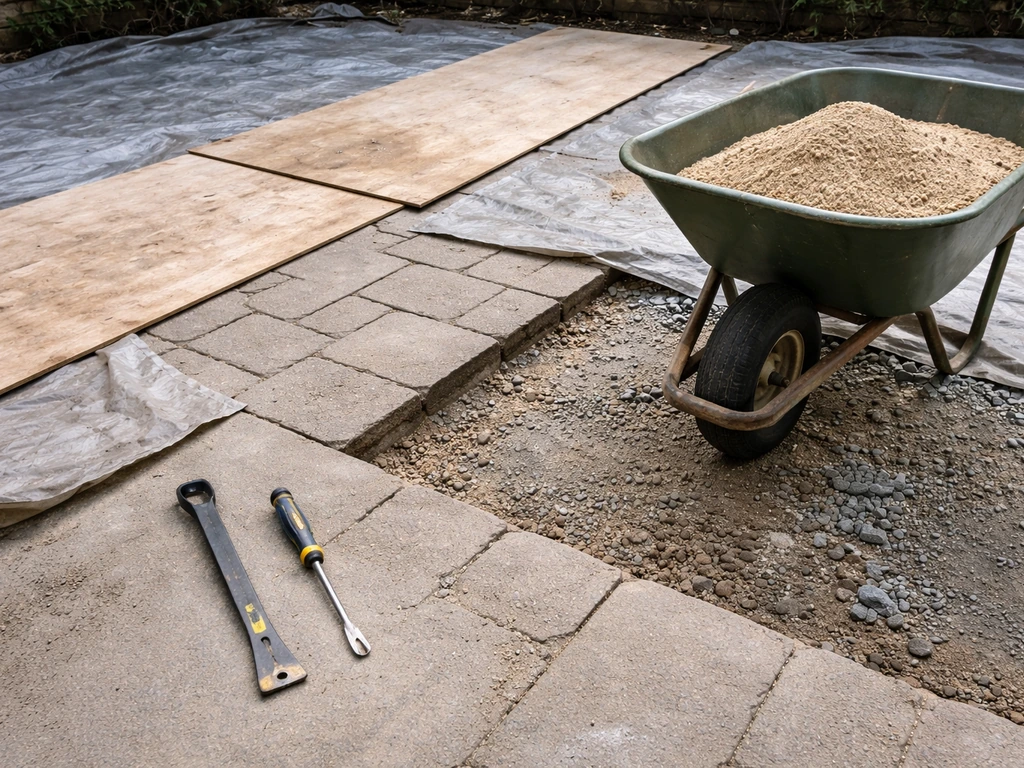
What you'll need
| Category | Item | Notes |
|---|---|---|
| Demo | Pry bar and flathead screwdriver | For lifting individual bricks without breaking them |
| Demo | Wheelbarrow and heavy-duty tarps | For hauling material and protecting plants |
| Excavation | Spade shovel and mattock | Mattock is useful for breaking up clay-heavy subgrades |
| Compaction | Plate compactor (rent) | Essential, not optional. Hand tampers are not sufficient for base layers |
| Grading | Long level (4 ft minimum) and string lines | For checking and setting slope across the whole patio |
| Screeding | Two straight pipes or metal conduit, 1 in diameter | Used as depth guides for screeding bedding sand |
| Cutting | Angle grinder with diamond blade, or a wet saw (rent) | Wet saw gives cleaner cuts; angle grinder works for straight cuts |
| Jointing | Broom, leaf blower, garden hose with misting nozzle | For sweeping in and activating polymeric sand |
| Safety | Safety glasses, hearing protection, work gloves, knee pads | You'll be on your knees a lot |
Materials list
- Crushed stone aggregate (typically 3/4 in clean crushed limestone or gravel): plan for 4 inches of compacted depth as a starting point for a standard residential pedestrian patio on good soil
- Coarse bedding sand (ASTM C33-graded concrete sand): you need roughly a 1-inch screeded layer. Do not use mason sand, play sand, or stone dust as a substitute
- Bricks or pavers: measure your patio area, add 10% for cuts and waste
- Polymeric joint sand: sized for the joint width of your brick pattern
- Rigid plastic or steel edge restraints with 12-inch spikes: one piece per linear foot of patio perimeter
- Geotextile landscape fabric (optional but recommended on clay-heavy or poorly draining soils): goes between subgrade and aggregate to prevent fines from migrating up
- Paver sealer (optional): only apply after patio has cured and any efflorescence has been addressed
Protect your landscaping and edges before anything else
Lay heavy tarps or plywood sheets over nearby lawn, garden beds, and plants before you start demo. Brick, gravel, and base material sliding off a wheelbarrow will kill grass and crush perennials faster than you'd think. Mark out underground utilities before any digging (call 811 in the US). If the patio runs alongside your house foundation, keep water runoff directed away from the foundation throughout the whole project, including while the base is exposed. If you have raised flower beds or timber edging bordering the patio, you may need to temporarily brace them when you remove the edge restraints and soil support on that side.
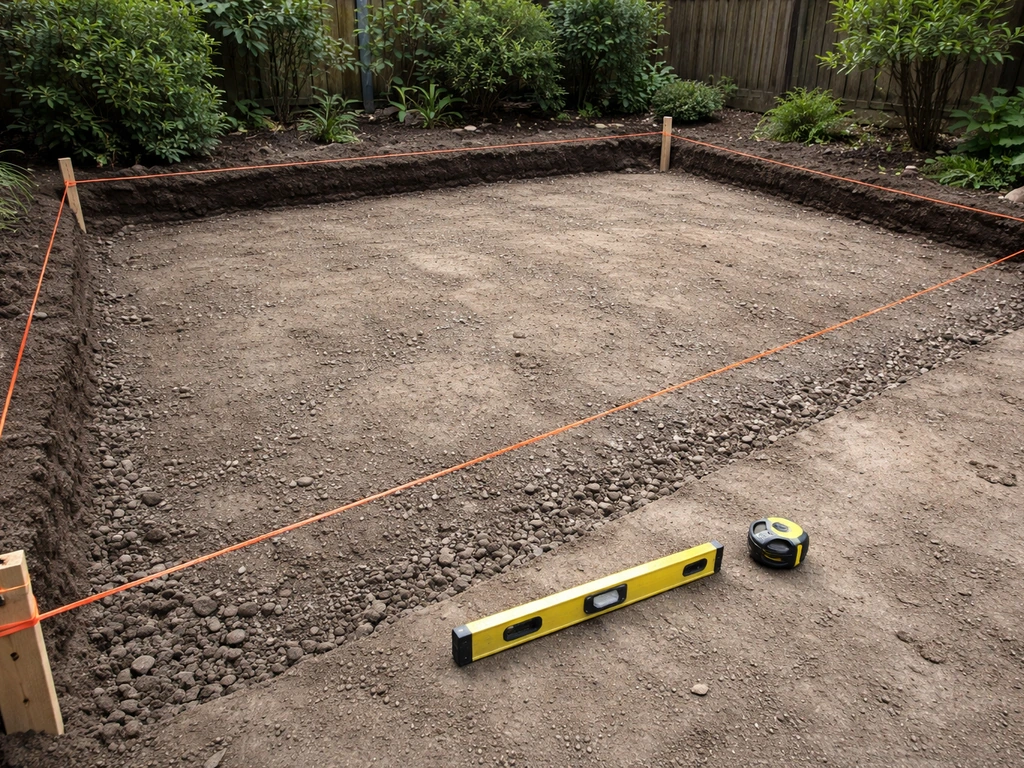
Tear-out and base inspection
Start at one corner and work across the patio systematically. Use a flathead screwdriver or pry bar to pop up the first brick, then use that gap to lift adjacent ones. Stack bricks on pallets if you're reusing them, and keep them nearby but out of your work zone. For mortared brick patios, you'll need a cold chisel and hammer to break the mortar joints first, which adds time and labor. Wet-set (mortared) tear-out is significantly harder than dry-set removal, so budget an extra half-day if that's what you have.
Once all bricks are off, scrape up the bedding sand layer and wheelbarrow it out. Now you're looking at your base aggregate, and this is the most important inspection of the whole project. Dig a small test hole about 12 inches deep in a few spots across the patio, especially near any areas that were sunken or problem areas. You're checking two things: how much aggregate base was originally there (often you'll find only an inch or two in a failed patio when 4 inches is the minimum), and what the subgrade soil looks like. If the soil is wet, spongy, or you can push a screwdriver into it easily, the subgrade was never properly compacted or has been repeatedly saturated by poor drainage.
A badly failed subgrade, especially if you're seeing ongoing water saturation or erosion channels in the soil, is a signal that this job may be beyond straightforward DIY. If the soil is actively wet, clay-heavy and unstable, or if you find evidence of underground drainage problems (buried debris, old failed drain lines, soft spots that don't firm up after drying), consider getting a professional drainage assessment before you invest in a new base. Repeatedly rebuilding on a broken subgrade is just expensive frustration.
Fix grading and drainage before you lay a single brick
This is the step most DIYers rush or skip, and it's why patios fail again after a redo. You need to get the slope right at the subgrade level before you add any base material. The standard target for a residential brick patio is a slope of 1/8 inch to 1/4 inch per foot of run, directed away from the house or toward a defined drainage point like a garden bed, lawn, or drain inlet. At 1/4 inch per foot, a 12-foot-wide patio drops 3 inches from the high side (near the house) to the low side. That's enough to move water off the surface reliably without being noticeable when you're sitting on the patio.
Set string lines across the excavated area at your target finished grade, then work backward to account for your base layers: 4 inches of compacted aggregate plus 1 inch of bedding sand equals 5 inches of material on top of the subgrade. That tells you what elevation your subgrade needs to sit at in each area. Use a 4-foot level and a story pole to check the subgrade slope across the whole area, and cut or fill the soil as needed to hit your target. If you're adding fill to low areas, you must compact those spots before proceeding. Loose fill under a base layer is just a future sinkhole.
Also think about where the water is actually going when it runs off the patio. If it's draining toward a neighbor's property, toward your foundation, or into a low spot with no outlet, you haven't solved the drainage problem, you've just relocated it. The runoff needs a real destination: a sloped lawn, a planted bed that can absorb it, a French drain, or a storm drain if local code permits. On patios adjacent to the house foundation specifically, drainage directed away from the foundation isn't optional.
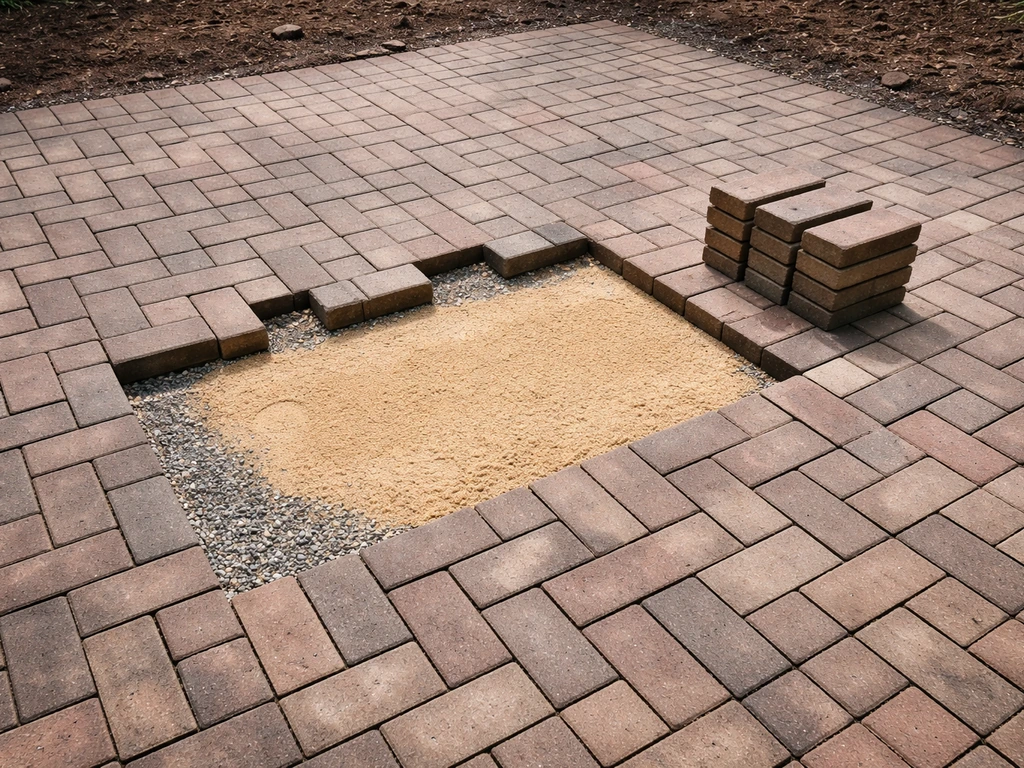
Rebuild the base and lay the bricks
Build the base properly
If your soil assessment showed clay-heavy or poorly draining subgrade, lay a geotextile landscape fabric over the compacted subgrade before adding aggregate. This fabric acts as a separator, preventing fine soil particles from migrating up into your base layer over time, which is one of the slow-motion failure mechanisms that causes patios to sink unevenly years after installation. Fold the fabric up the sides of the excavation slightly at the edges.
Add your crushed stone aggregate in two lifts of roughly 2 inches each rather than dumping all 4 inches in at once. Compact each lift thoroughly with a plate compactor. Run the compactor in overlapping passes in two directions (north-south, then east-west) across each lift. This is the step that most determines whether your patio stays flat or starts sinking in year two. The compaction target for a residential pedestrian patio is high, around 95% Standard Proctor density, which basically means you're running the plate compactor until the material stops visibly moving and the surface sounds solid rather than hollow. After compacting both lifts, check the grade of the aggregate surface against your string lines and make minor adjustments.
Screed the bedding sand
Pour your coarse concrete sand over the compacted aggregate. Lay two 1-inch diameter metal pipes or conduit across the aggregate as depth guides, parallel to each other, spaced about 4-5 feet apart. Dump sand between them and drag a straight 2x4 across the pipes to screed the sand to an even 1-inch depth. This is a precision step: the sand layer is not there to compensate for an uneven base. If the base is high in one spot and you compensate with extra sand there, that area will compress more when weight is applied and you'll get a dip. The base has to be right first, then the sand layer is just a setting bed.
After screeding, do not walk on the sand. Lay a kneeling board (a piece of scrap plywood) to distribute your weight as you work across it placing bricks.
Lay the bricks and install edge restraints
Start laying bricks from a straight, defined edge, typically the house wall or a known straight side. Use string lines to keep your rows aligned. Common patterns for brick patios include running bond (offset like a standard brick wall), herringbone (45 or 90 degrees, more stable but more cuts), and basket weave. Once the brick layout is set, you can start planning how to decorate a brick patio with lighting, outdoor furniture, and simple landscaping accents brick patios include running bond. Herringbone is actually the most mechanically stable pattern for a patio that takes foot traffic, because the interlocking angles resist lateral movement better than straight running bond.
Set each brick by pressing it straight down into the sand, not sliding it. Sliding displaces the screeded sand bed and creates uneven thickness. Use a rubber mallet to tap each brick flush with adjacent ones, and check frequently with your level. Don't let small gaps accumulate: a 1/16-inch discrepancy across one brick becomes a 1/2-inch problem across 8 bricks.
For cuts along the edges, score and snap thin pavers with a chisel, but for cleaner cuts on thicker brick, use an angle grinder with a diamond blade or rent a wet saw. Wear eye and hearing protection. Always cut bricks outside and downwind.
Install edge restraints along all perimeter edges that aren't bounded by a wall or permanent structure. These are rigid plastic or steel channels that you drive 12-inch spikes through into the aggregate base. Edge restraints are not cosmetic, they are structural. Without them, the entire brick field will slowly migrate outward under foot traffic and freeze-thaw cycles, and you'll be back to loose, rocking bricks within a few years. Spike them every 12 inches along the restraint length.
Leave a small gap (about 1/2 inch) wherever the patio meets a wall, step, or other fixed structure. This expansion gap prevents the brickwork from cracking when it expands and contracts seasonally. You can fill it with an appropriate backer rod and flexible sealant, or leave it as a planted gap depending on your preference.
Jointing, sealing, and keeping it solid for the long haul
Fill the joints with polymeric sand
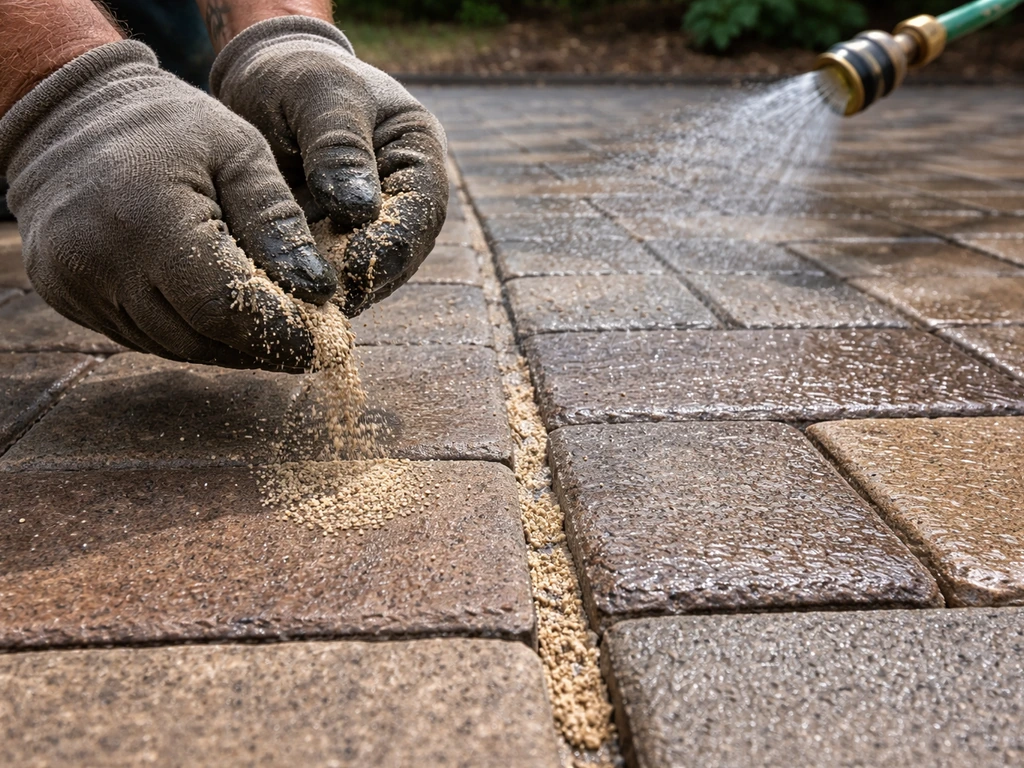
Once all bricks are laid, run a plate compactor over the entire surface (use a rubber pad attachment to protect the brick faces) to seat the bricks firmly into the bedding sand and even out any minor height differences. This final compaction pass is important. After compacting, dump polymeric joint sand over the surface and sweep it into the joints with a stiff broom. Work it in from multiple directions. Use a leaf blower on a low setting to clear excess sand off the brick surfaces before activation, getting the sand level to sit about 1/8 inch below the top surface of the brick. Polymeric sand sitting on top of the brick surface will leave a haze after it cures.
Activate the polymeric sand by misting the entire surface with water. Follow the product's specific instructions, but the general process is: mist, let it soak in, mist again, and stop when you start to see water pooling or sheeting on the surface rather than soaking in immediately. That's the signal that the sand is fully saturated and the binding agents are activated. Do not hose it aggressively or you'll wash the sand out of the joints. Let the patio cure undisturbed for 24 hours minimum before foot traffic, and 48-72 hours before heavy use.
Should you seal the brick?
Sealing is optional on brick patios and isn't always the right call. A good sealer can slow efflorescence, reduce staining, and help lock in joint sand, but it also locks in any moisture or salts that are already present. The rules are: let the patio cure for at least 30 days before sealing, make sure any efflorescence has been cleaned off first (acid washing may be needed), and don't seal over a surface with drainage problems still present underneath. Sealing on top of a moisture issue traps the problem and can cause peeling, bubbling, and surface failure. If you're not seeing efflorescence, staining, or excessive wear and your joint sand is polymeric and well-activated, skipping the sealer for the first year and then evaluating is a perfectly reasonable approach.
Preventing the same problems from coming back
Keep joints full. Check the polymeric sand level every spring and reapply where it has worn down. Joint sand is your first line of defense against water infiltration into the base. Keep nearby trees and large shrubs trimmed back so root growth doesn't start lifting bricks from below. Recheck the patio slope after the first winter, because even a well-built base may settle very slightly in the first freeze-thaw cycle. If you catch a minor low spot early and reset two or three bricks, you've prevented a much larger problem. And if water is ever pooling on the surface again, don't ignore it: trace where it's coming from and fix the grade or drainage before the base softens. If you want to know how to make a brick patio look new, start by identifying and correcting any pooling water or low spots before you do cosmetic cleaning or minor repairs how to make brick patio look new. If you want to refresh a brick patio that keeps failing, start by fixing the underlying grade or drainage that’s causing the water to pool fix the grade or drainage.
When to call a professional
This project is genuinely DIY-friendly if you have a stable subgrade and the time and physical stamina to do the base work right. But call a pro if: your subgrade is actively wet or unstable even after the area dries out, you're seeing water coming from under the patio rather than from rain on it, the patio borders a foundation or retaining wall that may be involved in the water problem, or this is the second or third time you've had the same areas fail. Persistent drainage failures, major subgrade issues, and structural problems adjacent to foundations are situations where professional drainage remediation will cost less in the long run than repeated DIY rebuilds that don't address the root cause. If you end up having to redo sections of your hardscape, you can still keep the look consistent by following how to paint a brick patio after the base and drainage work is finished.
FAQ
How do I tell if my brick patio is dry-set or mortared when it’s old and mixed materials are involved?
Look for mortar lines at the joints, hard-set brick edges, and leftover mortar lumps in seams. If a cold chisel can lift bricks with little resistance after breaking the joints, it’s likely dry-set. If bricks feel bonded throughout and mortar crumbs come up with every attempt, plan for mortared removal (it takes longer and is harder to reuse bricks).
Can I reuse my existing bricks if I redo the patio?
Yes if they are structurally sound (not spalling, not cracked through, not crumbling at edges) and stay in one piece when lifted. Avoid reusing bricks that rock, have deep chips, or have interior fractures you only see after cleaning. Also keep bricks sorted by thickness if they vary, since uneven thickness makes leveling more difficult even with proper base work.
What’s the right way to excavate and set depth if my patio is thick, built over pavers, or has multiple layers?
Remove all existing brick, sand, and base material down to the point where you find stable soil. If you leave any old, loose, or eroded base, it can compress differently under your new layers. Use a few check spots to confirm you can still achieve about 4 inches of compacted aggregate plus about 1 inch of bedding sand at the final grade, then adjust excavation depth accordingly.
Do I need geotextile fabric under the aggregate, and when is it most important?
Fabric is most useful when your subgrade is clay-heavy, prone to pumping, or when fine soil migration could occur. It helps keep fines from contaminating your aggregate and base. If your subgrade is granular and stays stable and dry, it may be less critical, but it still can help prevent long-term uneven settlement in marginal soils.
What should I do if I find soft subgrade areas only in a few spots?
Treat those as localized failure but still correct the subgrade, not just the surface. Remove the compromised soil in those spots until you reach stable material, then rebuild in thin lifts and compact before adding aggregate. Do not bridge over soft areas with extra sand, sand does not provide structural support.
How do I create the correct slope if the patio ties into a doorway or step?
Set your subgrade slope first, then confirm the finished brick height lands where it should relative to the threshold. Plan for an expansion gap at fixed edges and ensure the patio drains away from the house or toward a defined outlet. If your doorway clearance is tight, adjust layout height early, because once the base is compacted, changing finished elevation becomes expensive.
Is polymeric joint sand required, can I use regular sand instead?
Polymeric sand is strongly recommended when you want reduced weed growth and less water infiltration through joints. If you use regular sand, you’ll typically need more frequent joint maintenance because it can wash out over time and leave gaps. If your area has freeze-thaw and heavy rain, polymeric sand helps keep joints tighter, but you must activate it carefully and follow the product rules.
What’s the correct way to activate polymeric sand, and what goes wrong if I overdo it?
Mist gradually until the sand is fully saturated, you stop when you see pooling or sheeting rather than immediate absorption. If you hose aggressively or oversaturate, you can wash binding materials out of the joints, leading to weak joints that erode quickly and leave voids.
Should I seal the patio before or after the polymeric sand, and how long should I wait?
If you plan to seal, do not apply sealer until the patio has cured fully and joint sand has set as directed by the manufacturer. Many problems come from sealing too soon or sealing over unresolved efflorescence or drainage issues. If you can’t confidently identify and fix the cause of moisture beneath, skip sealing and focus on base and drainage.
How do I choose between repairing a small section and doing a full redo?
Repair small sections when movement and water issues are limited to an isolated area and the surrounding surface does not show recurring low spots or scattered loose bricks. If you have repeated failures in multiple locations, standing water, or signs that subgrade stays saturated after rain, the cost of repeated patching usually exceeds a one-time redo that fixes drainage and base across the full footprint.
What maintenance shows I should stop waiting and start redoing again?
If you repeatedly have to lift and reset the same areas, if joints keep washing out and water is pooling on the surface, or if you see new low spots after minor repairs, the base or drainage is still failing. At that point, focus on correcting slope, outlets, and subgrade conditions rather than only replacing bricks or topping off joints.
Do edge restraints and expansion gaps matter on every patio size?
Yes. Edge restraints are what prevent the entire field from creeping outward under loads and freeze-thaw. Expansion gaps near fixed structures prevent cracking from seasonal movement, even if the patio is new. If you omit them, you may see joint gaps widen, brick faces shift, and localized rocking that returns after a few years.
Next Article
How to Repair a Brick Patio Step by Step Guide
Diagnose loose bricks, cracks, uneven sinking, and failing joints, then re-level, replace, resand, and repoint.