Most bluestone patio repairs come down to one of four problems: cracked or spalled slabs, broken stones, sunken or rocking areas, and failing mortar or joints. If you’re instead dealing with a different stone type, see the full guide for how to repair flagstone patio using the right steps for the damage you have bluestone patio repairs. Each one has a fix, but the key is matching the repair to the actual cause, not just patching the surface and hoping it holds. If you skip the diagnosis step, the same damage comes back within a season or two, usually worse. For a full step-by-step guide on fixing a flagstone patio, follow the specific repair steps for your exact problem how to repair flagstone patio.
How to Repair Bluestone Patio: Step by Step DIY Guide

Talia Lang
29 Apr 2026
Start by identifying what kind of damage you actually have
Before you buy anything or lift a single stone, walk the patio and get a clear picture of what you're dealing with. Bluestone damage tends to fall into a few categories, and each one points to a different root cause.
- Cracks and spalling: Surface cracks, flaking, or broken corners are common in freeze-thaw climates. Water gets into micro-pores, freezes, expands, and breaks the stone from the inside. If you see this pattern mostly in winter, that's your culprit. A soft or insufficiently compacted base makes it worse by allowing flex under foot traffic.
- Sunken or settled areas: Depressions, low spots, and stones that rock underfoot usually mean the base material has eroded or compacted unevenly. This is almost always a drainage problem — water is moving through the joint or around the edge of the patio and washing out the sand or base beneath the stones.
- Rocking individual stones: A stone that tips when you step on it has lost contact with its bed. On sand-set patios, the bedding sand has shifted or eroded. On mortar-set patios, the mortar bond has broken.
- Failing or missing mortar joints: Crumbling, hollow-sounding, or entirely missing mortar between stones lets water infiltrate the base. This accelerates both settling and freeze-thaw damage.
- Weeds and joint washout: If weeds are growing through the joints or sand is visibly washing out after rain, the jointing material has failed. This isn't cosmetic — it destabilizes the entire patio surface over time.
- Efflorescence (white chalky deposits): White mineral staining on the stone surface often signals that water is moving through the base, dissolving salts, and depositing them on the surface. It can point to poor drainage or a film-forming sealer trapping moisture.
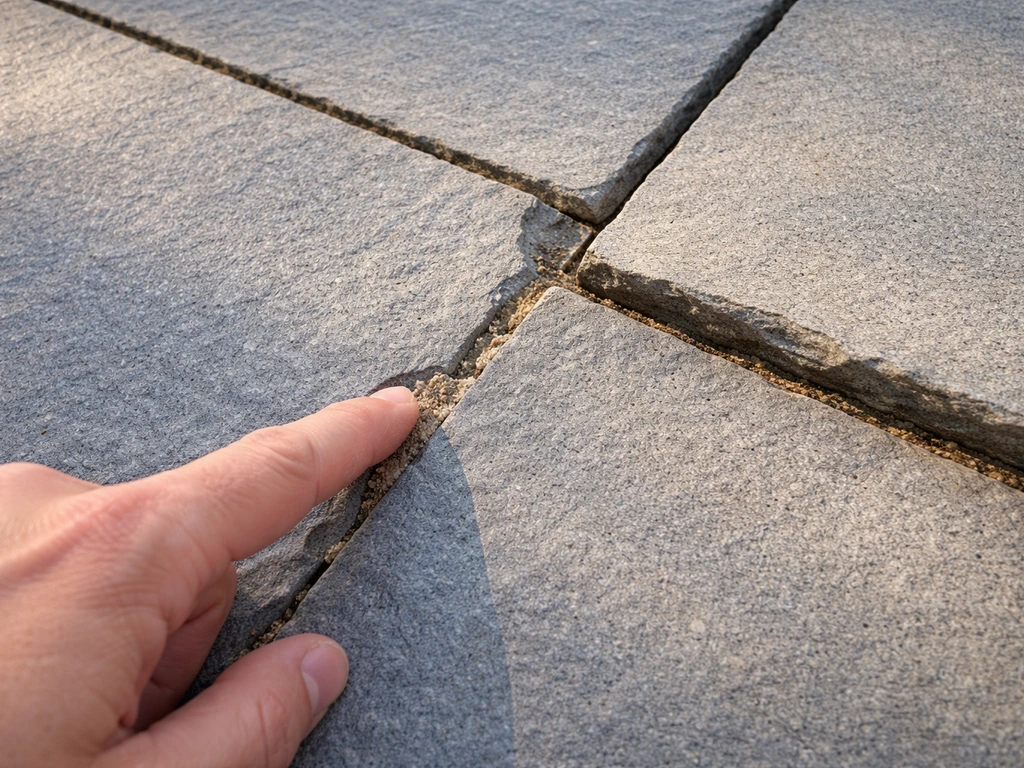
Do a simple knock test: use a rubber mallet or your knuckle to tap each stone. A solid thud is good. A hollow sound means the stone has lost contact with the bed and needs to be reset, not just patched.
Tools and materials to have on hand before you start
Having the right stuff ready before you start saves two extra trips to the hardware store. Here's what you'll realistically need for the most common bluestone repairs.
Tools
- Cold chisel and hammer (for breaking out old mortar without damaging adjacent stone)
- Angle grinder with a diamond blade (for cutting out cracked sections or scoring tight joints — wear eye and ear protection)
- Margin trowel and pointing trowel (for applying and packing mortar into joints)
- Rubber mallet (for seating stones without cracking them)
- Pry bar and flat shovel (for lifting existing stones cleanly)
- 4-foot level and a hand level (to check grade and spot low areas)
- Plate compactor or hand tamper (for re-compacting base material under reset stones)
- Stiff-bristle broom (for sweeping jointing sand into gaps)
- Garden hose with adjustable nozzle (for activating polymeric sand and general cleanup)
- Kneepads and safety glasses — bluestone shards are sharp
Materials
- Type S mortar mix: Use this for mortar-set patios. Type S is rated for exterior masonry and below-grade applications. Products like Sakrete Type S Mortar Mix are widely available. Do not substitute Type N where Type S is called for — it's not rated for the same load and freeze-thaw stress.
- Polymeric jointing sand: For sand-set patios with joints up to 2 inches wide. Quikrete HardScapes Polymeric Jointing Sand (No. 1175-56) handles joints up to 2 inches. Sakrete PermaSand maxes out at 1.5 inches. Techniseal HP NextGel is a premium option with good instructions and tech support. Match the product to your joint width.
- Crushed angular stone base material: For re-building base under reset stones. Angular crushed stone (not rounded gravel) compacts firmly and drains well. Most patio bases need 6 to 8 inches total depth.
- Coarse bedding sand or stone dust: The layer directly under the stone, typically 1 inch deep for sand-set installations.
- Replacement bluestone: Match existing thickness and finish as closely as possible. Bluestone comes in irregular and dimensional cuts — bring a sample or photo when sourcing.
- Penetrating impregnating sealer: A breathable silane-siloxane sealer like Armor SX5000 WB. Avoid film-forming or urethane-type coatings on natural bluestone — they trap moisture and can worsen efflorescence and spalling.
- Stone cleaner or efflorescence remover: For cleaning before sealing or when white staining is present.
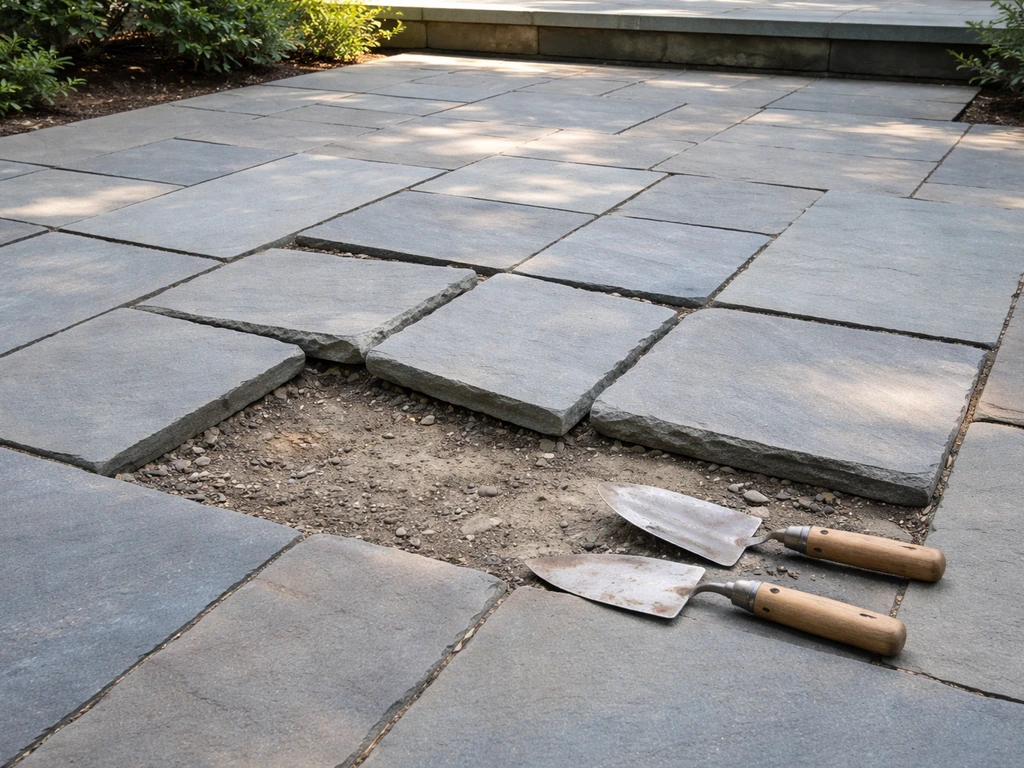
How to fix cracked, spalled, or broken bluestone slabs
Small hairline cracks on the surface that aren't structural can be left alone or treated with a penetrating sealer to slow moisture infiltration. But if a slab is cracked through, spalling badly, or broken into pieces, replacement is almost always the better call. Patching a broken bluestone slab with mortar looks rough and rarely lasts more than one or two freeze-thaw cycles.
- Clear the work area and protect adjacent stones. Tape cardboard or burlap around neighboring stones before you start chiseling — bluestone chips easily.
- Remove the damaged slab. On a mortar-set patio, use a cold chisel and hammer to break the mortar joint around the perimeter of the stone, then work a pry bar under the edge to lift it out. On a sand-set patio, the stone should lift more easily once the joint material is cleared out. Work slowly to avoid cracking neighboring stones.
- Clean out the void. Remove all old mortar, broken material, and loose base. Get down to solid, stable base material. If the base underneath looks eroded, washed out, or soft, you need to address that before setting the new stone (see the base section below).
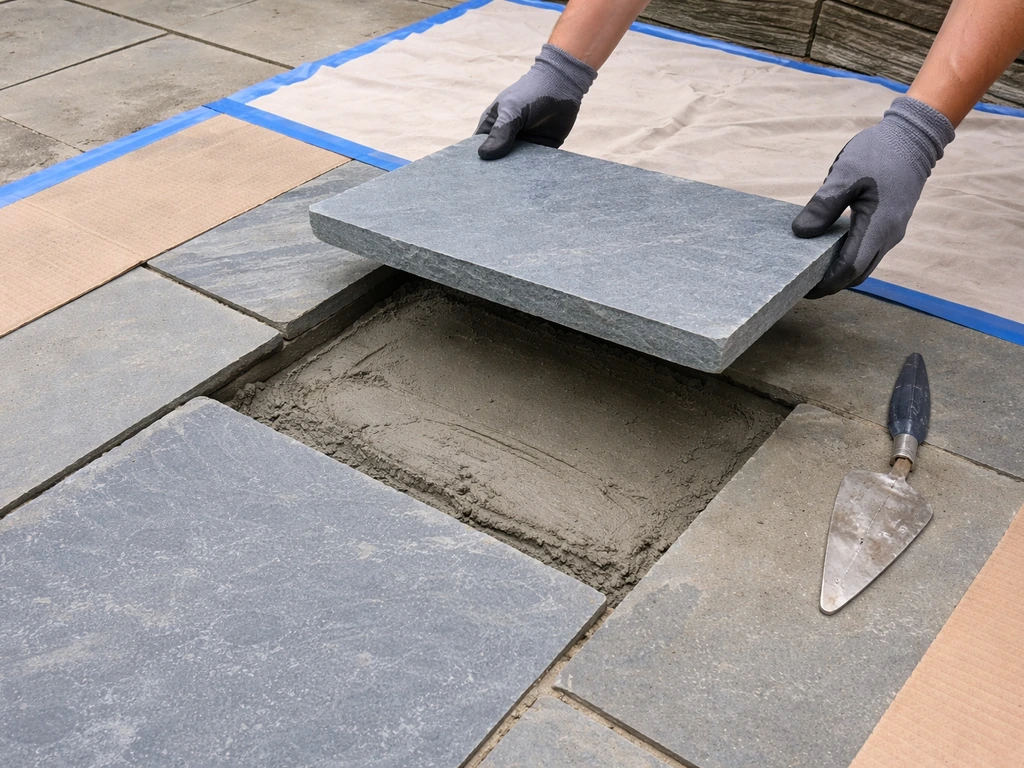
- For mortar-set patios: mix Type S mortar to a stiff peanut-butter consistency and spread a full mortar bed approximately 3/4 to 1 inch thick into the void. Comb the surface with your trowel to create even ridges. Butter the back of the replacement slab lightly as well for full contact.
- For sand-set patios: add back compacted base material to the correct depth, then add a fresh 1-inch layer of bedding sand or stone dust, screed it level, and set the stone dry.
- Set the replacement stone. Lower it straight down and tap firmly with a rubber mallet across the entire surface to seat it evenly. Check with a level in multiple directions. The stone should sit flush with its neighbors — not high, not low.
- Check drainage slope. The patio should slope away from your house at roughly 1/8 to 1/4 inch per foot. Verify this before the mortar sets.
- Allow mortar to cure for at least 24 to 48 hours before walking on the new stone. Keep it moist (cover with plastic or burlap in hot/dry conditions) to prevent the mortar from drying out too fast and cracking.
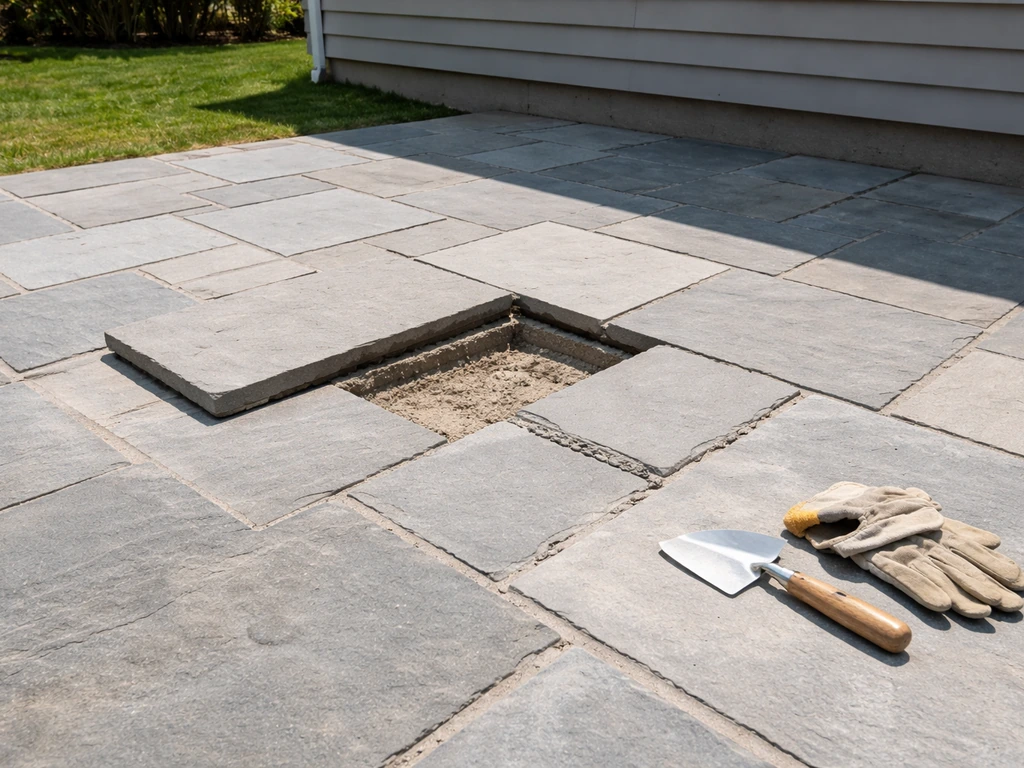
How to lift and reset sunken or rocking stones
A sunken or rocking stone is almost never just a stone problem, it's a base problem. If you’re trying to reset your bluestone patio stones, start by identifying whether the issue is a base or a drainage problem. If you simply add material under the stone without fixing why it settled in the first place, you'll be back out there doing the same repair next spring. The fix has two parts: addressing the cause and properly re-bedding the stone.
- Identify the extent of the problem. Step on every stone in the surrounding area and check with your level. Settling often affects a cluster of stones, not just one. If you have a large sunken zone (more than 4 or 5 stones), look for a drainage issue: a downspout discharging nearby, a low point that pools water, or a joint that has been washing out for years.
- Remove the affected stones carefully. On sand-set patios, clear the joint material and pry up the stones. Stack them face-up somewhere clean so you don't chip the surface. On mortar-set patios, chisel out the mortar joints around each stone before lifting.
- Excavate and inspect the base. Dig down and look at what's there. You want to see firm, compacted angular crushed stone. If you see loose, sandy material, fine sediment, or voids, that material has been eroded or was never properly installed. A solid patio base needs 6 to 8 inches of compacted crushed stone beneath the bedding layer.
- Fix the drainage if needed. If water is clearly channeling through the base, consider adding a gravel drainage layer at the perimeter or rerouting a downspout. This is the step most people skip and the reason repairs fail.
- Re-build the base in layers. Add crushed angular stone in 3- to 4-inch lifts and compact each layer with a plate compactor or hand tamper. Don't dump 8 inches in at once and compact the top — the lower layers won't consolidate properly.
- Add the bedding layer. For sand-set installations, spread a 1-inch layer of coarse sand or stone dust and screed it to a consistent, smooth surface at the correct elevation (accounting for the stone thickness so the finished surface ends up flush with the surrounding patio).
- Reset the stones, level them carefully, and fill joints. Check slope again with your level. Tap each stone down firmly and uniformly. No rocking, no high spots.
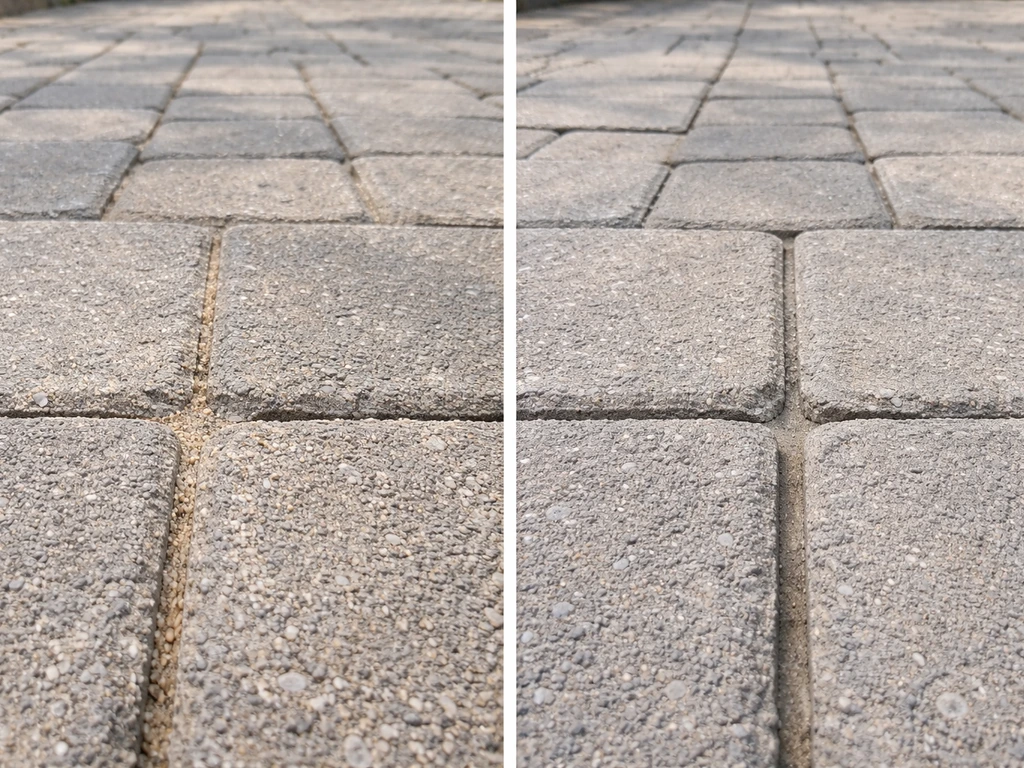
How to repair mortar joints and regrout between stones
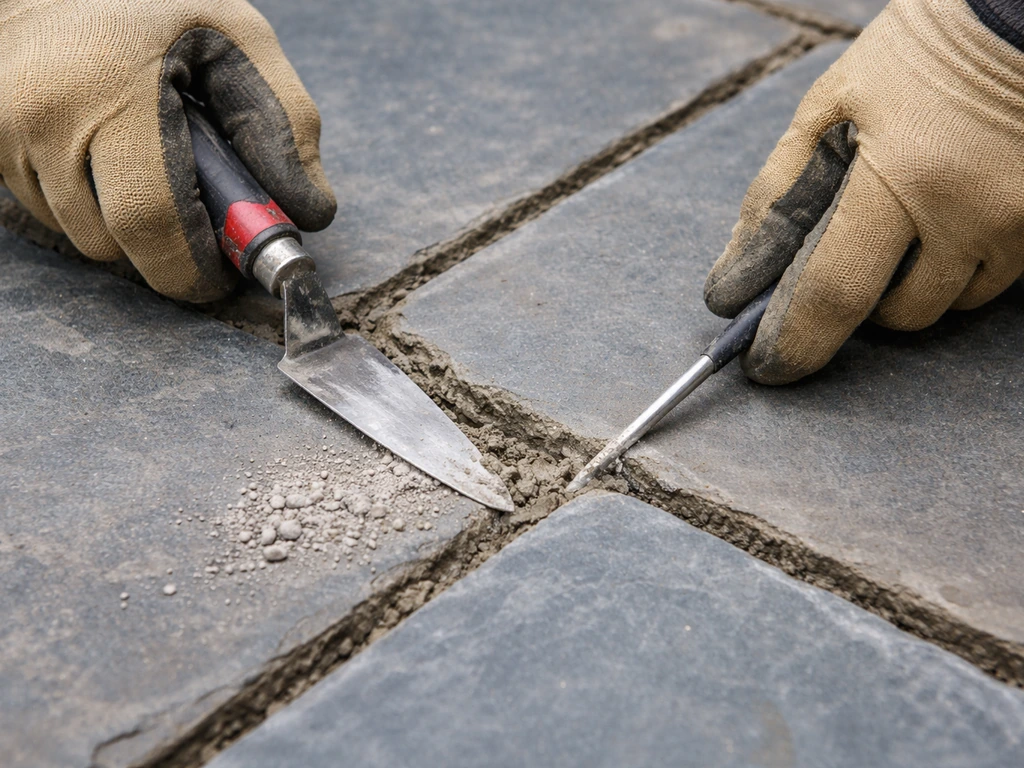
Repointing mortar joints is one of the most straightforward repairs on a mortar-set bluestone patio, as long as you remove all the old material first. Trying to pack new mortar over crumbling old mortar is a waste of time, it won't bond and it will fail in the first hard freeze.
- Remove all failing mortar. Use a cold chisel and hammer, or an angle grinder with a diamond blade for tight joints, to cut and scrape out crumbling or hollow-sounding mortar. Get the joint clean and dry down to at least 3/4 inch depth. Blow out or brush out all dust and debris.
- Protect the stone faces. Tape off adjacent stone surfaces if you're working with a grinder. Mortar stains are hard to remove from bluestone, especially thermal-finish stone.
- Mix Type S mortar to a stiff consistency. It should hold its shape when squeezed in your hand but not be soupy or dripping. Too wet and it shrinks and cracks as it dries. Too dry and it won't bond.
- Pack the joints in layers if they're deep. Don't fill a 1-inch-deep joint in one pass. Fill it halfway, let it firm up for 20 to 30 minutes, then complete the fill. This reduces shrinkage cracking.
- Tool the joint. Once the mortar is thumbprint-firm (not wet, not hard), use a pointing trowel or jointing tool to press and shape the joint slightly below the stone surface. A slightly recessed joint sheds water better than a flush or raised one.
- Clean up immediately. Wipe mortar smears off stone faces with a damp sponge before the mortar sets. Dried mortar on bluestone is significantly harder to remove.
- Cure time: keep the repointed joints damp for the first 24 to 48 hours in hot or dry weather. Don't let fresh mortar dry out in direct sun — cover with burlap if needed.
- For sand-set patios needing joint repair: sweep dry polymeric sand into the joints, compact or tamp it down, and add more until joints are filled to about 1/8 inch below the top of the pavers. Then activate per the product instructions (typically a controlled shower from a hose nozzle). Wait at least 24 hours after any significant rain before installing polymeric sand — wet conditions prevent proper bonding of the polymer binders.
Rebuild the base and check drainage so the repair actually lasts
This is the section most DIY guides skip over, and it's the reason the same patio gets repaired every few years. If water can pool under your patio or move through the base unchecked, no surface repair will hold long-term. The fix at the surface is only as good as what's underneath.
Re-leveling and base depth
When you've lifted and reset stones, take the opportunity to verify your base depth. Most patio applications need a minimum of 6 inches of compacted crushed stone base (some sources recommend 8 inches in areas with heavy clay soils or significant freeze-thaw cycles). Build it in 3- to 4-inch compacted lifts. On top of that goes a 1-inch screeded bedding layer of coarse sand or stone dust. The finished patio surface should slope away from the house at 1/8 to 1/4 inch per foot, this is the single most important drainage detail and it's easy to check with a long level.
Edge restraints and joint integrity
On sand-set patios, check your edge restraints. If the perimeter stones have no solid edge holding them in, the whole patio slowly migrates outward and joints open up. Plastic or aluminum paver edging pinned into the base material solves this. Once edges are secure and base is solid, fill all joints with your chosen material: polymeric sand for sand-set patios (follow the specific product's instructions for joint depth, fill level, and activation), or Type S mortar for mortar-set installations. The polymeric sand needs the surface to be dry and joints to be clean and dust-free before you sweep and activate it. Fill joints fully, compact the surface lightly with a plate compactor (use a rubber or foam pad to protect the stone), and activate by showering the surface per the product's instructions.
Drainage check
After a rain, look at where water goes. It should sheet off the patio surface quickly and move away from the house and the patio perimeter. If it pools on the surface, your grade needs correction. If it pools along an edge, the edge may be lower than the rest or your yard grade is directing water back toward the patio. In that case, a channel drain at the low edge or regrading the adjacent yard may be necessary before the repair will hold.
Sealing, cleanup, and keeping the patio in good shape
Sealing bluestone is optional, but it's worth doing after a repair because it slows moisture infiltration and makes ongoing maintenance easier. The critical rule: use a penetrating, impregnating sealer, not a film-forming or urethane coating. Film-forming sealers sit on top of the stone, trap moisture vapor, and can lead to peeling, bubbling, and worse efflorescence. A silane-siloxane penetrating sealer soaks into the stone, repels liquid water, and still lets vapor escape. Armor SX5000 WB is a widely available water-based option that works well on natural stone. Apply 1 to 2 coats to a clean, dry surface, following the manufacturer's directions. If you've just pressure-washed the patio, wait at least 24 hours for the stone to dry fully before sealing.
Cleanup steps after repair
- Sweep the entire surface to remove dust, mortar crumbs, and sand residue.
- Rinse with a garden hose (avoid high-pressure washing directly into fresh mortar joints — wait at least a week for mortar repairs).
- Treat any efflorescence with a diluted masonry cleaner or efflorescence remover before sealing. Sealing over mineral deposits traps them.
- Allow the surface to dry completely — a minimum of 24 hours in warm weather, longer in cool or humid conditions.
- Apply sealer in thin, even coats. Wipe off any excess that pools before it dries to avoid surface haze.
- Allow the sealer to cure per the product instructions before heavy use. Polymeric jointing sand typically needs about 30 days for full polymer cure, so don't power wash the joints during that window.
Prevention going forward
- Check and clean joints every spring before weeds get established.
- Top up polymeric sand in joints that have thinned due to minor wear — don't wait until stones start rocking.
- Keep gutters and downspouts clear and directed away from the patio.
- Reapply penetrating sealer every 2 to 4 years, or when water stops beading on the surface.
- After hard winters, do a tap test across the whole patio surface and catch any newly loose stones before they crack a neighbor.
When to stop DIYing and call a professional
Not every bluestone patio repair is a reasonable DIY project, and it's worth being honest about that. Here are the situations where professional assessment or work is the smarter call.
- Widespread settling across a large area: If more than 20 to 30 percent of your patio surface is sunken, tilted, or unstable, you likely have a sub-base failure — not just spot erosion. Rebuilding the entire base is a major project involving excavation, proper material sourcing, and equipment most homeowners don't own.
- Persistent drainage problems that you can't resolve by regrading: If water consistently moves toward the house or pools deeply on the patio surface, a drainage professional or landscape contractor needs to assess the grading situation around the property. No surface repair fixes a fundamental site drainage problem.
- Major heaving from frost: If your patio has shifted dramatically upward in multiple areas after a hard winter, the base preparation was inadequate from the start. Spot repairs won't solve systematic frost heave — the base needs to be rebuilt below the frost line.
- Structural or retaining elements involved: If your patio is adjacent to a retaining wall, steps, or sits on a slope, and any of those elements are failing or cracking, that's not a DIY situation. Retaining wall failures can be dangerous and require structural assessment.
- Mortar-set patios with widespread bond failure: If the hollow sound covers most of the patio, the mortar bed has failed at large. Removing and re-setting every stone on a full mortar bed is a skilled masonry job, not a weekend project for most homeowners.
If you're in the zone where repairs keep coming back in the same spots, it's worth having a masonry contractor or landscape professional take a look before you put more time and money into surface fixes. A two-hour site visit from someone experienced with natural stone can save you from repeating the same failed repair for the third time.
A quick comparison: sand-set vs. mortar-set repairs
The repair approach depends on how your patio was originally built. Here's a side-by-side look at the key differences so you can match the method to your situation.
| Factor | Sand-Set Patio | Mortar-Set Patio |
|---|---|---|
| Joint material | Polymeric sand or paver sand | Type S mortar |
| Stone removal | Easier — pry up after clearing joints | Requires chiseling mortar bonds first |
| Base re-leveling | Add/remove sand to adjust height | Full mortar bed must be mixed and set |
| Cure time after repair | 24 hrs before light use; 30 days for polymeric sand cure | 24–48 hrs before walking; 28 days full cure |
| DIY difficulty | Moderate | Moderate to hard (mortar work takes practice) |
| Drainage sensitivity | High — sand base erodes if drainage is poor | Moderate — mortar bed is more stable but still needs drainage slope |
| Best for | Dry-laid natural stone, irregular bluestone | Formal installations, smooth or dimensional cut bluestone |
If you're not sure which type you have, look at an existing joint carefully. Mortar joints are hard, gray, and continuous. Sand-set joints have visible granules and may have some give when you press them with a fingernail. When in doubt, the hollow knock test and how easily a stone lifts will tell you quickly.
FAQ
I have small cracks in my bluestone patio, should I patch them or just seal them?
For bluestone, start by separating “surface cracks” from “movement.” If the slab clicks or you can lift it slightly after removing loose debris, treat it as a reset or replacement issue, not a grout or mortar fill job. Use the knock test first, then only seal hairline, non-movable cracks.
When I lift a stone to re-bed it, how deep should the base be and how should I rebuild it?
Do not pour or pack base materials without compacting in lifts. Most failures happen because someone adds too much thickness at once, leaving soft spots that pump under freeze-thaw. Aim for 3- to 4-inch compacted lifts, then re-check that the stones sit flush and do not rock.
Will sealing my repaired bluestone patio prevent future sinking or rocking?
Yes, but only if you address the drainage path under the patio. If water is pooling on the surface or creeping back toward the house, sealing may slow moisture entry but it will not stop the underlying washout or base saturation. Fix grade or drainage first, then seal after the stones are fully dry.
What are the most common mistakes when using polymeric sand in bluestone joints?
If you use polymeric sand on a sand-set patio, you must activate it correctly. Joints that are not fully dry, joints that are underfilled, or activation with too little water can leave weak spots. Also keep water off the surface until the product cures per label instructions, usually with a no-rain window.
Can I switch between mortar-set and sand-set joint materials when I’m repairing joints?
If the patio was built mortar-set, do not use polymeric sand in the joints. Mortar-set joints require Type S mortar repointing, and the bonding behavior depends on removing deteriorated material down to sound edges. Mixing systems can cause joints to look fine initially, then fail at the first hard freeze.
How do I tell if I re-bedded a bluestone stone correctly and not too high or low?
A good sign is that joints are tight at the top and the stone does not wobble after re-bedding. If a stone sits high or uneven, you may need to scrape down the bedding layer and re-level with the correct sand thickness. High spots trap water and accelerate spalling, especially in freeze-thaw climates.
My bluestone keeps failing in the same area, what should I inspect before I repair it again?
If the patio is constantly re-cracking in the same footprint, check for sub-base separation or a repeating weak point like a low area or buried drainage line. The fix is often re-excavation and rebuilding the base and grade, not adding more sand or mortar on top. A pro visit is worth it when the same stones fail twice.
How can I make sure I bought the right type of sealer for bluestone repairs?
Bluestone needs a penetrating, impregnating sealer. If your sealer is film-forming (it can leave a sheen) or it noticeably beads on the surface, it can trap moisture vapor and worsen efflorescence or peeling. Do a small spot test on a hidden area to confirm absorption, then proceed only with products labeled for natural stone penetration.
Should I overfill joints when repointing or using joint sand on bluestone?
Overfilling joints is a common issue. With polymeric sand, fill to the manufacturer’s recommended depth and do not leave heavy mounds. Too much material can prevent proper compaction and activation, leading to washout and re-opening joints after rain.
Any tips for curing and finishing mortar joints so they last through freeze-thaw?
During repointing, protect adjacent stones from smearing and make sure the old mortar is removed fully to sound edges. Also, avoid sealing or watering the joints immediately after repointing, because mortar needs proper cure time in typical conditions. If you can still scrape old material with a margin trowel, keep cleaning before applying new mortar.
Next Article
How to Reset Bluestone Patio: Step-by-Step DIY Guide
Step-by-step DIY to reset a sunken bluestone patio: inspect, rebuild base, re-level stones, fix joints, prevent repeat i