To repair mortar joints on a stone or brick patio, you rake out the crumbling old mortar to a depth of at least 3/4 inch (ideally closer to twice the joint width), brush out all the dust, and pack in fresh Type S mortar in thin 1/4-inch layers until the joint is flush and properly shaped. The whole process takes a weekend for a typical patio, and the materials cost under $50 for most jobs. The tricky part is matching the color and profile of the original joints so the repair doesn't look like a patch. This guide walks you through the entire job from diagnosis to sealing.
How to Repair Mortar Joints in a Stone Patio (DIY Guide)

Talia Lang
29 Apr 2026
How to tell your mortar joints are actually failing
Not every crack or discolored joint needs immediate repair. Before you mix anything, spend 10 minutes actually looking at what's happening so you fix the right problem.
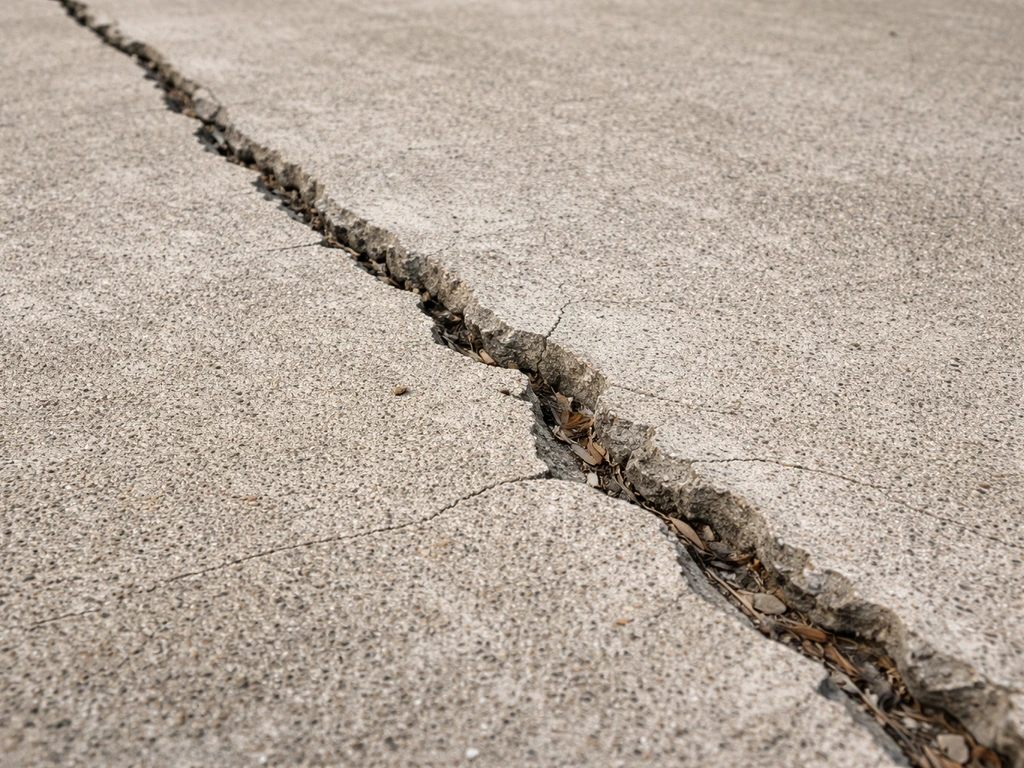
The clearest sign of joint failure is mortar that crumbles when you poke it with a screwdriver or key. If it flakes out easily, it's gone soft and water is already getting in. Visible cracks running along or through the joint face are a second warning sign, especially if they follow the freeze-thaw cycle: fine cracks appear in fall, widen over winter, and look much worse by spring. Spalling (where the joint face pops off in thin chips) is classic freeze-thaw damage. Once water gets into a small crack, it freezes, expands, and breaks the mortar apart from the inside.
Watch for white crusty deposits on the joint surface or the stone face next to it. That's efflorescence: soluble salts carried by moisture migrating through the mortar and depositing on the surface as the water evaporates. It's not structurally dangerous on its own, but it's a reliable sign that water is moving through your joints more than it should be. Where you see efflorescence, there's usually softening mortar nearby.
Also look for weeds or moss growing out of the joints, stones that have shifted or tilted, and any low spots where water pools after rain. Weed roots accelerate joint damage badly, and pooling water is often why the joints failed in the first place. If you see multiple stones have moved or your patio has a visible sag or heave, that's a base problem, not a mortar problem, and repointing won't fix it. More on that below.
- Mortar crumbles or powders when scratched with a key or screwdriver
- Cracks along the joint face, especially widened since last winter
- Spalling or chipping on the joint surface
- White efflorescence deposits on joints or adjacent stone
- Weeds or moss growing from joints
- Loose or rocking stones (minor shifting) around deteriorated joints
- Water pooling on or near the affected area
One honest note here: if more than 30 to 40 percent of your patio joints are failing, or if multiple stones have shifted significantly, stop and think before you start repointing. Widespread failure usually means the original mortar mix was wrong, drainage is poor, or the base has settled. Repointing over a bad base just delays the inevitable. If you suspect base failure (the patio rocks when you walk on it, or there are multiple sunken sections), that's a bigger project than this guide covers.
What you need before you start
Tools
- Cold chisel (3/8 to 1/2 inch wide) and hammer, or an oscillating multi-tool with a carbide grout blade
- Angle grinder with a tuckpointing blade (for wider or heavily deteriorated joints only)
- Stiff natural-bristle brush or masonry brush for cleaning out joints
- Shop vacuum
- Margin trowel and pointing trowel (a narrow 3/8-inch or 1/2-inch jointing tool for packing mortar)
- Mixing bucket and margin trowel or a drill with a paddle mixer
- Spray bottle or garden hose with mist setting
- Safety glasses, dust mask rated N95 or better, and gloves
- Foam kneeling pad
Materials
- Bagged Type S mortar mix (most reliable choice for outdoor patio joints exposed to weather)
- Masonry pigment if color matching is needed (must comply with ASTM C979; keep pigment under 10% of cement weight)
- Clean potable water
- Penetrating silane/siloxane sealer (optional but recommended for high-moisture or freeze-thaw climates)
- Plastic sheeting or burlap for curing
A word on the angle grinder: it works fast, but grinding mortar creates silica dust that is genuinely hazardous to your lungs. If you use one, attach a vacuum shroud directly to the grinder so dust is captured at the source rather than floating into the air. An oscillating tool is slower but much safer and causes less risk of accidentally nicking the stone face. For most homeowners doing a patio, the oscillating tool or cold chisel is the better choice.
Removing the old mortar without wrecking the stone
This is the step people rush, and it's where most DIY repairs fail. If you don't remove enough mortar, the new material won't bond and will pop out within a season or two. If you're too aggressive, you chip the stone edges and the repair looks terrible.
The target depth is at least 3/4 inch, and ideally about twice the width of the joint. So if your joints are 1/2 inch wide, you want to go about an inch deep. For most residential stone patios with 1/2 to 3/4 inch joints, that means raking out to 3/4 to 1.5 inches. The reason for this is simple: shallow mortar has too little surface area to bond well, and it'll just pop loose again. You're not done until you hit mortar that's actually hard and sound, or until you've reached the minimum depth.
- Put on your safety glasses, N95 mask, and gloves before you touch any tools.
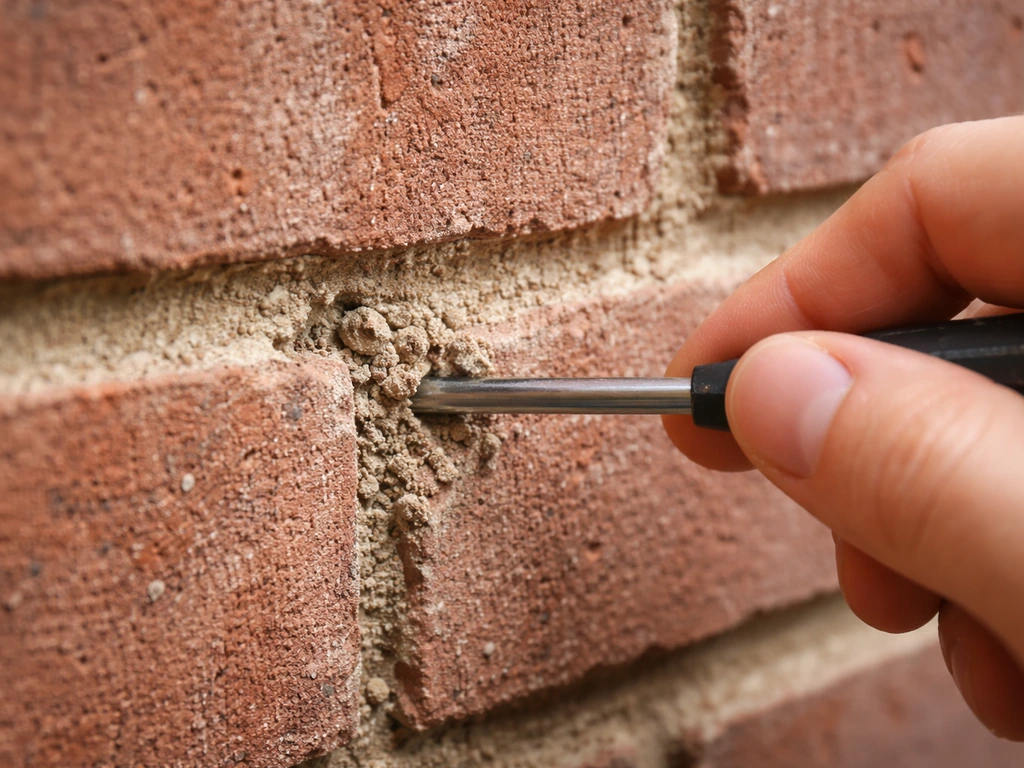
- Start with a cold chisel and hammer or an oscillating multi-tool. Work along the joint, breaking up and loosening the soft or crumbling mortar. Keep your chisel angled along the joint, not into the stone face.
- For an angle grinder: use a tuckpointing blade and keep it centered in the joint. Use the vacuum shroud. Make one or two passes to a controlled depth, then finish with a chisel to square up the back of the joint.
- The back of the raked joint should be as square and clean as possible, not tapered or wedge-shaped. A clean, flat back gives maximum contact area for the new mortar.
- Vacuum out all dust and loose debris. Then mist the joint lightly with water and brush with a stiff natural-bristle brush to remove anything the vacuum missed. Vacuum again.
- Do not use a metal wire brush on the stone face or joint edges. It can scratch stone and leave metal particles that rust and stain later.
If a joint is only 1/4 to 1/2 inch deep after raking but you're hitting solid mortar, that solid mortar is fine to leave as the back of your joint. You're removing deteriorated material, not all the mortar. What matters is that the remaining mortar at the back is hard and well-bonded.
Picking and mixing the right mortar
This is where a lot of DIY repairs go wrong, and it's worth taking a few extra minutes to get it right.
Which mortar type to use
For a patio, you want Type S mortar. Full stop. Type S is rated for masonry that's in contact with the ground or exposed to severe weathering, which describes every horizontal outdoor surface perfectly. It's stronger than Type N, more flexible than Type M, and it's what the standards (ASTM C270 in the US, CSA A179 in Canada) specify for this kind of exposure. Type N is fine for above-grade walls but it's softer and less water-resistant, so it tends to fail faster in patio joints. Type M is the strongest but is so rigid it can actually crack the stone around it when the patio moves; avoid it unless a structural engineer specifies it.
| Mortar Type | Compressive Strength | Best Use for Patios | Notes |
|---|---|---|---|
| Type M | Very high (2500+ psi) | Not recommended | Too rigid; can crack surrounding stone |
| Type S | High (~1800 psi) | Best choice | Rated for horizontal, weather-exposed masonry (ASTM C270 / CSA A179) |
| Type N | Medium (~750 psi) | Marginal | Fine for walls, too soft for patio joints in freeze-thaw climates |
| Type O | Low (~350 psi) | Not suitable | Interior use only |
One exception worth knowing: if your patio is built with historic or soft stone (like sandstone or limestone), or if the original mortar was a lime-based mix, using a hard Portland-based Type S can actually trap moisture and damage the stone over time. Softer stones need a softer, more breathable mortar. A standard 1 part Portland to 3 parts lime to 9 to 12 parts sand mix is a reasonable starting point for those situations. If you're not sure what your stone is, a mason who works with historic materials is worth a phone call.
Color matching
The hardest part of any repointing job isn't the labor, it's the color match. Fresh mortar always looks lighter than cured original mortar, and different sand colors produce very different results. Do a small test batch, trowel it onto a scrap piece of cardboard, and let it dry completely before comparing to your existing joints. Wet mortar is always a poor color reference.
If standard gray mortar doesn't match, add masonry pigment. Use pigments that meet ASTM C979 (they're UV-stable and won't fade). Keep the pigment under 10% of the cement weight in your mix, or it can weaken the mortar. Common additions are buff, tan, or brown pigment for natural stone patios. Mix a few test batches, let them cure, and compare before committing to the whole job.
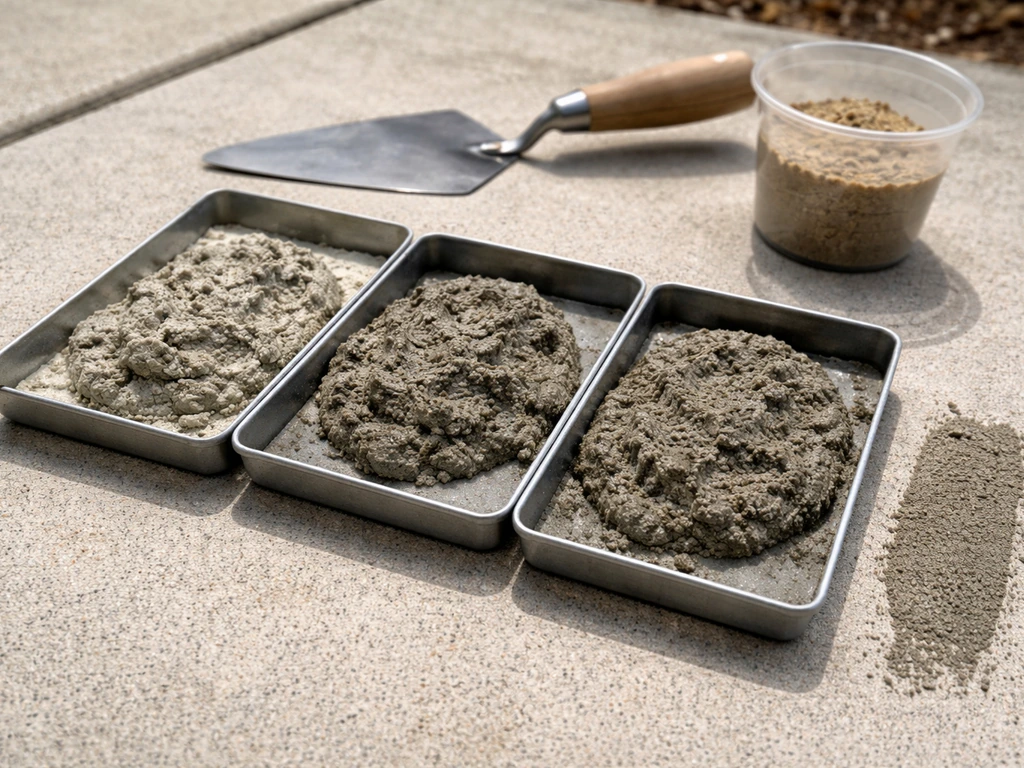
Mixing consistency
Mortar for repointing should be stiffer than mortar for laying new masonry. You want it to hold its shape when you press it into a ball in your hand, not slump or flow. If it's too wet, it shrinks as it dries and pulls away from the stone edges. A good sand-to-binder ratio is roughly 2.25 to 3 parts sand per part binder. Add water slowly and mix thoroughly. If you're using a pre-blended bagged mix, add slightly less water than the bag instructs, then check the stiffness. You can always add a tiny bit more water, but you can't take it out.
Mix only as much as you can use in about 30 to 45 minutes. As the mortar starts to stiffen in the bucket, you can add a very small amount of water and remix once to restore workability. Don't do this more than once, and never add water after the mortar has become stiff and grainy: that's a sign the cement has started hydrating and diluting it at that point weakens the final product.
Step-by-step: repointing the joints
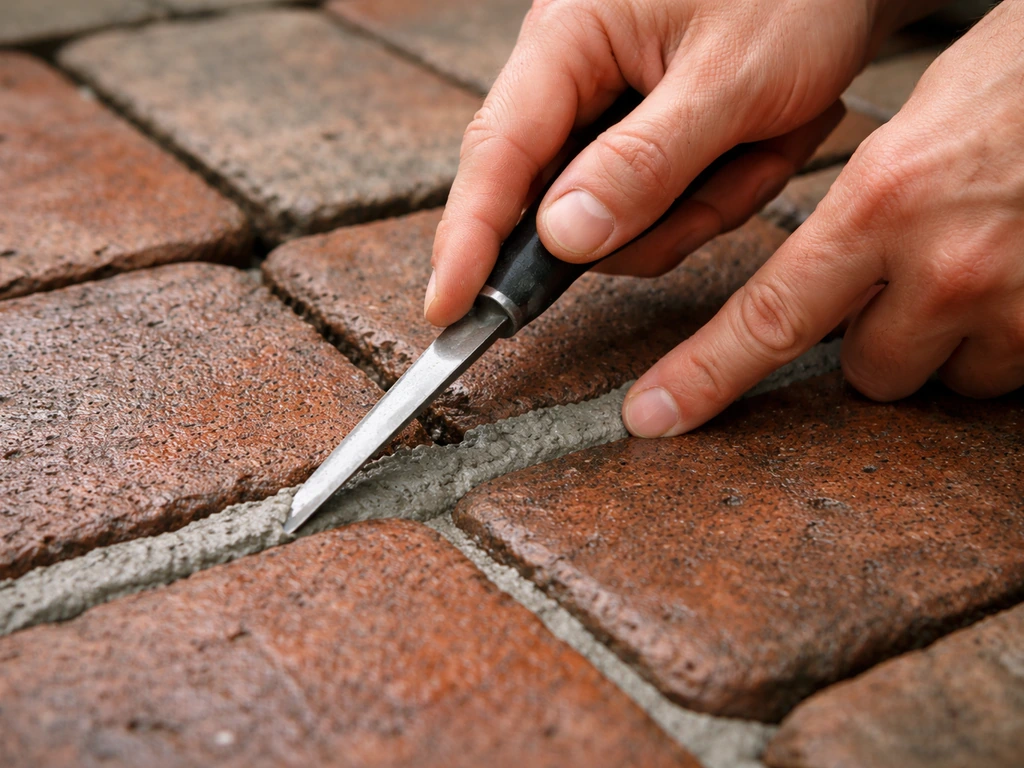
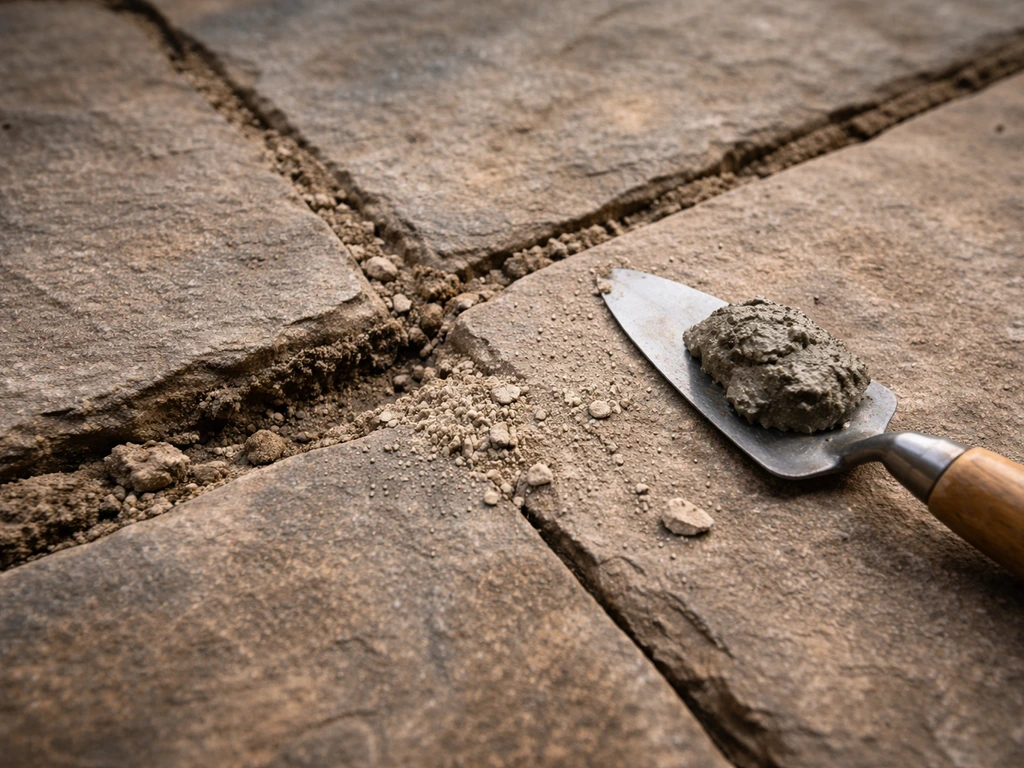
- Dampen the joint with a mist of clean water about 30 minutes before you start packing mortar. The joint should be damp but not wet or shiny. Dry masonry sucks moisture out of the mortar too fast, weakening the bond. Soaking it creates a slippery surface. Damp is the target.
- Load a small amount of mortar onto your hawk or directly onto a margin trowel. Use the pointing trowel to push mortar into the joint from the side, not the top. Think of pressing the mortar in and back toward the deepest part of the joint.
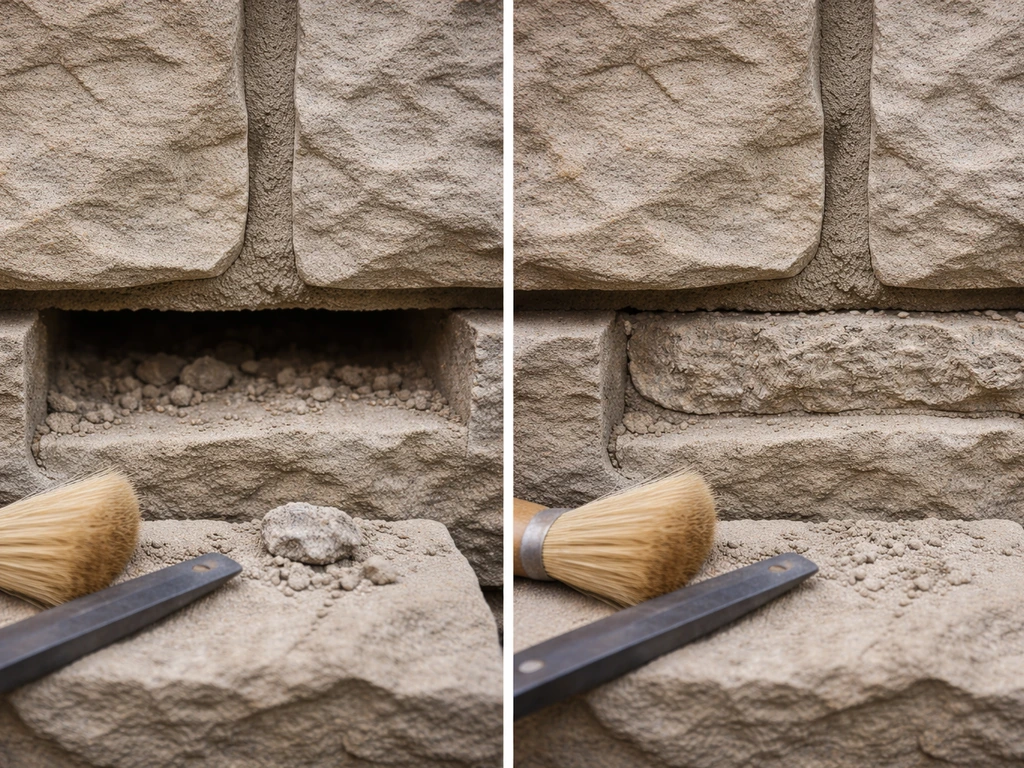
- For joints deeper than 3/4 inch, work in lifts: fill the back third of the joint with a first layer, compact it firmly with the pointing tool, and let it set until it's thumbprint-firm (about 30 to 60 minutes depending on temperature) before adding the next layer. Each layer should be roughly 1/4 inch thick. Don't try to fill a deep joint in one pass; the mortar won't compact properly and will crack.
- Keep packing and slightly overfilling the joint as you build up the layers. The goal is slightly proud (raised above flush) on the final pass so you have material to tool back.
- Once the mortar is thumbprint-firm on the final layer (you can press it with your thumb and leave a print but it doesn't smear), tool the joint to match the original profile. For outdoor patios, a slightly concave or flush joint is best: it sheds water rather than trapping it. Avoid recessed or raked profiles on horizontal patio surfaces because they hold water, which accelerates freeze-thaw damage.
- As you finish each section, wipe excess mortar off the stone face immediately with a damp sponge or rag. Don't let it cure on the stone surface; it gets much harder to remove.
- Work in manageable sections, roughly 10 to 15 linear feet at a time, so the mortar doesn't dry out before you can tool it.
For brick patio joints specifically, the same steps apply, but brick joints are typically more uniform in width (3/8 to 1/2 inch is standard) which makes packing and tooling more straightforward. Use a jointing tool that matches the original profile: a rounded jointing rod for a concave finish, or a flat tool for a flush/weather-struck finish. The original joint shape on a brick patio is usually pretty clear once you clean out a few sections.
Stone patio joints are trickier because natural stone joints vary in width and depth. Don't try to make irregular stone joints look perfectly uniform: it looks wrong. Match the general depth and profile, and focus on making sure all joints are filled solid without voids.
Curing, cleanup, and whether to seal
Curing
Mortar cures through a chemical process that requires moisture, not just drying out. In hot or dry conditions, mist the repaired joints lightly with water once or twice a day for the first two to three days. In direct sun or wind, cover the work with burlap or plastic sheeting to slow evaporation. The mortar needs at least 72 hours before it can get wet from rain, and it needs 28 days to reach full strength. Don't let anyone walk heavily on a stone patio with freshly repointed joints for at least 24 to 48 hours, and avoid any concentrated loads (furniture, planters) for a week.
Don't do this work when temperatures are below 40°F or when freezing temps are expected within 24 hours. Fresh mortar that freezes before it cures is ruined. Above 90°F and in direct sun, mortar dries too fast: work in the shade or early morning and keep things damp.
Cleanup
Light smears of mortar on the stone surface can be removed by misting with water and scrubbing gently with a small stiff natural-bristle brush while the mortar is still relatively fresh (within a few hours). Once mortar has cured for a day or more, it's much harder to remove. Dried mortar smears can be cleaned with a diluted masonry acid wash (follow product directions carefully), but test in an inconspicuous spot first, especially with natural stone, since acid can etch certain stones. Avoid metal scrapers on the stone face.
Sealing: yes or no?
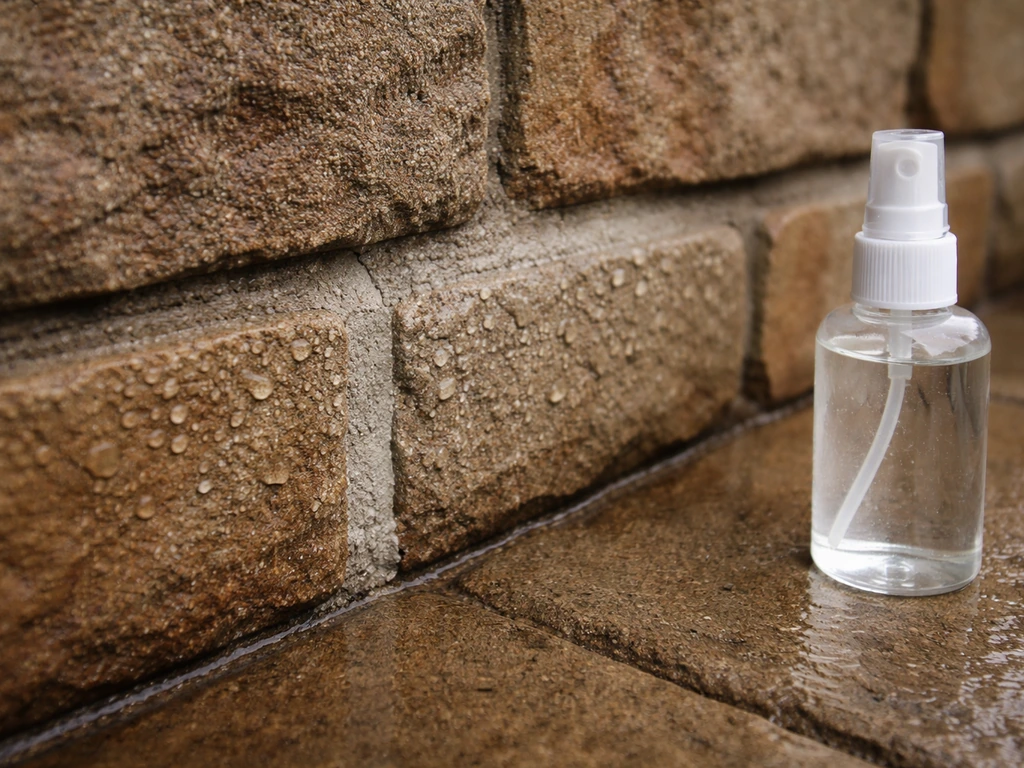
Sealing is optional, but on a patio in a freeze-thaw climate it's genuinely useful. The right sealer is a penetrating silane/siloxane product, not a film-forming coating. Film-forming sealers trap moisture inside the masonry, which makes freeze-thaw damage worse, not better. Penetrating sealers soak into the stone and mortar, repel liquid water, but still allow water vapor to breathe out. That breathability is the key: you want the patio to shed water, not trap it.
Wait at least 72 hours after repointing before applying sealer, and ideally wait a full week. The masonry surface needs to be dry: plan for two to three dry days before application, and don't apply if rain is expected within 24 hours. Air and surface temperature should both be above 50°F. Apply the sealer per the product instructions, usually one or two coats with a pump sprayer or roller, and wipe off any pooling. It won't change the look of most natural stone significantly, though it may slightly darken some porous stones.
How to stop this from happening again
Mortar joint failure on patios is almost always a water problem. After you identify the failing joints, follow the steps for how to repair stone patio mortar so the new material bonds and cures properly. The mortar itself is rarely the root cause: it's water that gets in, freezes, and destroys it. Address the water and you get a much longer-lasting repair.
- Check the patio slope and drainage: a well-built patio should slope at least 1/8 to 1/4 inch per foot away from the house. If water pools anywhere on the surface, that spot will keep failing. Improving drainage may mean adding a channel drain or regrading nearby landscape, but it makes every repair last longer.
- Keep joints clear of debris: leaves, pine needles, and soil that accumulate in joints hold moisture constantly against the mortar. Sweep or blow off the patio regularly, especially in fall.
- Pull weeds early: once a weed gets a root into a joint, it creates a crack that accelerates water infiltration. Pull them when small; don't let them establish.
- Inspect joints annually in spring: catch small cracks and deteriorating sections when they're easy to repair, before water has a full winter season to work on them.
- Reapply penetrating sealer every three to five years: sealer doesn't last forever, especially on horizontal surfaces exposed to UV and foot traffic. A fresh coat every few years is cheap insurance.
- Avoid deicers on or near the patio: calcium chloride and rock salt are corrosive to mortar. Use sand for traction in winter instead.
The joints on a stone patio are inherently the most vulnerable part of the assembly, especially on a horizontal surface. Even with a perfect repair, well-maintained joints in a harsh climate may need touching up every 10 to 15 years. That's normal. The goal isn't to find a permanent fix; it's to do a quality repair and manage the conditions that accelerate wear so you're repointing on your schedule, not because of an emergency.
If your patio uses flagstone, bluestone, or other specific stone types, the mortar repair process is the same in principle, but some stone types (especially softer or more porous ones) have specific mortar and sealer requirements worth looking into before you start. If you’re wondering how to repair <a data-article-id="602A0578-96A8-49EF-8458-EF91F624FB57">bluestone patio</a> joints, use the same repointing steps but pay close attention to color matching and the right sealer for freeze-thaw conditions. For a full walkthrough, see how to repair flagstone patio joints without damaging the stones. The broader repair picture for those patios covers base prep and stone resetting too, which often goes hand-in-hand with repointing when a patio has seen significant movement or settling.
When to call a mason instead
Repointing a stone or brick patio is genuinely DIY-friendly when the damage is localized: a few bad sections, soft or crumbling joints, some weed damage. But there are situations where calling a professional mason is the smarter move. If your entire patio has failing joints, the base has settled or heaved in multiple spots, or the stone itself is cracking (not just the mortar), you're looking at a rebuild, not a repoint. Similarly, if you have a historic stone patio with soft natural stone and original lime mortar, getting the mortar mix wrong can cause irreversible stone damage: a mason with historic masonry experience is worth the consultation fee. And if you're not confident matching the joint color and profile on a highly visible patio, a professional finish will look significantly better than a patchy DIY attempt. There's no shame in knowing the limits of a weekend project.
FAQ
Can I spot-repair only the visibly cracked section instead of raking out the whole joint?
Yes, but only if you first confirm the joint cavity is actually voided. If the mortar behind the surface is still hard and well-bonded, you can scrape and tool just the loose face and then pack in fresh mortar to the remaining sound depth. If tapping or poking reveals more of the joint is soft than you can see, shallow patching will pop out within a season.
How do I know if my mortar mix is the right consistency for repointing patio joints?
Use the cold, hand-mold test as your main check. Mortar that is stiff enough to hold a ball shape and barely smears when pressed will usually cure with proper strength and less shrinkage. If it squeezes out easily like paste, it is too wet. If it won’t compress into the joint and it crumbles when you pack it, it’s too dry.
What joint profile should I tool, concave, flush, or weather-struck, for a stone patio?
Plan to match the existing profile, not “make it perfect.” If the original joint is weather-struck (slightly recessed and tight to shed water), overfilling and flattening can trap moisture against the stone edge. Tool the repair to the same general finish across the section, and avoid leaving a high ridge that water can wick into.
If the new mortar keeps failing quickly, what water-related issues should I check first?
If the patio surface stays wet for long periods, repointing alone usually fails again. After rain, note where water pools or runs, then address drainage first (regrade low spots, clear clogged weep paths, improve slope away from the house). Also consider weed control in the joints, since roots open channels for water to reach the mortar core.
Is white crust (efflorescence) something I can ignore, or does it mean my repointing will fail?
Light efflorescence often clears after a dry spell, but recurring white deposits plus soft mortar means moisture is still moving through the joint. Don’t seal immediately to “lock it in.” Improve drainage and let the masonry dry thoroughly, then repoint any joints that crumble when tested, and only then consider a breathable penetrating sealer.
What should I do if the repaired joints look too light or the color match is off after curing?
Try to avoid color mismatches by doing test panels before mixing a full batch, and remember wet comparison is misleading. If you already repointed and spots look too light, you can sometimes tone the surface lightly with carefully applied mortar pigment in future repairs, but cured mortar usually cannot be reliably “recolored” without abrasion that can damage stone.
How can I remove mortar smears without damaging the stone surface?
If mortar smears can still be worked within a few hours, misting and gently scrubbing with a natural-bristle brush is your best option. Once it has cured for a day or more, any acid wash can etch porous or soft stone, even if the directions say it’s safe. For stone patios, test the cleaner in an inconspicuous spot and stop as soon as the smear releases.
How do I know it’s truly safe to seal after repointing mortar joints?
You should assume the sealer window is determined by dryness, not just time. Wait at least 72 hours, but if the weather is humid or the stone is slow to dry, extend the wait and verify the surface is dry. Applying sealer to damp masonry can trap moisture and worsen freeze-thaw stress.
Can I seal over previously sealed patio joints, and how do I tell if the existing sealer will cause problems?
If you have a sealant already, test it by sprinkling water on an inconspicuous area. If water beads and won’t soak in, the surface is probably film-forming or already sealed, which can interfere with breathable penetration. In that case, you may need to remove incompatible coatings before applying a silane/siloxane penetrating product, or skip sealing if the system can trap moisture.
If only the top 1/8 inch of mortar is crumbling, should I still rake to the full target depth?
Yes for small areas, but use the right approach. If you remove only the failing face and don’t rake to sound depth, the new mortar may look filled at first but will detach under freeze-thaw cycles. Also ensure the remaining backer (the “spine” of the joint) is hard. If it’s soft anywhere along the joint run, keep raking deeper.
Next Article
How to Fix Cement Patio Cracks: Diagnose and Repair
Diagnose concrete patio crack types and repair with the right sealant or patch, from prep to curing and prevention.