Most patio problems come down to four culprits: cracked or spalling concrete, sunken or uneven pavers, failed joints and edges letting weeds take over, and water going somewhere it shouldn't. Once you know which one you're dealing with, the fix is pretty straightforward. Once you know which one you're dealing with, the fix is pretty straightforward how to repair patio deck only related option for your exact patio issues, even if this guide focuses on other common patio repairs like concrete cracking, pavers, and drainage problems)"}],. If you’re not sure what type of issue you have, start by using this guide’s step-by-step process for how to fix patio flooring. The tricky part is diagnosing correctly before you buy materials, because a patch job on the wrong problem just fails again in a season or two.
Fix a Patio: Diagnose Damage and Repair Fast DIY

Identify what's wrong with your patio first
Walk your patio and look closely before you do anything else. Grab a screwdriver and poke at any cracked or discolored areas. The goal is to figure out whether you're dealing with a surface problem, a structural problem, or a drainage problem, because each one calls for a completely different approach.
Here's a quick diagnostic breakdown to figure out which section of this guide applies to you:
| What you see | Likely cause | Where to go |
|---|---|---|
| Hairline or shallow surface cracks | Shrinkage, freeze-thaw cycles, age | Cracked concrete repair section |
| Deep cracks, chunks missing, flaking surface (spalling) | Moisture intrusion, deicing salt damage, aging concrete | Cracked concrete repair section |
| Cracks that are wider on one side than the other, or actively shifting | Base movement or settlement | Cracked concrete repair + pro consult |
| Pavers rocking, tilting, or visibly sunken | Eroded or improperly compacted base/bedding sand | Sunken paver repair section |
| Weeds, moss, or ants coming up through joints | Failed joint sand, poor edge restraints | Moss/weed and joint failure section |
| Puddles that don't drain, or water running toward the house | Inadequate slope, clogged drainage | Drainage section |
| Dull, stained, or pitted surface with water soaking in fast | Worn or failed sealant | Resealing section |
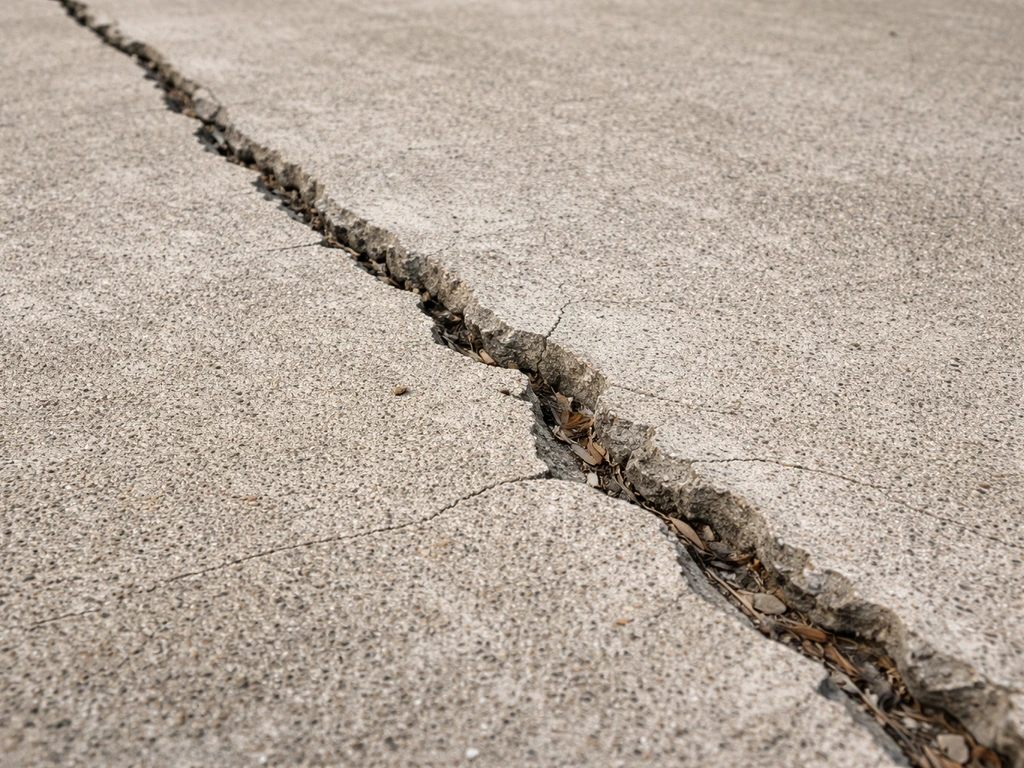
One important distinction before you spend a dollar on materials: a crack that's still moving is called an active crack. If you patch an active crack with a rigid cementitious filler, it will crack again, usually along the same line. You can tell a crack is active if it changes width seasonally, if one side is higher than the other, or if you can see fresh concrete dust or debris in it. Active cracks need a flexible repair product and often need the underlying cause addressed first. Stable cracks that haven't moved in years are much simpler to fix.
Cracked concrete: what to use and how to do it right
Concrete cracks are almost inevitable over time, especially in climates with hard winters. Water seeps in, freezes, expands, and breaks the surface apart. Deicing salts accelerate this by drawing moisture into the concrete. The good news is that most surface cracks and moderate spalling are fixable with a weekend afternoon and about $30 to $60 in materials.
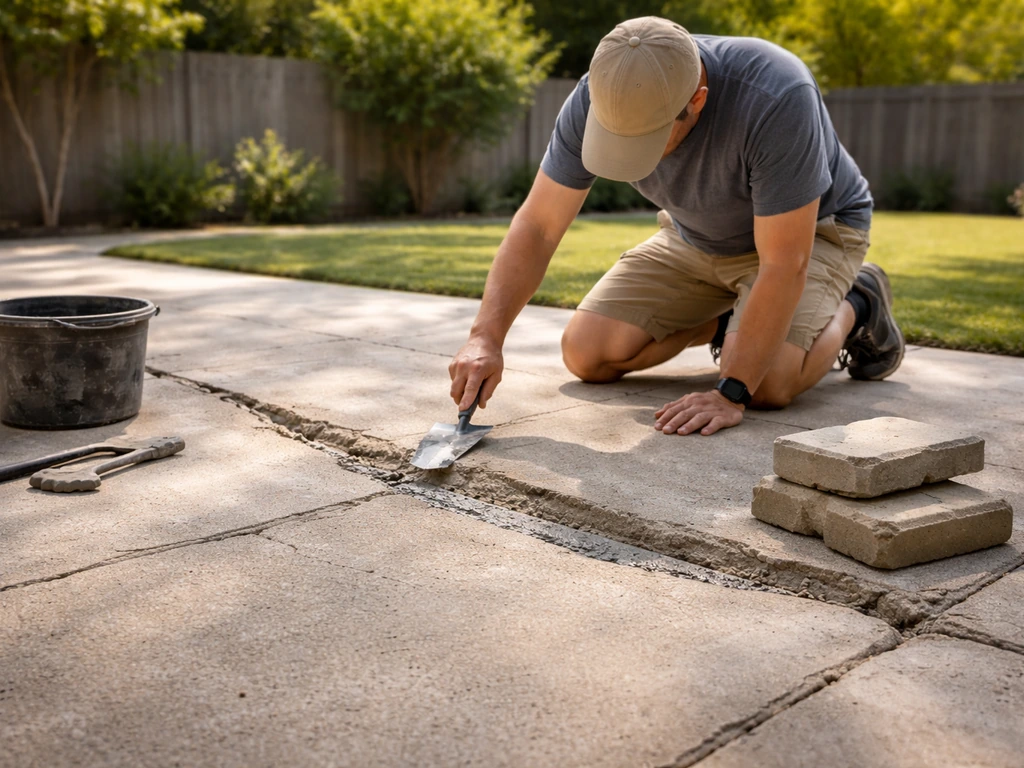
Prep: this step makes or breaks the repair
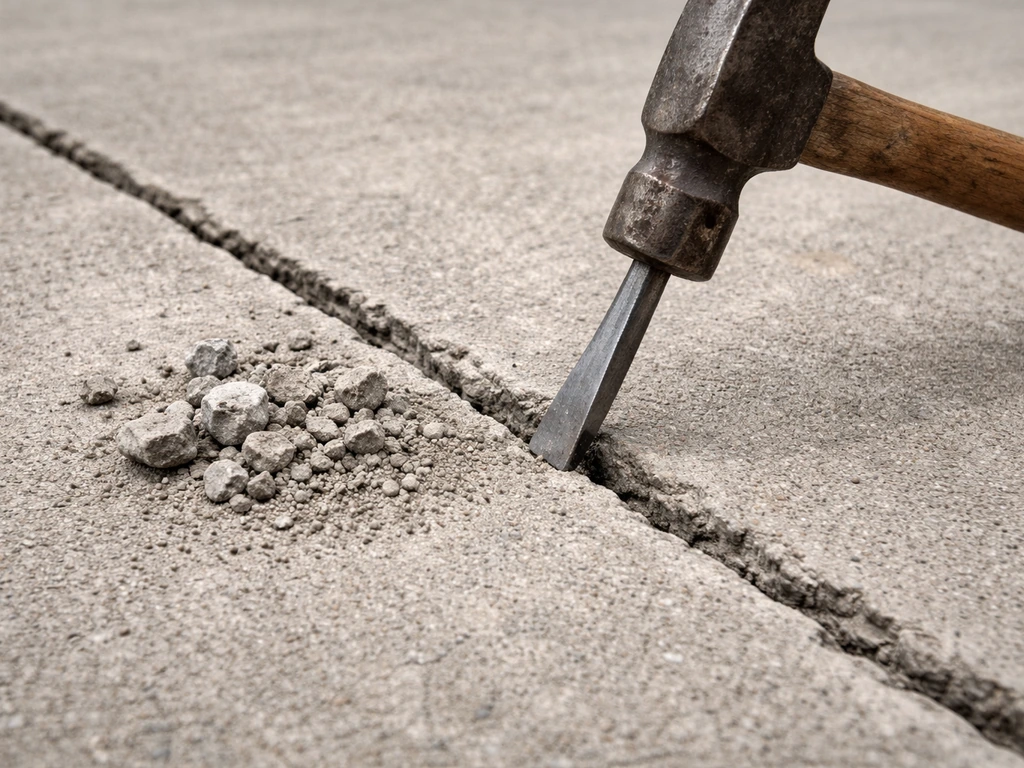
Clean prep is non-negotiable. Any loose concrete, dirt, oil, or old sealer left in the crack will prevent the repair material from bonding, and the patch will pop out within a season. Use a cold chisel and hammer to knock out any loose edges (this is called chasing the crack), then blow or vacuum out all the dust and debris. For a patio, a stiff wire brush and a shop vac work well. If there's any oil staining, degrease the area and rinse it completely. The crack needs to be clean, dry, and structurally sound before anything goes in.
Choosing the right crack repair product
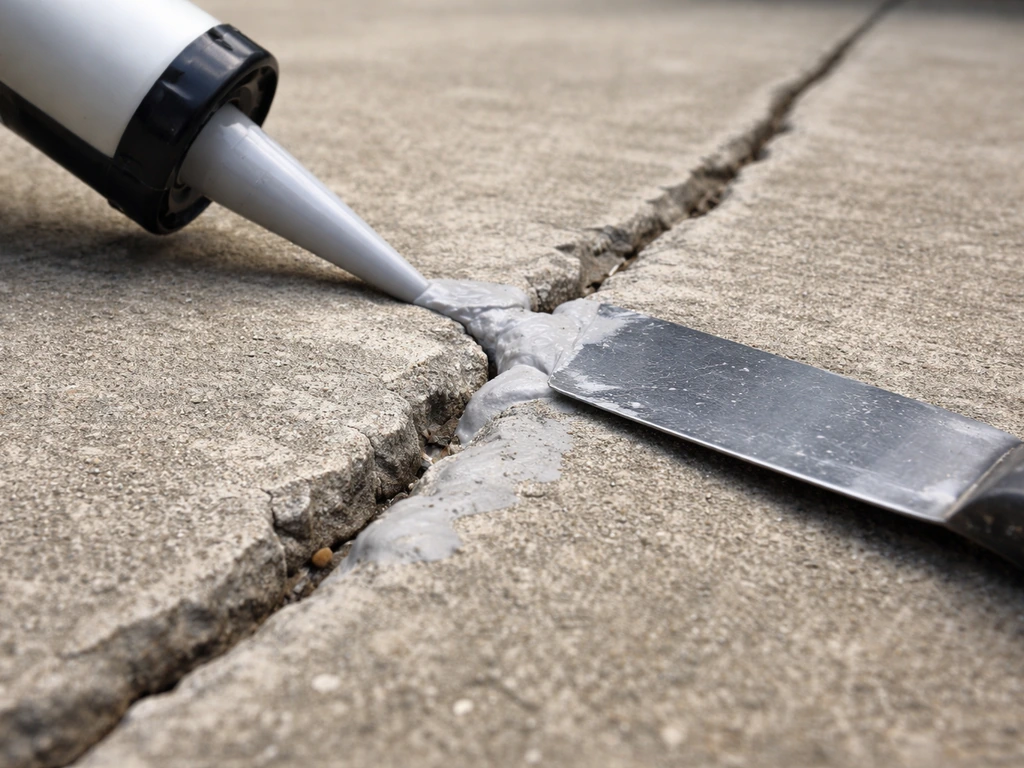
For hairline to moderate cracks (under about 1/2 inch wide) that are stable, a siliconized acrylic latex product like Sakrete Concrete Repair in a tube works well. It goes in with a standard caulking gun, is sandable when cured, and handles minor flex without cracking back out. For active or wider cracks where you need a more flexible, durable seal, a polyurethane-based product is a better choice. QUIKRETE FastSet Concrete Crack Repair is a two-part hybrid polyurethane that cures quickly and handles movement better than rigid patches. Epoxy injections are used for structural repairs where you need the crack bonded back together tightly, but that's overkill for most residential patios and really belongs in a professional's toolkit.
Step-by-step for a concrete crack repair
- Chase the crack: use a chisel and hammer to undercut the edges slightly so the repair material has something to grip. Remove all loose concrete.
- Clean thoroughly: wire brush the crack, vacuum out dust, and if needed, degrease and rinse the area. Let it dry completely.
- For shallow cracks (under 1/4 inch): apply a siliconized acrylic latex filler with a caulking gun, pressing it fully into the crack. Smooth with a putty knife or gloved finger.
- For deeper or active cracks: use a polyurethane crack filler. Follow the product's mixing or cartridge instructions exactly. These are less forgiving of improvisation.
- For wide or deep voids (spalling areas larger than a quarter): use a vinyl concrete patcher mixed to a stiff, mortar-like consistency. Pack it in, overfill slightly, and feather the edges with a trowel.
- Allow full cure time before foot traffic, typically 24 hours for most patchers and at least 4 to 6 hours for fast-set products. Don't rush this.
- Once cured, check if the patch sits flush. Lightly grind or sand down any high spots. Then reseal the entire surface (see the resealing section).
When to stop and call a pro
If you're seeing cracks running in a grid pattern across large sections, or if one slab section is noticeably higher or lower than another (called differential settlement), that's a base failure or, in serious cases, a foundation issue. Patching the surface won't solve it. Widespread cracking with active movement, slabs that rock when you step on them, or any sign that water is building up pressure beneath the slab (called hydrostatic pressure) are all signals to get a structural assessment before spending money on surface repairs. These problems don't get better with caulk.
Sunken or uneven pavers: leveling and resetting
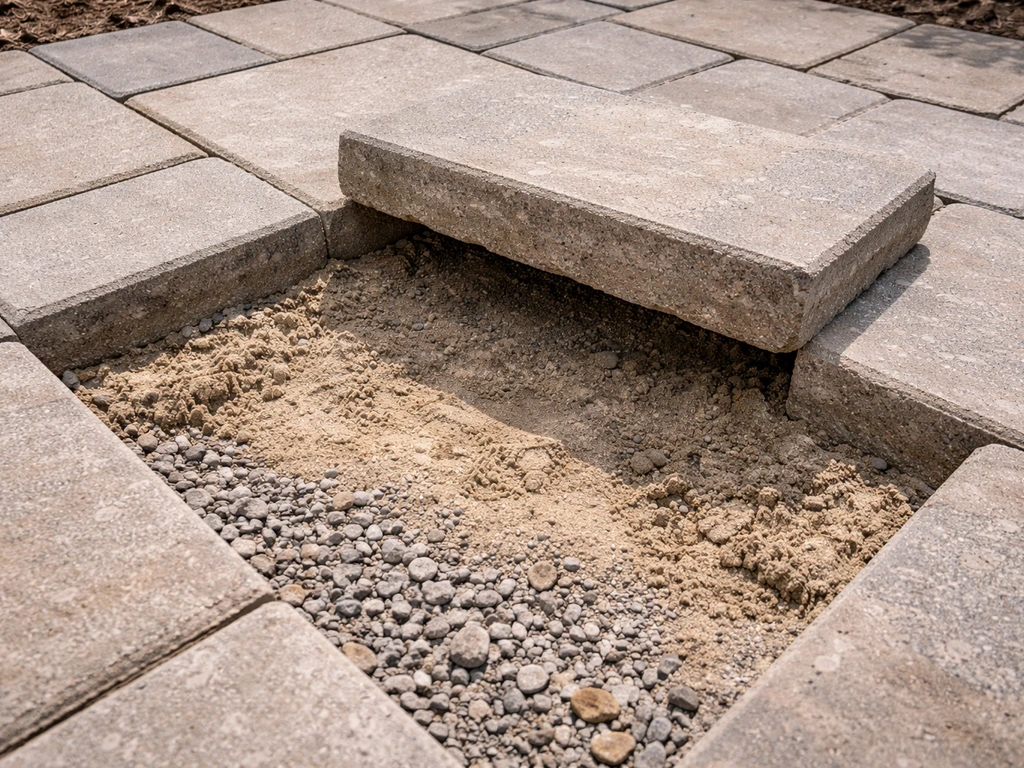
Sunken pavers almost always mean one of two things: the bedding sand beneath them has eroded or washed out, or the compacted gravel base underneath that was never quite right to begin with. Either way, the fix involves lifting the affected pavers, correcting whatever went wrong below, and resetting them properly. It sounds like a lot, but for a small sunken area it's genuinely a one-day job.
What a correctly built paver base looks like
A properly installed paver system has a compacted gravel base (typically 4 to 6 inches deep for a residential patio), then about 1 inch of bedding sand screeded to a smooth, even surface, then the pavers. That 1-inch sand layer is critical because it allows fine adjustments during installation and provides even support across the entire paver face. When that sand layer washes out or the gravel base wasn't compacted enough, individual pavers sink or tip.
How to reset sunken pavers
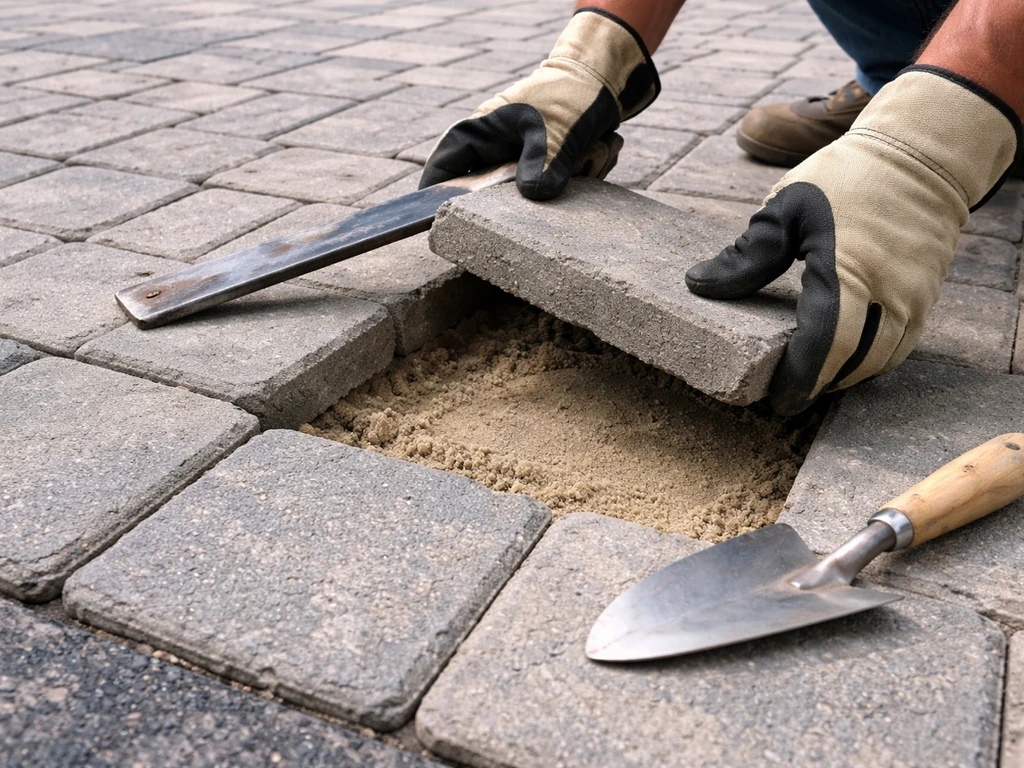
- Use a flat pry bar or a dedicated paver puller to lift the affected pavers. Work carefully to avoid chipping the edges. Set them aside in the order you removed them so you can put them back in the same orientation.
- Assess the base. Dig down and check the gravel layer. If it's clearly eroded, washed out, or never properly compacted, add fresh angular gravel (not round pea gravel) and compact it with a plate compactor or a hand tamper for small areas.
- Add or re-screed the bedding sand to a nominal 1-inch depth. Use a screed board and two pipes or rails as guides to get a perfectly flat surface at the right height. Do not compact the sand at this stage.
- Reset the pavers, pressing them gently but firmly into the sand. Check each one with a level as you go. The finished surface should have a minimum 2% slope (about 1/4 inch of drop per foot) away from the house for drainage.
- Once all pavers are reset and level, sweep polymeric sand into the joints, compact the entire surface with a plate compactor to lock everything in, and activate the polymeric sand with water (see the joint sand section below).
If the sunken area is large, say more than 10 to 15 square feet, or if the base is clearly compromised across a wide section, you're really looking at a partial or full reinstallation of that area. That's still DIY-doable, but be realistic about the scope before you start.
Moss, weeds, and failed joints or edges
Weeds and moss in patio joints aren't just cosmetic annoyances. They signal that the jointing sand has broken down, which means water is getting into the base, roots are disrupting the structure, and the pavers will eventually shift. Left alone, this accelerates every other problem on the list.
Clearing weeds and moss
Pull or scrape out all visible growth first. For moss stains on concrete, a diluted sodium hypochlorite solution (standard laundry bleach, around 5 to 10% concentration diluted further with water) applied and scrubbed with a stiff brush is effective. Let it dwell for a few minutes, scrub, then rinse thoroughly. Work outdoors with gloves and eye protection, don't mix bleach with any other cleaners, and keep it off plants and grass. Once the surface is clean and dry, you're ready to address the joints.
Refilling joints with polymeric sand

Polymeric sand is the right material for paver joints. It contains binders that activate with water and harden into a firm, weed-resistant, ant-resistant joint that doesn't wash out with rain. Here's how to apply it correctly, because the application technique matters a lot with this product.
- Make sure joints are clean and completely dry before you start. Any moisture in the joints can cause the binders to activate prematurely.
- Pour polymeric sand across the paver surface and sweep it diagonally into the joints using a stiff push broom. Work it in thoroughly until joints are filled to within about 1/8 inch of the top of the pavers.
- Run a plate compactor (or a hand tamper) over the pavers to settle the sand deeper into the joints. Sweep in more sand as needed to keep joints full.
- Use a leaf blower to blow all excess sand off the paver surfaces before wetting. Any sand left on the surface will cause a white haze (called efflorescence) once it's activated and dried. This step is critical.
- Lightly mist the surface with water. Don't soak it. The goal is to dampen the sand in stages, not flush it out. Follow the specific product's instructions for the number of wetting passes.
- Allow the joints to cure undisturbed. In warm, dry weather this takes about 24 hours. In cool or damp conditions it can take significantly longer, and the joints are vulnerable to rain during this window. Check the forecast before you start.
Edge restraints: the often-missed fix
If pavers along the perimeter of your patio are spreading outward, tipping, or coming loose, the edge restraints have failed. Edge restraints (plastic or metal strips spiked into the ground along the patio perimeter) hold the entire paver field together under load. Without them, pavers migrate outward over time and the whole installation gradually falls apart. Check the edges of your patio: if there are no visible restraints, or if the existing ones have heaved or broken, reinstall them with 10-inch spikes driven at an angle into firm ground. If your patio edging is more complex, the repair approach for patio edging covers this in more detail.
Drainage and water damage: fix the cause, not just the symptoms
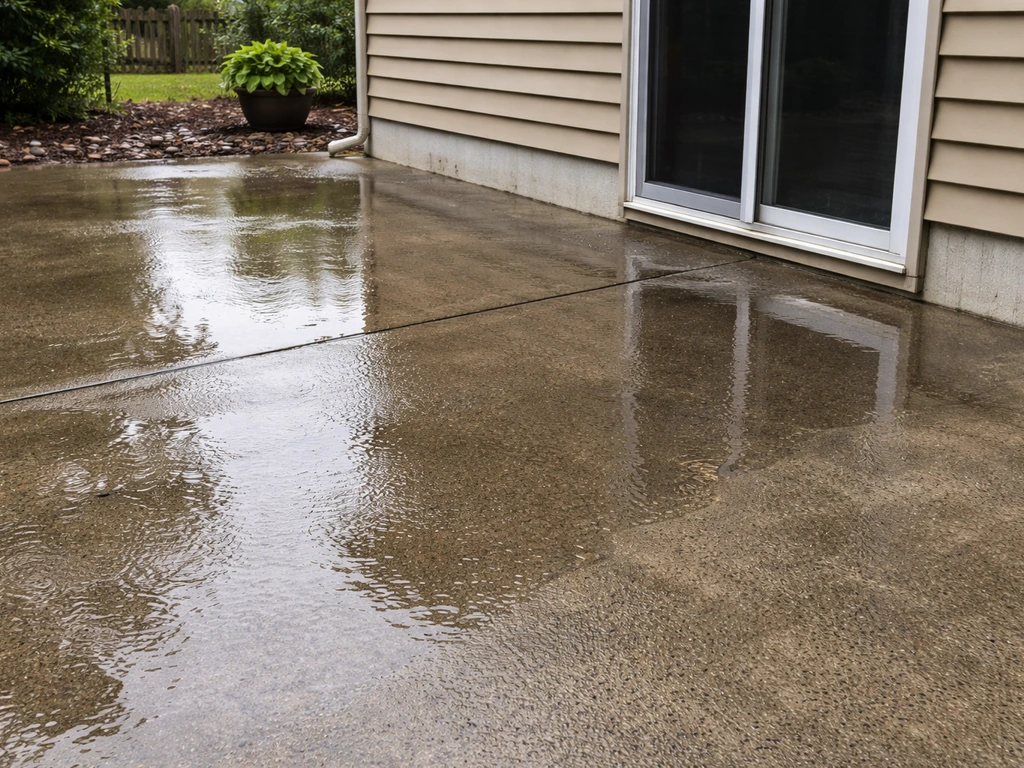
Water is behind most repeat patio failures. If your patio drains toward the house, pools after rain, or has areas that stay wet for days, that's not just a comfort issue. Water sitting against or under a patio slab or paver base causes erosion, freeze-thaw cracking, and eventually structural movement. Every other repair you do will fail faster if the drainage problem isn't solved.
Getting the slope right
The standard for patio drainage is a minimum 2% slope away from the structure, which works out to roughly 1/4 inch of drop for every foot of patio. Use a long level and a tape measure to check your actual slope. If the surface is flat or running toward the house, you have a few options depending on the material. For concrete patios, adding a thin topping layer with the correct slope is one option, though it's a moderately advanced job. For paver patios, resetting the affected sections at the correct grade is usually more practical. For both, make sure downspout extensions are directing roof water well away from the patio perimeter.
When drainage is a bigger problem
If water is consistently pooling despite correct slope, or if you're seeing water intrude under the slab or come up through joints after rain, you may need a channel drain or French drain installed at the low edge of the patio. Channel drains are set flush with the surface and carry water to a designated outlet. For most homeowners, installing a channel drain is manageable, but it does involve some excavation and connecting to a proper outlet point. If you're seeing persistent water pressure building against the patio from below or against a nearby foundation wall (signs include efflorescence, cracking in a horizontal pattern, or bulging), that's a hydrostatic pressure issue and belongs in a structural or drainage contractor's hands, not a DIY bucket.
Resealing, patching, and protecting the surface long-term
Sealing is the last step of any patio repair, and also the most skipped. A quality sealer does two important things: it prevents water from soaking into the surface (which stops a lot of the freeze-thaw damage cycle) and it makes the surface much easier to clean. If water beads on your patio, the sealer is working. If it soaks in within a few seconds, it's time to reseal.
Prep before sealing
Clean the entire surface before you apply any sealer. For concrete, use a concrete cleaner or degreaser and rinse thoroughly. For pavers, make sure all joint sand is cured and any efflorescence is cleaned off first. Let the surface dry completely. Applying sealer over a damp or dirty surface traps moisture and causes the sealer to peel or cloud. If there's old sealer on the surface that's peeling or bubbling, strip it with a sealer stripper product before applying new product.
Choosing a sealer
| Sealer type | Best for | Finish | Typical reapplication interval |
|---|---|---|---|
| Acrylic sealer | Concrete and pavers, general use | Wet look or matte | 2 to 3 years |
| Penetrating/silane-siloxane sealer | Concrete, especially in freeze-thaw climates | No visible change (invisible) | 3 to 5 years |
| Polyurethane sealer | High-traffic concrete patios | Glossy, very durable | 3 to 5 years |
| Polymeric sand restorer | Paver joints that are starting to break down but not fully failed | N/A | As needed |
For most residential concrete patios, a penetrating silane-siloxane sealer is the best long-term choice because it doesn't change the appearance and doesn't peel. For pavers where you want the color enhanced, an acrylic wet-look sealer is popular. Apply with a pump sprayer or roller in thin, even coats. Two thin coats are always better than one thick one. Most sealers need 24 to 48 hours before foot traffic and 72 hours before furniture is placed back.
Patching before you seal
Always complete any crack repairs or surface patching before sealing, and let patches cure fully first. Sealer applied over uncured patches can trap outgassing and bubble. If you're repairing and resealing on the same weekend, do the patching on Saturday morning and the sealing Sunday afternoon. That 24-hour window is usually enough for most fast-setting patching products in warm weather.
Your next steps based on what you found
Here's how to turn what you've diagnosed into a concrete action plan for today or this weekend. A lot of the same diagnostic steps also apply when you need to know how to fix patio steps, especially if cracking or water damage is involved. Once you know what to repair, follow the steps for <a data-article-id="3BB5C7DF-F8EC-4E2C-A034-2D60CA1FB5DE">how to repair patio</a> issues in this guide to get the right fix the first time.
- Small stable cracks: buy a tube of siliconized acrylic concrete repair, clean and prep the crack, fill it, let it cure, then seal the surface. Total time: half a day.
- Active or structural cracks: get a polyurethane crack filler, address the underlying cause if possible, and reseal. If slabs are shifting or there's widespread cracking, call a concrete contractor for an assessment before spending on materials.
- Sunken or rocking pavers: lift the affected pavers, fix the base (add and compact gravel if needed), re-screed a 1-inch sand bed, reset the pavers at the correct 2% slope, and refill joints with polymeric sand.
- Weeds and failed joints: clean the surface, pull all growth, refill with polymeric sand following the correct wetting technique, and check edge restraints.
- Pooling water: check your slope, extend downspouts, and if needed add a channel drain at the low edge. Persistent subsurface water pressure means a drainage professional.
- Dull, stained, or unprotected surface: clean thoroughly, let it dry, and apply a fresh coat of the right sealer for your material type.
If your patio has multiple issues at once (sunken pavers AND failed joints AND poor drainage, for example), tackle them in the right order: fix the drainage and base issues first, then address the surface and joints, then seal. Doing it in reverse means redoing work. And if any of this reveals a problem bigger than you expected, like significant base failure, widespread structural cracking, or water coming from below, that's not a failure on your part. That's just knowing when to get the right help.
FAQ
How can I tell whether a patio crack is active or just a cosmetic crack before I pick a repair product?
Look for seasonal width changes, vertical displacement (one side higher), and fresh dust or debris inside the crack after rain or freeze-thaw cycles. If you see movement or the crack is lifting at paver edges, treat it as active and choose a flexible, movement-tolerant repair instead of a rigid patch.
Should I fill cracks in concrete the same day I clean them, or do I really need them dry?
You need the crack and surrounding concrete fully dry. If you patch while moisture is present, the repair can debond or bubble when trapped water evaporates. A practical check is to tape a small plastic square over the area for several hours, if it fogs underneath, wait longer.
What’s the most common reason a concrete patch pops back out?
Poor prep. If you skip chasing loose edges, leave dust or oil residue, or apply to a damp surface, bonding fails quickly. The fastest way to avoid this is to remove anything unsound back to stable concrete, vacuum thoroughly, and only patch when the area is clean and dry.
Can I use one repair material for everything, like filling paver joint weeds and sealing concrete cracks?
No, joint weeds and concrete cracking have different failure modes. Paver joints typically need polymeric sand after cleaning, while concrete cracking repair requires products matched to crack stability (siliconized acrylic for stable hairline cracks, polyurethane for movement). Mixing approaches usually leads to rapid reoccurrence.
When lifting sunken pavers, how deep should I dig and how do I know the base is the real problem?
Reset starts with correcting the bedding sand and verifying the compacted gravel base. For typical residential patios, the bedding sand is about 1 inch thick on top of a properly compacted 4 to 6 inch gravel base. If pavers sink after resetting, re-check base compaction and washout patterns, not just sand thickness.
Do I need to remove all polymeric sand when joints are weedy, or can I top off?
Usually you must remove the degraded joint material first. Polymer binders that have broken down cannot reliably re-bond if you just add more on top, and weeds will return. Scrape out to the correct depth, clean out debris, then re-apply polymeric sand according to the product’s activation and sweeping steps.
How do I avoid over-watering polymeric sand during installation?
Use the minimum water required to activate it, apply lightly and in stages, and do not flood the joints. Over-watering can cause polymeric sand to wash away or smear, reducing its weed resistance. If joints look flushed or sandy residue appears on the surface, stop and let it settle before continuing.
What’s the right order to fix multiple patio problems so I don’t redo work?
Fix drainage and base first, then correct settlement or joint issues, then do surface patching, then seal at the end. If you seal before correcting water flow or resetting pavers, the sealer can lock in moisture and you will likely have to strip or re-do it after the structural adjustments.
How can I confirm my patio slope is correct for drainage?
Use a long level and a tape measure to measure drop over the patio length. The target is at least about a 2% slope away from the structure, roughly 1/4 inch drop per foot. If your measurement shows flat or inward drainage, plan for re-grading or resetting affected sections, not just spot patching.
Is a thin topping layer on a concrete patio always a good fix for flat drainage?
Not always. A topping can work, but only if the underlying slab is stable and water problems are addressed so the new surface does not trap moisture. If there are signs of widespread movement or base failure, re-grading or a more substantial repair is often required instead of a simple overlay.
When do I need to stop DIY and call someone for hydrostatic pressure or structural settlement?
Stop and get an assessment if you see water intruding under the slab, horizontal cracking patterns that expand, efflorescence, bulging near a foundation wall, or slab sections that rock underfoot. These can indicate pressure buildup or foundation-related issues that caulking and patching will not solve.
How long should I wait after crack repairs or patches before applying sealer?
Let patches cure fully, typically do crack repair first and schedule sealing for the next day if you’re using fast-setting products in warm weather. If you’re unsure, rely on the product’s cure time rather than a guess, because trapping outgassing under sealer can cause bubbling or clouding.
Can I reseal if my patio already has old sealer peeling or bubbling?
Usually no. If the existing sealer is peeling, bubbling, or failing, you should strip it first so the new coating can bond properly. Applying new sealer over a failing layer often results in peeling soon after, even if the surface looks clean.
How do I know sealing is actually doing its job after the repair?
Do a simple bead test. After sealing, water should bead rather than soak in quickly. If water absorbs within a few seconds, the sealer may be worn, improperly applied, or the concrete surface may still be contaminated or too porous to bond as expected.
How to Fix Cement Patio Cracks: Diagnose and Repair
Diagnose concrete patio crack types and repair with the right sealant or patch, from prep to curing and prevention.