Building a brick patio yourself is completely doable over a weekend or two. The basic process is: mark out the area, dig down 8 to 10 inches, lay a compacted gravel base, spread a 1-inch bedding sand layer, set your bricks or pavers in your chosen pattern, cut pieces to fit around obstacles, install edge restraints, and lock everything together with polymeric sand. Get those layers right and your patio won't shift, heave, or puddle water for decades.
How to Brick Patio: Step-by-Step DIY Guide

Talia Lang
29 Apr 2026

Brick vs pavers: picking your material and pattern
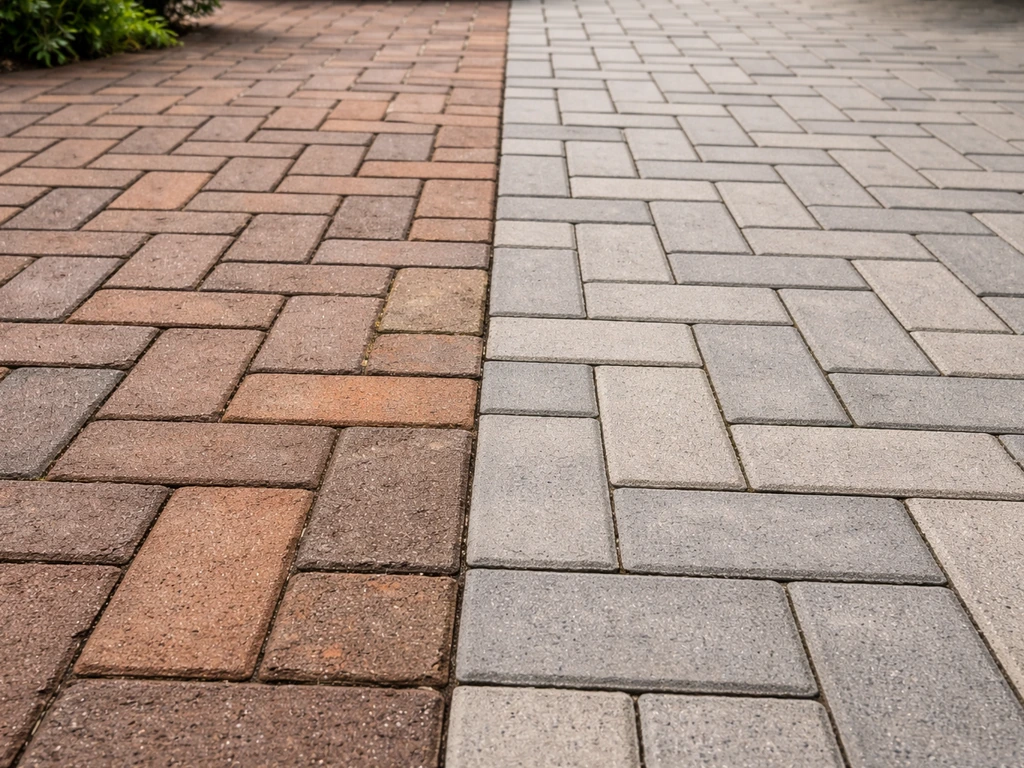
Most people searching 'how to brick a patio' are choosing between traditional clay bricks and concrete pavers. Both work well, but they behave differently and suit different looks.
| Feature | Clay Brick | Concrete Pavers |
|---|---|---|
| Look | Classic, warm red/brown tones | Wide range of colors and finishes |
| Durability | Very durable; check SW (Severe Weathering) grade for freeze-thaw climates | Consistent density; resists freeze-thaw well when properly rated |
| Water absorption | Tested per ASTM C67; SW grade absorbs less than 8% | Dense mix limits absorption; check manufacturer rating |
| Size consistency | Can vary slightly batch to batch | Highly consistent, easier to lay evenly |
| Cost | Moderate to high | Moderate; bulk pricing available |
| DIY difficulty | Moderate (slightly irregular sizes need adjustment) | Easier (consistent sizing speeds layout) |
If you live somewhere with hard winters, always buy SW-grade clay brick. The freeze-thaw testing in ASTM C67 is specifically designed to catch bricks that will crack and spall after repeated wet-freeze cycles. For concrete pavers, check that the product is rated for your climate zone. Either way, buy 5 to 10 percent extra to account for cuts and breakage.
Picking a pattern
The pattern affects both the look and how much cutting you'll do. Running bond (each row offset by half a brick length) is the easiest starting point for beginners because it uses rectangular or square units efficiently and requires minimal cuts in open areas. Herringbone creates a distinctive V-shape that actually improves the structural interlock of the surface, making it a smart choice for areas with foot traffic, though it does involve more 45-degree cuts at the edges. Basketweave and stack bond are also popular. If this is your first patio, start with running bond.
Planning, layout, and measuring your patio
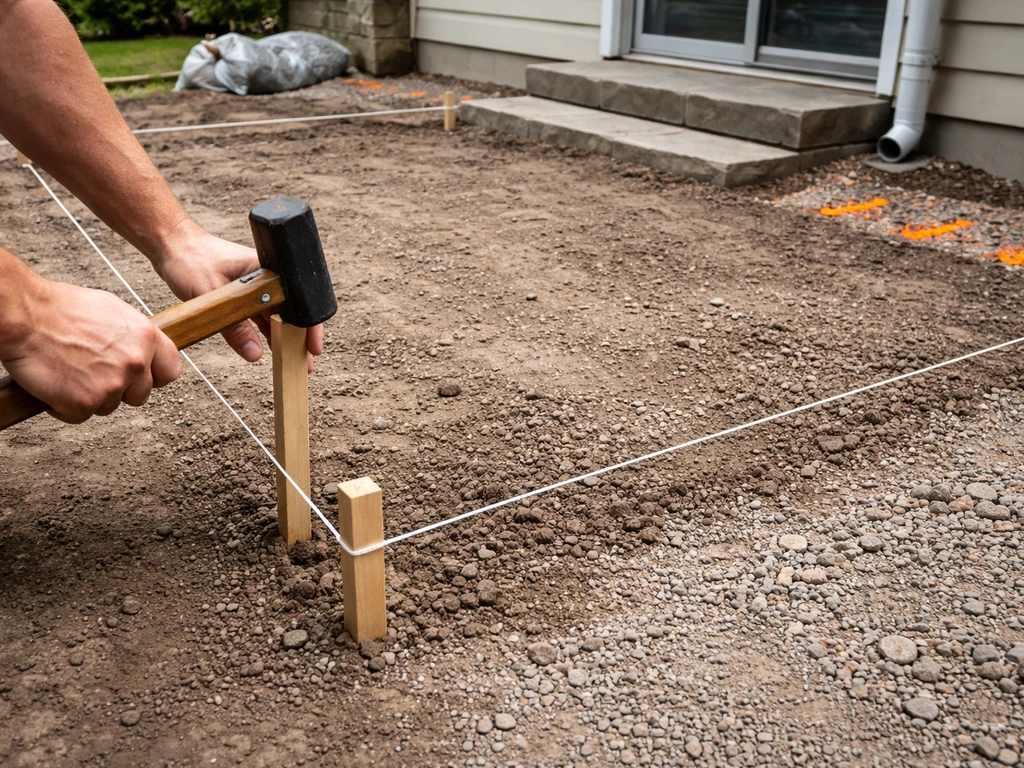
Measure the area carefully before buying anything. Sketch it on graph paper, noting any obstacles like downspouts, steps, or garden beds. Use spray paint or stakes and string to mark the exact perimeter on the ground. Square up the corners using the 3-4-5 triangle method: measure 3 feet along one side, 4 feet along the adjacent side, and if the diagonal between those two points measures exactly 5 feet, the corner is square. Check every corner.
Plan your slope at this stage. The surface must drain away from your house at a minimum of 1/4 inch per foot (about 2 percent grade). A 10-foot-wide patio should drop at least 2.5 inches from the house side to the outer edge. Mark your finished elevation at the house, then set string lines at slope to guide your excavation and base work. Getting this right now saves you from standing water problems later, which is one of the most common complaints from DIY patios.
To estimate materials, multiply the length by the width to get square footage. Add 8 to 10 percent for waste, cuts, and pattern offsets. For a 12-by-16-foot patio (192 sq ft), order materials for roughly 210 to 215 sq ft.
Digging, grading, and building the gravel base
This is the part most DIYers underestimate and the main reason patios fail. A solid, compacted aggregate base is what keeps bricks level and prevents shifting. Skim on the base and no amount of good bricklaying will save you.
Excavate to a total depth of 8 to 10 inches for a pedestrian patio (more if you have poor or clay-heavy soil). That accounts for roughly 6 inches of compacted gravel base, 1 inch of bedding sand, and the thickness of your brick or paver (typically 2.5 to 3 inches for standard units). After excavating, remove all organic material, roots, and loose soil. Compact the subgrade with a plate compactor before adding any base material.
Fill the base with clean crushed stone (compactable gravel, not pea gravel). Add it in lifts of 4 to 6 inches maximum, compacting each lift thoroughly with a plate compactor before adding the next. Compacting in thin lifts is critical: dumping 8 inches in at once and running the compactor over it once does not give you a stable base. In areas with poor or silty subgrade, lay a geotextile fabric before adding gravel to prevent the stone from mixing into the soil over time and losing its structural integrity.
Bedding sand, compaction, and drainage
Once your compacted gravel base is at the right elevation (accounting for your slope), it's time for the bedding sand layer. Spread coarse concrete sand (not mason sand, which is too fine) to a depth of about 1 inch. Do not compact the bedding sand before laying bricks. Its job is to allow you to level individual units as you set them, not to provide structure. The structure comes from the compacted gravel below.
Use screed pipes or rails to pull the sand to a consistent 1-inch depth across the area. Lay two parallel pipes on your compacted base, pour sand between them, then drag a straight board (a screed board) across the pipes to create a flat, consistent surface. Remove the pipes carefully and fill the channels with sand, smoothing by hand.
Keep your drainage slope consistent through the sand layer. The slope you set in the gravel base should carry through to the sand and finished surface. If you cover the sand bed and need to stop for the day, cover the area with plastic sheeting. Wet, saturated bedding sand is a problem: it becomes unstable and your bricks won't sit level when you return.
Laying the bricks: starting points, leveling, and edges
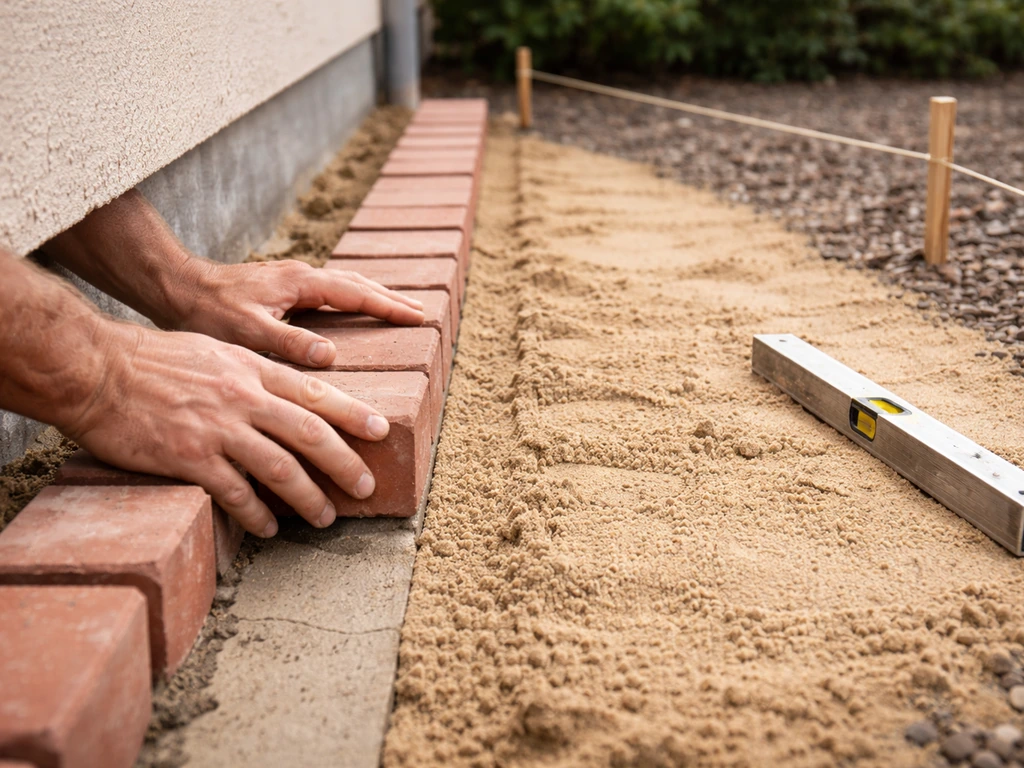
Start from a straight, fixed edge, typically the house wall or a permanent structure. Work outward so you're always stepping back onto compacted base or your gravel, never on freshly laid bricks or disturbed sand. Use kneeling boards (a piece of plywood works fine) to distribute your weight when you do need to kneel near the work area.
- Set your first row tight against the house or your starting edge, following your string line exactly.
- Lay bricks in your chosen pattern, pressing each one firmly into the sand. Don't drag or slide them, which disturbs the bed.
- Check for level every few rows using a long straightedge or level. Individual bricks should be flat and consistent with their neighbors. Tap high spots down gently with a rubber mallet.
- Maintain consistent joint spacing (typically 1/8 to 3/8 inch for pavers; traditional clay bricks often run slightly tighter). Use plastic spacers if needed.
- After every 4 to 6 square feet, lay a long straightedge across the surface to catch any high or low spots. Lift and adjust individual units by adding or removing a pinch of sand.
- Install plastic or aluminum edge restraints along all open edges before you get too far in. Spike them into the base every 12 inches. These are not optional: without them, the perimeter bricks will creep outward over time and the whole surface will loosen.
Industry guidance for interlocking pavement notes that after final compaction, the top of the paver surface should sit about 1/8 to 1/4 inch above your intended final elevation. The compaction step later will bring it down to grade. Keep that in mind as you lay, especially near edges and transitions.
Cutting around obstacles and getting clean lines
At downspouts, posts, garden borders, and curved edges, you'll need to cut bricks or pavers to fit. Rent an angle grinder with a diamond blade or a wet saw (also called a paver saw or masonry saw) for this. A cold chisel and hammer can work for rough cuts on clay brick but won't give you the clean, precise results a saw will.
Mark your cut line with a pencil or chalk directly on the brick. For straight cuts, score the line with the grinder first, then make the full cut. For curved cuts around circular obstacles like a post or drain, make multiple straight relief cuts and chip away material in small increments. Always wear eye protection, a dust mask, and hearing protection when cutting masonry.
The key to clean edges is consistent joint width and making sure every cut piece has the same base support as the full pieces. Don't let small cut pieces float on thin sand over a low spot. If a cut piece doesn't have enough surface area to sit stably, bed it in a thin layer of construction adhesive over the compacted base rather than leaving it to shift independently.
For a clean perimeter line along lawn or garden edges, consider installing a purpose-made paver edging or a row of soldier course bricks (bricks set vertically or on their long edge perpendicular to the field). This gives a finished look and helps hold the edge restraint in place. If you're also thinking about edging materials in more detail, the topic of how to edge a brick patio covers those options thoroughly. If you want a cleaner, longer-lasting perimeter, follow this guide on how to edge a brick patio from base prep to edge restraint details.
Jointing, locking the surface, and keeping it looking good
Once all bricks are laid and you're happy with the layout, run a plate compactor over the entire surface. Use a rubber pad or a piece of carpet under the compactor's plate to protect the brick faces. This step seats all the bricks firmly into the bedding sand and locks the surface into a unified plane. Make one or two passes in different directions.
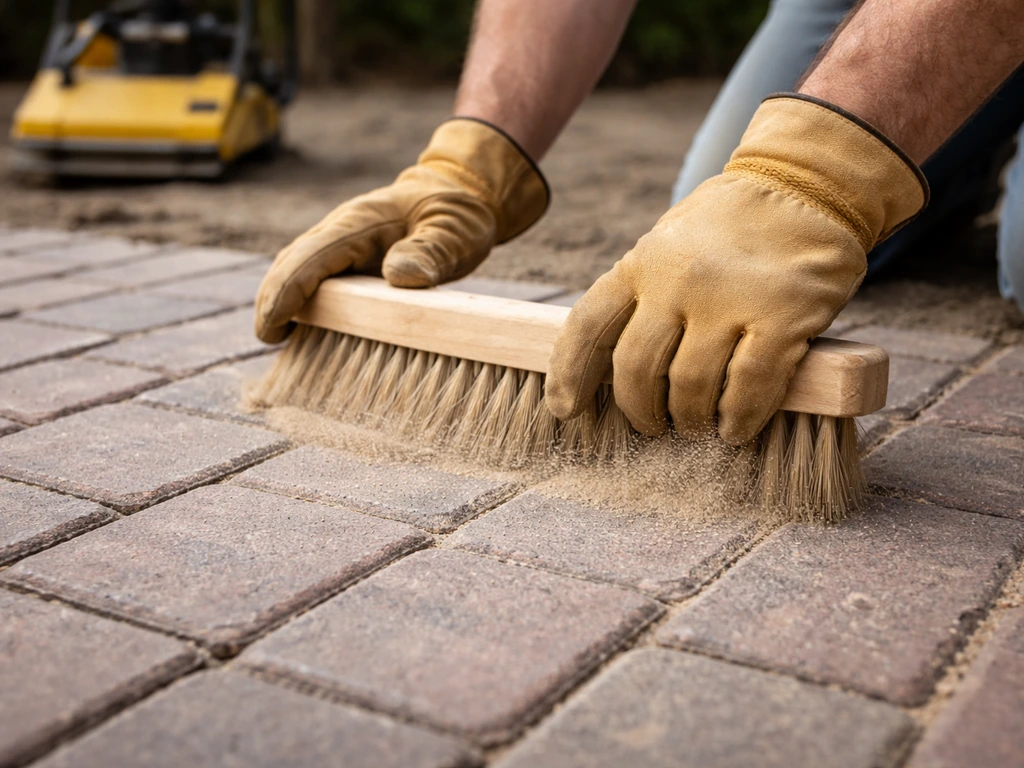
Next, fill the joints with polymeric jointing sand. This is a sand-and-polymer blend that hardens when wet and resists ants, weeds, and washout far better than plain sand. Sweep it across the surface with a stiff broom, working it into every joint. Run the plate compactor over the surface again (with the protective pad) to vibrate the sand deeper into the joints. Add more sand and repeat until joints are filled to within about 1/8 inch of the surface.
Activation is the step people most often get wrong. The bricks must be completely dry before you apply the final sweep and before you wet the surface. Once dry and swept, mist the entire surface with a garden hose set to a fine spray. Don't soak it: the goal is to wet the joints to activate the polymer binder without flushing the sand out or creating a polymer film on the brick faces. Let it cure for at least 24 hours before foot traffic. If it rains within a few hours of activation, cover the surface.
Sealing: do you need it?
Sealing is optional but worthwhile. A penetrating paver sealer enhances color, reduces staining from oil and food, and helps lock polymeric sand in place. Apply it 30 to 90 days after installation (follow the specific product's guidance) once the surface has fully cured and any efflorescence (white salt bloom) has weathered off. Clean the surface thoroughly before applying. Reapply every 2 to 4 years depending on traffic and exposure.
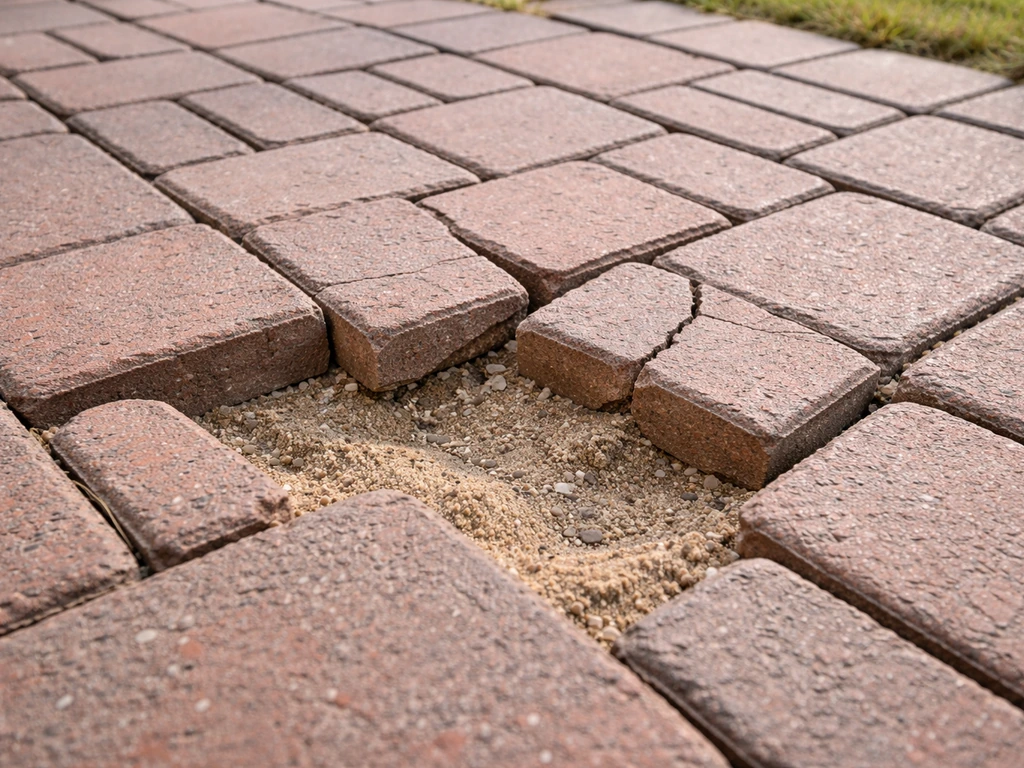
Maintenance to keep it level and tight
A well-built brick patio needs minimal maintenance, but a little regular attention prevents small issues from becoming big repairs. Check the joints once a year and top up polymeric sand in any areas that have washed out. Pull weeds as soon as you see them before roots disturb the sand. If you are seeing weeds between the joints, follow the steps in this guide on how to weed a brick patio so they do not come back Pull weeds as soon as you see them. If individual bricks settle or tip, you can lift them, adjust the sand beneath, and reset them without disturbing the rest of the surface. If you ever need to replace or re-level your patio, learn how to remove a brick patio without damaging nearby areas. That kind of targeted repair is much easier than dealing with a broken cement patio or a full-scale rebuild. If you are already seeing damage, such as a broken brick patio from freeze-thaw or washout, the same repair principles apply. Keeping the drainage slope clear of debris is also important: blocked edges lead to water pooling, which is the fastest way to undermine your base over time. If your brick patio is already shifting or settling, focus on fixing the base, leveling the units, and redoing the joints fix brick patio.
FAQ
How can I tell if my patio has the right drainage slope before I lay bricks?
Not exactly. Bricks and pavers should drain and flex in place, but polymeric sand can still wash out if activation is done when the joints are damp or if the patio gets strong water flow right after. If you expect heavy rain soon, cover the surface immediately after misting and avoid pressure washing later.
Can I correct a low spot in the bedding sand before I set bricks?
Use a straight level or laser to check finished elevation points, but also verify slope consistency across the whole footprint, not just the perimeter. If you set slope in the gravel base and then disturb the sand bed while screeding, you can unintentionally flatten low spots, which later shows up as puddling.
What’s the best way to prevent cut brick pieces from rocking at edges?
Aim to keep joints roughly uniform and avoid “micro gaps” between cut pieces. If a cut section is small, give it full base support and, when needed, bed it with a thin construction adhesive layer on the compacted base so it does not float on sand or rock when you step on it.
What should I do if I have to stop for the day before activating the polymeric sand?
Stay off the surface until after joint activation has cured, but you can do limited work earlier. For stopping mid-project, keep the sand bed dry and protected with plastic, and do not compact again after you resume, unless you remove and re-screed the disturbed area.
How wet should I make the patio during the polymeric sand activation step?
Let the polymeric sand cure fully, then hose lightly if the product instructions call for a follow-up misting. Avoid saturating, because excess moisture can mobilize the polymer binder and leave a hazy film on brick faces that is hard to remove.
What should I do if bricks start to shift or settle after a season?
If the patio is cracking or rocking months later, the cause is usually base instability or washout, not bricklaying technique. The fix is to lift affected units, rework the bedding sand over a properly compacted gravel base, and re-do the joints in that zone rather than trying to “fill and hope” with more sand.
Can I install a brick patio on top of existing concrete?
Yes, but only if the units are rated for freeze-thaw and you manage thickness and bedding correctly. Thicker pavers or bricks sometimes require a slightly deeper excavation, because the total assembly (base plus bedding plus unit) must still land at the planned elevation with the correct drainage.
Is polymeric sand okay to use year-round?
Polymeric sand generally performs best when joints are tight and consistent, and when temperatures are within the product’s stated range. Very cold or very hot conditions can slow or prevent proper activation, so check the label and plan to activate on a moderate day.
What’s the difference between edging with a soldier course and using purpose-made paver edging?
You can, but it depends on how you plan to terminate the edge. A soldier course or purpose-made edging helps hold the restraint system, especially where soil is soft, and it also gives you a clean visual finish along lawn transitions.
Next Article
Broken Brick Patio Repair Guide: Diagnose and Fix Damage
Diagnose and repair a broken brick patio with step-by-step fixes for settling, drainage, mortar, base rebuilds and preve