Most patio flooring problems come down to three root causes: water getting somewhere it shouldn't, base material that shifted or was never properly compacted, or surface material that's just worn out. Once you know which one you're dealing with, the fix is usually straightforward. The tricky part is correctly diagnosing the problem so you're not patching the surface when the real issue is six inches underground.
How to Fix Patio Flooring: Step-by-Step Repair Guide

Talia Lang
11 May 2026
Quick assessment: what's wrong and what it likely means

Before you buy anything or start chipping away, spend 10 minutes really looking at what you have. Walk the whole patio and note where problems are concentrated. Damage clustered near a downspout, along one edge, or in the center of the slab tells very different stories.
The single most useful diagnostic tool you own is a hammer. Tap the surface firmly across the damaged area and listen. A clear, ringing sound means the material underneath is solid and bonded. A hollow, dull, or muted thud means delamination, which is where the surface layer has separated from the base. This technique, sometimes called hammer sounding, is the same method used by bridge inspectors under ASTM D4580. If you're getting hollow sounds over a large area, the problem goes deeper than a cosmetic patch can fix.
Here's a quick guide to common symptoms and what they usually mean:
| What you see | What it likely means | Urgency |
|---|---|---|
| Hairline surface cracks, no movement | Shrinkage or thermal cycling, cosmetic only | Low — seal when convenient |
| Cracks wider than 1/4 inch or with vertical offset | Structural movement, possible base failure | High — assess base before patching |
| Hollow sound when tapped (delamination) | Surface layer has separated from substrate | Medium-High — remove and repatch |
| Sunken or rocking pavers | Bedding sand eroded or base settled | Medium — relay affected section |
| Crumbling, pitting, or spalling surface | Freeze-thaw damage or deicing salt deterioration | Medium — remove unsound material, patch |
| Loose or lifting tiles | Failed adhesive bond or water intrusion below | Medium — re-bond or relay |
| Standing water or water tracking indoors | Drainage failure or improper slope | High — fix slope or drainage first |
| Efflorescence (white powder on surface) | Water moving through material, evaporating at surface | Low-Medium — find water source |
One honest note: the surface can sometimes look fine while being structurally compromised underneath. Delamination pockets can hide air or trapped moisture that you won't see until you start tapping. Always sound out an area larger than the visible damage before you decide how much material to remove.
Match the repair to the patio type
The right fix depends heavily on what material you're working with. Applying concrete patch to a paver problem, or using the wrong mortar on outdoor tile, wastes time and money. Here's how to route yourself correctly.
Poured concrete patios
Concrete is the most common patio surface and the most forgiving to repair at a surface level. Cracks, spalling, and small delaminated sections can usually be patched with a Portland-cement-based patch compound. The critical rule is that all unsound concrete must come out before you patch. If you leave hollow or crumbling material under a patch, the patch will fail within a season. For filling cracks narrower than about 1/4 inch, use a flowable polyurethane or epoxy crack filler. For anything deeper, you need a full patch with proper bonding agent.
Interlocking paver patios
Pavers don't crack the same way concrete does, but they sink, rock, and shift. The fix almost always involves pulling up the affected pavers, correcting the base or bedding sand underneath, and relaying. The good news is that pavers are meant to be removed and reset, so you're working with the system rather than against it. The bad news is that if the base layer failed, you may need to dig down 4 to 6 inches to fix it properly.
Tile and stone patios
Outdoor tile (ceramic, porcelain, natural stone, or brick pavers set in mortar) fails when the adhesive bond breaks down, when grout joints crack, or when water gets under the tile and causes freeze-thaw heaving. ASTM C920 is the standard specification for cured elastomeric joint sealants used on buildings, plazas, and decks, including classification by movement capability ASTM C920 Standard Specification for Elastomeric Joint Sealants. Loose or hollow-sounding tiles need to come up completely. You can't just inject adhesive under a tile and expect it to hold outdoors. Re-setting requires an exterior-rated polymer-modified thinset that meets at least ANSI A118.4 standards, not standard interior tile mortar.
| Patio Type | Most Common Failure | Core Fix | Typical DIY Difficulty |
|---|---|---|---|
| Poured concrete | Cracking, spalling, delamination | Remove unsound material, patch with Portland-cement compound | Moderate |
| Interlocking pavers | Sinking, rocking, joint erosion | Pull up, fix base/bedding sand, relay, re-sand joints | Moderate |
| Mortar-set tile or stone | Loose tiles, cracked grout, water intrusion | Remove loose tiles, re-bond with exterior thinset, regrout | Moderate-Hard |
| Brick (dry-laid) | Shifting, sinking, frost heave | Reset bricks, improve base and drainage | Moderate |
| Stamped/decorative concrete | Surface scaling, color fading, joint cracking | Patch, reseal, or resurface with overlay | Moderate-Hard |
Tools and materials you'll need for common patio repairs
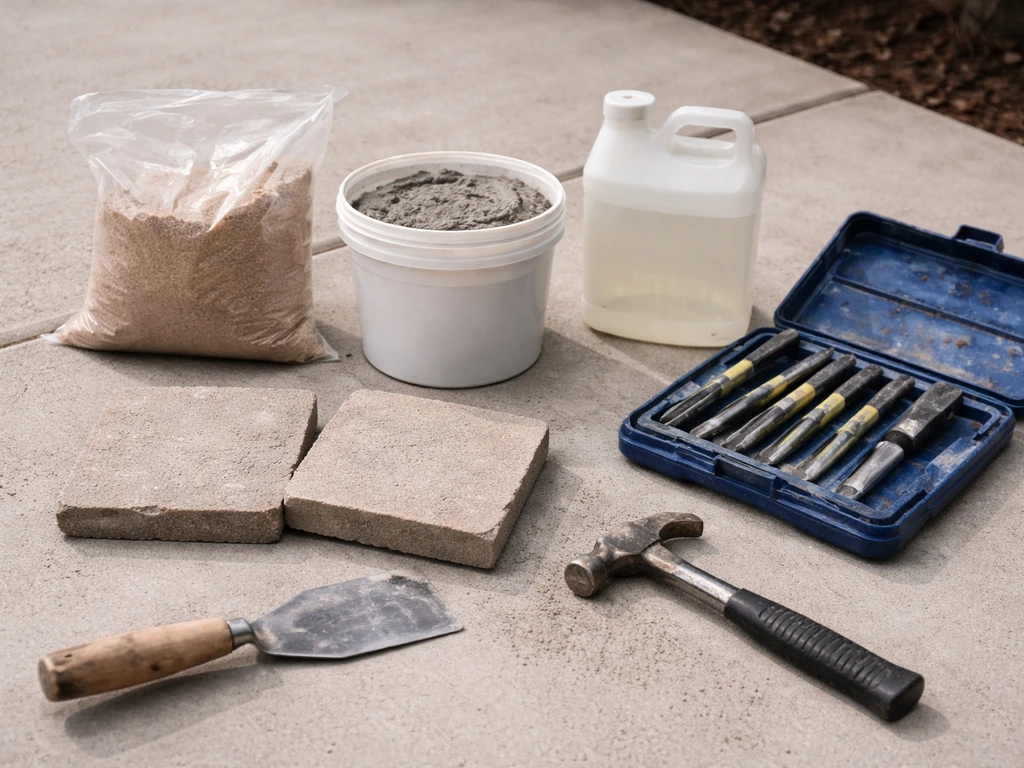
You don't need a truck full of equipment for most patio repairs, but having the right tools makes a real difference in whether the patch holds. Here's what covers the most common jobs:
Tools
- Cold chisel and hammer (or rented electric chipping hammer for larger areas)
- Wire brush or angle grinder with wire cup attachment for surface prep
- Margin trowel and steel finishing trowel
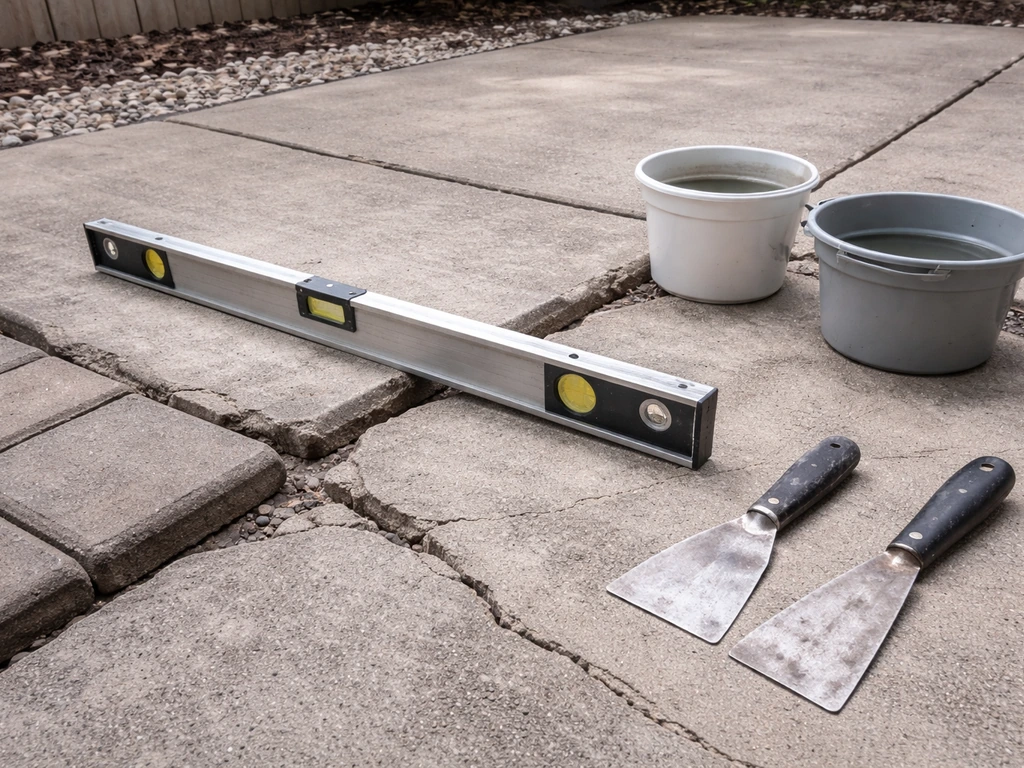
- 4-foot level and a long straightedge
- Rubber mallet (essential for paver work)
- Plate compactor (rent one, don't skip this for paver base work)
- Pry bar for pulling up pavers or tiles
- Shop vac or compressed air for cleaning out cracks before patching
- Garden hose and stiff-bristle brush for surface cleaning
- Safety glasses, dust mask, and knee pads
Materials (match to your repair type)
- Concrete patch compound: Portland-cement-based, exterior-rated (products like ARDEX CP offer about 30 minutes of working time and are suitable above, on, or below grade)
- Concrete bonding adhesive or primer: required any time you're patching existing concrete
- Polymeric sand: for paver joints, fill to about 1/8 inch below the paver top surface
- Compactable gravel base: 3/4-inch crushed stone, quantity depends on how deep you're digging
- Coarse bedding sand: spread at 1 to 1.5 inches thick over compacted base before laying pavers
- Exterior polymer-modified thinset (ANSI A118.4 or higher): for tile or stone re-bonding
- Exterior-rated grout or joint sealant (ASTM C920-rated elastomeric sealant for joints with movement)
- Concrete sealer: penetrating silane/siloxane sealer for concrete or tile; sanding sealer or joint stabilizer for pavers
- Crack filler: self-leveling polyurethane for flat cracks, epoxy injection for structural cracks
Fix steps for the most common damage patterns
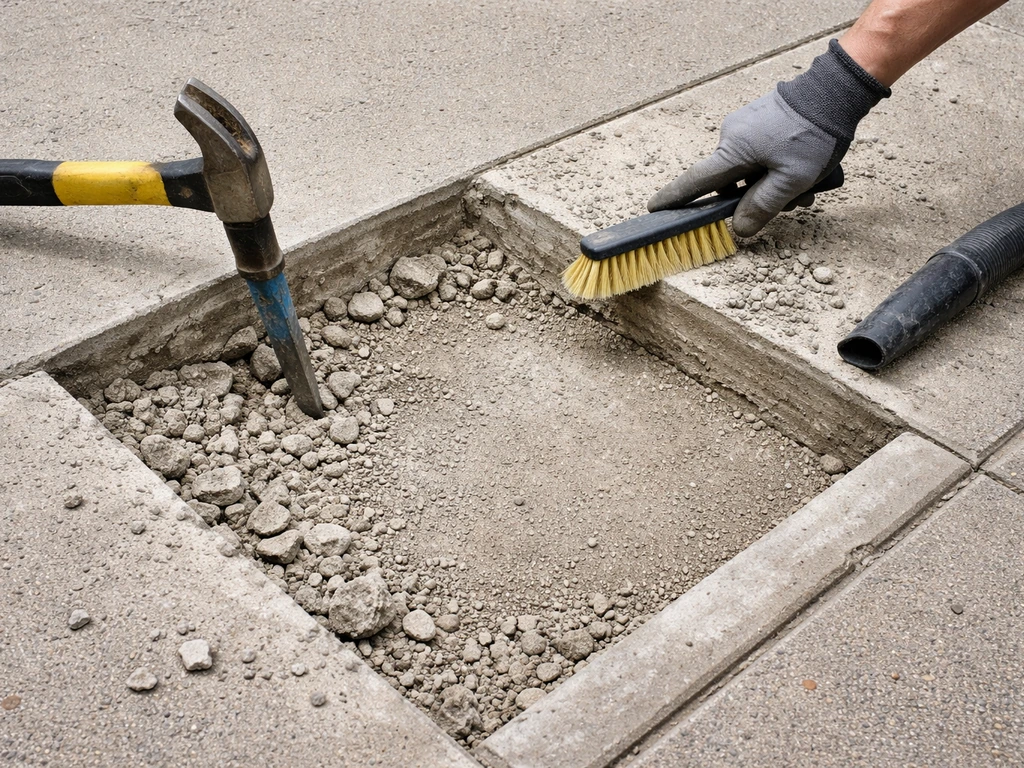
Patching cracked or spalled concrete
- Sound out the full repair area with a hammer. Mark the hollow-sounding zones with chalk — these are the boundaries of what needs to come out, not just the visible damage.
- Use a cold chisel and hammer (or chipping hammer for anything larger than a few square feet) to remove all unsound concrete. Cut the edges of the patch area at a slight undercut angle, not a feathered taper. You need at least 1/4-inch depth for patch material to hold; shallow patches fail.
- Vacuum or blow out all dust and debris. Rinse with water and let the surface get to a saturated surface-dry (SSD) condition — damp but with no standing water. Dry concrete pulls moisture from the patch too quickly and causes bonding failure.
- Apply concrete bonding adhesive to the repair area and let it become tacky before placing patch material. Skipping this step is the single most common reason patches fail.
- Mix and apply your patch compound according to directions. For trowel-grade patches like ARDEX CP, work it firmly into the repair and strike off level. Don't overwork the surface.
- Finish to match surrounding texture. For broom-finished concrete, drag a stiff brush across the surface while still wet. For smooth surfaces, use a steel trowel in light passes.
- Cover the patch with plastic sheeting or damp burlap for curing. In hot, dry, or windy conditions, cover for at least 3 hours after placement. Don't let the patch dry out too fast in the first 24 hours.
Re-laying sunken or rocking pavers
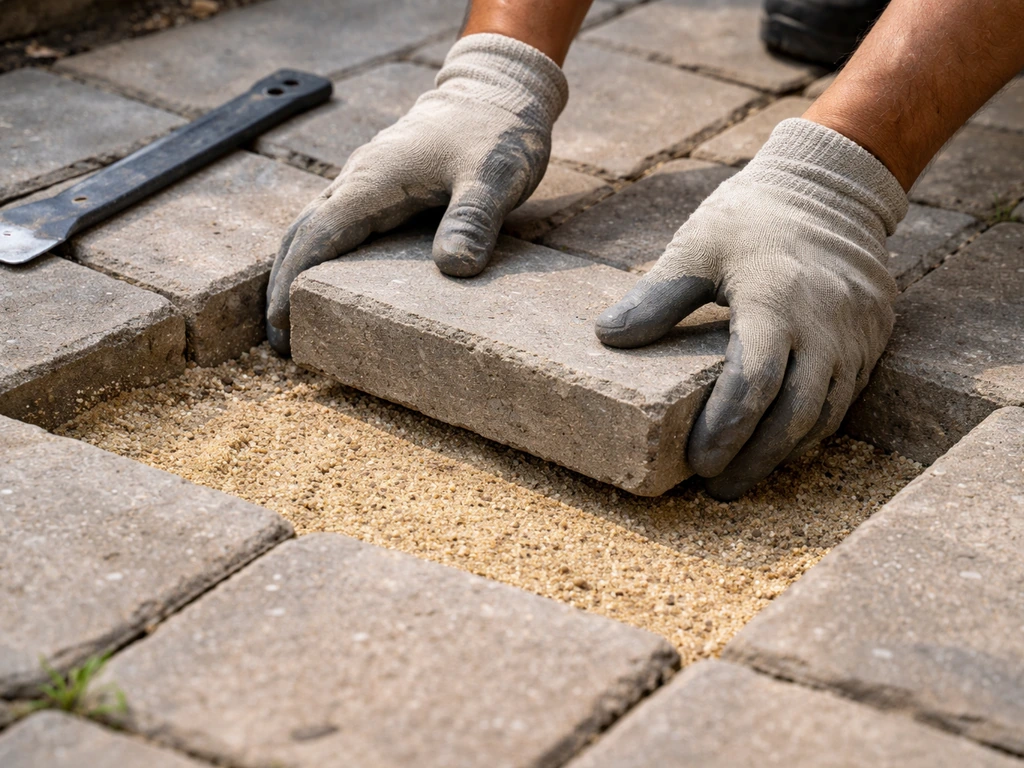
- Remove the affected pavers by prying up from a joint with a flat bar. Pavers are meant to be reset — they won't be damaged if removed carefully.
- Dig down and assess the base. If bedding sand has eroded or washed out, scrape it all away and start clean. If the compacted gravel base underneath has settled or is missing entirely, you'll need to add and re-compact base material.
- Add compacted gravel base as needed to get the depth back (4 inches is minimum for pedestrian patio use; 6 inches in freeze-thaw climates). Rent a plate compactor and compact in 2-inch lifts.
- Spread 1 to 1.5 inches of coarse bedding sand over the compacted base. Screed it level with a straight board pulled across screed rails set at the right height. Don't compact this layer — it needs to stay loose so pavers seat properly.
- Lay pavers back in place and tap down with a rubber mallet. Check level frequently with your straightedge.
- Once pavers are set, sweep polymeric sand into joints. Fill to about 1/8 inch below the top of the paver surface. Compact with a plate compactor (use a rubber pad protector) to vibrate sand into joints.
- Lightly mist the surface to activate the polymeric binder in the sand. Don't soak it — follow product instructions precisely. Avoid installation when temps will drop below 32°F for the next 48 to 72 hours.
Re-bonding or replacing loose outdoor tile
- Tap all tiles in the affected area. Remove any that sound hollow, even if they look fine. A hollow tile will pop loose next season.
- Use a chisel and hammer to chip off old mortar from both the tile back and the substrate. The bond surface must be clean and solid.
- Sound the substrate itself. If the concrete slab under the tile is delaminating, patch that first using the concrete steps above before setting any new tile.
- Apply exterior polymer-modified thinset (ANSI A118.4 minimum) to the substrate using a notched trowel. Also back-butter the tile. In outdoor applications, full coverage of the tile back is non-negotiable — voids trap water.
- Set tile and tap firmly into place. Check alignment and level. Allow to cure fully before grouting, typically 24 hours minimum.
- Grout joints with an exterior-rated grout. For joints in areas with any movement or thermal cycling, use an ASTM C920 elastomeric sealant instead of rigid grout — it won't crack when the surface expands and contracts.
Refreshing eroded paver joints
If your pavers are stable but joints are hollow, weed-filled, or washing out, you don't need to pull anything up. Remove old joint material by raking or using a reciprocating saw with a grout blade. Sweep in fresh polymeric sand, compact, and activate with water. This is one of the easiest and most impactful patio fixes you can do.
Leveling and drainage fixes to prevent repeat failures
This is the section most DIY guides skip, and it's the reason the same patio fails again two years after repair. If water is the root cause, fixing the surface without fixing drainage just resets the clock. If you want the fix to last, make sure the patio drainage and base are addressed along with the surface so you're not back to repairing it soon fix a patio.
All patio surfaces need a minimum slope of about 1/8 inch per foot away from the house. On a 10-foot-deep patio, that's about 1.25 inches of drop from the house wall to the outer edge. If your patio is flat or slopes toward the house, water sits on the surface, infiltrates joints, and eventually undermines whatever's beneath.
To check your slope, lay a 4-foot level on the surface and see which direction water would run. If it runs toward the house or pools in the center, your next repair needs to address slope, not just the surface material.
Correcting slope on a concrete patio
For moderate slope corrections (less than about 1 inch of correction needed), you can use a self-leveling underlayment product. Products like SikaLevel work best when ambient and substrate temperatures are between 59 and 77°F, and the curing surface needs to be protected from direct sun and excessive heat, which causes surface cracking before the product gains strength. For larger slope corrections or persistently wet areas, you may need to either break out and repour a section of the slab or add a channel drain at the low point.
Drainage fixes for paver patios
Pavers are actually better at handling drainage than concrete because water can pass through the joints. The problem is when the base material below has fine particles that drain poorly, or when the patio has settled into a bowl shape. When you're resetting pavers over a failed base, this is your chance to grade the base material correctly. Set your screed rails at the correct slope before spreading bedding sand, and you'll build the right pitch directly into the surface.
When to add a channel drain or French drain
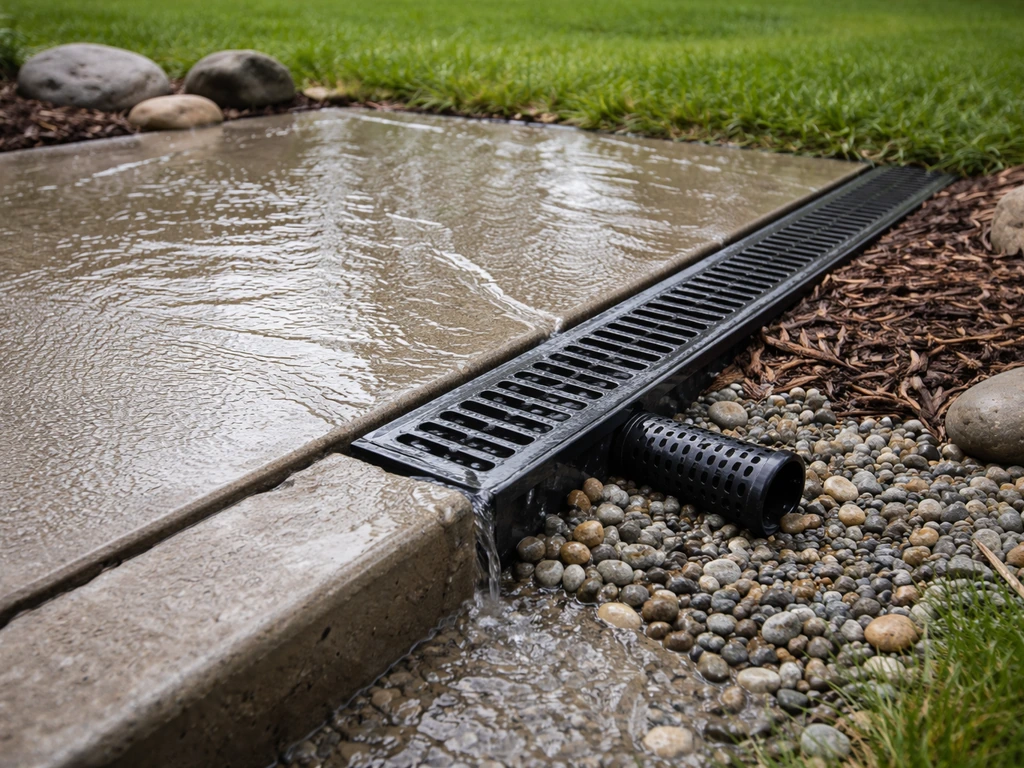
If a downspout dumps onto the patio, or if your patio sits in a natural low point with nowhere for water to go, a surface-mounted channel drain is often the most practical solution. You can cut a channel into an existing concrete slab with an angle grinder and diamond blade, set a pre-made channel drain unit in fresh concrete, and connect it to a pipe that runs water away from the structure. For pavers, channel drains install cleanly between paver rows. This isn't a beginner job, but it's a realistic intermediate DIY project.
Curing, sealing, and finishing for outdoor durability
Getting the repair right is only half the job. How you cure and finish it determines whether it lasts 2 years or 20.
Curing concrete patches
Concrete and cement-based patches need moisture to cure properly, which is the opposite of what most people think. Letting a fresh patch dry fast in the sun produces a weak, brittle surface. After placing any cement-based patch, cover it with plastic sheeting or damp burlap. In hot or windy weather, that cover should stay on for at least 3 hours after placement.
For normal conditions, 24 hours of wet curing gives you significantly stronger results, but don't exceed that maximum, you want the surface to begin drying eventually. Don't let anyone walk on a fresh patch until it's reached walkable strength, which varies by product. Fast-set patches like SikaQuick-800 can be walkable in under an hour; standard Portland-cement patches typically need 24 hours minimum.
Weather windows for repairs
Don't do cement or mortar work when temperatures are below 40°F or expected to drop below 35 to 40°F during the curing window. Cold temperatures slow or stop hydration and can ruin a patch overnight. Some products (like SikaQuick-800 with Winter Boost additive) extend the working range in cold weather, but standard patch compounds don't. On the hot end, working in direct sun above 90°F shortens working time dramatically and causes rapid moisture loss, plan for early morning work in summer. The same applies to polymeric sand: don't install it if temps will drop to 32°F within 48 to 72 hours of installation.
Sealing the surface
Sealing is the step that extends every repair significantly. For concrete, a penetrating silane or siloxane sealer is the best long-term choice outdoors because it doesn't change the appearance and won't peel. Film-forming acrylic sealers look better short-term but need reapplication every 2 to 3 years and can trap moisture if applied too early. For pavers, a joint-stabilizing sealer helps lock polymeric sand in place and resists weed germination. For tile and natural stone, use a product rated for the specific material and outdoor exposure. Always wait for patches to cure fully before sealing, at least 28 days for concrete patches if using a penetrating sealer, or follow the specific product guidance.
Common mistakes and when to call a pro
Mistakes that guarantee a repeat failure
- Patching over hollow or unsound material: if hammer sounding tells you the material is delaminated, patch over it anyway and that patch will come loose within a season
- Skipping bonding adhesive on concrete patches: adhesion between old concrete and new patch is the weak link, and primer is not optional
- Making patches too shallow: anything under 1/4 inch is a cosmetic fix that won't last; structural patches need enough depth to develop strength
- Using interior tile mortar outdoors: standard thinset doesn't handle freeze-thaw cycling — use ANSI A118.4 minimum for any exterior application
- Skipping base compaction when resetting pavers: un-compacted base will settle unevenly and you'll be pulling the same pavers up again in a year
- Ignoring the drainage cause: patching a surface that still collects standing water just delays the same failure
- Washing in polymeric sand without compacting first: sand has to fill the full joint depth before activation, or joints stay loose
- Working in bad weather conditions: cold slows or kills curing; heat kills working time and dries patches too fast
When the job is beyond DIY
There are situations where the honest answer is that this needs a professional, and pushing through with a DIY fix will cost you more in the long run. Call a concrete contractor if you have cracks with vertical offset (one side higher than the other), which indicates slab movement that a patch won't stop. If you've got delamination across more than about 20 to 30 percent of the slab, or if the slab has sunk unevenly, you're looking at either slab lifting (mudjacking or foam injection) or a full removal and repour, neither of which is a realistic DIY project. For persistent water infiltration into a basement or crawlspace through or around a patio, the drainage fix goes beyond the surface and involves waterproofing work that needs a specialist.
For paver patios, if you pull up a section and find that the base material has completely washed out or that there's soft, saturated soil all the way down, you likely have a subsurface drainage problem that will keep repeating. A landscape contractor who specializes in hardscaping can assess whether a French drain system is needed before any new surface work makes sense.
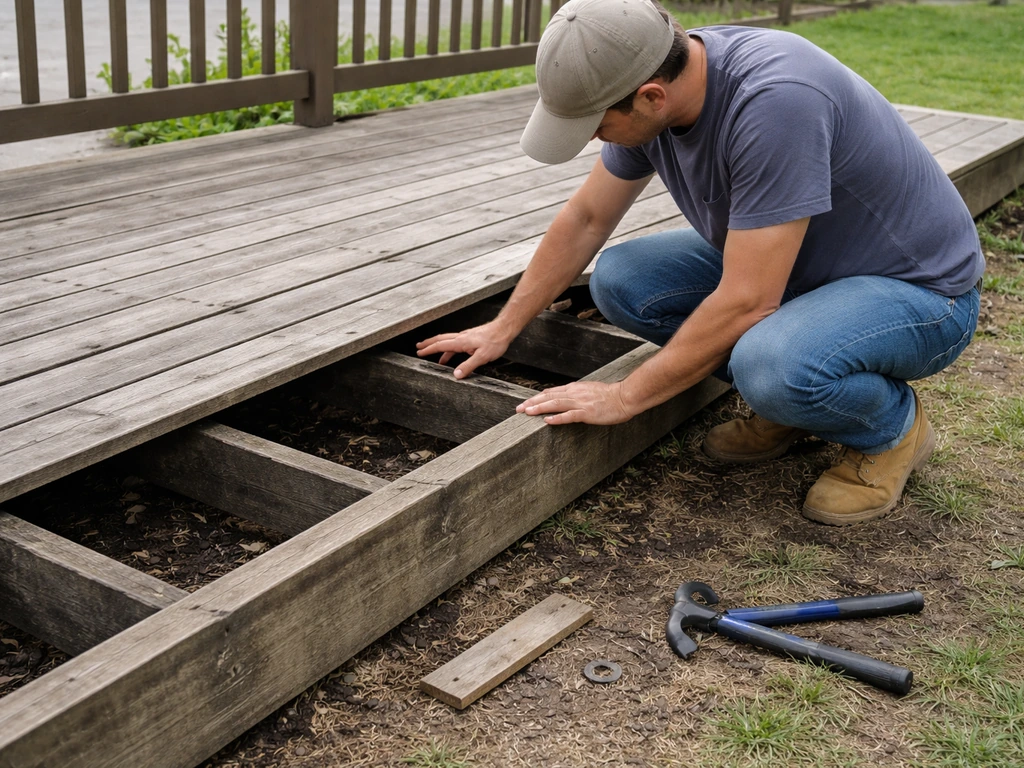
If your patio also has steps, edging, or a deck structure that's showing the same kind of wear, those elements often share the same root causes, drainage or base failure, so it's worth assessing all of it together rather than fixing surfaces piecemeal. The same diagnostic steps for a patio also apply when you're learning how to fix patio steps, especially when drainage and the base are the real problem. If you want the best results, follow a clear step-by-step approach to diagnose, repair, and restore your patio deck deck structure. Patio edging failures and step damage in particular can accelerate surface problems if water is getting in at those edges, so don't treat them as separate problems if they're all happening at once.
FAQ
How far should I remove concrete if I hear a hollow sound?
For concrete patches, measure the hollow area by hammer sounding and remove until you reach fully bonded, ringing substrate. If you patch over soft or muted-sounding concrete, the patch can detach even if the surface looks solid.
Can I just fill a crack or spall without breaking out the surrounding area?
Yes, but only after you confirm the damage is truly surface-level. Hammer-sound beyond the visible crack area first, then clean and re-profile the cavity so patch material can mechanically bond. If you see widespread muted sounds, plan for a larger breakout instead of a small cosmetic fill.
Why does polymeric sand keep washing out after I install it?
Polymeric sand needs stable, dry-ish joints and proper compaction. If you hose the patio and the sand washes out quickly, it often means fines are missing or the joint is too wide or contaminated (soil, moss, old residue), so you may need to re-rake out joints and re-sand correctly rather than just adding more sand.
Will sealing alone stop patio cracking or lifting?
If the patio has a flat spot or slopes toward the house, a sealing or patch-only approach will usually fail. Even with a perfect patch, trapped water can re-enter joints or undermine the base, so you need to correct slope or add drainage before you seal and expect longevity.
Is it ever acceptable to inject adhesive under loose outdoor tile?
For outdoor tile, the replacement or re-setting step should include using an exterior-rated polymer-modified thinset (not interior mortar) and redoing the full bond area. A one-off adhesive injection under a tile rarely holds outdoors because water and freeze-thaw keep breaking the bond.
What should I do if a cold night is expected during patch curing?
Typical guidance is to avoid standard cement or mortar work when temperatures are below about 40°F, and to avoid curing windows that will drop into the mid 30s. If a cold snap is expected, wait, use a product with winter additives, or build a temperature control plan so hydration can proceed normally.
Why does my patio crack or delaminate again soon after I repair it?
In that case, your fix must address the cause of trapped moisture, not just the crack. Re-check slope direction, look for downspout runoff impact points, and confirm whether the base is draining. Without that, you can patch the crack and still get renewed delamination or movement within a season.
How can I tell if the problem is the top surface or the paver base?
If you have pavers that are sinking or rocking, assume a base or bedding problem unless hammer sounding shows the base is solid (concrete) or the surrounding paver bed is stable (pavers). For pavers, resetting over a failed base usually leads to repeat settlement, so you may need to dig down to correct and re-grade.
When should I choose self-leveling underlayment instead of breaking out and repouring?
If you need to use a self-leveling underlayment, confirm the required thickness and substrate suitability for your product, and match the curing and temperature guidance. For larger corrections or persistent wet areas, plan on breaking out and repouring or installing drainage, because leveling products do not fix underlying water flow issues.
Do I always have to remove pavers to fix joint problems?
Not necessarily. If the existing slope is correct and only joints are deteriorating, you can often keep the pavers and focus on joint cleaning and re-sanding. If you find a bowl shape or the base has washed out, you should reset and re-grade rather than topping up joints.
What mistakes during curing cause a patch to fail early?
Use the right curing sequence: cover cement-based patches with plastic or damp coverings so the surface doesn’t dry too fast. Also, verify walkable strength before allowing traffic, since foot traffic too early can create weak, brittle failure even if the patch looks fine.
How do I know when it is safe to seal after repairing concrete or pavers?
Yes, mismatched sealing timing and type are common issues. Penetrating silane or siloxane sealers generally require full curing time before application, while film-forming acrylics can peel and may trap moisture if applied too early. Choose the sealer based on material and wait the minimum cure period before sealing.
When is it better to call a concrete contractor instead of DIY patching?
Call a pro if you see vertical offset across a crack (one side higher than the other), if delamination appears widespread, or if the slab is unevenly sunk. These point to movement or deeper base failure, where patching is unlikely to be durable.
How do I tell if I need drainage work under the patio?
If you notice repeated water-related damage even after surface repairs, consider subsurface drainage. For paver patios, signs like washed-out base or saturated soil after removing pavers suggest a recurring drainage problem, often requiring assessment for a French drain before new surface work.
Should I diagnose steps, edging, and the main patio as one repair project?
Edging, steps, and deck attachments often share the same drainage and base failure pathway. If they’re getting damaged in the same pattern, diagnose the whole system together so water is directed away and the base is supported consistently.
Next Article
How to Repair a Patio Deck Step by Step DIY Guide
Step-by-step how to repair patio deck issues: diagnose rot, sag, loose boards, joists, drainage, then replace and re-sea