Most patio deck repairs fall into one of two buckets: surface damage you can fix yourself in a weekend, or structural problems that need a closer look before anyone walks on that deck again. The key is figuring out which one you're dealing with before you grab a board and a box of screws. Start from underneath if you can, probe the wood with a screwdriver, check for any movement in the frame, and then work outward from there. This guide walks you through the whole process, from diagnosis to final coat of sealer. If you want the step-by-step details for each situation, follow the guide on how to repair patio damage safely.
How to Repair a Patio Deck Step by Step DIY Guide

Talia Lang
11 May 2026
Quick triage: figure out what's broken and whether it's structural
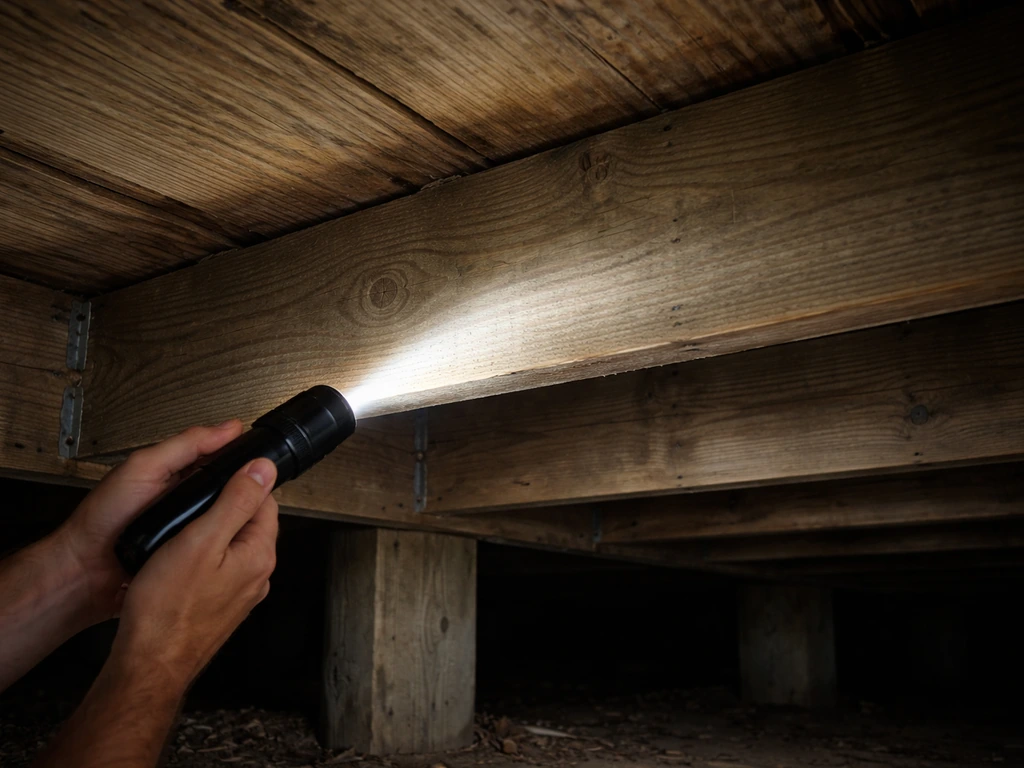
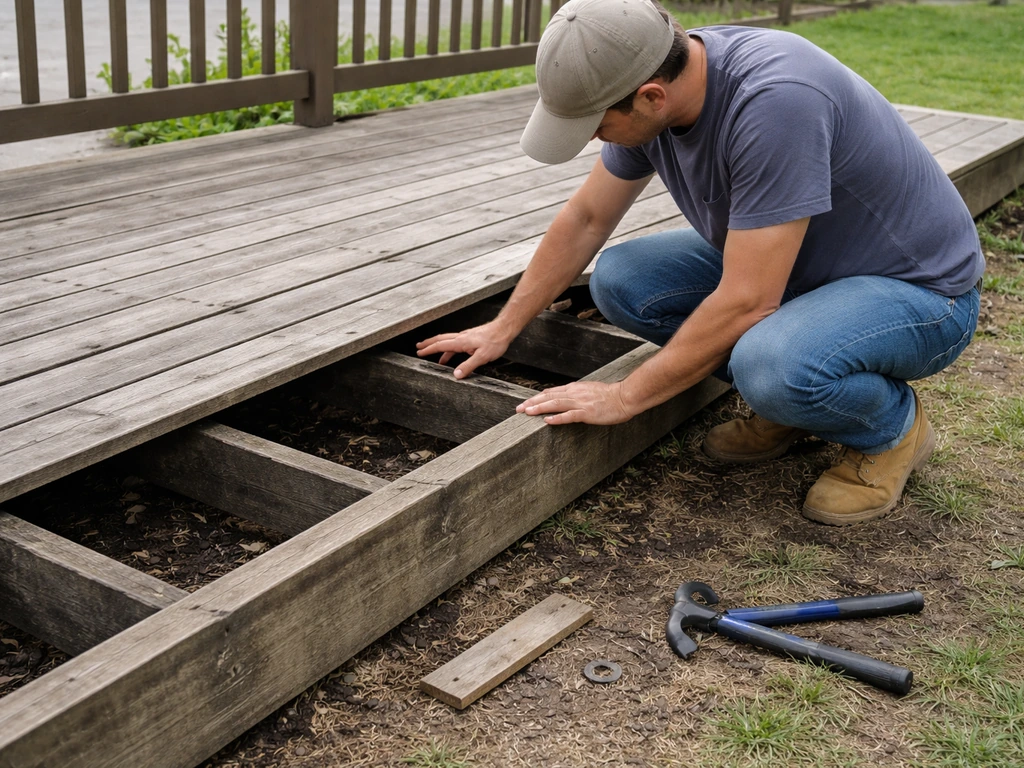
Before you do anything else, get under the deck if you can. Structural problems live in the framing, not on the surface, and it's easy to mistake a serious joist issue for a simple loose board. InterNACHI estimates that only about 40% of decks are completely safe, which sounds alarming, but the point is that surface appearances are misleading. A deck can look fine from above and still have a ledger that's pulling away from the house or a joist that's mostly rot.
Here's how to do a fast but honest assessment. Grab a flashlight, a hammer, and a flat-bladed screwdriver. From underneath, look at the ledger board (the piece bolted to your house) and check whether it's sitting flush and tight or showing any gap. A ledger pulling away from the structure is a serious safety red flag, full stop. Then work along each joist, tapping with the hammer and pressing hard with the screwdriver tip. Solid wood gives a firm, resonant tap and doesn't indent. Rotted wood sounds dull and hollow, and the screwdriver tip sinks in easily. Do the same from above on any boards that look discolored, gray-soft, or feel spongy underfoot.
- Soft, spongy feel underfoot or boards that flex more than surrounding ones: likely rot in the board or the joist below it
- Squeaking or movement: often a fastener issue or a joist that's shifted
- Visible sagging in the deck surface: check beam sag with a long level held along the beam from below
- Ledger gap or visible separation from house wall: structural concern, stop here and read the pro section before proceeding
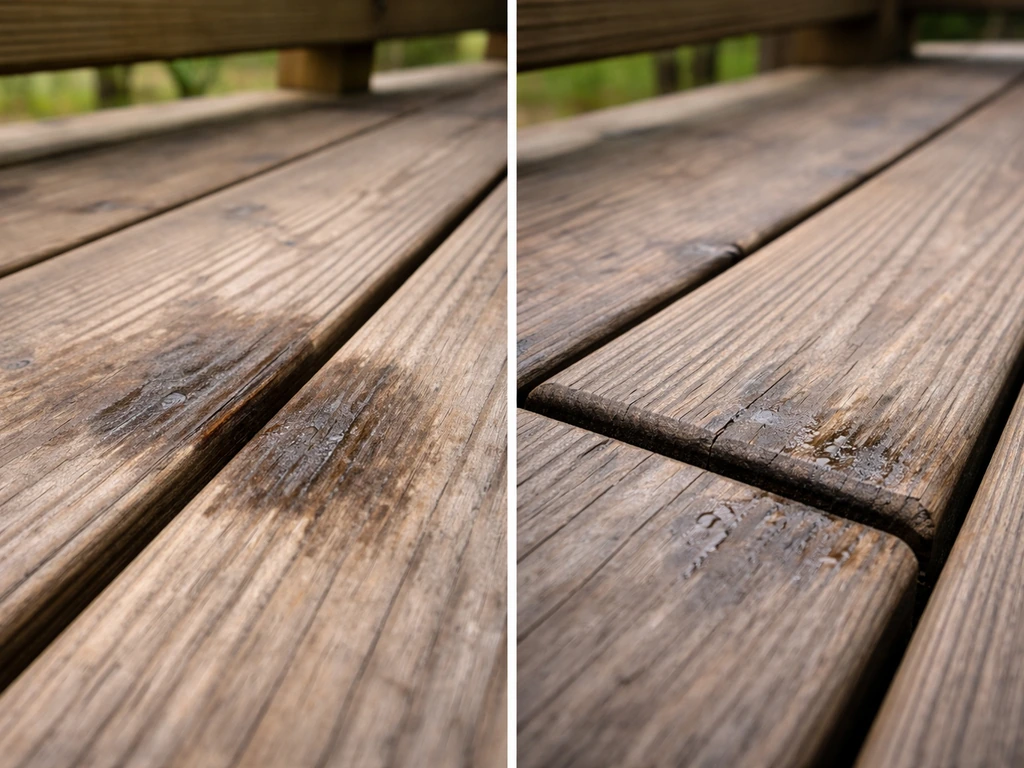
- Discolored streaks, dark staining, or mold on boards: water damage, could be superficial or deep depending on how far it's penetrated
- Warped, cupped, or cracked boards with no give: surface damage, usually DIY-repairable
- Rusted or missing fasteners: replaceable, but check whether the board has also shifted off the joist
If you have or can borrow a moisture meter, use it on any boards or joists that look questionable. Readings above 19% in wood mean moisture is at a level where rot fungi can actively grow. You don't need one to do this job, but it removes the guesswork when you're trying to decide whether a joist is borderline or definitely needs sistering.
The most common types of patio deck damage
Knowing what you're dealing with saves you from buying the wrong materials and doing repairs twice. Here are the damage types you're most likely to run into, and what usually causes them.
Boards: rot, cracks, warping, and splitting
Surface boards take the most abuse. Wood boards rot most often at the ends and anywhere water pools or sits in a gap. Cracking and splitting usually means the wood dried out and contracted, or was installed too green and moved as it dried. Warping (cupping across the width, or bowing along the length) typically means uneven moisture exposure, often from water sitting on the top surface while the underside dries faster. Composite boards don't rot, but they can crack, fade, or develop mold staining in humid climates.
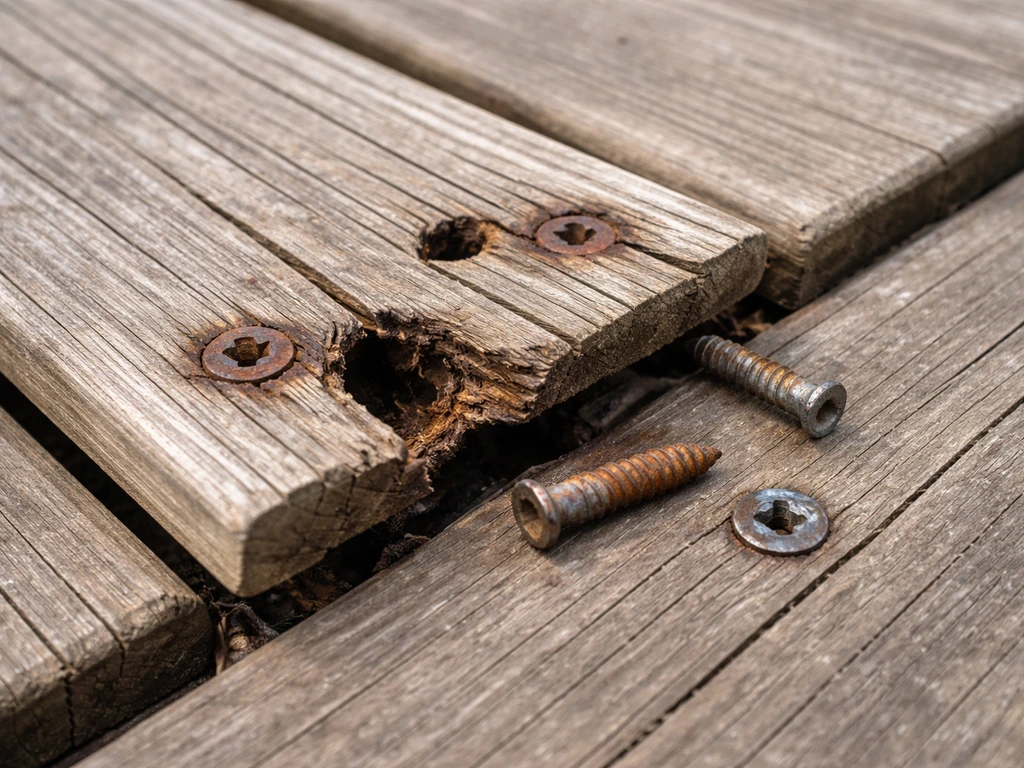
Fasteners: loose, rusted, missing, or wrong type
This is one of the most underestimated problems on older decks. If your deck was built with standard bright steel nails or screws and uses pressure-treated lumber, those fasteners are almost certainly corroding. ACQ and CA pressure treatments are aggressive on most metals, and the rust stains you see streaking down from nail heads are a sign that the fasteners are degrading and losing grip. Loose boards that squeak or bounce usually have fasteners that have backed out or corroded through. Replacement fasteners need to be hot-dip galvanized (ASTM A153 minimum), stainless steel (type 304 or 316), silicon bronze, or copper to hold up in contact with treated lumber.
Joists and framing: rot, sag, and movement
Joist rot is usually the result of water sitting on top of the joists (boards that aren't draining properly) or water infiltrating at the ledger connection. Once a joist goes soft, the boards above it will flex and the deck surface develops a low spot. Sagging beams are a more serious structural issue. A beam that's dropped even half an inch is worth investigating carefully before you do any surface work.
Drainage and water pooling
Standing water on a deck surface accelerates rot and finish failure faster than almost anything else. Gaps between boards that have closed up (boards swelled and never got respaced) are a common culprit, along with a deck that was built without adequate slope or that has settled unevenly. Water pooling against the house at the ledger is the worst-case version of this problem, because that's exactly how rot works its way into both the deck framing and the exterior wall.
Finish failure: peeling, flaking, or gray bare wood
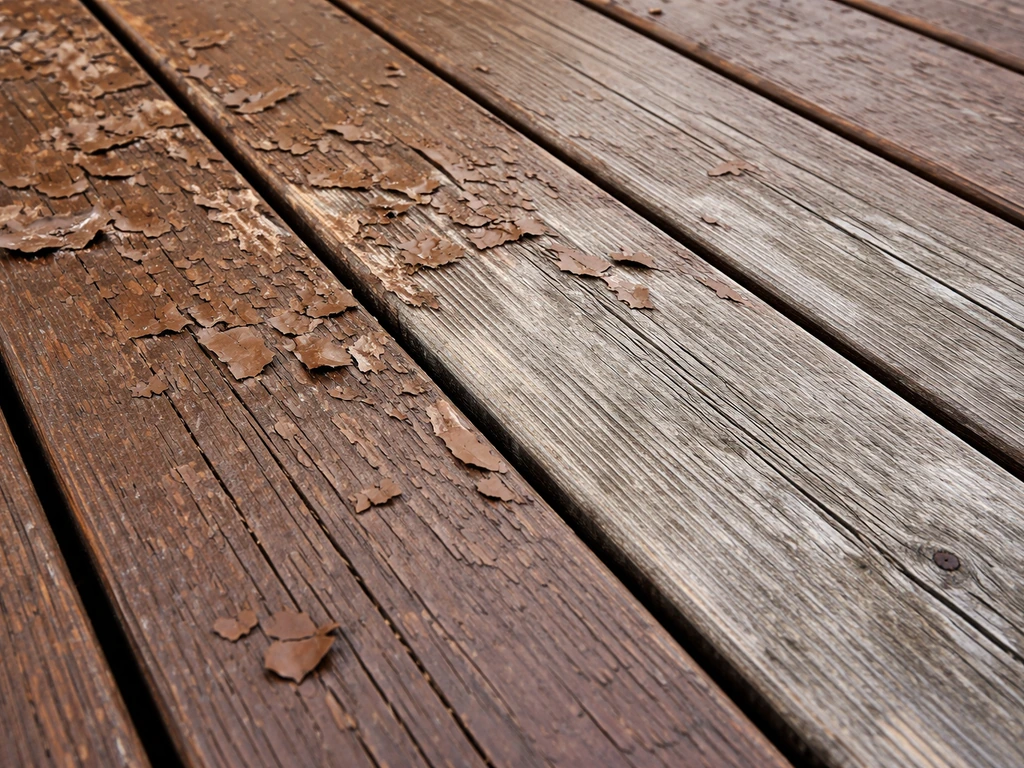
A failed sealant or stain isn't just a cosmetic issue. Once the finish is gone, UV breaks down the wood surface and moisture penetrates freely. You'll typically see gray color, a fuzzy or rough texture, peeling paint or film, or water that soaks in instead of beading. This is one of the easier things to fix, but it needs to be done on clean, dry, sound wood to last.
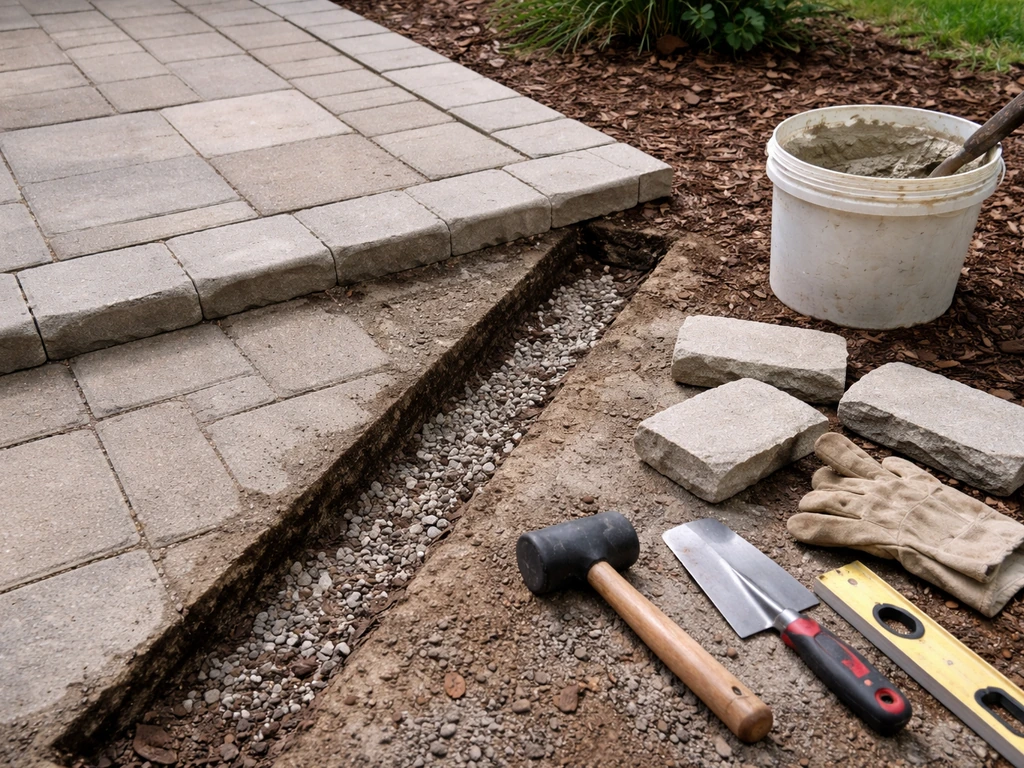
Tools and materials you'll need
For most board-level and fastener repairs, you don't need much beyond what's probably already in your shop. Here's a practical list, split between what's genuinely necessary and what makes the job easier.
| Item | What It's For | Notes |
|---|---|---|
| Flat pry bar / cat's paw | Removing old boards and backing out fasteners | Essential |
| Hammer | Probing for rot (tap test) and driving fasteners | Essential |
| Flat-bladed screwdriver or awl | Probing wood for soft spots | Essential |
| Cordless drill/driver | Driving new screws, removing old ones | Essential |
| Circular saw | Cutting boards to length | Essential |
| Speed square and tape measure | Marking cuts and checking alignment | Essential |
| 4-foot level | Checking board plane and beam sag | Essential |
| Safety glasses and gloves | PPE for rot removal and treated lumber handling | Essential |
| Moisture meter | Quantifying moisture in borderline joists/boards | Helpful, not required |
| Oscillating multi-tool | Cutting boards flush in tight spaces | Helpful |
| Jigsaw | Notching around posts or making irregular cuts | Situational |
| Deck screws (hot-dip galvanized or stainless) | All fastening in contact with treated lumber | Match to lumber type |
| Joist hanger screws or structural screws | Sistering joists, ledger connections | Use code-compliant hardware |
| Pressure-treated lumber (replacement boards/sisters) | Board and joist replacement | Match existing dimensions |
| Wood preservative/end-cut sealer | Treating cut ends of pressure-treated wood | Apply immediately after cutting |
| Exterior wood cleaner | Prep before staining or sealing | Use before any finish |
| Penetrating deck stain or sealer | Finish coat after repairs | Penetrating outperforms film finishes on decks |
How to replace deck boards and fix loose or failed fasteners
This is the most common repair and genuinely DIY-friendly as long as the joists underneath are sound. Fix a patio the same way by first identifying whether the damage is just on the surface or if the structure under it is compromised. Work through this sequence and you'll get a clean result.
Replacing a damaged or rotted board
- Confirm the joists under the bad board are solid. Probe them with your screwdriver before ordering materials. If they're soft, handle the joist repair first (see the rot section below).
- Remove the old fasteners first. For screws, use your drill/driver in reverse. For nails or old screws that are corroded solid, use a cat's paw to dig in and pry them out. For composite boards, remove screws or hidden clips before trying to lift the board.
- Pry out the damaged board carefully using a flat bar. Work slowly to avoid damaging adjacent boards or the joists.
- Inspect the joist tops where the board was sitting. If there's surface discoloration or soft spots, treat them with a wood preservative before installing the new board.
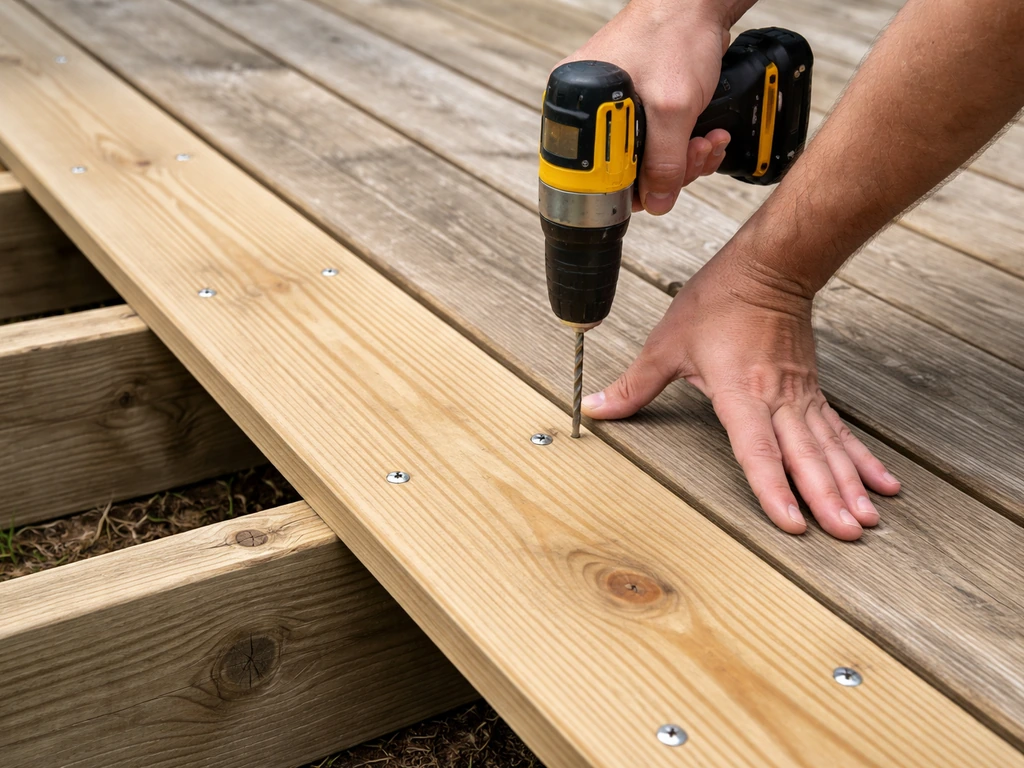
- Cut the new board to length. For pressure-treated wood, cut it about 1/8 inch longer than the opening to account for shrinkage as the wood dries after installation. Seal all cut ends immediately with end-cut preservative.
- Set the new board in place with 1/8-inch gaps on each side for drainage. Use a nail or a deck spacing tool to hold the gap while you fasten.
- Drive two fasteners per joist crossing. Pre-drill near board ends to prevent splitting. Use hot-dip galvanized, stainless, or other code-compliant fasteners throughout. Do not use standard bright steel screws with pressure-treated lumber.
- Check that the board surface is flush with its neighbors and lying flat across the joists. A slight crown (arch) in the board should face up so the board drains outward as it dries.
Fixing loose boards and failed fasteners
If boards are squeaking or bouncing but aren't rotted, the usual cause is fasteners that have backed out or lost grip. Don't just drive new screws through the same holes, because those holes are stripped. Offset new screws about an inch to the side of the old ones, angling slightly toward the center of the board to hit solid joist wood. Use a screw long enough to penetrate at least 1.
5 inches into the joist (a 3-inch deck screw is typically right for 5/4 decking). Remove any old nails that are proud of the surface or obviously corroded. If the board is still bouncy after refastening, the joist below it has probably dropped or rotted at the top edge, which is a joist repair, not a fastener repair.
Dealing with rot and water damage in the framing
Rot in the joists or beams is the part of deck repair that homeowners most often underestimate. If you are dealing with patio flooring that has soft spots or low areas, use the same rot diagnosis steps before you start repairs fixes wood rot. The good news is that minor joist rot has a reliable DIY fix: sistering. The bad news is that severe rot, rot at the ledger connection, or rot that's spread into the beam or post requires either major reconstruction or a professional assessment.
Assessing how far the rot has gone
Probe every joist in the area near the damage, not just the obvious one. Rot spreads when water sits, and if one joist is bad, the neighbors are often close behind. Mark each joist as solid, soft at the top only, or compromised through most of its depth. If more than about a third of a joist's cross-section is soft, sistering alone may not be enough and you may need a full replacement.
Sistering a joist
Sistering means bolting or screwing a new pressure-treated joist alongside the damaged one to restore structural capacity. It's the best approach when the existing joist has minimal rot and is still mostly intact. Cut the sister joist to the same length as the original, or long enough to span from bearing point to bearing point (rim joist to beam, or beam to beam). Position it tight against the damaged joist, making sure both are sitting level on the same bearing points. Fasten through both joists with structural screws or 3/8-inch carriage bolts at 16-inch intervals. Don't skip the end connections: attach the sister to the rim joist and beam using proper joist hanger hardware.
Removing rotted wood and treating the area
Before sistering or replacing, remove as much soft, punky wood as you can with a chisel or oscillating tool. You want the new wood bearing against sound material where possible. Brush wood preservative liberally onto the exposed surfaces of any remaining damaged wood and onto the tops of joists before you reinstall decking.
Follow AWC guidance for pressure-treated lumber by treating drilled holes and cut ends with an appropriate wood preservative (for example, copper-based for exterior use or boron-based for interior use) Brush wood preservative liberally onto the exposed surfaces of any remaining damaged wood and onto the tops of joists before you reinstall decking. . This isn't a miracle cure for rot that's already there, but it slows further deterioration and protects the new wood nearby.
Ledger and flashing problems
The ledger board is where most serious deck water damage originates. It's the board bolted to the house that the joists hang from, and if the flashing above it is missing, incorrectly installed, or has failed, water runs straight down behind it and into your wall framing. Proper ledger flashing directs water out and over the ledger, not behind it.
In a Reddit thread about deck flashing placement, commenters discuss whether ledger-flashing should be installed above or below the deck boards and how that affects water movement flashing above it is missing, incorrectly installed, or has failed. If you're seeing rot in the joists near the house wall, check the flashing first.
Peel back any caulk or siding that's covering the top of the ledger and look for a metal or flexible flashing layer that's properly lapped under the siding above. If it's missing or has failed, that's a water management repair that needs to be done before any structural repair will hold.
How to prevent the same problems from coming back
Repairs that don't address the root cause just fail again, usually faster the second time because the wood is already compromised. Here's what actually makes the difference long-term.
Fix the drainage first
Water needs somewhere to go. Boards should have at least a 1/8-inch gap between them to let water drain through. If gaps have closed up over time from swelling and seasonal movement, you may need to respace some boards. The deck surface itself should have a slight pitch away from the house, roughly 1/8 inch per foot, so water doesn't sit on the surface or pool against the ledger. If you have a persistent water pooling problem, consider whether an under-deck drainage system is appropriate, especially if the framing is already showing early signs of moisture damage.
Seal and stain on a real schedule
A penetrating stain or sealer is your main defense against moisture intrusion and UV degradation. Most penetrating products need to be reapplied every two to three years on a deck that gets real weather. Don't wait until the finish is visibly failing and the wood has gone gray and checked. Clean the deck with an appropriate exterior wood cleaner first, let it dry completely (at least 48 hours, more in humid conditions), and apply the stain or sealer according to the product instructions. Applying sealer over wet or dirty wood is one of the most common reasons finishes fail early.
Ventilation and spacing under the deck
Decks that sit low to the ground or have skirting that blocks airflow around the framing tend to stay damp longer and rot faster. If your deck is close to grade, make sure there's adequate clearance and that air can move under the structure. Avoid storing things against the underside of the framing, and clear away any leaf litter or mulch that accumulates in contact with posts or beams.
Use the right fasteners from the start
Every time you do a repair, use hot-dip galvanized or stainless hardware throughout. This single decision eliminates most of the fastener corrosion problems that cause repeat repairs. It costs a little more upfront and saves you from doing the same repair in five years.
When to stop DIY and call a professional
There are deck repairs that are genuinely beyond the average homeowner, and there's no shame in knowing where that line is. Pushing past it means a safety risk, not just a bad-looking result.
- The ledger is visibly separating from the house wall, or you find rot in the rim joist and ledger at the same time. This is a structural safety failure that requires a licensed contractor and likely a permit.
- A beam is sagging or a post has shifted. These elements carry the entire load of the deck. A beam or post repair that's done wrong can lead to sudden collapse.
- Rot has spread to multiple joists across a large section of the deck, or has reached the posts or footings.
- You find evidence of rot in the house wall framing behind the ledger. This is now a building envelope repair, not just a deck repair.
- The deck is bouncing, swaying laterally, or feels unstable even after surface repairs. Decks must resist both downward and lateral loads, and instability in any direction is a structural issue.
- Railings are loose or have failed at their post bases. Railing failures are a leading cause of deck-related injuries. If you can't identify and fix the exact connection point confidently, get a pro to assess it.
- The deck requires a permit to repair (check your local building department). Any repair that involves framing replacement typically requires inspection in most jurisdictions.
If you're not sure whether a problem is in this category, the practical test is: would you confidently let twenty people stand on this deck right now? If the answer is no, or even maybe, don't use the deck until a qualified inspector or contractor has cleared it. The surface-level repairs described in this guide, like board replacement, fastener work, and re-sealing, are appropriate DIY work. Anything touching the primary structure deserves a second set of expert eyes before you call it done.
If your repair work involves the deck surface, steps, edging, or flooring materials more broadly, those are closely related problems that follow a similar diagnosis process. If you're working on patio edging, use the same safety-first diagnosis to confirm there isn't hidden rot or water damage before you start replacing materials deck edging. Deck steps in particular are worth inspecting at the same time as the main deck surface, since they take concentrated foot traffic and tend to rot at the stringers before the main deck shows obvious problems.
FAQ
How do I tell if a soft spot is just one rotted board or a joist problem underneath?
Press down around the soft area and look for movement between boards, then probe from underneath if possible. If the board itself feels flexible but nearby boards stay firm, refastening or board replacement may be enough. If the deck deflects broadly or the joist sounds dull and sinks with a screwdriver, plan on joist repair (often sistering) rather than only swapping boards.
Is it safe to repair a patio deck if I see rust stains from nails or screws?
Rust stains usually mean the fasteners are corroding and may have lost grip, so any loose boards should be refastened or replaced using approved corrosion-resistant hardware. If rust is located near the ledger or is accompanied by gaps, sagging, or creaking, treat it as a potential structural water problem and stop until you verify ledger flashing and joist condition.
Can I replace a few decking boards without fixing closed gaps or bad drainage?
You can, but the repair often fails early if water continues to pool. Before reinstalling boards, confirm there is the recommended drainage spacing between boards and that the deck has proper pitch away from the house. If gaps have swollen shut, you may need to respace boards or address the underlying cause (settlement, leveling, or a drainage solution).
What should I do if the ledger flashing looks incomplete or wrong?
Do the water management repair first. If flashing is missing, incorrectly lapped, or caulk has been used in a way that traps water, structural fixes can fail because rot will keep restarting behind the ledger. After correcting flashing, let the area dry fully before any sistering, beam work, or refastening.
Do I need to remove the old nails before installing new screws?
If nails are proud of the surface, obviously corroded, or interfering with new fastening points, remove them. Keeping severely corroded nails in place can create weak bearing points and cause uneven board movement. For stripped screw holes, avoid reusing the same holes, use an offset screw location as the guide suggests.
Should I replace hardware on the whole deck or only where the damage is visible?
As a rule, replace fasteners throughout the repair area and use the same corrosion-resistant type everywhere you disturb or reattach boards. If only one section shows looseness but the deck is older and has treated lumber contact, the surrounding hardware may be degrading too, so limited replacement can lead to repeat failures.
When is sistering not enough and I should replace the joist or get professional help?
Sistering is best when rot is limited and the existing joist is mostly intact. If more than about one third of the joist cross-section is soft, if rot is widespread through most of the depth, or if the rot involves the ledger connection or beam and post areas, replacement or a professional assessment is usually the safer option.
How should I treat exposed wood after I remove rotted sections?
Brush a wood preservative on any remaining sound or minimally damaged material before you reinstall decking and before closing up the structure. Also preserve the tops of joists, since those are often where moisture sits after repairs. The goal is slowing further deterioration, not sealing over already-failing wood.
How long should I wait before staining or sealing after cleaning?
Let the deck dry completely, at least 48 hours under typical conditions, longer if humidity is high. Applying stain or sealer to damp or dirty wood is a common finish failure cause, it can trap moisture and make the finish peel or gray prematurely.
Do composite deck boards still need the same repair approach as wood boards?
Composite boards do not rot, but cracked boards, faded areas, and mold staining can still indicate drainage problems. If boards are soft to walk on, move, or the area is low, check fasteners, joist condition, and spacing. Replace boards and address moisture management even though the material itself is rot-resistant.
What is a quick decision check for whether I should stop and not use the deck?
Use the practical safety test: if you would not confidently allow multiple people to stand on the deck right now, do not proceed with DIY repairs. Verify the condition of ledger and joists first, and if movement, sagging, or ledger pull-away is suspected, get an inspector or contractor before continuing.
Next Article
How to Fix Patio Edging: DIY Repair Steps by Type
Step-by-step DIY fixes for bulging, cracked or missing patio edging by material, with base and drainage guidance.