Removing a brick patio is a real weekend project for most homeowners, but the approach changes completely depending on whether your bricks are set in sand or mortared down. Sand-set patios come apart quickly with basic hand tools. Mortared patios take longer, create more dust, and require a few extra precautions. Either way, the full job, from pulling the first brick to having a clean, prepped subgrade ready for whatever comes next, typically takes one to three days depending on the patio size and what you find underneath.
How to Remove an Old Brick Patio Step-by-Step DIY Guide

Talia Lang
3 May 2026
Before you start: know what you're dealing with
Spend 15 minutes figuring out your patio's construction before you touch a tool. This is not optional. The build type dictates everything: which tools you need, how long the job takes, and what complications to expect.
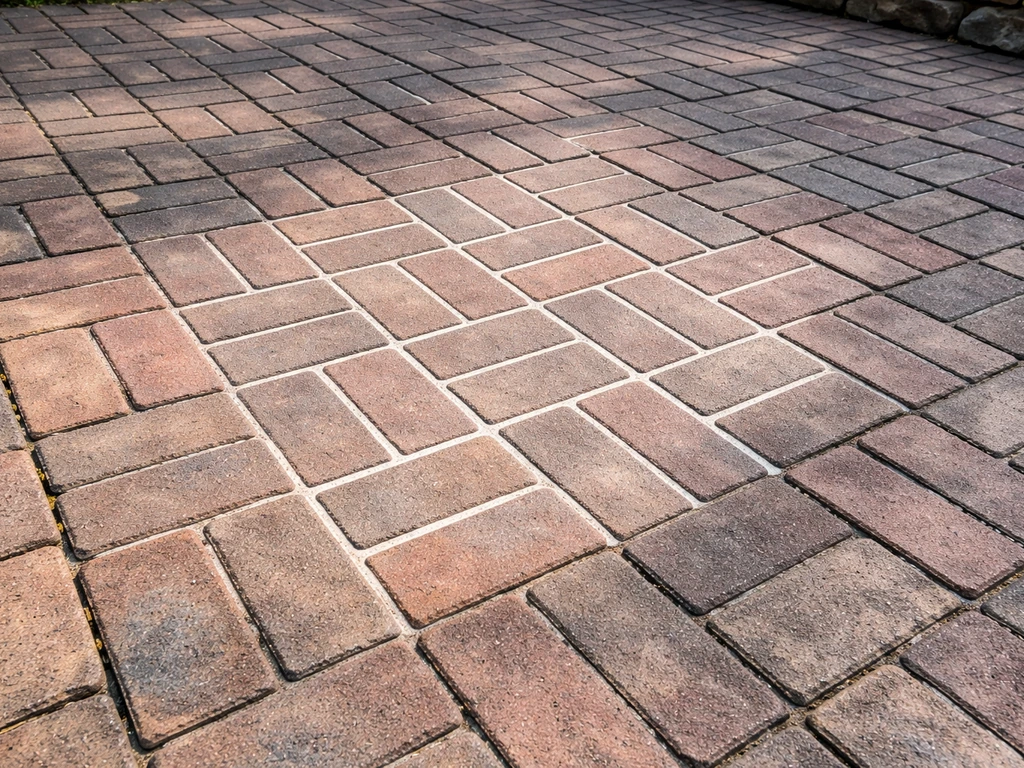
Sand-set vs. mortar-set: how to tell the difference
Look at the joints between bricks. If you see a thin line of sand or fine grit that crumbles when you poke it with a screwdriver, you have a sand-set (dry-laid) patio. These are designed to be flexible and come apart relatively easily. If the joints are filled with a hard, cement-like material that doesn't budge when you probe it, that's mortar. Mortared bricks are bonded to each other and often to a concrete slab underneath, forming a rigid, monolithic assembly. That's a different animal entirely.
On older patios, you might also find a hybrid situation: bricks originally set in sand but with mortar added later to stop weeds, or a patio where only the border bricks are mortared. Probe several spots around the patio, not just one corner, before you commit to a plan.
Check what's underneath
Lift one brick from an inconspicuous spot if you can. Sand-set patios typically have about 1 inch of bedding sand over a 4 to 6 inch compacted gravel base. If you hit solid concrete under the sand or directly under the brick, the patio was likely mortared over a slab, and removal is heavier work. Knowing this upfront means you won't be surprised halfway through.
Survey adjacent structures and landscaping
Look at what borders the patio: a house foundation, a retaining wall, garden beds, a fence line. Old mortar patios near a foundation sometimes have bricks that are partially wedged under a ledger board or siding. Pulling those without care can shift water management away from the house or disturb flashing. Mark anything that needs to stay protected before demo starts.
Call 811 before you dig
If any part of the removal involves excavating the base layer, call 811 (the national call-before-you-dig line) at least a few business days before you start. This gets underground utilities marked at no cost. Outdoor patio areas sometimes have irrigation lines, landscape lighting conduit, or even gas lines running nearby. It takes one phone call and a few days of wait time to avoid a very expensive and dangerous mistake.
Tools, supplies, and safety setup

What you'll need
| Tool / Supply | Used For | Notes |
|---|---|---|
| Flat pry bar (24" or longer) | Lifting sand-set bricks | A longer bar gives better leverage |
| Cold chisel and hammer | Breaking mortar joints | Use with hearing protection |
| Angle grinder with diamond blade | Cutting mortar joints | Wet-cutting preferred; use water suppression |
| Rotary hammer / demo hammer | Breaking up mortar beds or slabs | Rent if you don't own one |
| Wheelbarrow | Moving bricks and debris | Heavy-duty if possible |
| Garden hose or spray bottle | Dust suppression when cutting | Essential for silica control |
| Shovel and spade | Removing sand, gravel, soil | Flat spade for base layers |
| Plate compactor (rental) | Recompacting subgrade after removal | Usually $60–100/day |
| N95 or P100 half-face respirator | Silica dust protection | Required; not optional |
| Safety glasses / goggles | Eye protection from chips | Wrap-around preferred |
| Work gloves | Hand protection | Heavy leather or impact gloves |
| Hearing protection | Power tool use | Especially for hammer work |
| Knee pads | Extended ground work | Worth it for a full day of removal |
One thing people consistently underestimate is dust. Brick, concrete, and mortar all contain crystalline silica, and cutting or grinding any of them releases fine particles that cause serious long-term lung damage. OSHA and NIOSH are clear on this: use water suppression on your saw or grinder blade when cutting, and always wear at minimum an N95 respirator. A basic paper dust mask is not enough for silica.
How to loosen and remove the bricks
Sand-set patio removal
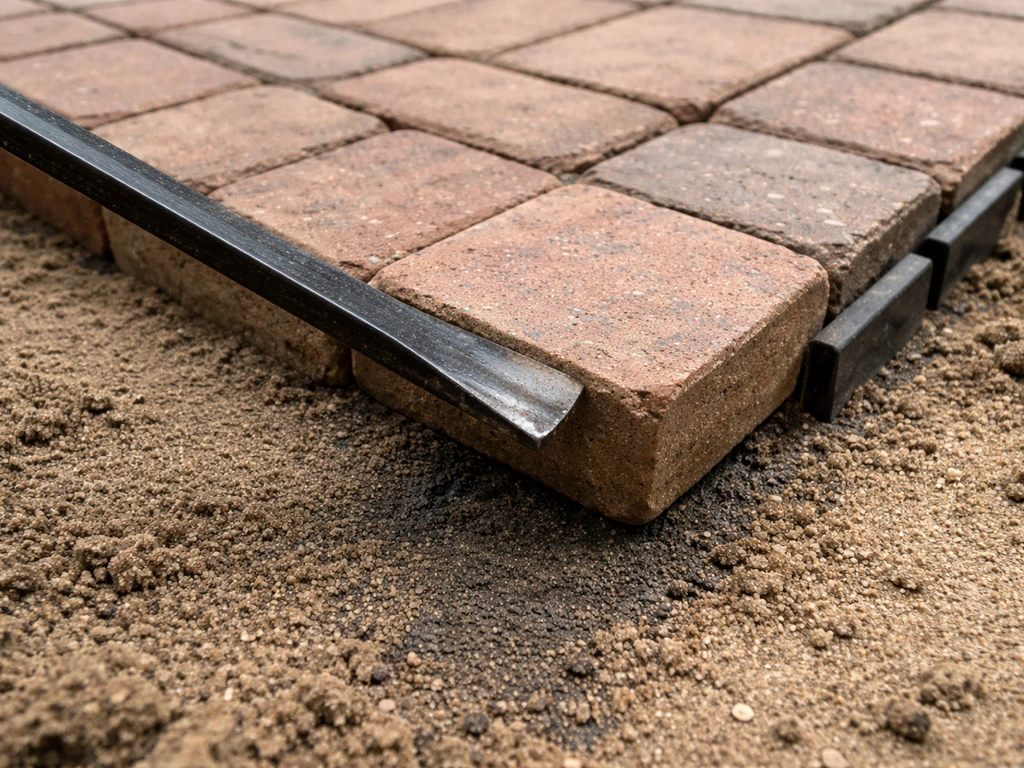
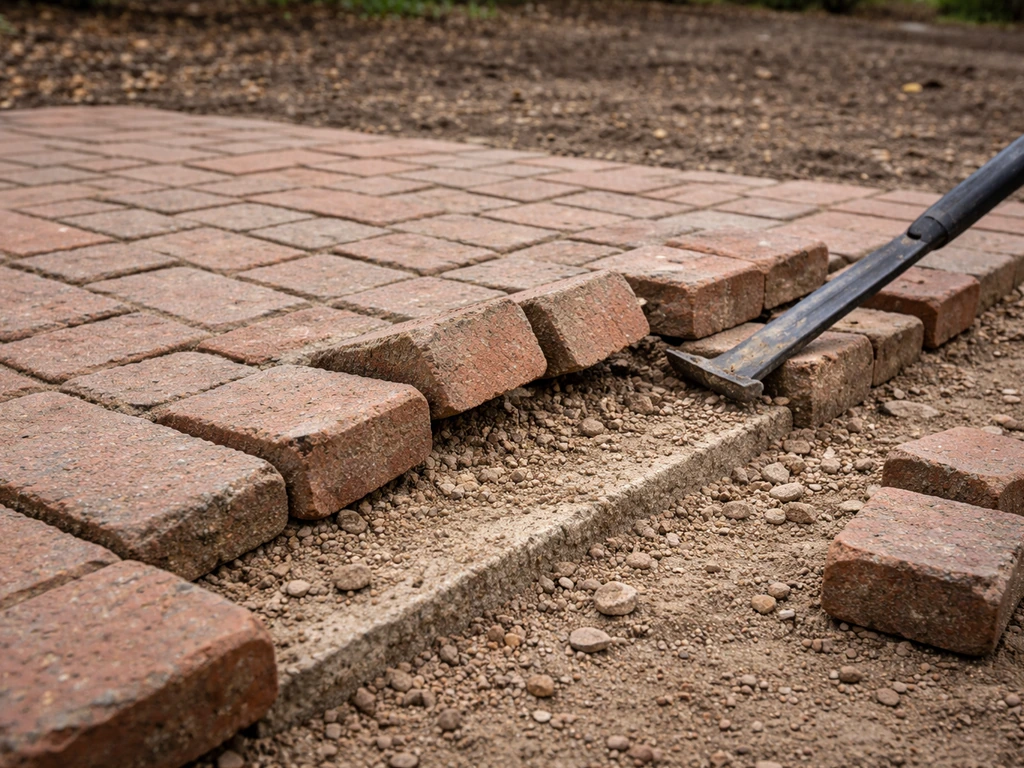
Sand-set patios are the easier case. Start at an edge or a corner where you have the most access. If there's a plastic or metal edge restraint, pull that up first, it's usually staked into the ground and comes out with a flat bar and some effort. Once you have an exposed edge, slide a long flat pry bar under the first brick and pop it up. After the first few bricks are out, you have room to work and the rest go fast.
- Start at an accessible edge or corner and remove any edge restraints.
- Insert a flat pry bar under the first brick at a low angle and lever it up.
- Stack removed bricks nearby on a pallet or flat ground to keep them organized and save your back.
- Once you have a few bricks out, use the gap to get your bar under adjacent bricks more easily.
- Work in rows across the patio rather than randomly pulling bricks from different spots.
- If a brick resists, check for a small amount of mortar someone may have added later; use a chisel to break that bond first.
Sand-set bricks that have been in place for years can sometimes be surprisingly stubborn, especially if compaction and vegetation have wedged them tight. A paver extractor tool (a specialized bar with a curved foot, available at rental centers) makes this much faster on large patios. It works by sliding under the brick and letting you lever it straight up without chipping the edges.
Mortar-set patio removal
Mortar-set removal is slower and harder, full stop. The bricks are bonded to each other and usually to a concrete slab underneath. Expect more breakage, more dust, and more physical effort. The goal is to break the mortar joints so individual bricks can be removed. If you want to salvage the bricks intact, work slowly with hand tools. If you just need them gone, a rotary hammer with a flat chisel bit is much faster.
- Put on your respirator and eye protection before anything else.
- Use an angle grinder with a diamond blade (wet-cutting preferred) to score along the mortar joints at the patio perimeter. Keep a garden hose running water onto the blade to control silica dust.
- Drive a cold chisel into the scored joint with a hammer to break the bond on the first brick.
- Once the first brick is free, use a pry bar to work adjacent bricks. The freed space gives you leverage.
- For bricks firmly adhered to a concrete slab, a rotary hammer with a flat chisel attachment breaks the mortar bed faster than hand tools.
- Work in small sections, 2 to 3 square feet at a time, rather than trying to loosen a large area at once.
- Set aside any intact bricks you want to reuse. Expect 20 to 40 percent breakage on older mortared patios.
If the patio is mortared over a concrete slab and you don't need to keep the slab, a demolition hammer (rented for around $80 to $120 per day) can break through both layers simultaneously, which is faster for large areas. If the slab needs to stay (for example, you're planning to pour new concrete over it), you need to remove the bricks carefully without damaging the slab surface.
Removing leftover mortar, cement, and base layers
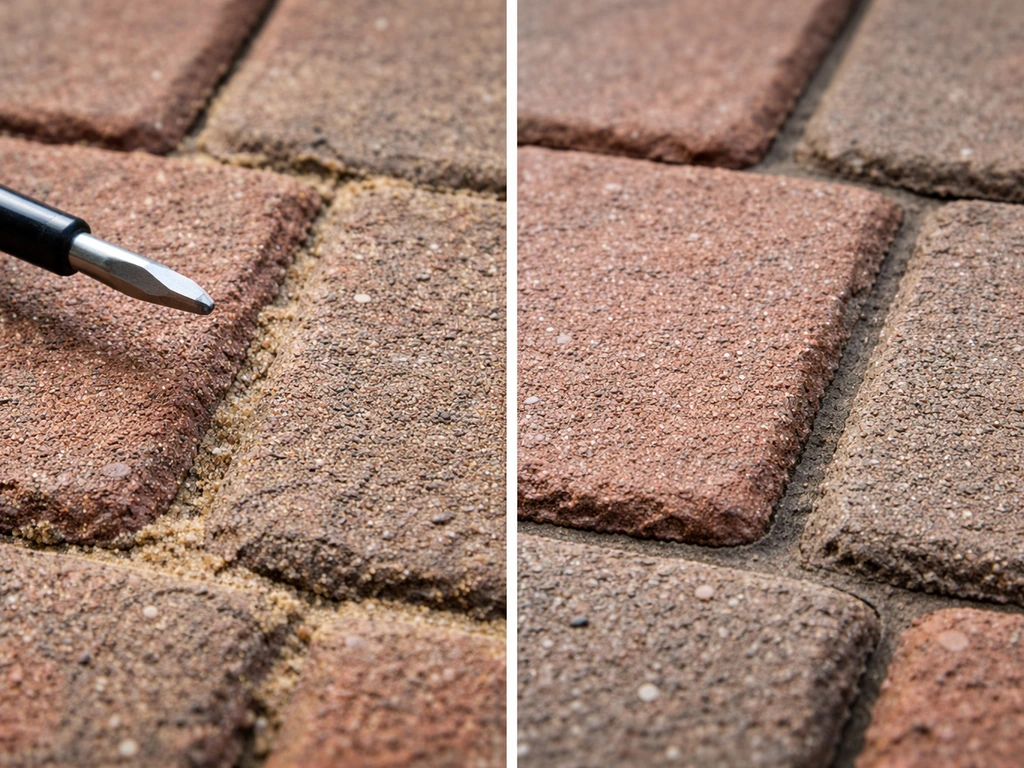
Cleaning up mortar remnants
After the bricks are out, you'll usually have mortar chunks and residue left on the substrate. For a concrete slab you want to keep, a floor scraper, cold chisel, and rotary hammer with a scraping bit will handle most of it. Work carefully: aggressive grinding with an angle grinder can damage the concrete surface and create significant silica dust. NIOSH/CDC’s Engineering Controls Database notes that grinding concrete can expose workers to very high levels of crystalline silica dust, including measured exposures far above recommended limits, which makes effective dust controls essential create significant silica dust. If you go the grinder route, use water suppression and your respirator the whole time.
For leftover mortar on individual salvaged bricks, soak them in water for 30 minutes and then chip the mortar off with a mason's hammer and chisel. It won't be fast, but soaking makes the mortar more brittle and easier to break clean. Old lime-based mortars (common on vintage brick) often come off more easily than modern portland cement mortars.
Removing the sand bedding layer
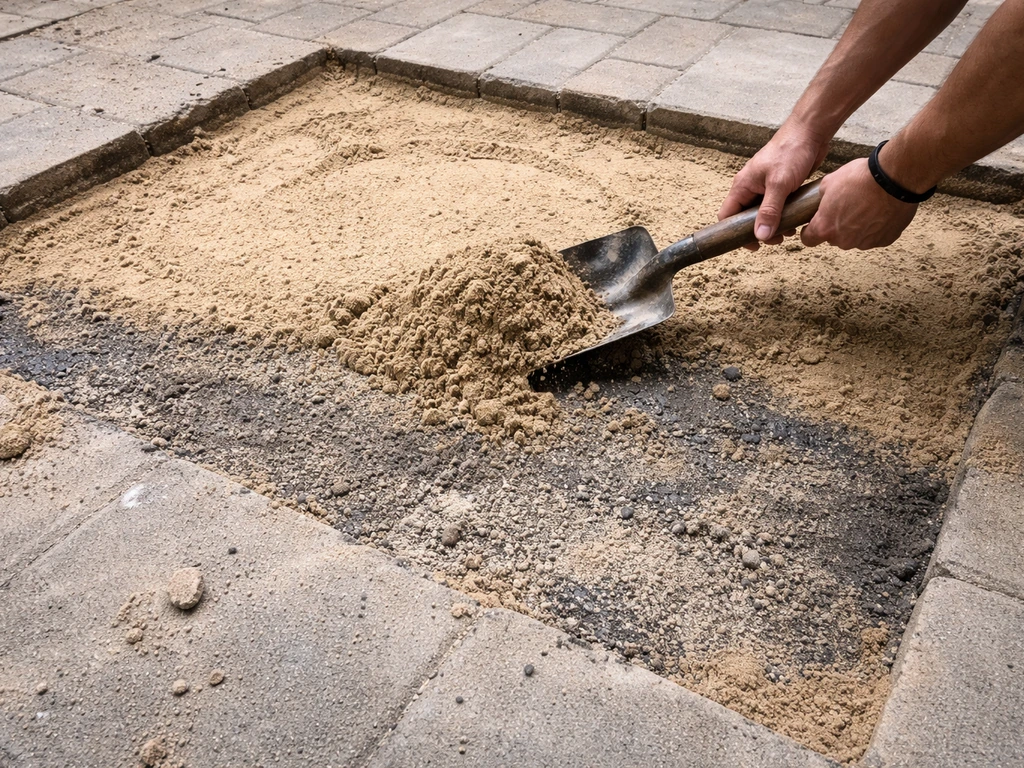
Once the bricks are out of a sand-set patio, you'll find roughly 1 inch of bedding sand. Shovel it out and set it aside. If it's clean and not contaminated with debris or vegetation roots, you can reuse it as bedding sand for new pavers later. Spreading it thin and letting it dry before storing it in bags or a pile keeps it from clumping.
Removing the gravel base
Under the bedding sand you'll typically find 4 to 6 inches of compacted crushed stone or gravel base. Whether you remove it depends entirely on what you're doing next. If you're installing new pavers, you may be able to leave the existing compacted base in place, re-level it, and recompact it. If the base is uneven, contaminated with organics, or poorly compacted (which is common on older patios with drainage problems), pull it out and start fresh. A flat spade and wheelbarrow are the main tools here, and it's heavy work.
What about a weed barrier?
Older patios often have a landscape fabric or plastic sheeting layer somewhere in the base. Pull it out completely. Landscape fabric in paver bases degrades over time and can interfere with proper drainage. It's not part of a properly constructed ICPI-standard paver base, and leaving old degraded fabric in place just creates future problems.
Site cleanup and what to do with the debris
By the end of removal you'll have a significant pile of materials to deal with: bricks, mortar chunks, sand, gravel, and possibly broken concrete. Sorting as you go makes disposal much easier than dealing with a mixed pile.
Reusing the bricks
Intact bricks from an old patio are genuinely useful. Common reclaimed brick reuse options include raised garden beds, garden path edging, stepping stone paths, or donating to a local Habitat for Humanity ReStore or building salvage yard. If you're planning to relay a brick patio in the same spot, obviously set the good ones aside carefully. If you plan to edge a brick patio after reinstalling or replacing bricks, focus on getting straight borders and the right edging restraint in place before you set the pavers. Stack them flat with consistent orientation to make it easier to assess quantity.
Disposing of broken bricks and mortar
Broken brick and mortar chunks are classified as clean concrete and masonry debris in most municipalities, which often means you can take them to a concrete recycling facility for free or very low cost. If your brick patio is broken, the type of setting and base underneath will determine how difficult the removal is and what safety precautions you need broken brick patio. Call ahead to confirm what they accept. A standard 10-yard dumpster rental (typically $300 to $500 for a week, depending on your area) is the easiest solution if you have large volumes. Check with your curbside waste provider too, some accept small amounts of masonry in bins if broken into smaller pieces.
Sand and gravel disposal or reuse
Clean sand and gravel can often be reused on-site or given away. Post it on local buy-nothing groups or neighborhood apps and someone will usually take it within a day or two. If it's mixed with debris or heavily contaminated with clay, it goes in the dumpster.
Prepping the site for new pavers or concrete
What you do after the patio is out depends on what you're putting in next. This is the step that most DIY guides rush, and it's the one that determines whether your new patio lasts 5 years or 25.
If you're installing new pavers
For a new sand-set paver system, the standard build is: compacted subgrade, then 4 to 6 inches of compacted crushed stone base (sometimes called road base or Class II aggregate), then about 1 inch of coarse bedding sand, then the pavers. If you kept the existing gravel base and it's in good shape, compact it again with a plate compactor, check that it's level and draining away from the house at roughly a 1 to 2 percent slope, and add fresh bedding sand on top. If the base was problematic (soft spots, standing water, visible settling), excavate it completely and build fresh.
Before you compact and add sand, this is also the time to address any drainage issues you noticed during removal. If the subgrade was wet or you found standing water, consider adding a perforated drain pipe at the low point before you build the base back up. Fixing drainage at this stage costs very little compared to dealing with a sunken patio in three years.
If you're pouring concrete
For a new concrete slab, you need a well-compacted, stable subgrade. Excavate to a depth that accommodates your slab thickness (typically 4 inches for foot traffic, 6 inches if vehicles will use it) plus a 4-inch compacted gravel base. The subgrade soil should be compacted firm and not spongy. Soft spots need to be excavated deeper and filled with compacted gravel before you pour. If you're keeping an existing concrete slab and just removed a brick overlay, assess the slab condition carefully before deciding whether to pour over it or break it out.
Final grade check
Before adding any base material, check your final excavated grade with a long level or a string line. To get a level finish with a brick patio, you’ll also want to focus on consistent slope and proper compaction before setting pavers final excavated grade. The surface should slope away from the house at roughly 1/8 to 1/4 inch per foot. Getting this right at the subgrade level makes everything above it easier to install correctly and prevents water from pooling against the foundation.
When to call a pro or take extra precautions
Most brick patio removals are solid DIY work. If you plan to fix a brick patio instead of removing it, focus on joint repair, leveling the surface, and addressing the underlying base. But there are situations where calling a professional, or at least a specialist, is the smarter call.
- The patio is adjacent to or partially under the house foundation. Removing bricks here can affect drainage patterns or disturb the soil that supports the foundation. Have a contractor assess it first.
- You find a large concrete slab under the bricks that needs to come out. Breaking up and hauling concrete at scale is heavy equipment work. Renting a jackhammer and calling for concrete hauling is one option, but a demo contractor with a skid steer will do it faster and safer on anything over roughly 200 square feet.
- You suspect there are utilities in the area and you haven't confirmed their locations. Wait for 811 marking before any excavation.
- The area shows signs of significant drainage problems: saturated soil, erosion channels, or a foundation that shows water staining. A grading or drainage contractor should evaluate before you rebuild.
- Asbestos is a possibility. Some old patio mortars or concrete products used before the late 1970s may contain asbestos. If the patio is from that era and the material has a fibrous or unusual texture when broken, stop and have it tested before disturbing more material.
- You're not comfortable operating a rotary hammer or angle grinder for extended periods. These are real tools with real injury risk. If you've never used them, consider renting with a brief tutorial from the rental center or hiring labor for the demo portion.
If your plan after removal is to relay a brick patio in a different pattern or with new pavers, it's worth reading up on the full installation process before you commit to the subgrade prep. If you want to weed a brick patio later, the key is removing weeds at the root and using the right joint filler and weed barrier options. If you want the replacement to be stable and level, review how to brick patio installation before you finalize the subgrade and base. The base work you do now directly affects the outcome, and doing it right the first time is much easier than trying to fix a settled or uneven patio down the road.
FAQ
How can I tell for sure if my brick patio is sand-set or mortared without risking the whole patio?
If you can still lift a brick with a flat pry bar, pull that brick and check what sits immediately beneath it. Sand-set typically has bedding sand under the brick, then compacted gravel, while mortared assemblies often show hard, cement-like residue bonded to brick or to a slab. If you hit concrete right under most bricks, plan for heavier, dustier removal (and consider a chisel-only approach to limit slab damage).
What should I watch out for if my patio borders a foundation or retaining wall?
Yes. If the patio is near a house foundation, siding, or retaining wall, removal can redirect runoff paths. Before you start, temporarily measure the current slope (use a short straightedge and a level) and mark any weep holes, flashing edges, or brick ledgers you must keep protected. When you rebuild, replicate the same slope away from the structure and ensure any border restraints are reinstalled correctly.
Can I remove bricks intact if the patio is mortared down?
In many cases you can preserve some bricks intact even on mortared patios, but it requires slower, controlled work: break the mortar joints first, use a paver extractor or a thin flat chisel to separate the brick from adjacent bonds, and avoid twisting that can chip edges. If the bricks are mortared to a slab, expect partial breakage. If your goal is maximum salvage, do not rush the first row, it sets the technique for the rest.
How do I clean and store salvaged bricks so they are usable later?
If you are planning to reuse salvaged bricks, keep them dry and protected from fresh mortar dust until you can clean them. For sand-set patios, only the bedding sand needs sorting, the bricks often come cleanest with brushing and gentle rinsing. For mortared bricks, the best method is to chip after soaking, but you should wear a respirator during chipping because dried mortar dust can still be silica-heavy.
When can I reuse the bedding sand after removing the patio?
Reusing bedding sand is usually fine only if it is mostly free of vegetation roots, clay, and debris. To decide, grab a handful and squeeze it, if it clumps with wet soil or feels gritty with organic matter, treat it as contaminated and discard or dump it. Also sift out tiny broken brick and mortar fragments, those can create voids and lead to uneven joints later.
Can I leave the existing gravel base in place, or should I remove it?
Keep the base if it is stable, uniform, and properly compacted. A quick check is to probe multiple spots with a hand tamper, if it shifts, feels spongy, or shows pumping around low areas, you should excavate and rebuild. If you find standing water or a history of settling, remove at least the affected zones, rebuild to proper depth, then recompact in lifts rather than trying to patch on top.
Do I really need to remove any old landscape fabric under the patio?
Old landscape fabric often degrades and can act like a drainage barrier, but leaving it might be acceptable only if it is intact and you confirm drainage is working. The safer approach is to pull it entirely when you can access the full depth, especially in areas with prior standing water. If it is stapled or partially buried, remove as much as possible, then inspect for remaining layers that could trap moisture.
What is the most common mistake people make after the bricks are gone?
After brick removal, the biggest mistake is skipping the grade check. Use a long level or string line across the whole patio area before you add stone or sand, and confirm the slope away from the house using the same reference points. If you add base without verifying grade, you often end up with a surface that drains poorly and causes premature joint and freeze-thaw failure.
If I want a new concrete slab, can I just pour over the existing slab after removing bricks?
If you plan to pour new concrete over an existing slab, check whether the old slab is stable, not cracked through, and not spalling badly. If there is significant deterioration, you may need to break it out instead of topping it. For brick overlays, also remove remaining mortar residue thoroughly, because thick or uneven residue can prevent a consistent bond and create weak spots.
What changes if I use a demolition hammer instead of prying and chiseling?
If you use a demolition hammer, expect the work to go faster but with more noise and uncontrolled debris. Try to keep the hammer mostly on joints or targeted zones, and protect nearby plants, fences, and windows. Also plan for utility marking and dust control, even if you think the area is utility-free, because patio edges and borders are where irrigation lines and conduit often run.
Should I start at an edge, or can I begin in the middle?
Yes, and it often comes up with patios that slope or have edging restraints. If your bricks are still tied into a border, remove restraints carefully first, then lift from the outside in. If you wait until later, you can end up pulling bricks that are locked under edge rails or under siding trim, which can tear flashing or create gaps that are hard to correct during reinstallation.
How should I sort materials for disposal, and what if my city has strict rules?
If you are unsure about which materials your local facility classifies, call and ask specifically how they want brick, mortar chunks, and broken concrete separated (clean vs mixed loads). For disposal, pre-sort into at least two piles (brick plus mortar, and concrete debris), and keep the bedding sand in a separate container if possible, sand is often treated differently than masonry debris.
Next Article
Fix Brick Patio: Step-by-Step Repairs and Prevention
Step-by-step DIY to fix a brick patio: diagnose loose bricks, repoint joints, rebuild base, and prevent drainage issues.