To repair cracks in a stone patio, you need to match your repair material to the crack type: use polymeric sand or jointing mortar for failed joints between stones, a stone patch mortar or epoxy filler for cracks running through the stone itself, and a flexible backer rod plus polyurethane caulk for wider gaps where movement is likely. Clean the crack out completely first, let it dry, fill it in layers if it's deep, and let it cure fully before sealing or allowing foot traffic. If the crack keeps coming back, there's an underlying drainage or settlement problem that no filler will solve on its own.
How to Repair Cracks in a Stone Patio: DIY Steps

Talia Lang
29 Apr 2026
Quick diagnosis: figure out what you're actually dealing with
Before you buy anything or mix anything, spend five minutes figuring out what kind of crack you have. This determines everything: the right material, the right method, and whether DIY is even realistic. There are really three questions to answer.
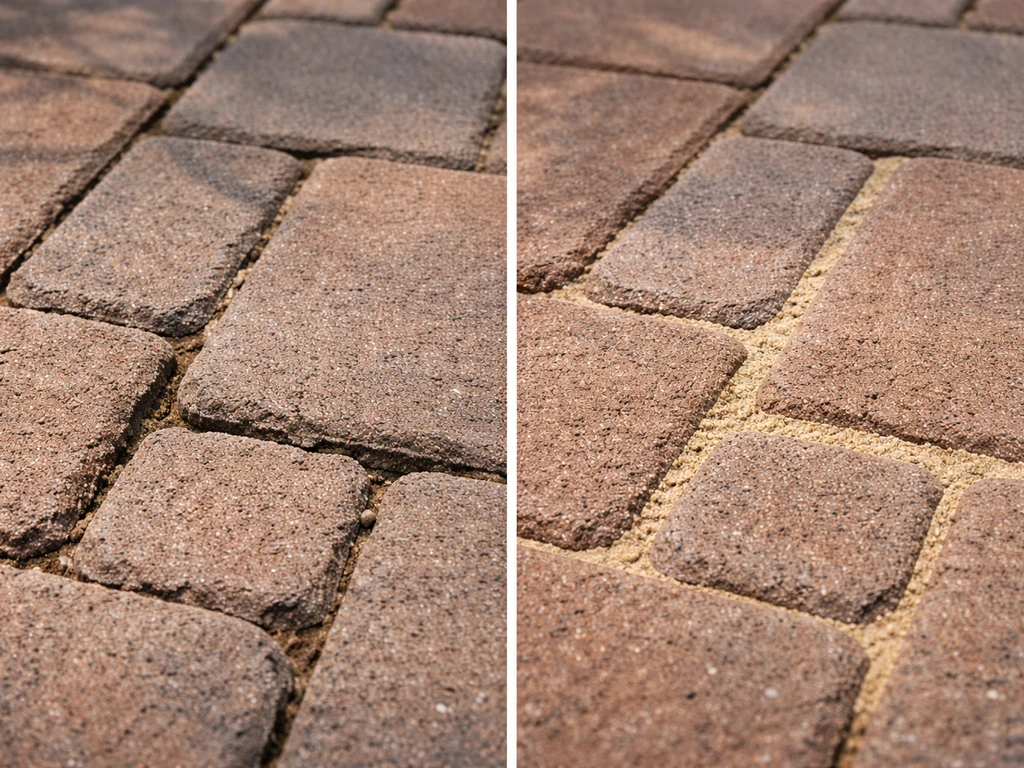
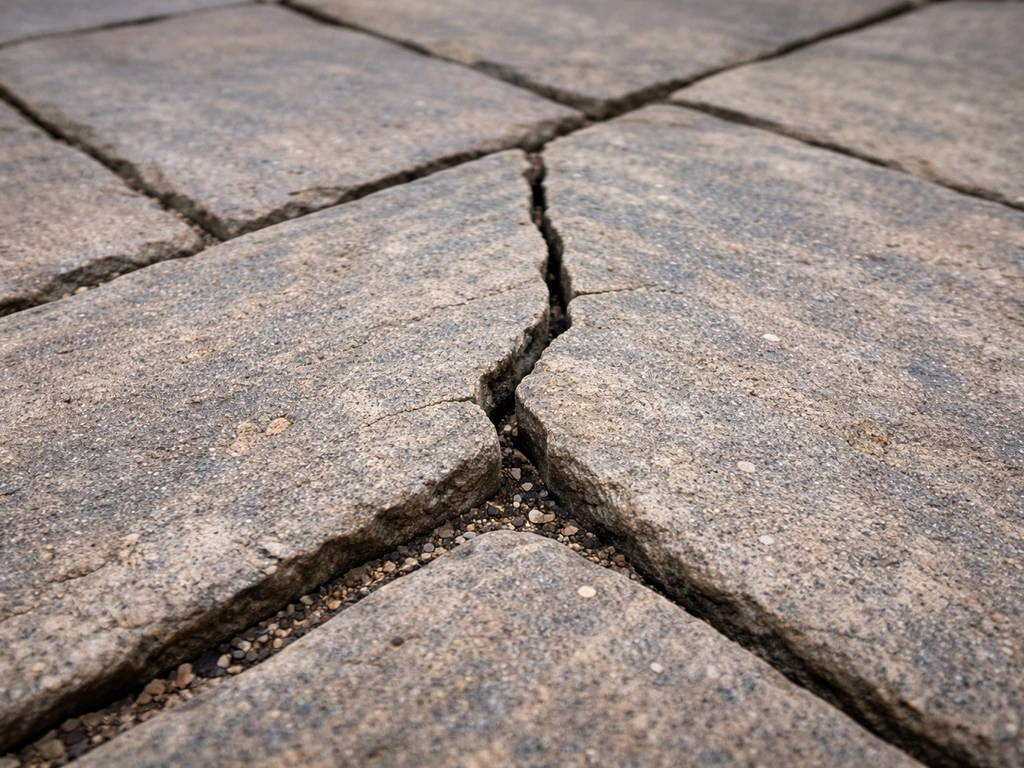
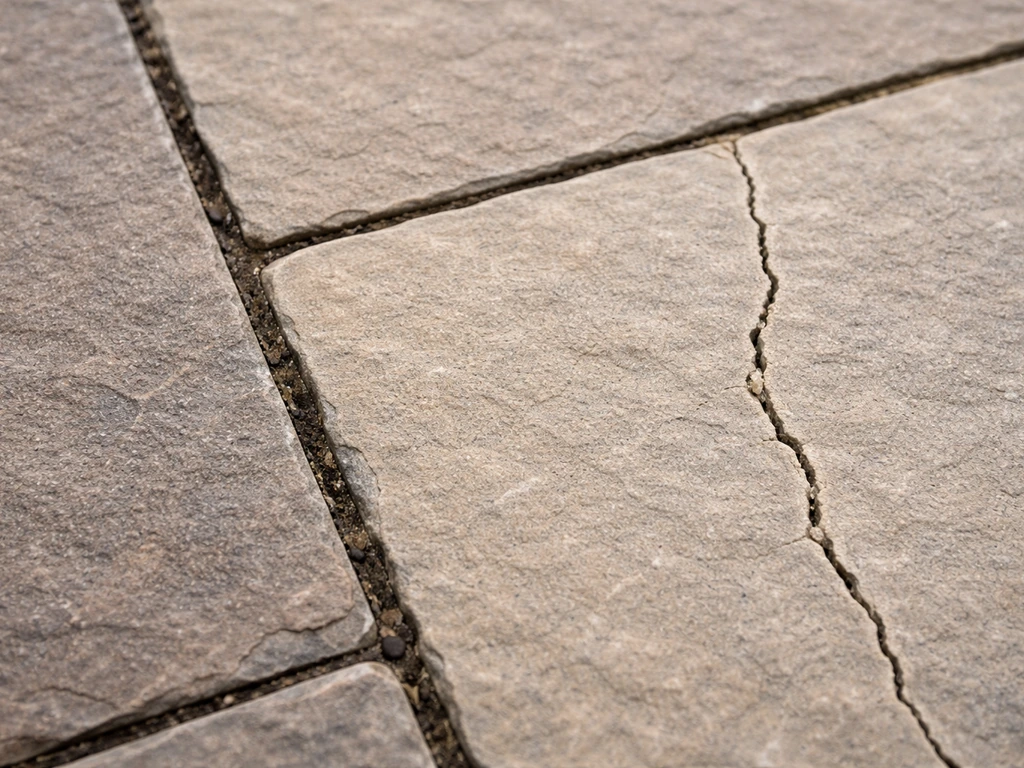
First, is the crack in the joint between stones or through the stone itself? Joint failure is by far the most common problem on stone patios. The jointing material (sand, mortar, or polymeric sand) erodes, washes out, or simply ages out over years. You'll see gaps or crumbling between individual stones rather than a crack splitting the stone itself. This is the most DIY-friendly repair. Cracks running through the face of the stone are less common but do happen, usually from a hard impact, a freeze-thaw cycle forcing water into a flaw, or a stone that was structurally compromised to begin with.
Second, is the crack moving? A stationary crack is one that formed at some point and stopped. A moving crack is actively widening, lengthening, or shifting. To check, press a small piece of tape on each side of the crack and mark a reference line, or use a ruler to measure the width at two points and note the date. Check it again in two to three weeks. If the measurement has changed, the crack is still moving, meaning something underneath is still shifting. Filling a moving crack is a temporary patch at best. You can still do it to keep water out while you address the root cause, but don't expect it to hold permanently.
Third, what caused it? The most common culprits on stone patios are freeze-thaw cycles (water gets into joints, freezes, expands, and blows the joint apart), drainage problems (water pooling under the patio base saturates the sub-base and causes movement), settlement (the base material shifts or compacts unevenly over time), and simply old or incorrect jointing material that was never the right product. The cause tells you whether a repair alone will hold or whether you're also fixing a drainage issue, re-leveling stones, or addressing a larger base failure.
Crack types at a glance
| Crack Type | What It Looks Like | Most Likely Cause | Repair Approach |
|---|---|---|---|
| Joint failure | Gaps or crumble between stones | Erosion, age, freeze-thaw | Polymeric sand or jointing mortar |
| Hairline surface crack | Thin crack on stone face, shallow | Minor impact, frost, shrinkage | Stone crack filler or thin mortar |
| Open crack through stone | Visible gap splitting a stone | Heavy impact, freeze-thaw, settlement | Epoxy stone filler or patch mortar |
| Wide moving gap | Gap 1/4 inch or wider, may be changing | Active settlement or drainage failure | Backer rod + flexible polyurethane caulk |
Tools and materials you'll need today

Most of what you need is available at any hardware store or home center. Don't overbuy until you've diagnosed your crack type, but here's a complete list so you can grab what applies to your situation in one trip.
- Wire brush (stiff-bristled, for scrubbing out loose material from joints and crack faces)
- Cold chisel and hammer or an oscillating multi-tool with a grout removal blade (for clearing out old mortar or failed jointing material)
- Shop vac or compressed air (for blowing dust and debris out of the crack before filling)
- Garden hose or pressure washer (for cleaning the surface; a pressure washer is faster and more thorough)
- Bucket and stiff-bristled scrub brush
- Polymeric jointing sand (for joint gaps between stones; pick a color that matches your existing joints)
- Pre-mixed stone patch mortar or masonry repair mortar (for cracks through stone; some come tinted to match common stone colors)
- Two-part epoxy stone filler (for structural cracks through stone where you need a hard, durable bond)
- Polyurethane caulk rated for masonry and outdoor use (for wider, potentially moving gaps; not regular silicone)
- Foam backer rod in the appropriate diameter (for filling deep, wide gaps before caulking so you don't waste caulk and get a proper caulk depth)
- Margin trowel or putty knife (for pressing filler into cracks and leveling)
- Grout float or rubber mallet with a piece of plywood (for pressing polymeric sand into joints)
- Masonry sealer appropriate for your stone type (flagstone, bluestone, limestone, etc.)
- Safety glasses and gloves
- Knee pads (you'll be on the ground for a while)
A note on materials: if your patio is flagstone, limestone, or another softer, more porous stone, check that any filler or sealer you choose is specifically compatible with that stone type. If your patio is flagstone, this guide will also help you choose the right filler and sealer for how to fix cracks in a flagstone patio how to fix cracks in flagstone patio. Some products are formulated for concrete or harder stone and can stain or react with softer material. When in doubt, test on a small hidden area first.
Prep work: the part most people skip (and regret)
Crack repairs fail when the prep is skipped. Filler applied over loose material, damp stone, or weeds will not bond, will not last, and you'll be doing this again next season. If you want the full walkthrough, start with this guide on how to fill cracks in a patio and follow the steps for your crack type. If you want the same overall approach, use this guide to learn how to fill cracks step by step and choose the right material for your situation how to fill cracks in a patio. Give the prep work as much time as the actual filling.
- Pull any weeds or plant growth out of the crack by hand, root and all. If the roots go deep, use a narrow screwdriver to work them out. Leaving roots behind means the crack will be pushed open again as growth continues.
- Use your cold chisel, oscillating tool, or a stiff wire brush to remove all loose, crumbling, or flaking material from inside the crack. You want clean, solid stone edges. Anything that moves or flakes when you press it needs to come out. For joint failures, scrape or chisel out all the old jointing material to a depth of at least 1 inch.
- Vacuum or blow out all dust, debris, and loose particles with a shop vac or compressed air. This step is non-negotiable. Dust prevents adhesion.
- Wash the crack and the surrounding surface with water. For stubborn staining or organic growth, use a diluted masonry cleaner or a mix of water and white vinegar, scrub with a stiff brush, and rinse thoroughly.
- Let the crack dry completely. This is the step people rush. In warm, sunny weather, allow at least 24 hours after washing. In cool or humid conditions, give it 48 hours. Applying mortar, epoxy, or polymeric sand over a damp crack is the single most common reason repairs fail. If the stone feels cool to the touch or you can see any moisture sheen, it's not dry enough.
One practical check for dryness: tape a piece of plastic sheeting over the crack overnight. If you see condensation on the underside in the morning, there's still moisture coming up from the base and you need to wait longer, or investigate whether you have a drainage problem contributing to persistent moisture.
How to fill cracks in a stone patio: step by step by crack type
Filling failed joints with polymeric sand
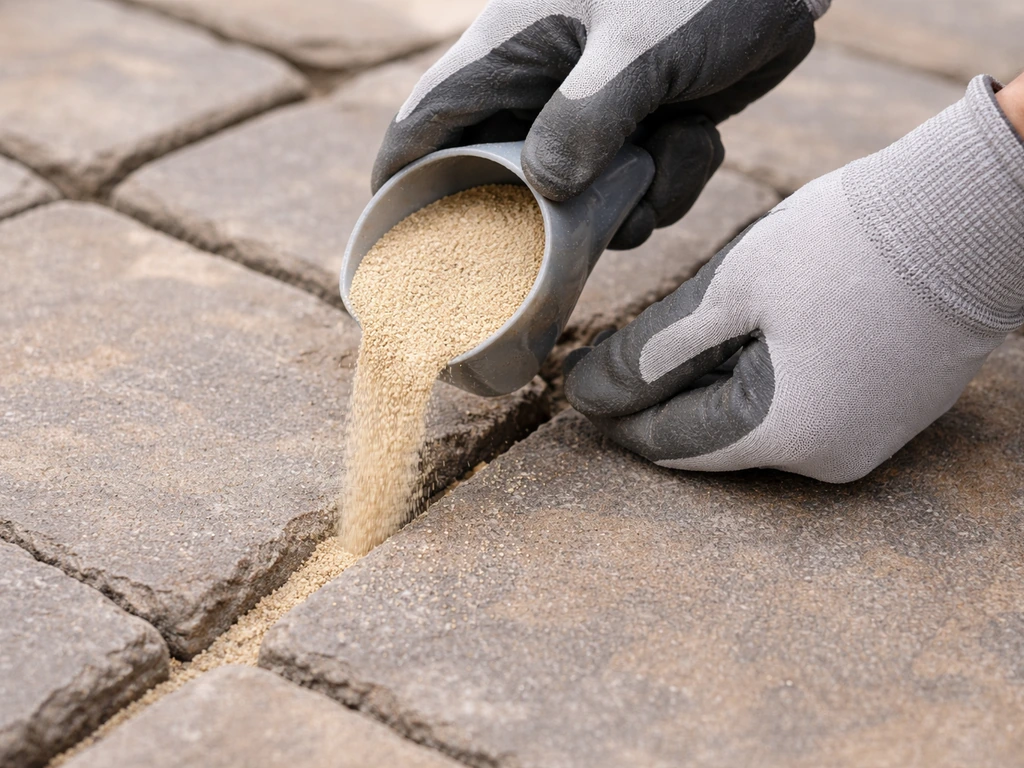
This is the most common repair and, done right, it holds for years. Polymeric sand is a blend of fine sand and a polymer binder that activates with water and sets firm, resisting erosion, weeds, and insects better than plain sand or basic mortar.
- After your prep work is complete and the joints are dry, pour polymeric sand over the patio surface in the area you're repairing.
- Use a stiff-bristled broom to sweep the sand diagonally across the joints, working it down into them. Go over the area multiple times from different angles.
- Use a rubber mallet tapping on a scrap piece of plywood to compact the sand into the joints and help it settle fully.
- Sweep in more sand and repeat the compaction step until joints are filled to within about 1/4 inch of the top of the stone surface.
- Blow off any excess polymeric sand from the face of the stones with a leaf blower on a low setting. This step matters: leftover sand on the stone surface will haze when you wet it.
- Mist the joints with water using a gentle spray setting. Do not use a jet or high-pressure stream, which will wash the sand back out. Allow the water to absorb, then mist again. Follow the product's specific instructions here, as activation requirements vary slightly by brand.
- Keep foot traffic off the repaired area for 24 hours minimum, and avoid heavy rain or irrigation during that curing window.
Filling hairline or surface cracks in the stone itself
For shallow cracks on the face of the stone (less than about 1/4 inch wide and not deep), a pre-mixed stone patch mortar or masonry crack filler works well. These come in small tubes that apply like caulk or in tub form that you trowel in.
- Clean and dry the crack as described in the prep section.
- If using a tube applicator, cut the tip to a size just smaller than the crack width. Apply the filler in a steady bead, pushing it into the crack rather than just laying it on the surface.
- If using a trowel-applied mortar, load a small amount onto a margin trowel and press it firmly into the crack, working in short sections.
- Overfill the crack slightly, then use a wet margin trowel or putty knife to level the filler flush with the stone surface. Wipe away excess immediately with a damp cloth before it sets.
- Allow to cure according to the product instructions, typically 24 to 48 hours, before foot traffic.
Repairing open structural cracks through stone
A crack that goes all the way through the stone, or one that's wider than 1/4 inch, needs something with more structural integrity. A two-part epoxy stone filler is the best choice here. It bonds chemically to the stone, cures very hard, and won't shrink. It's also more expensive and less forgiving, so read the product instructions before mixing.
- Clean and dry the crack thoroughly. Epoxy adhesion depends heavily on a clean, dry surface.
- Mix the two-part epoxy according to the product instructions. Work time is typically 10 to 20 minutes, so mix only what you can apply quickly.
- Press the epoxy into the crack with a margin trowel or a gloved finger, working from one end to the other and making sure it fills the full depth. For cracks deeper than about 1/2 inch, fill in two layers: let the first layer set up before applying the second.
- Level the surface with a wet trowel or putty knife before the epoxy begins to harden. Once it cures, it's very difficult to sand or shape.
- Allow a full 24-hour cure before any foot traffic. Some two-part epoxies take up to 72 hours to reach full hardness.
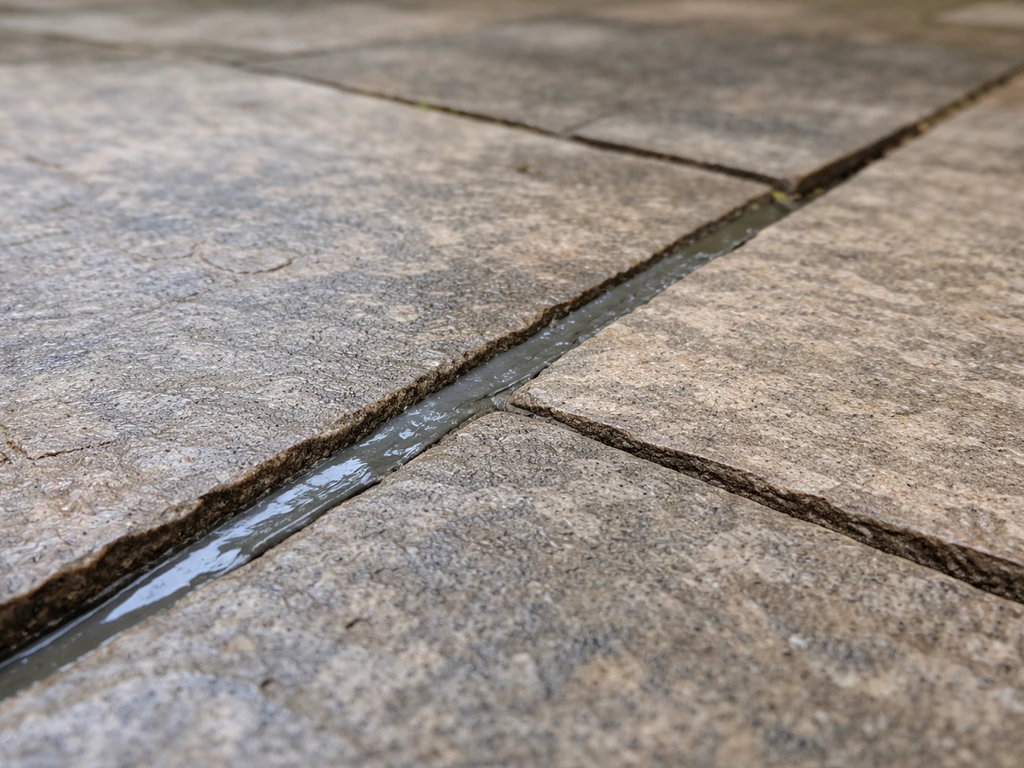
Handling wide or moving gaps with backer rod and caulk
If the gap is wider than about 3/8 inch, or if you've determined it may still be moving, a rigid filler will crack again quickly. The right approach is a flexible polyurethane caulk designed for masonry, installed over a foam backer rod. The backer rod fills the depth of the gap so the caulk sits at the right depth (roughly two-thirds the width of the gap) and can flex properly without tearing. The Dymonic 100 datasheet from ColSafety describes using a joint-filling approach with an appropriate width-to-depth ratio (with backer rod and depth control when needed) and notes the cure rate for the product blank" rel="noopener noreferrer">joint filling with an appropriate width-to-depth ratio.
- Choose a foam backer rod slightly larger in diameter than your gap width so it compresses slightly when pressed in.
- Push the backer rod into the gap so its top surface sits about 1/4 to 3/8 inch below the stone surface. Use a blunt tool like a screwdriver handle to press it in without puncturing it.
- Apply painter's tape on each side of the gap along the stone surface to keep your caulk lines clean.
- Apply the polyurethane caulk in a steady bead over the backer rod, slightly overfilling the gap.
- Tool the caulk with a wet finger or a caulk-smoothing tool to create a slightly concave surface that sheds water. Remove the tape immediately while the caulk is still wet.
- Polyurethane caulk typically needs 24 to 48 hours to skin over and up to a week to cure fully. Keep foot traffic off it for at least 48 hours.
One important note on caulk: don't use basic silicone caulk outdoors on masonry. Silicone doesn't bond reliably to stone, can't be painted, and degrades faster in outdoor conditions. Stick with a polyurethane or siliconized-acrylic masonry caulk rated for exterior use.
Curing, sealing, and finishing for outdoor conditions
The curing window is the period after you apply your repair material when it's gaining strength and shouldn't be stressed. Most masonry fillers and mortars need at least 24 to 48 hours before foot traffic, and at least 5 to 7 days before they reach full hardness. Epoxy cures faster but still needs time. Don't rush this. Foot traffic on a partially cured repair will damage the bond and you'll see the repair fail in days rather than years.
Temperature matters during curing. Concrete Coating Cure Time: Temperature, Humidity, and Foot Traffic notes that epoxy or polyurethane coating performance depends on temperature and humidity, and polyurethane systems may take about 24 to 72 hours to fully cure depending on conditions temperature matters during curing. Most repair materials need ambient temperatures between 50 and 90 degrees Fahrenheit to cure correctly. If nighttime temps are dropping below 40 degrees, avoid repairs unless you can cover the area with a frost blanket. Extreme heat also causes problems: direct sun on fresh mortar can cause it to dry too fast and crack. If you're working in summer heat, shade the repaired area or mist lightly if the product allows it.
Once the repair is fully cured, sealing the surface is worth doing on most stone patios. A penetrating masonry sealer soaks into the stone and repels water, which directly reduces freeze-thaw damage to your repair and extends the life of any jointing material. For flagstone, bluestone, limestone, or travertine, use a penetrating impregnating sealer rather than a film-forming or topcoat sealer, which can peel or look plasticky on natural stone. Apply it with a roller or a pump sprayer in thin, even coats, wipe off any excess before it dries, and let it cure according to the product's instructions (typically 24 to 72 hours before exposure to water). Reseal every two to four years depending on traffic and climate.
Preventing return cracks: drainage and joint maintenance
Here's the honest reality: if you only fill the crack without addressing why it formed, it will come back. If you want a lasting result, focus on the right repair method and prevention steps to fix cracked patio sections before they return. The repair materials are good, but they're not stronger than the forces that caused the crack in the first place. Prevention comes down to two things: water management and routine joint maintenance.
Water is the root cause of most stone patio cracking. It saturates the base, freezes and expands, and washes out jointing material. Check that your patio has a proper slope away from the house, typically a minimum of 1/8 inch drop per foot of horizontal run. Water should never pool on the surface or drain toward the foundation. If it does, you have a grading problem that needs correction, and no amount of crack filling will give you a lasting repair.
Also check where water from downspouts, lawn irrigation, and neighboring garden beds is going. Redirecting a downspout away from the patio or extending it further from the foundation can make a significant difference in how much water is cycling through the base under your stones.
For joint maintenance, plan to inspect and refresh your polymeric sand or jointing mortar every two to three years. Joints that are allowed to erode completely let water and roots get into the base and cause much bigger problems. A quick annual inspection in spring, after the freeze-thaw season, takes about 20 minutes and lets you catch problems while they're still a minor joint-fill job rather than a full re-leveling project.
If you're dealing with cracks in flagstone specifically, the causes and prevention steps can differ slightly from general stone repairs. Similarly, if your patio involves mortared joints over a concrete base rather than a sand-set system, the repair approach for the joints is closer to what you'd use for cement patio cracks than for typical stone patio joints. If your situation is specifically cement patio cracks, the underlying cause and repair materials can be a bit different than for stone, so follow the cement-focused steps for the best results.
When DIY isn't enough: signs you need a pro
Most stone patio crack repairs are genuinely DIY-friendly. But some situations are beyond what a filler and a trowel will fix, and it's worth being honest about that rather than spending a weekend on a repair that won't hold.
- Multiple stones have shifted, tilted, or settled at different heights. This is a base failure, not a surface problem. Filling the cracks won't re-level the stones or stabilize the base. The patio needs to be lifted, the base regraded and compacted, and the stones reset.
- The crack is actively moving and widening over weeks. A progressing crack indicates ongoing movement below. Filling it before the movement stops is wasted effort. A contractor can evaluate whether the cause is soil movement, drainage failure, or something structural.
- You have widespread settlement across a large area, not just one or two problem spots. Spot repairs can't compensate for a base that has failed across the whole patio.
- There's significant water pooling under the patio or signs of erosion washing out the base material. This needs a drainage solution, not a filler.
- The patio is on a slope or near a retaining wall with any sign of retaining wall movement or soil creep. This can indicate much larger structural issues that go beyond patio repair.
- Cracks keep coming back in the same spot within a single season despite correct repairs. Repeat failure in the same location usually means the underlying cause hasn't been resolved and needs professional assessment.
Getting a professional assessment doesn't always mean a full patio rebuild. Sometimes a contractor can address a drainage issue or reset a few sunken stones in a few hours at a reasonable cost, and that one fix makes every other repair you do actually last. It's worth the consultation if you're seeing any of the signs above.
FAQ
Can I just seal the crack instead of repairing it first?
Yes, but only if the crack is actually a joint (or a non-structural hairline in the face) and it is not moving. If you determine the crack is widening or shifting, sealing or filling alone is a temporary water barrier. In that case you should prioritize drainage and re-stabilizing the base or resetting loose stones before the sealant is worth it.
When does a cracked stone patio need more than filler (like resetting stones or fixing the base)?
If the patio shows rocking stones, visibly hollow sounding areas, or joint loss that exposes base material, a DIY filler will usually fail because the movement never stops. Consider a reset or base correction (and possibly professional assessment) when you notice repeated cracking in the same footprint or stones feel unstable underfoot.
What common products should I avoid for repairing stone patio cracks?
Avoid using concrete patch or exterior spackle unless the product is specifically labeled for stone or masonry and compatible with your stone type. Cement-based patches are rigid and can bond poorly to porous stones or stain them, and they can create a mismatch in hardness that leads to another crack nearby.
How do I know I’m filling the crack to the right depth, especially if it’s deep?
Don’t overfill in one pass, but do ensure full contact with the sides of the crack. For deep joints, pack in the filler in lifts so each layer cures properly and reaches the depth needed for strength. If you leave voids or apply too shallow, you may get surface skinning that peels or loosens.
How should I handle curing for polymeric sand so the joints actually lock in?
For polymeric sand, wet curing matters, if the brand instructions call for it. If you apply it dry and do not activate it correctly, it can remain loose and wash out. If you overwater too aggressively before it sets, it can harden unevenly or wash fines out, so follow the manufacturer’s watering guidance.
Can I seal soon after repairing, and what mistakes prevent a good seal?
If you used a rigid patch or epoxy, wipe and clean any residue immediately, because dried materials can be harder to remove and may affect later sealing or stain. Also allow full cure before sealing, if you seal too early you can trap uncured chemistry under a sealer layer.
What should I do if my plastic sheeting test shows condensation under the crack?
Condensation overnight (your plastic-sheet test) is a sign the base is still driving moisture upward. In that situation, waiting is usually best, but if it keeps happening after a couple of dry days, investigate drainage and water sources like downspouts and irrigation because repeated moisture will undermine adhesion and wash out jointing.
Do I always need a backer rod when using polyurethane caulk on wider cracks?
Yes, when the crack is wider and you need depth, foam backer rod is the usual fix for caulk joints. Use enough rod so the caulk sits at the right depth, roughly two-thirds of the gap, then tool it so it fully contacts the sides. If the caulk is too shallow, it tears with movement.
What are the most common epoxy-filler mistakes that make stone crack repairs fail?
Mix epoxy only when you can use it before it starts to thicken, and protect it from contamination since tiny amounts of dust or jointing sand can weaken the bond. If you’re working in cold weather, warm the materials to room temperature, because slow curing can leave it tacky longer and reduce final strength.
If the crack comes back, how should I re-diagnose the problem before repeating the repair?
If you see the crack returning right along the same line after a few seasons, it usually means movement is continuing or water is still infiltrating. Re-diagnose whether the crack is moving, check patio slope and pooling, and inspect drainage paths. If stones look sunken, address settlement or re-level the area before redoing the crack fill.
Next Article
How to Fill Cracks in Brick Patio: DIY Step-by-Step
DIY steps to fill cracks and gaps between patio bricks, remove weeds, choose the right filler, and prevent water damage.