For most brick patios, the fix comes down to two materials: polymeric sand for wide open joints between pavers, and tuckpointing mortar for mortared brick patios where the joints are crumbling. Get the diagnosis right first, then pick the filler, prep the joints properly, and the repair will last years instead of washing out by next spring. If you already have visible cracking, focus on the root cause first so your plan to fix cracked patio is more than just a cosmetic patch.
How to Fill Cracks in Brick Patio: DIY Step-by-Step

Talia Lang
29 Apr 2026

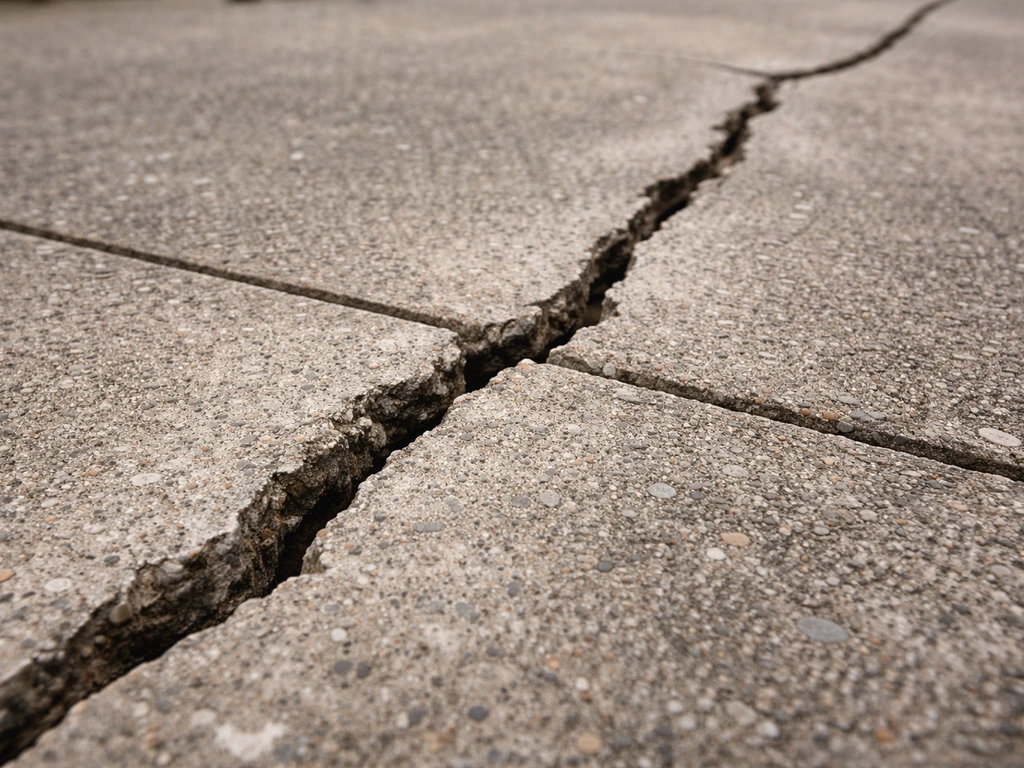
Why the gaps and cracks are appearing in the first place
Before you buy anything, it helps to understand what you're actually looking at. Brick patios fail in a few distinct ways, and the cause determines the fix.
- Missing or eroded jointing sand: The most common problem on dry-laid (sand-set) brick patios. The original sand between bricks slowly washes or blows away over years, leaving open gaps that invite weeds, ants, and water.
- Deteriorated mortar joints: On mortared brick patios, mortar gets brittle and flaky after years of freeze-thaw cycles. You'll see crumbling, hollow-sounding joints and loose bricks. This is a tuckpointing job, not a sand job.
- Settlement cracks: When the base material (gravel or compacted sand beneath the bricks) shifts or erodes, individual bricks sink or tip. Gaps open up unevenly and you may notice one section is lower than another. Filling these without fixing the base is a short-term band-aid.
- Surface cracks running through the brick itself: The brick body has fractured, usually from impact, freeze-thaw stress, or a tree root underneath. Crack filler can cosmetically improve it, but if the brick is structurally broken, it needs replacing.
- Failed previous repair: Old mortar patch that's shrunk away from the edges, or polymeric sand that washed out because it was applied wet. The repair failed, not the patio itself.
Take five minutes to look at the pattern. If gaps are uniform and consistent across the whole patio, you're dealing with joint erosion. If damage is concentrated in one area, especially if bricks are uneven, suspect base movement. If the mortar is visibly crumbly and hollow when you tap it, that's deterioration. Knowing which problem you have saves you from buying the wrong materials.
Tools and materials you'll need
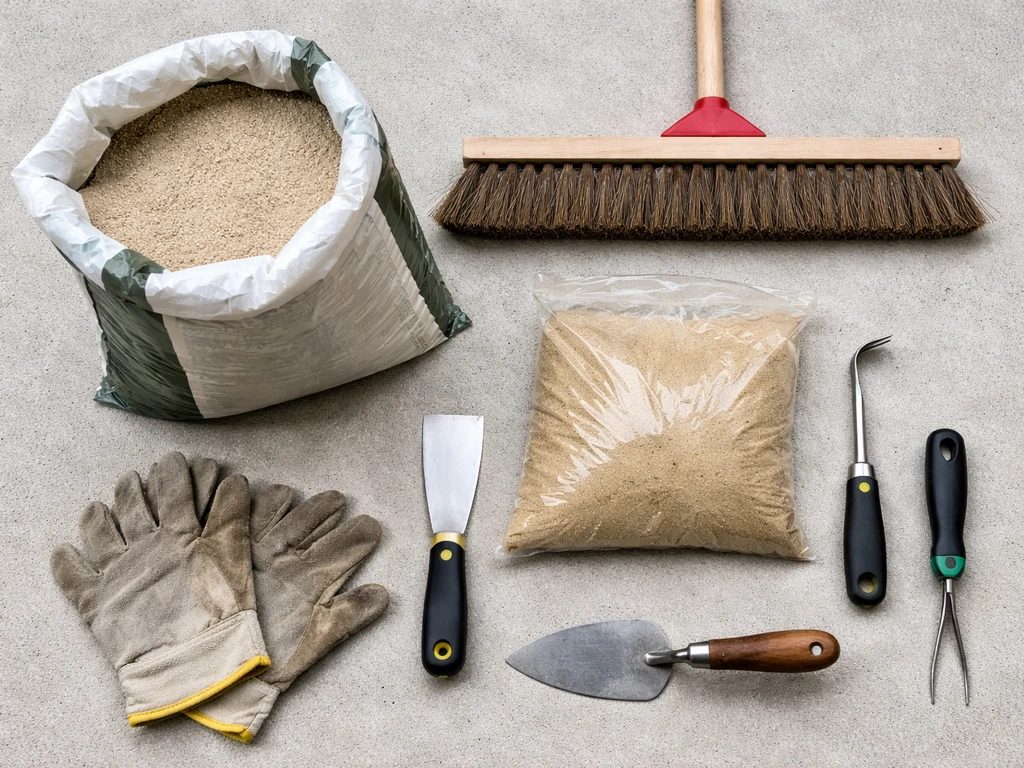
The list changes slightly depending on whether you're doing a sand-set paver job or repointing mortar joints, but here's what covers most situations:
| Item | Used For | Notes |
|---|---|---|
| Polymeric jointing sand (e.g., QUIKRETE HardScapes, Sakrete PermaSand, Techniseal EZSand) | Sand-set brick patio gaps up to 2 inches wide | Comes in multiple colors; buy more than you think you need |
| Tuckpointing mortar mix (e.g., QUIKRETE Mortar Mix or Mason Mix) | Mortared brick patio with crumbling joints | Mix to a stiff peanut-butter consistency |
| Tuckpointing tool / margin trowel | Pressing mortar into joints | A tuckpointing trowel is narrow and makes this much easier |
| Stiff-bristle push broom or hand brush | Sweeping polymeric sand into joints | Standard push broom works fine |
| Wire brush | Cleaning out old mortar and debris from joints | Essential for mortar prep |
| Cold chisel and hammer (or angle grinder with masonry blade) | Removing deteriorated mortar to correct depth | Angle grinder is faster on large areas |
| Shop vacuum | Removing loose grit after cleaning joints | Blowing out with compressed air also works |
| Garden hose with adjustable nozzle | Activating polymeric sand | Must have a mist/shower setting, not a jet |
| Plate compactor or hand tamper | Settling bricks and compacting sand into joints on large areas | Rental for large patios; hand tamper for small repairs |
| Leaf blower | Removing excess polymeric sand from brick surface | Use before wetting, not after |
| Safety glasses, gloves | Personal protection | Mortar is caustic; wear both |
Prep work: the step most people rush and regret
Good prep is 60 percent of this job. Skipping it is why repairs fail in one season. Whether you're dealing with sand joints or mortar joints, you need the same starting point: clean, stable, dry.
For sand-set brick patios
- Pull all visible weeds by hand. Get the roots out. If weeds have grown thick, hit the area with a weed killer rated safe for use around masonry and give it a few days before proceeding.
- Remove old, failing jointing sand from the joints. You can pressure-wash it out, use a stiff brush, or vacuum it out. The goal is to get back to clean, open joints. Partial cleanup leads to poor bonding.
- Let everything dry completely. This is non-negotiable for polymeric sand. If you pressure-washed, wait at least 24 to 48 hours of dry weather. Sakrete explicitly says the pavers must be completely dry before you apply polymeric sand. Wet joints cause the polymers to activate prematurely and the material won't bind properly.
- Check for unstable bricks. Walk across the patio and press down on each brick. Any that rock, tip, or feel hollow underneath need to be pulled up and releveled before you refill joints. Filling over a loose brick just delays the problem.
- Assess drainage. If water pools on the patio or near the house, that's a drainage issue that no filler will solve. You need a slope of at least 1/8 inch per foot away from the structure.
For mortared brick patios
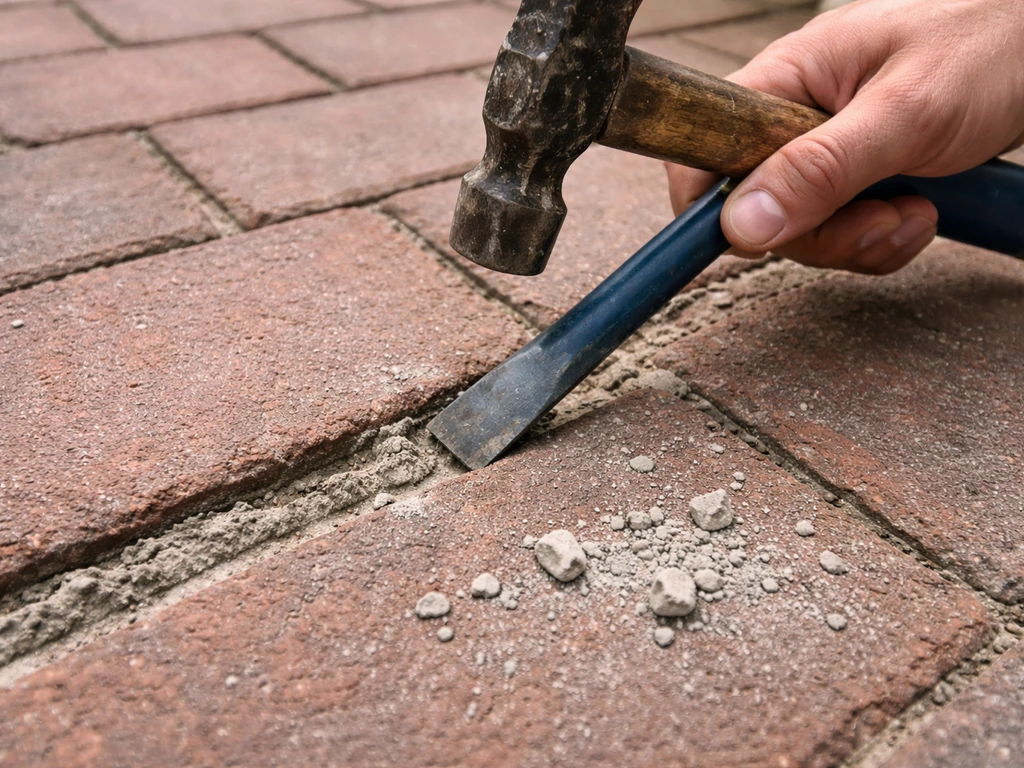
- Use a cold chisel and hammer or an angle grinder with a masonry blade to cut out crumbling mortar. You need to remove it to a depth of at least 3/4 inch, and QUIKRETE's guidance specifies a range of 3/4 inch to 1 inch for solid tuckpointing. Shallow repairs shrink and pop back out.
- Once cut, rake out all loose grit with a wire brush and vacuum or blow out the dust. The joint needs to be clean and free of powder or the new mortar won't bond.
- Check for bricks that are loose or cracked through. If a brick is broken, it needs replacement, not patching. If it's just loose mortar holding it, continue with tuckpointing once joints are cleaned.
- Dampen (don't soak) the joint area before applying mortar. A dry brick will pull moisture out of fresh mortar too fast and weaken the bond. Wet is too much; damp is right.
Choosing the right filler for your specific situation
Using the wrong filler is one of the most common mistakes on this repair. Here's how to match the material to the problem:
| Situation | Best Filler | Why |
|---|---|---|
| Sand-set brick patio, joints 1/8" to 2" wide, good base | Polymeric jointing sand | Flexible, weed-resistant, water-activated, and easy to apply across a whole patio |
| Mortared brick patio with crumbling joints | Tuckpointing mortar mix | Rigid bond needed; matches original construction method |
| Isolated hairline crack through a brick or mortar joint | Masonry caulk or concrete crack filler | Flexible enough to handle small movement |
| Deep joint gap over 3/4" in mortared patio | Mortar applied in staged lifts | One thick fill shrinks; build in layers to 3/4" then finish |
| Large open joint, non-structural, decorative brick patio | Polymeric sand rated for wide joints (up to 2") | Products like QUIKRETE HardScapes Polymeric Jointing Sand are specifically rated for wide gaps |
A note on color matching: both polymeric sand and mortar come in multiple shades. Take a photo of your existing joints to a masonry supply store or big box home center and compare samples in good lighting. The color will lighten as it cures, so a slightly darker match on the shelf usually ends up closer to right once dry. Expect some variation, especially if the existing material has weathered for years. Repairs on older patios rarely match perfectly, and that's normal.
If you have a flagstone patio or natural stone patio instead of brick, the filling process is similar but the joint widths and material tolerances can be different. The same logic applies to cracks in cement or concrete patios, which are a separate repair category.
How to apply the filler, step by step
Applying polymeric sand to a sand-set brick patio
- Confirm the bricks are completely dry and the joints are clean and open. This is step one and step one only. Do not rush this.
- Pour polymeric sand over the patio surface and spread it loosely with a push broom, working it across the joints at an angle. The sand should fall into the joints as you sweep.
- Run a plate compactor over the area (or use a hand tamper on smaller sections) to settle the bricks and drive the sand deeper into the joints. This vibration is what fully seats the material.
- Sweep more sand over the surface and repeat the compaction step. You want the joints filled to within about 1/8 inch of the top of the brick surface, not flush and not proud.
- Use a leaf blower on low to blow off all excess sand from the brick surface before wetting. This is critical. Bell Industries specifically warns never to wet the joints before removing surface residue. Wet polymeric sand on the brick face creates a haze or film that's very hard to remove.
- Switch your hose nozzle to a mist or shower setting, never a jet. Wet the entire area using a slow, steady pass. Sakrete warns that too much water causes a white polymer film to float out of the joints onto the surface. You're looking to saturate the joints, not flood the surface.
- Allow the first wetting to absorb for a few minutes, then apply a second light misting if the product instructions call for it. Check the specific brand's data sheet for their exact wetting sequence.
- Keep foot traffic off the area for at least 24 hours. Protect the area from rain for the same period. Sakrete's PermaSand TDS specifies a 24-hour rain protection window.
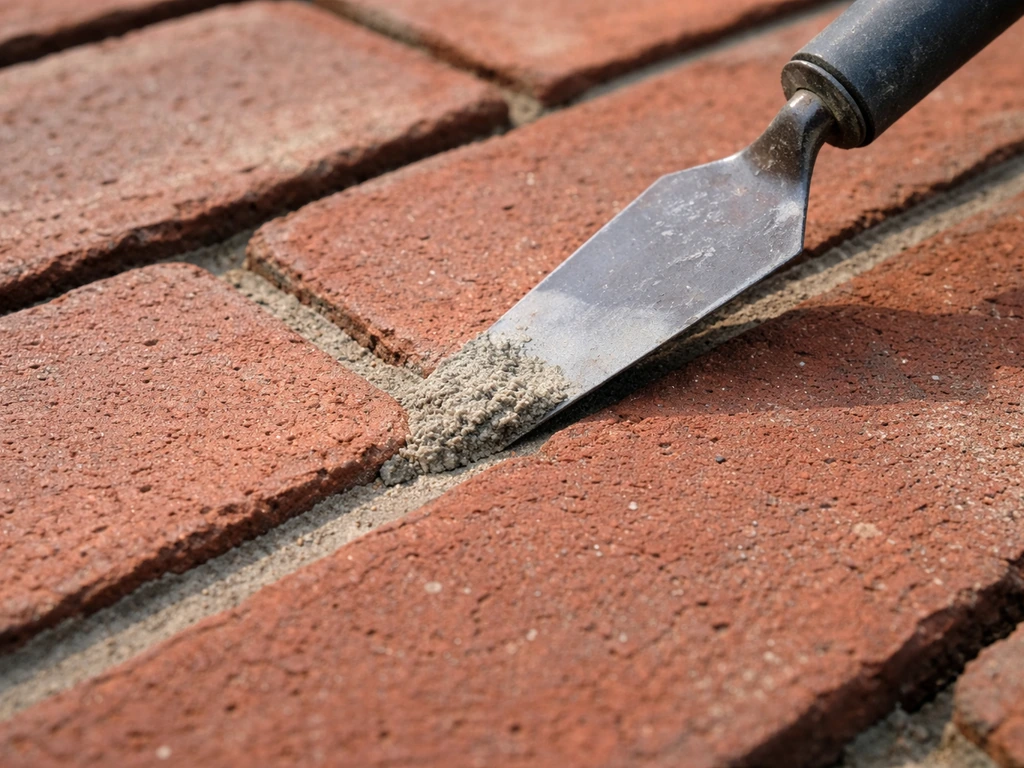
Tuckpointing mortar joints on a mortared brick patio
- Mix your mortar to a stiff, workable consistency, about the texture of peanut butter. It should hold its shape when pressed and not slump off the trowel. QUIKRETE recommends allowing the mix to prehydrate slightly before use, meaning mix it, let it sit for a few minutes, then recheck consistency.
- Load a small amount of mortar onto a tuckpointing trowel or margin trowel. Work with small amounts so the mortar doesn't dry on the tool.
- Press the mortar into the joint in thin layers, about 1/4 inch thick at a time. Del Prete Masonry specifically describes pushing mortar in as 'small slivers' to avoid trapping air voids. Work from the back of the joint forward.
- For joints deeper than 3/4 inch, build up in stages. GSA's repointing guidance for masonry specifies that joints over 3/4 inch deep should receive an initial lift to bring them to a uniform 3/4 inch depth, then the final finish layer.
- Pack each layer firmly before applying the next. The mortar needs to be solid, not airy.
- Once the joint is filled to the right depth, use a jointing tool or the tip of your trowel to shape the surface so it matches the profile of the surrounding original joints (either flat, slightly recessed, or rounded). Don't overfill. Filling joints too full alters the visible joint character and makes the repair obvious.
- Let the mortar firm up to the 'thumbprint' stage, meaning you can press it lightly and it holds the impression, before doing any final tooling or brushing. This usually takes 30 to 60 minutes depending on temperature and humidity.
- Brush away any smears on the brick face with a stiff brush while the mortar is still green (partially set but not hardened). Dried mortar smears are much harder to remove.
Finishing, curing, and whether to seal
Polymeric sand is fully water-activated and typically locks up within a few hours on a warm day, but the standard guidance is to stay off it for 24 hours and keep rain away for the same period. The polymers continue curing with heat and UV exposure over the following days, which is why the surface may feel slightly soft at first and firms up over time.
Mortar joints need to cure slowly. Keep them damp (not wet) for the first 24 to 48 hours, especially in hot or windy weather. Fast drying causes shrinkage cracks. A light misting with a spray bottle and covering with burlap or plastic sheeting in very dry conditions helps. Full mortar cure takes about 28 days for maximum strength, but the repair will be functional within a few days.
Sealing is optional but worth considering. For sand-set brick patios, a paver sealer applied over cured polymeric sand can extend the life of the material and add some stain resistance. Wait at least 30 days after applying polymeric sand before sealing so the material has fully cured. For mortared patios, a masonry sealer or water repellent can slow future mortar deterioration, particularly in climates with harsh freeze-thaw cycles. Use a penetrating sealer, not a film-forming one, for mortared surfaces.
When things go wrong: troubleshooting common failures
Polymeric sand washed out or didn't harden
Almost always caused by one of two things: the bricks were damp when the sand was applied, or it rained within 24 hours of installation. You'll need to remove the failed sand, let everything dry out completely, and start over. There's no fixing half-set polymeric sand in place.
White haze on the brick surface
This is the polymer residue that floated out of joints during wetting, usually because too much water was used or because excess sand wasn't removed before wetting. While still fresh, it can sometimes be scrubbed off with water and a stiff brush. Once cured, you may need a masonry efflorescence cleaner or diluted muriatic acid wash. Test in a hidden spot first.
New mortar cracking or pulling away from the joint edges
Either the old mortar wasn't removed deep enough (minimum 3/4 inch), the joint wasn't cleaned of dust before application, the mix was too wet, or it dried too fast. GSA's masonry guidance notes that hairline cracking within new mortar or mortar separating at joint edges is considered unacceptable and the repair should be redone. Cut it out and start the prep again properly.
Weeds coming back through polymeric sand
Polymeric sand resists weeds but isn't a permanent barrier if the joints are only partially filled or if the material has started to degrade. Make sure joints are filled to within 1/8 inch of the surface. A pre-emergent herbicide applied before you refill joints can also help.
When to stop DIYing and call a pro
Some situations are beyond what filler can fix, and continuing to patch around them costs more in the long run:
- Multiple bricks are sunken, heaving, or rocking: This indicates base failure. The gravel or compacted sand layer underneath has shifted, eroded, or been undermined. The bricks need to be lifted, the base releveled, and then relaid. No amount of filler addresses this.
- Cracks are actively growing or changing: If a crack you filled last year has reopened and gotten wider, there's ongoing movement. Could be tree roots, soil settlement, or drainage failure. A masonry contractor needs to assess the cause before any repair makes sense.
- Large sections are separating from the house or a step structure: This can indicate foundation movement or improper construction, neither of which is a DIY fill job.
- Water is pooling and draining toward the foundation: Fix the drainage issue first. Any filler repair done before correcting drainage will fail and you'll be back to square one.
- The brick itself is spalling, flaking, or crumbling: Deteriorating brick often means the masonry has absorbed water and gone through too many freeze-thaw cycles. Tuckpointing won't save it if the brick faces are failing.
If you're dealing with cracks that run through the brick or through a large poured section, those are covered in more detail in guides on fixing cracked patios more broadly, whether the surface is concrete, stone, or flagstone. This guide focuses on stone patio cracking, so you can follow the same diagnosis-first steps to plan the right repair approach how to repair cracks in stone patio. If you have cracks specifically in a flagstone patio, use the same diagnosis-first approach and choose a filler suited to natural stone joints. To get specific, step-by-step instructions on filling cracks in a patio, follow the dedicated guide for the right filler and prep steps fill cracks in patio. The diagnosis process is similar: figure out if it's a surface issue or a base issue before you commit to a repair approach.
FAQ
How deep should I clean out brick joints before I fill them with mortar or sand?
For mortared joints, scrape out loose material to at least the depth needed to remove crumbling mortar, a common target is about 3/4 inch. For polymeric sand joints, you still need to remove any old, dusty fill so the joint is stable and can accept new sand, aiming for clean, bare joint walls rather than just skimming the surface.
Can I use polymeric sand on a patio that already has mortar in the joints?
Usually no. Polymeric sand is designed for sand-set joints between pavers, not for deteriorated mortar joints. If your patio is truly mortared, using sand instead of repointing will leave the wrong material in place and can fail quickly as the underlying mortar continues to crumble.
What weather conditions are safest for filling cracks in a brick patio?
Plan for dry conditions with moderate temperatures. Polymeric sand requires avoiding rain for about 24 hours and tends to lock up within hours in warm weather, so extremes can create a too-fast set or washout. Mortar joints need slower curing, keep them from drying out too quickly with misting and light cover in hot, windy, or very dry conditions.
Why are my filled joints washing out even after I followed the steps?
Most often it is one of two root causes: the base or joints were damp when sand was applied, or rain hit before the sand was fully activated and cured. Also confirm you fully removed old, degraded material and swept/wetted the joints according to product directions, excess material left on the surface can break down during the first watering cycles.
How do I remove excess polymeric sand residue without damaging the joint fill?
While residue is still fresh, scrub lightly with water and a stiff brush, working carefully so you do not dig out new fill. Once cured, residue usually needs a masonry efflorescence cleaner or a diluted acid wash, and you should test in a hidden spot first to ensure it does not discolor bricks.
How full should I pack the joints when using polymeric sand?
Fill to just below the surface, a common rule is within about 1/8 inch of the top. If you underfill, weeds and debris can enter and the joint can keep degrading. If you overfill and leave extra on top, residue and inconsistent activation are more likely.
Will sealing my brick patio trap moisture and cause more damage?
It can if you seal at the wrong time or use the wrong type of sealer. Wait until polymeric sand is fully cured (a common minimum is 30 days) before sealing, and for mortared joints choose a penetrating sealer or water repellent rather than a film-forming product so trapped moisture is less likely.
How soon can I walk on the patio after filling joints?
Expect reduced tolerance at first. Polymeric sand typically should not be walked on immediately, most guidance uses a 24-hour no-traffic window. Mortar repairs are also best treated gently early on, the joint needs time to set, then full strength takes longer, often around four weeks.
Do I need to re-level or fix movement if the cracks keep returning?
Yes. If cracking patterns are concentrated in one area or bricks are uneven, base movement is a likely cause, and simply refilling joints will only mask the symptom. Repeated failures usually mean you need to address the underlying base stability or drainage problem before doing another cycle of joint filling.
How can I tell whether my patio needs repointing mortar instead of sand filling?
If the existing joints are mortared and the mortar is crumbling, hollow-sounding when tapped, or separating at the edges, you are dealing with mortar joint deterioration. In that case, the appropriate repair is removing deteriorated mortar and repointing, not adding polymeric sand to bridge the problem.
What if the mortar cracks immediately after curing, is it normal?
Hairline cracking that appears very early, or mortar separating from joint edges, is generally a sign the repair is not acceptable and often requires redoing. The usual fixes involve improving joint prep depth, ensuring dust is removed, using the right mix consistency, and preventing rapid drying during cure.
Should I apply herbicide for weeds, or is joint filling enough?
Joint filling reduces weed growth but is not always a permanent barrier, especially if joints are only partially filled or the joint material is degrading. A pre-emergent herbicide applied before refilling joints can help, but the key is still achieving properly filled, stable joints first.
What cracks mean I should stop DIY joint filling and look for a structural issue?
If cracks run through the brick into larger poured sections, or you see movement, uneven settlement, or cracking that expands beyond the joint lines, filler alone will not solve it. Those situations often require a broader patio repair approach, including addressing base and subgrade issues, not just repointing or resanding.
Next Article
Fix Cracked Patio: DIY Guide for Slab and Cement Cracks
Step-by-step DIY to fix cracked patio slab and cement cracks, diagnose causes, repair by crack width, cure, seal, and kn