Most stone patio repairs come down to one of three problems: the joints have failed and stones are shifting, the base underneath has eroded and sections have sunk, or individual stones are cracked and need replacing. If you can figure out which one you're dealing with, the fix is actually pretty straightforward. Get that wrong, though, and you'll be back out there doing it again in a season or two.
How to Repair a Stone Patio: Step by Step DIY Guide

Talia Lang
5 May 2026
Quick diagnosis: why stone patios fail
Before you touch anything, spend ten minutes walking the patio and cataloging what you actually see. Stone patios fail in predictable ways, and each symptom points to a specific cause.
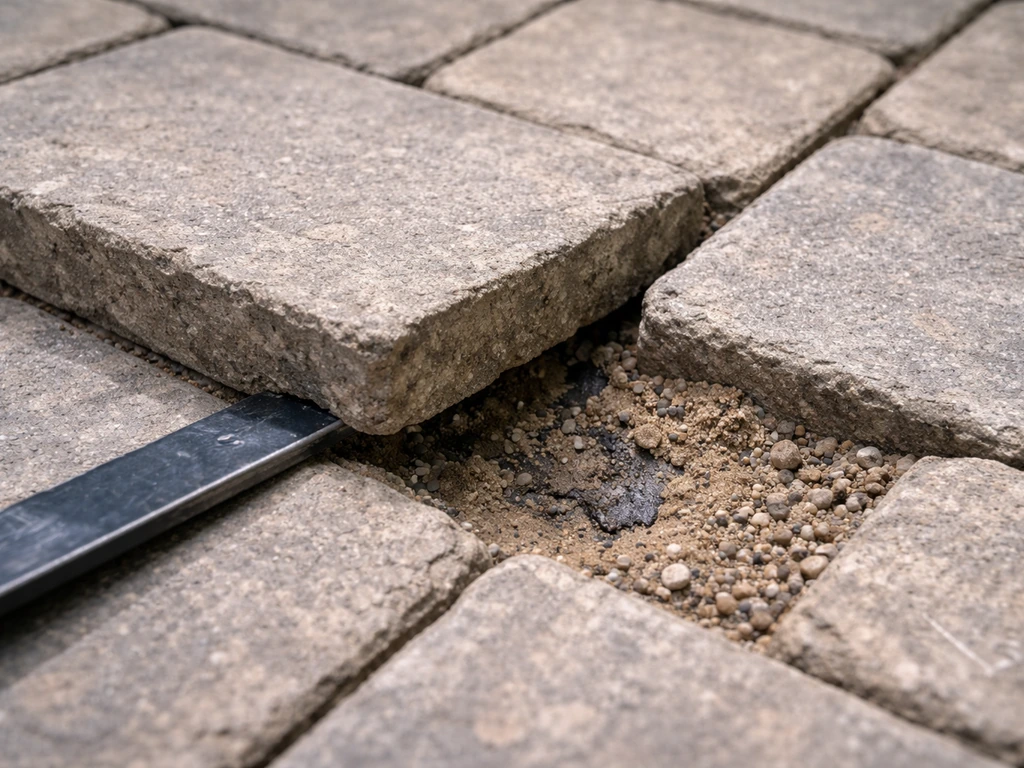
- Loose or rocking stones: joint sand or bedding material has washed out, allowing water in and stones to shift. Often caused by aggressive pressure washing aimed into the joints, or simply years of rain erosion.
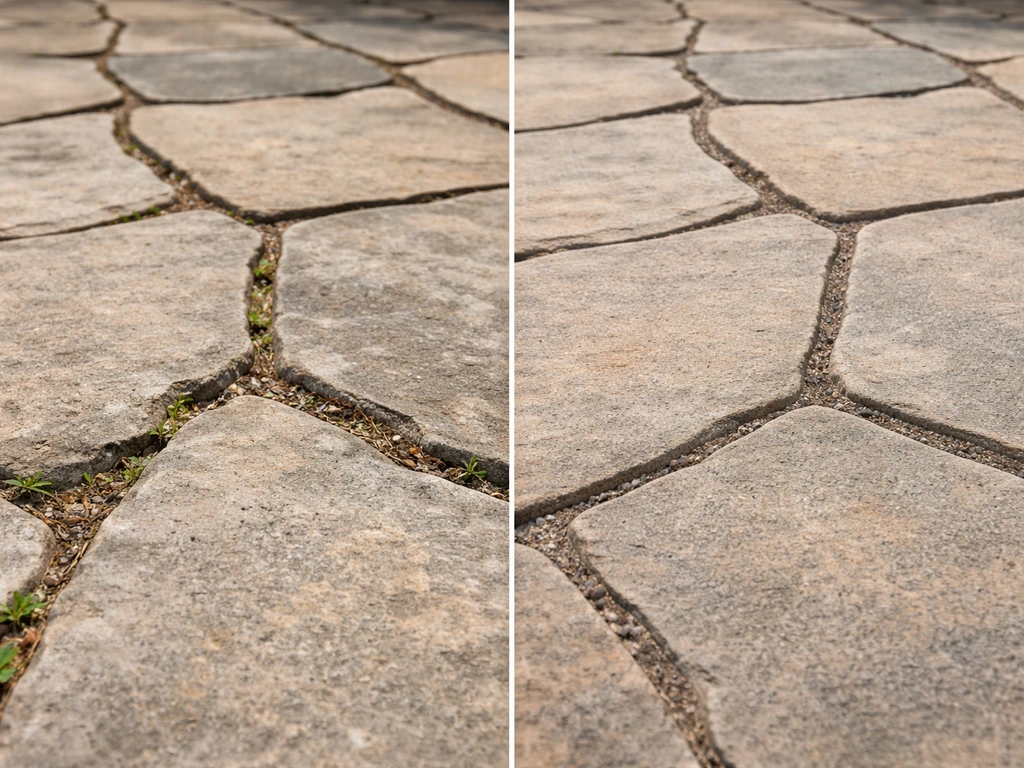
- Weeds pushing through joints: this means organic debris has collected in low or empty joints and given weeds a foothold. Pulling the weeds without restoring the joint material is a temporary fix at best.
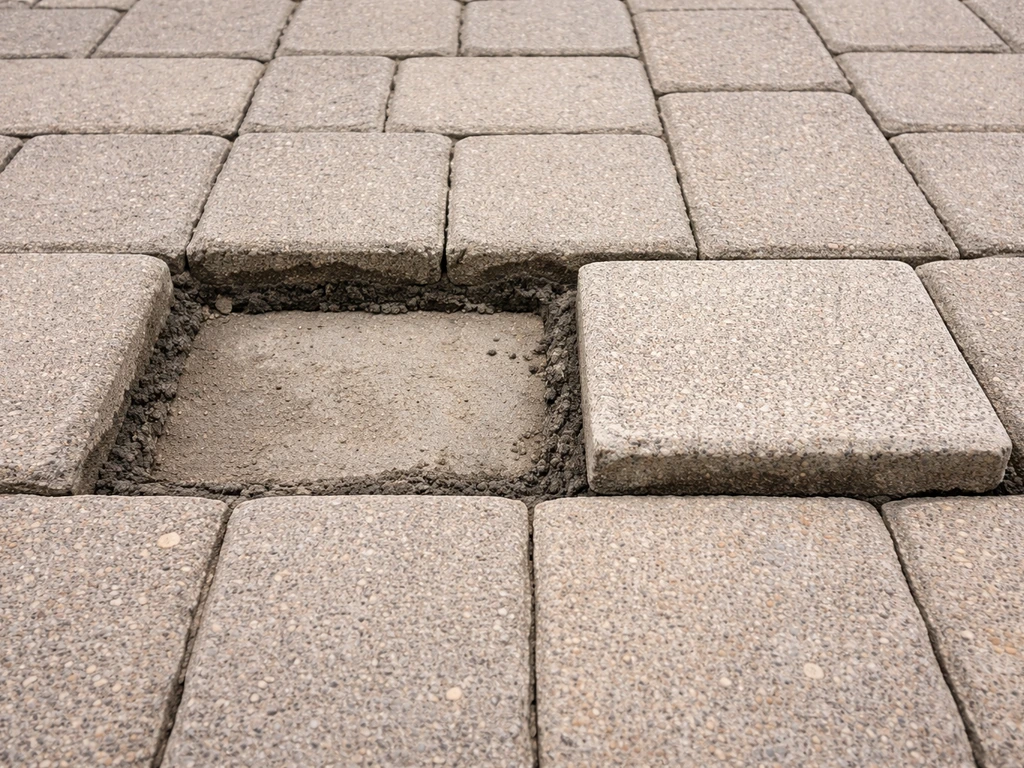
- Sunken or uneven sections: almost always a base problem. Either the original excavation wasn't deep enough, the base wasn't compacted properly, or drainage is eroding the material underneath.
- Cracked stones: can be caused by ground movement, heavy loads, freeze-thaw cycles, or impact damage. Hairline cracks in otherwise stable stones are cosmetic; full breaks or spalling usually mean replacement.
- Visible wash channels or low joints: water is moving through the patio surface rather than draining away from it, and it's taking sand with it every time it rains.
One important pattern to watch for: if weeds keep coming back in the same spots even after you've treated them, that's often a sign that the joint material is gone or the installation itself is failing in that area. The weeds are a symptom, not the root problem.
Assess the damage and decide: spot repair or re-lay?
This is the decision that most people skip, and it's the reason a lot of patio repairs fail within a year. Here's how to think it through honestly.
Kneel down and press firmly on every stone in the problem area. If a stone rocks or gives under pressure, pull it up and look at the sand or mortar bed underneath. If it's wet, soft, or mostly gone, you have base erosion in that spot. If the bedding looks intact but the perimeter joints are empty, it's a joint material issue. If the stone itself is clean underneath and just the sand between joints has washed out, a re-sand repair will hold. If you find soft, muddy, or hollow-feeling ground below the bedding layer, you're dealing with base failure and no amount of re-sanding will fix it permanently.
| Symptom | Likely cause | Correct approach |
|---|---|---|
| 1-2 loose stones with intact base | Joint sand washout | Re-set stones, refill joints |
| Multiple stones loose in one zone | Localized base erosion or drainage issue | Lift section, fix base, re-lay |
| Sunken area (stones level to each other but low) | Base failure or settling | Full excavation and reinstallation of section |
| Cracked stones, stable base | Impact or freeze-thaw damage | Replace individual stones |
| Widespread weed infestation | Degraded joint material throughout | Full joint restoration after treatment |
| Entire patio uneven or shifting | Inadequate original base, drainage problem | Professional assessment likely needed |
As a general rule: if the damage is contained to fewer than 10-15% of the patio's surface and the surrounding stones are firm, spot repair is the right call. If the damage is widespread or the base is consistently wet or soft, you're looking at a partial or full re-lay, and you should address the drainage before you put anything back down.
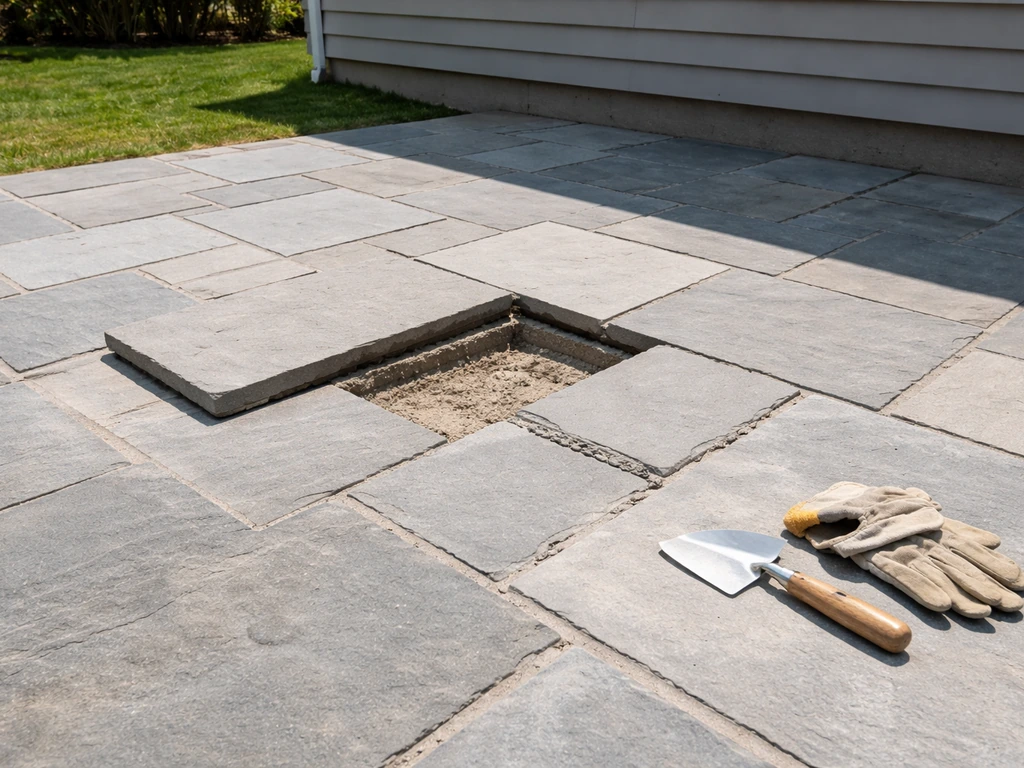
Repairing loose or cracked patio stones
For loose stones on a dry-laid patio (stones set on a compacted sand or gravel base with sand-filled joints), this is genuinely a manageable DIY repair. If you’re specifically looking for how to reset a Bluestone patio, focus on lifting the affected stones, correcting the base and drainage, then re-laying and re-sanding the joints reset bluestone patio.
If you need a focused walkthrough on how to repair bluestone patio sections, start by identifying whether your issue is in the joints, the base, or the stones themselves repair a stone patio. If your issue is loose or cracked flagstones, this guide walks through the same approach step by step so you can repair a flagstone patio correctly the first time how to repair flagstone patio. Here's the process step by step.
- Lift the loose stone carefully. Use a flat pry bar or a stiff putty knife to get under the edge. Set the stone aside on a flat surface so you can inspect both the stone and what's underneath.
- Remove all old bedding material from the excavated spot. Scrape it clean down to firm base material. If the area feels soft or wet, let it dry out completely before proceeding. Wet base material will just compact unevenly.
- Check the depth. The stone should sit flush with its neighbors when re-set. If the pocket is too deep, add coarse bedding sand (also called concrete sand or sharp sand) in thin layers. If it's too shallow, remove more base material.
- Screeding the bed: rake the sand roughly level, then use a straight-edged board or a small screed to create a flat, even surface at the right height. The stone should sit about 1/4 inch high before final seating to allow for settling.
- Set the stone back. Place it carefully so you don't disturb the prepared bed. Press down firmly by hand first, then use a rubber mallet to seat it. Check it with a level and against the neighboring stones.
- Fill the joints. For dry-laid patios, polymeric sand is the best material to use. It activates with water and hardens into a firm but flexible joint that resists washout and discourages weeds. Sweep it into the joints dry, compact lightly, then mist with water according to the product directions. Regular sand will work but won't last as long.
- For cracked-but-stable stones in mortared patios, you can fill hairline cracks with a masonry crack filler or color-matched caulk designed for outdoor stone. Clean the crack thoroughly first, let it dry completely, then apply in thin passes. Don't try to fill a wide crack in one pass.
One thing worth knowing: if your patio was originally built with mortar joints rather than sand joints, re-pointing the joints is a different process. That repair involves mixing and applying fresh mortar, which has its own curing requirements and technique. If that's what you're dealing with, the process for repairing mortar joints in a stone patio is worth reading through separately before you start.
Fixing sunken or uneven areas (base leveling)
Sunken sections are almost always a base problem. The instinct is to add more sand on top and re-set the stones, but if the base itself has eroded or was never properly compacted, that fix won't last a season. Fine Homebuilding adds that patio longevity depends on a compacted, permeable gravel base that lets water pass through instead of trapping it at the patio site if the base itself has eroded or was never properly compacted. You have to go deeper.
- Mark out the affected section and lift all the stones in it. Stack them carefully in order if possible so you can relay them in the same configuration.
- Excavate down to undisturbed, firm ground. In most residential patios this means getting through the bedding sand and into the gravel base (typically 4-6 inches of compacted crushed gravel or road base for a dry-laid patio). If you hit soft, wet, or organic material, keep going.
- Check for drainage issues before refilling. Look for signs of water pooling, runoff channels, or soil that stays consistently wet. If drainage is the cause, you'll need to address it here (a French drain, grading adjustment, or redirecting a downspout) before you put the base back. Skipping this step means the same section will sink again.
- Add base material back in layers no more than 3-4 inches thick. Use compactable gravel (not pea gravel or decorative stone). Compact each layer with a plate compactor or hand tamper before adding the next. This step is non-negotiable for a repair that holds.
- Add your bedding sand layer on top of the compacted base, typically 1 inch deep. Screed it flat and level with the surrounding area.
- Re-set the stones, check for level with a long straightedge spanning from the repaired area to the undisturbed sections, and adjust as needed.
- Re-fill joints and compact the surface once more before activating polymeric sand.
If you discover that the sunken area is large (say, a quarter of the patio or more) or that multiple areas are sinking for no obvious reason, that's a signal to step back and think about whether the whole patio needs releveling or whether there's a systemic drainage problem. A large-scale base failure that keeps recurring really does call for a professional eye, not because it's too hard to do, but because the underlying cause (poor grading, a high water table, inadequate original construction) might not be something you can solve with a weekend repair.
Replacing badly damaged stones and matching pieces
If a stone is cracked through, spalling badly, or broken in half, replace it. Patching a badly damaged stone looks rough and won't hold up.
The hardest part of replacing individual stones is matching them. Natural stone varies in color, texture, and thickness even within the same quarry, so a brand-new stone often looks noticeably different from weathered ones. Here's how to manage that.
- Bring a sample (or a photo with clear color and texture detail) to a stone yard, not a big-box home center. Stone yards carry a wider range and staff who can help you match species, finish, and approximate color range.
- Buy a few extra pieces if you can. Stone thickness varies, and you want to be able to choose the closest match from a small selection rather than taking whatever one piece you get.
- Check thickness carefully. Irregular natural stone (flagstone, bluestone, fieldstone) varies in thickness across a single piece, which affects how you prepare the bed. If your replacement stone is thinner than the surrounding stones, build up the bed; if it's thicker, remove more base material.
- Weathering the stone: a fresh stone will look bright and new for a season or two. Letting it weather naturally is the most realistic approach. Some people lightly wire-brush the surface or apply a diluted soil slurry to accelerate aging, but results vary.
- For specific stone types like flagstone or bluestone, the matching process has some nuances worth knowing about. The process for flagstone patio repair and bluestone patio repair each cover material-specific details that are useful if that's what you're working with.
Once you have the replacement stone, the installation process is the same as re-setting a loose stone: clean bed, correct depth, compacted base, bedding sand screeded level, stone set and mallet-seated, joints filled.
Re-sanding joints, sealing, and keeping it that way
Whether you've just re-set a few stones or re-laid an entire section, properly finishing the joints is what makes the repair last. Bell Industries’ polymeric sand installation guidance says to sweep the polymeric sand into the joints with a broom and follow activation cautions so the joints are not disturbed before activation properly finishing the joints. This step gets skipped or rushed more than any other, and it's usually why patios fail again within a couple of years.
Re-sanding the joints
- Blow or brush out any debris from the joints before adding new material. Old sand, weed fragments, and dirt left in the joint will prevent the new material from bonding correctly.
- For dry-laid patios, use polymeric sand. Pour it dry over the surface, sweep it into the joints with a stiff broom, and work it in from multiple directions. Get the joints filled as close to the top of the stone as possible without leaving excess on the surface.
- Use a plate compactor (or a hand tamper for smaller areas) over the surface before activating. This seats the sand fully into the joints and firms up the stones.
- Blow off excess polymeric sand from the stone faces with a leaf blower on a low setting before wetting. Any polymeric sand left on the surface will haze when activated.
- Activate with a fine water mist, not a direct stream. Follow the product's specific instructions for misting intervals. Most products want two or three light applications with drying time between passes. Overly heavy watering washes the activator chemistry out of the joints.
- Keep foot traffic off the repair for at least 24 hours and heavy use off for 48-72 hours while the polymeric sand cures.
To seal or not to seal
Sealing is optional on most natural stone patios, but it genuinely extends the life of the joints and reduces staining. If you use polymeric sand, wait a minimum of 30 days after installation before applying sealer so the sand has fully cured and any residual moisture has escaped. Use a penetrating sealer (also called an impregnating sealer) rather than a topical film-forming sealer. Topical sealers look shiny but peel, flake, and trap moisture over time. A penetrating sealer soaks into the stone and the joint material, provides protection without changing the appearance, and lasts 3-5 years before needing reapplication.
Apply sealer on a dry day when no rain is forecast for at least 24-48 hours and temperatures are between 50-90°F. Clean the patio surface first and let it dry completely. Apply with a low-pressure pump sprayer or a paint roller, working in manageable sections and wiping off any excess that hasn't absorbed within 10-15 minutes.
Long-term maintenance to avoid going through this again
- Blow or sweep debris off the patio regularly. Leaves and organic matter sitting in joints decompose into soil and give weeds a place to germinate.
- When pressure washing, use a fan-tip nozzle (never a zero-degree tip), keep the pressure under 1500 PSI on natural stone, and spray parallel to the joints rather than directly into them. Aiming into joints blasts out sand, which is how washout starts.
- Inspect joints annually, especially after winter. Re-top with polymeric sand wherever you see low or empty joints before weeds establish.
- Check grading around the patio perimeter each spring. Water should drain away from the patio surface at a slope of roughly 1/8 to 1/4 inch per foot. If water pools on or near the patio, fix the grading before it undermines the base again.
- Treat weed intrusion early. A pre-emergent herbicide applied in early spring (before soil temperatures hit 55°F consistently) will prevent most weed germination in the joints without damaging the stone. Manual removal plus joint restoration handles what breaks through.
Done right, a repaired stone patio should give you years of solid use without repeating the same problems. The repairs that fail quickly almost always skipped the base work, rushed the joint filling, or never addressed the drainage issue that caused the failure in the first place. Fix the underlying problem, do the joints properly, and the surface repair will hold.
FAQ
Can I just add more sand to fix loose or missing joints?
Yes, but only if the stones are sitting on stable, properly graded base. If you can feel waterlogged or hollow ground when you lift a stone, re-sanding alone will wash out again. In that case, remove the affected section far enough to reach firm bedding, correct drainage and grading, then re-lay and re-sand joints.
Is polymeric sand better than regular sand for patio joints?
Polymeric sand is often the better long-term choice for re-jointing, but it must be installed to the right depth and then activated with water in a controlled way. If you already have eroded base or poor drainage, polymeric sand will not compensate for the movement and will still crack or wash out.
How can I tell whether my stone patio uses mortar joints or sand joints?
Use as little mortar as needed and keep it out of the joints that are meant to remain flexible if your patio is sand-laid. If you are not sure whether your patio was built with sand joints or mortar joints, check a few joints after gently removing surface material, and test a hidden area for staining or residue that looks like cured mortar. Incorrect joint type is a common reason re-pointing fails.
What’s the best way to match a replacement stone so it does not stand out?
Start by replacing first, then matching. For natural stone, pick replacements from the same lot or at least the same production run, and dry-lay the stone in place before final setting to compare color under actual outdoor lighting. If you cannot source identical pieces, blend by replacing in a wider area rather than swapping one or two stones.
How do I prepare so I keep the patio slope and pattern when doing a stone replacement?
Before you lift any stones, take measurements of the existing layout, mark the edges of the repair area, and set aside a diagram of stone orientation. Also note the slope and runoff direction. Restoring the same slope matters for drainage, and it is easy to lose it when you re-bed without checking.
Can I fix a sunken area by re-bedding on top of the existing base?
Yes, but only for small, localized issues like hairline joint loss where the stones are stable. For sunken sections, you typically need to remove stones, remove failed bedding material, and rebuild the base. If you re-set on top of a soft spot, you are effectively rebuilding over a void.
How much water should I use to activate polymeric sand joints?
Follow the manufacturer’s activation method for polymeric sand, but avoid over-watering. Saturating too much can cause the sand to slump or disperse before it cures. Also keep traffic and heavy loads off the joints until the sand has fully hardened.
Should I seal before or after I repair stones and joints?
Be careful with sealers if you plan future repairs. Sealer can reduce adhesion of joint materials and make spot cleaning harder, so many DIYers seal after all repairs are complete. If you must seal now, do it after the joint material has cured fully, and expect color differences between sealed and unsealed stones until the whole area weathers together.
If I used polymeric sand, what’s the minimum wait time before sealing?
Yes, but only after the joint material has cured and the area is fully dry. Waiting at least a month for polymeric sand is a common rule of thumb, and you still need to ensure no residual moisture is trapped. If you seal too early, you can get haze, inconsistent absorption, or weak joint performance.
Why do weeds keep coming back even after I re-sand or spray?
Yes. If the same spots repeatedly sprout weeds, and lifting stones shows washout or empty joints returning, you likely have ongoing joint material failure due to base movement or drainage. Add a long-term solution by fixing grading, improving runoff paths, and restoring joint material depth, not just applying weed treatment.
How do I know how large a section I should remove for a long-lasting repair?
Often. Many successful DIY spot repairs fail because the repair area was too small for the actual base problem or because the base was not compacted to a firm, uniform layer. A good next step is to expand the excavation to include any surrounding damp or unstable ground, then rebuild in layers and compact thoroughly.
Next Article
How to Repair Bluestone Patio: Step by Step DIY Guide
Diagnose and DIY repair a bluestone patio: replace slabs, reset sunken stones, patch mortar, fix joints, and prevent bas