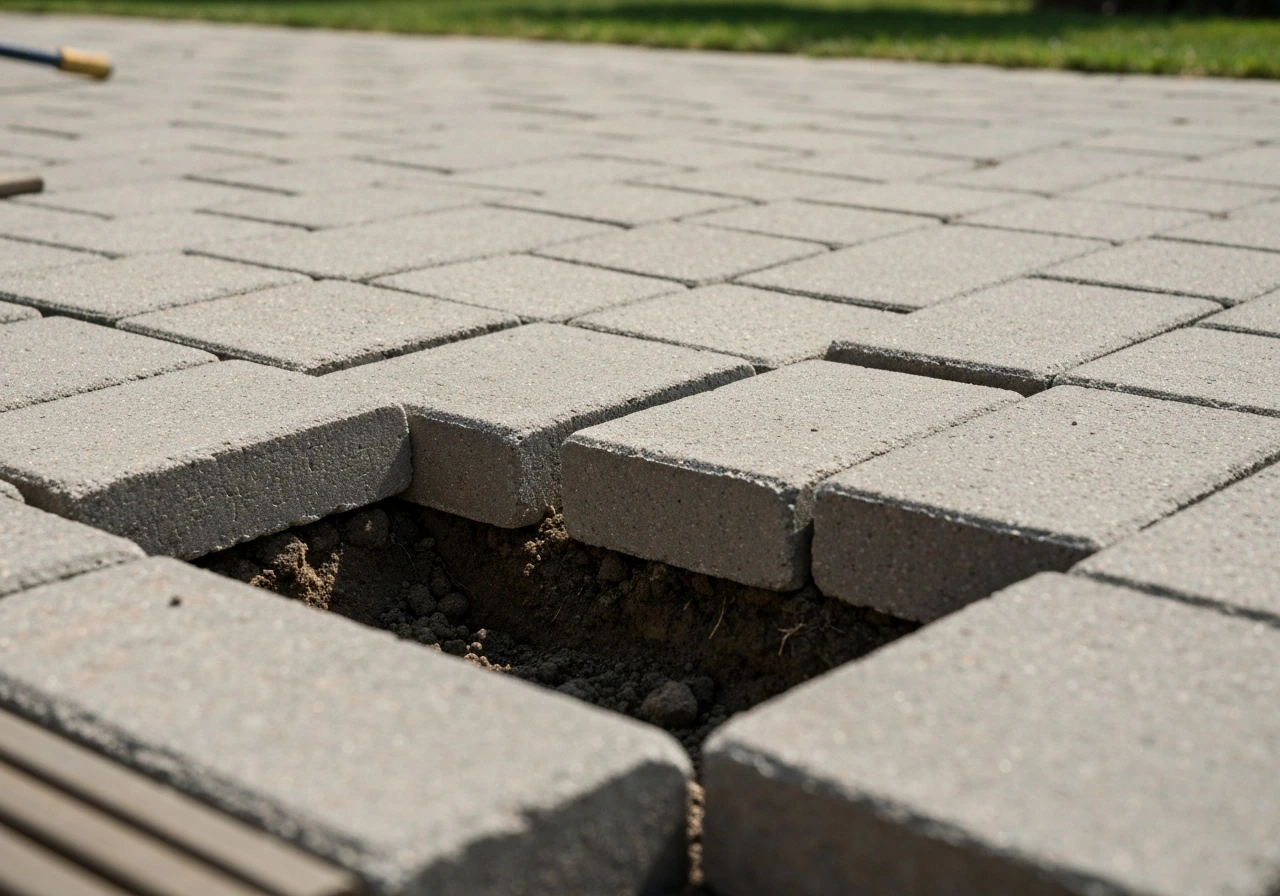
You can fix a sunken brick patio yourself, but only if you fix the actual cause first. If your patio is sinking, focus on fixing the underlying base and drainage issues first so the problem does not return how to fix sinking patio. Lifting bricks and adding sand on top without addressing what made them sink will have you doing the same job again in a year or two. The real repair sequence is: diagnose the cause, excavate down to stable ground, correct the base and drainage, then re-lay the bricks on a properly prepared surface. That's what this guide walks you through.
Fix Sunken Brick Patio: DIY Diagnose and Repair Steps

Talia Lang
8 Jul 2026
Spot the problem and figure out how bad it actually is
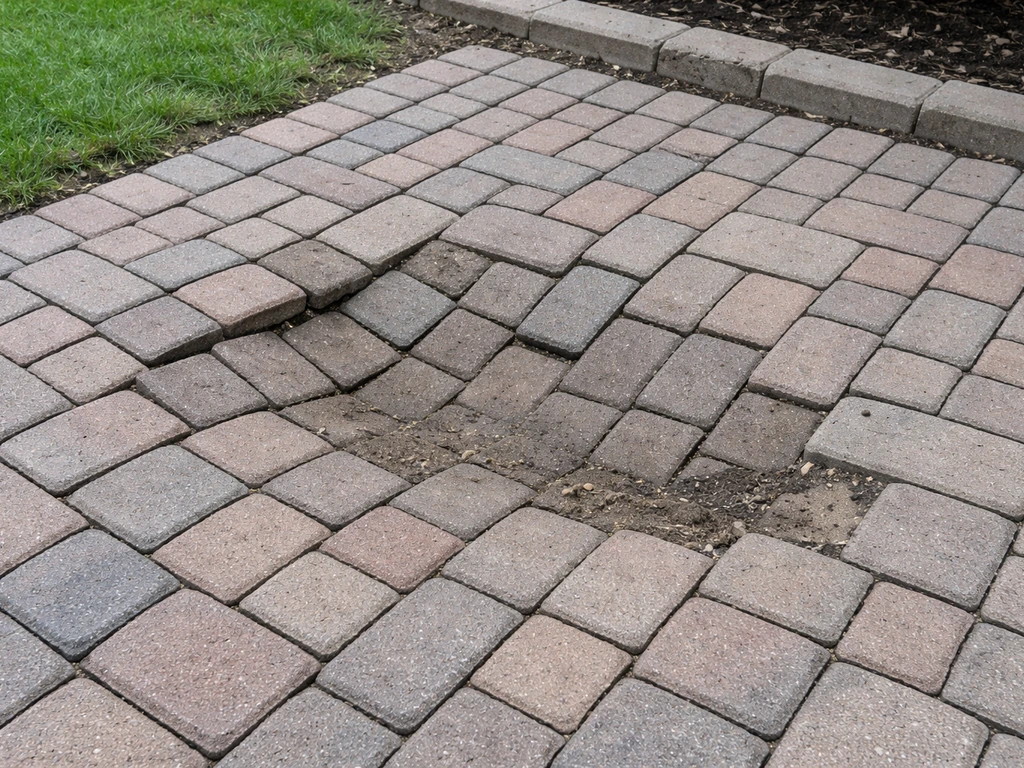
Start by walking the whole patio slowly and taking stock of what you see. A single low spot in the middle of an otherwise solid surface is a much easier fix than widespread sinking across half the patio. Press down on each brick as you walk. If they rock or flex underfoot, the bedding or base beneath them has failed. When diagnosing rocking or settlement, check for gaps between units, tilted stones, and water pooling because those indicators point to bedding or base problems that need attention, not just a surface-level sand top-up blank" rel="noopener noreferrer">rock or flex underfoot, the bedding or base beneath them has failed. If they feel solid but are just sitting low, you may have a more localized settling issue.
Look for these signs and note where they cluster:
- Visible dips or depressions, especially after rain
- Bricks that rock when you step on or press them
- Gaps opening up between bricks
- Standing water that doesn't drain away within an hour or two
- A 'spongy' feeling underfoot, which points to washed-out base material
- Bricks sinking in a pattern that follows a downspout, garden bed edge, or utility trench
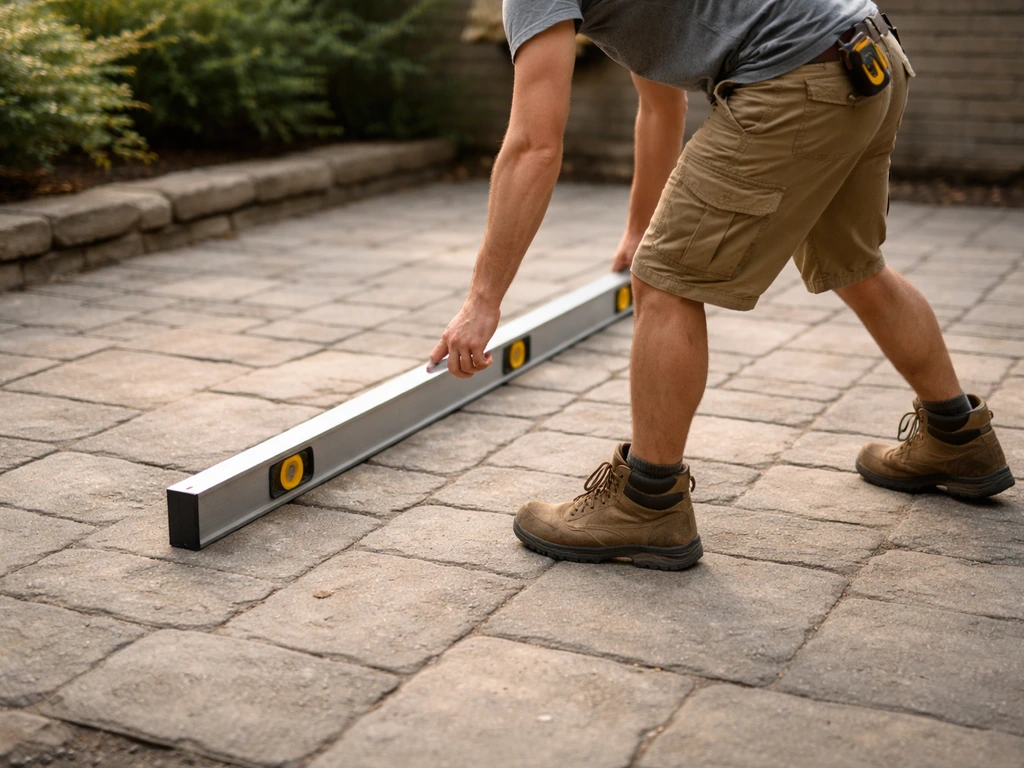
Use a straightedge or long level to measure the depth of any dips. A shallow dish of half an inch or less over a few bricks is minor. A drop of 2 inches or more, or sinking that covers a large section, means significant base failure. Mark the affected area with spray paint or stakes so you know exactly what you're dealing with before you touch a single brick.
Also check the slope across the whole patio. Properly installed patios should pitch away from your house at 1/4 inch per foot (some guides accept as little as 1/8 inch per foot). If the patio is now sloping toward your foundation, that's a drainage problem that needs to be corrected as part of this repair, not after it.
Find out why it's sinking before you fix anything
This is the step most DIYers skip, and it's why their repairs fail. Once you pull up a few bricks, you'll get a clear picture of what went wrong. There are five common culprits, and they require different fixes.
Inadequate or uncompacted base
The most common cause. If the original install used too little base material, or if it was dumped in without being compacted in lifts, the weight of the bricks and foot traffic slowly compressed the base over time. A proper residential patio base should be 4 to 6 inches of compacted crushed stone, laid and compacted in 4-to-6-inch lifts. If you dig down and find less than that, or find loose, unconsolidated material, this is your problem.
Washout from poor drainage
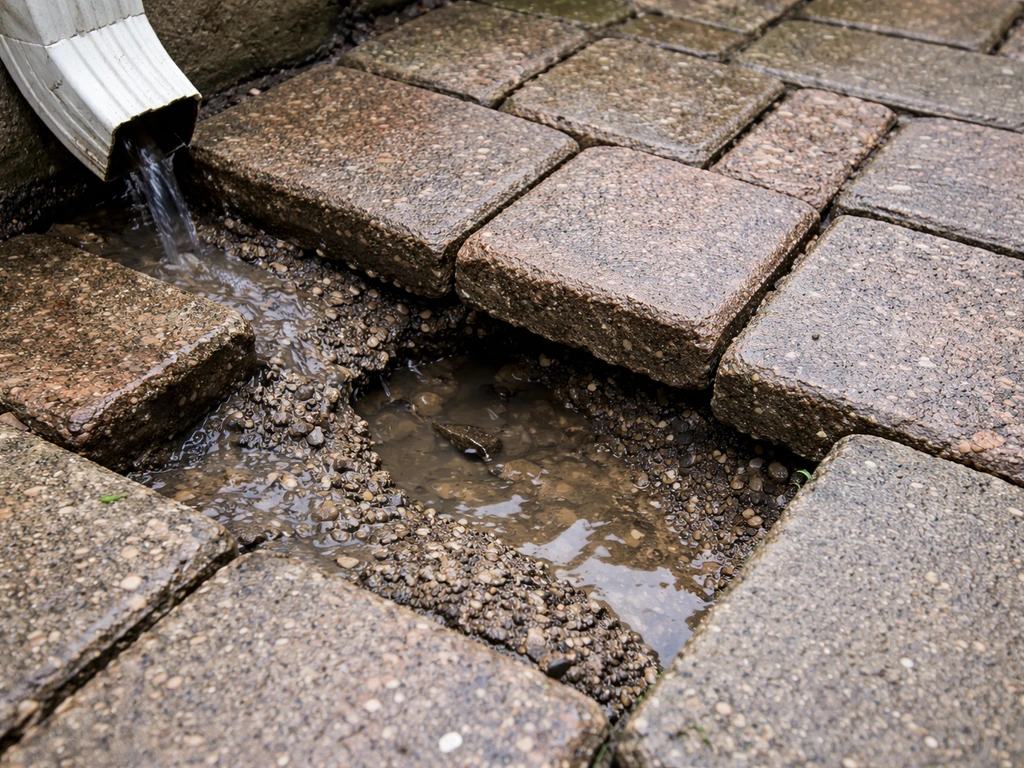
Water gets under the bricks and carries fine particles of base material away over time. A downspout dumping water at the edge of the patio is a classic culprit. So is a sprinkler head spraying onto the surface, or a planting bed that drains toward the patio. If your sinking follows a line or pattern that tracks with a water source, this is almost certainly what happened. When you excavate, you'll find base material that's been hollowed out or eroded rather than simply compressed.
Freeze-thaw cycles
In colder climates, water that infiltrates the base freezes, expands, and displaces material. Over multiple winters this heaving and thawing gradually shifts bricks out of position. The damage tends to be more widespread and slightly random rather than concentrated in one spot. If this is your situation, geotextile fabric under the base becomes especially important when you rebuild, because it stops soil fines from migrating up into the base and weakening it.
Voids from utility work or soil changes
If the sinking tracks along a straight line across the patio, check whether there's a utility trench beneath it. Backfill in utility trenches settles over years, sometimes dramatically. Tree root decay and removal can also leave underground voids that cause localized collapse. Slow leaks from water lines or irrigation running underground can erode soil over months without you ever seeing a wet spot at the surface.
Failed bedding sand
The 1-inch layer of sand that bricks sit on can wash out through joints if they were never properly filled, or if jointing sand failed over time. Making the bedding layer thicker than 1 inch (thinking more is better) actually creates more instability, because thick sand beds compress unevenly. If the base looks solid but the sand bedding is mostly gone or deep in some places and shallow in others, the fix is mainly restoring the bedding layer correctly.
Tools and materials you'll need
You don't need a truck full of specialized equipment for most DIY brick patio repairs, but a few things you absolutely cannot skip.
| Item | What it's for | Notes |
|---|---|---|
| Flat pry bar or brick puller | Lifting bricks without breaking them | A wide, flat bar works; avoid chisels that crack brick faces |
| Plate compactor (rental) | Compacting base material in lifts | Minimum 5,000 lbf; most rental yards carry these |
| Hand tamper | Compacting in tight spots the plate compactor can't reach | Cheap and essential |
| String line and line level | Setting slope and grade before re-laying | Use stakes at the perimeter to establish reference lines |
| Straightedge or screed board | Leveling bedding sand to consistent 1-inch depth | A straight 2x4 works fine |
| Crushed stone / compactible gravel | Rebuilding the base | 3/4" crushed stone is standard; avoid pea gravel or round stone |
| Coarse bedding sand | 1-inch bedding layer for bricks | Concrete sand or ASTM C33; not fine play sand |
| Geotextile landscape fabric | Separating base from native soil | Use nonwoven geotextile, not the cheap woven black kind |
| Polymeric sand | Filling joints between bricks | Match joint width to product specs; fine for joints under 3/4" |
| Edge restraints + spikes | Preventing perimeter bricks from spreading | Plastic or steel; spikes every 8–10 inches |
| Safety glasses, gloves, knee pads | Personal protection during lifting and setting | Kneeling on bricks for hours adds up fast |
On materials: use 3/4-inch crushed stone (also called crusher run or road base depending on your region) for the base, not pea gravel or round decorative stone. Round stone doesn't compact and lock together the way angular crushed stone does. For bedding, use coarse concrete sand, not the fine stuff from a bag of play sand. The difference matters because fine sand compresses and shifts too easily under brick.
Excavate, level, and rebuild the base
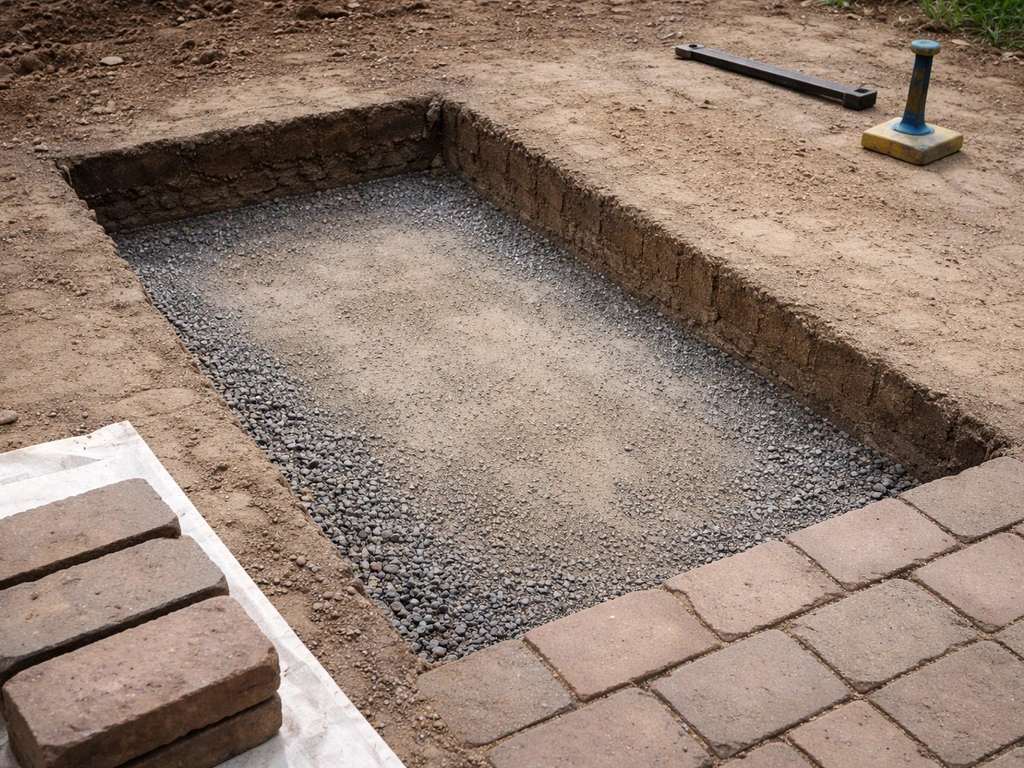
This is the core of the repair and the part that determines whether your fix lasts. Don't rush it.
- Pull up all the bricks in the affected area. Use a flat pry bar and work carefully; set bricks face-down on a tarp or plywood to keep them from chipping. Number or photograph the pattern if your patio has a specific design you want to replicate.
- Excavate the base material. Dig out the crushed stone and sand bedding layer, and keep going until you hit firm, undisturbed native soil. If the soil underneath is soft or wet, you need to go deeper and possibly address a drainage or plumbing issue before you can proceed.
- Identify and fix the root cause now. Check for broken irrigation lines, eroded channels where water has been flowing, or hollowed-out voids. If there's a downspout dumping water at the edge of the patio, extend it away with a downspout extender or underground drain before you re-build anything.
- Install geotextile fabric over the native soil. Overlap seams by at least 12 inches and run it up the edges of the excavation. This fabric is not optional on clay-heavy or wet soils; it stops soil fines from migrating up into your base and weakening it over time.
- Add crushed stone in 4-to-6-inch lifts and compact each lift before adding the next. For a pedestrian patio, you're aiming for a finished compacted base of at least 4 inches (6 inches is better on softer soils). Don't dump all the stone in at once and compact the top; the plate compactor only penetrates about 3 to 4 inches, so material deeper than that won't consolidate.
- Make 4 to 6 passes with the plate compactor per lift, overlapping each pass by about 6 inches so you don't leave loose strips between runs. The base should feel like rock under your feet when it's properly compacted.
- Set your grade with string lines before you add bedding sand. Run string lines from the edges of the existing patio to establish the correct slope: at least 1/4 inch per foot pitching away from your house or any structure. This is the time to correct a slope problem if one existed.
- Spread a 1-inch layer of coarse bedding sand over the compacted base. Use your screed board or a straight 2x4 riding on two parallel pipes or screed rails to pull the sand flat and consistent at exactly 1 inch. Don't make it thicker thinking it gives more adjustment room; a bedding layer over 1 inch will cause uneven settlement.
Re-lay the bricks and reset the joints
With the base rebuilt and bedding sand screeded flat, you're ready to set bricks back down. Work from one corner and lay outward, setting each brick by hand without sliding it (sliding disrupts the bedding). Press each brick down firmly so it seats into the sand, then check it with a straightedge or level as you go. If a brick sits too high, pull it up and scrape a little sand out. If it sits too low, add a pinch of sand under it.
Keep joints consistent as you lay. Most brick patios use joints between 3/8 inch and 3/4 inch wide. Use small plastic spacers if you need help maintaining consistency. Check alignment with your string line every few rows so small drift doesn't compound into a noticeable bow by the time you're done.
Before filling joints, reinstall or add edge restraints around the perimeter of the repaired section if it's not bordered by a wall or curb. Plastic or steel edge restraints spiked every 8 to 10 inches prevent the perimeter bricks from gradually spreading outward, which is one of the ways a patio starts rocking and sinking again over time.
Now fill the joints. Polymeric sand is the right choice for most brick patios with joints under about 3/4 inch wide. Pour it dry over the bricks and sweep it into the joints with a soft broom. Make multiple passes until every joint is filled flush with the top of the bricks. Blow off excess from the brick faces with a leaf blower before you activate the sand with water. Do not skip this step; polymeric sand residue left on brick faces when it gets wet creates a white haze that's very hard to remove.
Activate the polymeric sand by misting the surface with water. Don't use a hard spray or you'll wash it out of the joints. Mist, wait about 5 minutes for the water to absorb, then mist again. The Techniseal EZSand technical data sheet describes misting the surface, waiting about 5 minutes for water to absorb, and repeating the misting process to activate the polymeric sand properly wait about 5 minutes for the water to absorb. Repeat 2 to 3 times. The product is rain-safe within about 15 to 30 minutes for most brands once properly activated, but check your specific product's data sheet. Avoid walking heavily on the surface for 24 hours while it cures.
Compact, check drainage, and finish the surface
After re-laying bricks and before activating polymeric sand, run the plate compactor over the entire repaired section one time with a rubber pad or protective mat under the plate to avoid scratching the brick faces. This seats everything into the bedding and consolidates the joints so sand fills all the way down rather than just bridging the top. Once you've compacted, add another thin pass of polymeric sand to top up any joints that compressed down, then proceed with the water activation.
After the sand has cured for 24 hours, do a drainage check. Run your garden hose at normal pressure across the patio surface and watch where the water goes. It should sheet off the surface and move away from your house, not pool in the middle or collect near the foundation. If you see a new low spot, note it: a little settling within the first week or two after a repair is normal as the bedding sand fully consolidates. Minor adjustments can be made by carefully lifting individual bricks and adding a small amount of sand under them.
On sealing: most brick patios don't strictly require a sealer, but a penetrating paver sealer can help lock in polymeric sand, reduce weed infiltration, and protect the brick face from staining. If you choose to seal, wait at least 30 days after installation for the surface to fully cure and dry. Apply it on a dry day when no rain is forecast for 24 hours. Avoid film-forming sealers that sit on top of the surface; they peel and trap moisture. A penetrating sealer that soaks in is far more durable.
Know when to stop DIYing and call a professional
Most single-zone sunken areas on a brick patio are genuinely DIY-friendly if you have a free weekend and are willing to rent a plate compactor. But there are situations where pushing ahead yourself is likely to create a bigger problem or miss something that will cost you more later.
- The sinking is within 3 feet of your house foundation. Drainage or soil issues in this zone can directly affect your foundation, and you want someone experienced checking the full picture.
- You dig down and find wet, saturated, or actively muddy soil that doesn't firm up. This usually means a drainage problem that needs proper grading work or a drain system, not just a base rebuild.
- You suspect a broken underground water line or irrigation leak. A plumber needs to find and fix that before any patio repair will hold.
- The affected area is larger than roughly 100 square feet, or sinking is occurring across multiple separate zones. Widespread failure usually means a systemic drainage or soil problem that benefits from a professional assessment.
- The patio is mortared rather than sand-set. Mortared brick repairs require different tools, materials, and technique; surface repointing and sectional mortar repairs are doable DIY, but full relays of mortared patios get complicated fast.
- You've repaired the same spot twice already and it keeps sinking. Something below is still moving. Don't throw another weekend at the surface without getting the underlying cause properly diagnosed.
How to prevent it from sinking again
The repairs you make now are only as durable as the decisions you make during installation. A few habits will keep this patio level for years instead of months. If you follow these prevention steps, you can avoid repeating the same failure and keep your patio stable long-term prevent it from sinking again.
- Keep downspouts directed away from the patio. Extend them at least 6 feet from the patio edge, or use an underground drain to carry water away from the area entirely.
- Maintain your joints. Polymeric sand breaks down over years and needs to be topped up. When you start seeing open joints or cracks, sweep in fresh polymeric sand before water gets a chance to infiltrate the base.
- Don't let planting beds or mulch pile up against the patio edge. Mulch holds moisture and gradually feeds it into the base. Keep the edge of the patio visible and clear.
- Check the slope every spring. A quick pass with a level after winter will catch early settlement before it becomes a repair job.
- If you're on clay-heavy soil, consider extending your base depth to 6 to 8 inches and always use geotextile. Clay's tendency to expand and contract with moisture is much harder on a patio base than sandy or well-draining soil.
- Inspect edge restraints annually and re-drive any spikes that have worked loose. A failed edge restraint lets perimeter bricks migrate, which opens up gaps and lets water in.
Fixing a sunken brick patio is satisfying work when you do it right, and the whole process from pulling the first brick to filling the last joint is achievable over a weekend for a typical repair zone. The key is resisting the urge to just pour some sand under the low spots and call it done. That approach delays the real fix and usually makes the eventual proper repair harder. Excavate to the source of the problem, rebuild the base the way it should have been built the first time, and you'll have a patio that holds level for years. If you're dealing with sunken concrete slabs, loose individual patio stones, or sinking across a much larger surface area, those scenarios each have their own specific repair approaches worth looking into separately.
FAQ
My patio has low spots, but the bricks feel solid. Is this still a base problem, or can I just adjust the bedding?
If the surface is only uneven but the bricks are firmly set (they do not rock), it is often a slope or bedding issue rather than base failure. Still measure the depth of dips with a straightedge, then run the hose test before you lift anything. If water drains the wrong way toward your house, correcting pitch and drainage comes first, otherwise the new bedding will wash out again.
Can I fix a fix sunken brick patio by adding more sand under the existing bricks without excavating the base?
Don’t assume you can “top up” by adding sand. A thicker sand bed can compress unevenly and create new rocking, even if it looks level at first. The correct approach is to excavate to stable material, rebuild the base and drainage, then reset the bedding to the intended depth so the bricks seat consistently under compaction.
How do I know if I need edge restraints around my repaired section?
Yes, edge restraints matter most when the sinking is near the patio perimeter. If the perimeter bricks are not restrained by a wall or curb, the repaired zone can spread outward during joint filling and seasonal movement. Reinstall edge restraints and spike them every 8 to 10 inches, then re-check alignment with a string line before laying more bricks.
Is polymeric sand always safe for any brick patio joint width?
Polymeric sand width matters. If your joint opening is wider than about 3/4 inch, polymeric sand may not lock in properly and can wash out or leave voids. In that case, confirm the product’s joint-size range on the data sheet and consider an appropriate jointing material for wider joints so it fills down and hardens as intended.
Should I seal the patio right after I repair and activate the polymeric sand?
Skip the sealer if the polymeric sand has not been fully activated and cured, or if the surface is still drying after weather. If you do seal, only use a penetrating paver sealer, apply on a day with no forecasted rain for 24 hours, and wait the recommended cure period (at least 30 days after installation) so trapped moisture does not create dark spots or haze.
What if the patio keeps sinking in the same area after the repair, what should I check first?
Watch for repeating patterns. If low spots are aligned with a downspout, sprinkler zones, a planting bed, or a visible runoff path, the repair will fail unless that water source is corrected. During the hose check, note where water collects and where it disappears from the surface, then adjust grading or drainage so it consistently sheets away from the foundation.
How long should I wait to see if the repaired patio is stable before worrying it’s still settling?
A small amount of settling in the first week or two can be normal as bedding consolidates, especially if you compacted once and topped up with polymeric sand. If a new dip grows in size after that window, or if bricks begin rocking again, stop adding sand and reassess the base thickness, compaction lifts, and any signs of water loss under the bricks.
I think I used the wrong sand for the bedding, what problems does that cause and can I correct it?
Use coarse concrete sand for bedding and keep it from being washed out through joints by ensuring joints are properly filled and activated. If you used fine “play” sand or bedding is missing, it can shift under foot traffic. The fix usually requires lifting bricks in the affected area and restoring the correct bedding and jointing, not just adding a thin skim of sand.
I live in a freeze-thaw climate, do I need geotextile when I rebuild a sunken brick patio?
If bricks are heaving or shifting in cold weather, geotextile under the base becomes more important because it helps prevent soil fines from migrating into the base. For widespread, slightly random movement across the patio, treat it as a freeze-thaw and filtration problem, not just a local low spot.
When does a fix sunken brick patio become too big for DIY, and I should hire someone?
You can often still do a DIY repair if the sinking is limited to a single zone. But if the sinking covers a large area, involves structural movement, or you find evidence of major underground voids or subsidence near utilities, it can be cheaper to stop and consult a pro before you rebuild on an unstable foundation. A pro can also help identify utility-trench backfill issues or hidden leaks you might not locate safely.
Next Article
Fix Sinking Paver Patio: DIY Diagnose and Repair Steps
Diagnose why patio pavers sink, then rebuild base, reset level pavers, and restore joints to stop repeat settlement.