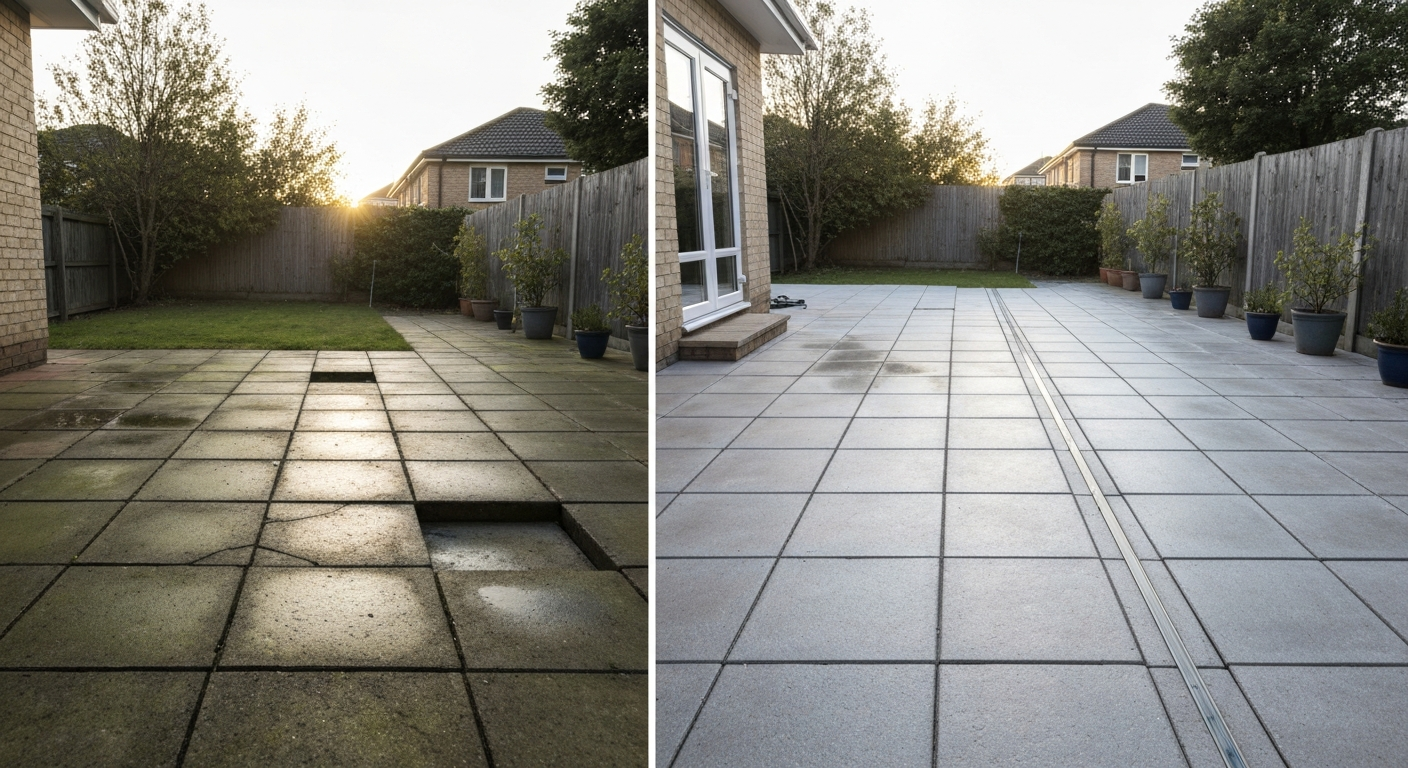
You can make patio slabs look dramatically better with nothing more than a thorough clean, fresh jointing sand, and a coat of sealer, and you can usually do all three in a weekend for under $150 in materials. If the slabs are sunken, cracked, or have failing edges, those are fixable too, but they need a bit more time and the right approach. This guide covers everything from a quick scrub and weed pull through to re-bedding sunken slabs and resurfacing worn concrete, so you can figure out exactly what your patio needs and tackle it yourself with realistic expectations.
How to Make Your Patio Slabs Look Better: DIY Guide

Talia Lang
28 Jul 2026
Start here: why bother and what this guide actually covers
Patio slabs take a beating. Rain, frost, moss, vehicle oils, fallen leaves, and years of foot traffic all add up. A patio that looked clean when it was laid can end up stained, green, crumbling at the joints, and frankly depressing to look at. The good news is that most of what makes a patio look bad is surface-level, and surface-level problems are the easiest to fix yourself.
This guide is structured so you can read the assessment sections first, then jump to whichever repair tier matches your situation: quick cosmetic fixes, medium DIY repairs, or longer-term surface updates like painting, staining, and sealing. It also covers safety, material choices, realistic costs, and the honest truth about when to stop and call a professional. Whether you want to brighten up tired slabs, refresh the whole area, or do a proper renewal and revamp, the logic is the same: understand what you are dealing with before you spend money on products.
Assess the patio before you do anything else
The single biggest mistake people make with patio repairs is reaching for a pressure washer or a bag of polymeric sand before they have checked what is actually going on underneath. Spend 20 minutes doing a proper inspection first, it will save you redoing the same job in six months.
Surface check
Walk slowly across the patio and look for cracks, chips, spalling (surface flaking), heavy staining, and biological growth (moss, algae, lichen). Note any slabs that rock or flex when you step on the centre, that is your walk test, and it tells you the bedding under that slab has failed. Then do a tap test: work your way across the surface with a hard rubber mallet or the handle of a lump hammer, tapping each slab and listening. A solid, sharp sound means good contact with the base. A hollow or resonant thud means there is a void underneath. If more than roughly a quarter of your patio sounds hollow, the bedding has widespread problems and you are looking at a medium repair job rather than just cosmetic work.
Joint and edge check
Probe the joints between slabs with a screwdriver or thin spike. If the jointing material crumbles out easily or the screwdriver sinks more than about 20 mm (3/4 in) without resistance, the joints need re-sanding or re-pointing. Check the perimeter edges for slabs that have lifted, rotated, or broken away from edging restraints. Loose edges let the whole patio creep and spread over time.
Drainage and base check
After the next rain, or after running a hose over the surface for a few minutes, look for standing water or persistent wet patches. Water that ponds on the surface means the falls (the slight slope that should direct water away) have been lost, usually because slabs have sunk or the base has settled unevenly. Water that is directed toward the house is a more serious problem and needs to be fixed regardless of how the slabs look. If you want to check infiltration, dig a small hole about 150 mm (6 in) deep near a suspect area, fill it with water, and time how long it takes to drain. Slow drainage (more than a couple of hours) points to a compacted or clay-heavy sub-base that puts the area at higher risk of future settlement.
Lippage and level tolerances
Run a long straight edge or a spirit level across the slabs. A variation of more than about 10 mm over a 3-metre run (roughly 3/8 in over 10 ft) or a step between adjacent slabs of more than 3 mm (1/8 in) is considered outside acceptable tolerance in accessibility guidance and paving standards. For material and specification limits for concrete paving units, see ASTM C936, Standard Specification for Solid Concrete Interlocking Paving Units ASTM C936 — Standard Specification for Solid Concrete Interlocking Paving Units. Beyond those thresholds, you are into genuine trip-hazard territory, which is worth fixing properly, not just cosmetically masking.
Cosmetic vs structural: deciding what actually needs attention
Once you have done your assessment, almost everything you find will fall into one of two categories. Getting this right saves you time and money.
| Problem | Category | DIY-able? | Typical fix |
|---|---|---|---|
| Green/black biological growth | Cosmetic | Yes | Soft-wash or pressure wash |
| Staining (rust, oil, leaf tannins) | Cosmetic | Yes | Chemical treatment or poultice |
| Weeds in joints | Cosmetic | Yes | Kill and remove, then re-sand joints |
| Faded or dull surface colour | Cosmetic | Yes | Clean and seal, or paint/stain |
| Empty or crumbling joints | Cosmetic/minor structural | Yes | Re-sand or re-point |
| One or two sunken or rocking slabs | Minor structural | Yes (with care) | Lift, re-bed on sand or mortar |
| Cracked slab (cosmetic hairline) | Minor structural | Yes | Fill or replace |
| Multiple sunken slabs, widespread hollows | Structural | Possibly with effort | Re-bed or professional lifting |
| Settlement linked to house foundations | Structural/foundation | No | Call a professional |
| Drainage directed toward the building | Structural/drainage | No | Call a professional |
If cracking radiates outward from the building or you are seeing recurring settlement in the same area despite previous repairs, stop. That is a sign of ground movement or a foundation issue, and no amount of DIY re-bedding will fix the underlying cause. A structural engineer or geotechnical professional needs to look at it before any more surface work is done. If slab movement or hollowing is linked to structural/foundation movement, recurring settlement, large cracks radiating to the building, or sloping that directs water toward the house, call a structural/foundation professional or geotechnical engineer rather than attempt DIY repairs (see ArchitectureCourses.org, When to call an engineer / professional for slab movement or foundation-related issues) ArchitectureCourses.org — When to call an engineer / professional for slab movement or foundation-related issues.
Quick cosmetic fixes: cleaning, stain removal and weed control
If your assessment shows the base is sound and the joints are decent, you are in the easiest tier. A thorough clean alone can transform a patio, I have seen slabs that looked ready for replacement come up like new after a proper wash and weed treatment. Here is how to approach each problem.
Biological growth: moss, algae and lichen
For green or black biological growth, soft-washing is more effective long-term than pressure washing alone. Apply a diluted biocide or patio cleaner (most are based on sodium hypochlorite, the same active ingredient as household bleach) to dry or damp slabs, let it dwell for 10 to 30 minutes (longer for heavy moss), then rinse off with a low-pressure hose or a wide-angle pressure washer nozzle. The biocide kills the root structure so regrowth is slower than if you just blast the surface off. Household bleach (typically 5 to 10% sodium hypochlorite) works for light growth but use a proper patio biocide for anything heavier. Either way: wear gloves and eye protection, keep the solution away from pond water and plant beds, and check the product's safety data sheet before you mix or dilute anything. Never mix bleach with acidic cleaners or anything containing ammonia, the combination produces toxic chlorine gas.
Stain removal
Different stains need different treatments. Rust marks (often from metal furniture or fittings) respond well to oxalic acid-based removers, which are widely available as powder or formulated liquids. Apply per the product instructions, let it work, then rinse thoroughly. Because oxalic acid can etch calcareous stones like limestone or sandstone, always test on an inconspicuous corner first and neutralise well with clean water. For oil and grease stains on porous concrete or natural stone, the most effective approach is a poultice: mix an absorbent powder (kaolin, talc, or even cat litter) with a solvent or oxidising agent to form a thick paste, apply it over the stain about 10 mm deep, cover with plastic film, and leave it for several hours or overnight. The paste draws the oil out of the pore structure as it dries. Remove it, rinse, and repeat if needed. For general grime and leaf tannin staining, a purpose-made patio cleaner or diluted pH-neutral detergent applied with a stiff brush works well before pressure washing.
Weed control
Weeds growing through joints are partly a cosmetic problem and partly a sign that the jointing material has broken down. Pull or kill existing weeds with a path weedkiller, let them die back fully, then remove the dead material before you re-sand the joints. If you just brush sand over living weeds, they grow straight through it within a season.
Tools and products you will need for quick fixes
You do not need much for the cosmetic tier, and most of it is reusable. Here is what I would actually recommend buying:
- Pressure washer: a domestic electric unit in the 1,800 to 2,700 PSI range is sufficient for most concrete and natural stone paving. Use a 25-to-40-degree fan nozzle and keep the lance 150 to 300 mm (6 to 12 in) from the surface. Start with wide angle and low pressure on a test patch — going too close or using a zero-degree nozzle can etch concrete or chip soft stone.
- PPE for pressure washing: safety glasses or a face shield, waterproof gloves, and non-slip footwear. Above about 2,000 PSI, a water jet can lacerate skin — take it seriously.
- Stiff-bristle deck brush or patio scrubbing brush: essential for working cleaner into the surface before rinsing and for areas where you cannot use a pressure washer safely.
- Patio biocide or cleaner: choose one labelled for the surface type you have (concrete, natural stone, or porcelain). Read the label — some products should not be used near certain plants or drainage.
- Oxalic acid-based rust remover: for rust stains. Keep it away from calcareous stone.
- Poultice materials: kaolin clay or absorbent powder plus a solvent — or buy a pre-made stone poultice product.
- Garden sprayer or watering can: for applying biocide or diluted cleaner evenly.
- Path weedkiller: apply several days before you plan to clean so weeds are dead and drying back by wash day.
- Chemical-resistant gloves and eye protection: mandatory when handling biocides, bleach, or acid-based cleaners.
Step-by-step cleaning routines for light, moderate and heavy soiling
Light soiling: general dirt and dust
- Sweep the surface to remove loose debris, leaves, and grit.
- Apply a diluted pH-neutral patio cleaner with a watering can or sprayer.
- Scrub with a stiff brush, working the cleaner into the surface.
- Rinse thoroughly with a garden hose or a wide-angle pressure washer nozzle at low pressure.
- Allow to dry fully (usually a few hours in good weather) before assessing whether a second pass is needed.
Moderate soiling: established moss, algae, leaf staining
- Sweep the area and remove large debris.
- Apply biocide or a diluted bleach solution (following product dilution instructions) evenly across the surface. Keep it away from plants and drainage.
- Allow to dwell for at least 15 to 20 minutes, or up to 30 minutes for thicker moss.
- Scrub with a stiff brush to break up softened growth.
- Pressure wash using a 25-to-40-degree nozzle at 1,800 to 2,700 PSI, maintaining 150 to 300 mm distance and working in consistent overlapping passes.
- Rinse the perimeter area with clean water to dilute any chemical runoff reaching plants or drains.
- Inspect once dry. Stubborn staining may need a second application or a specific stain product.
Heavy soiling: thick moss, deep stains, ingrained grime
- Scrape off thick moss deposits with a stiff flat scraper before applying any chemical.
- Apply a high-strength biocide or patio cleaner and allow an extended dwell time — up to 30 minutes or as the product specifies.
- For rust stains: apply an oxalic acid-based remover to those areas specifically, allow to react, then neutralise with water before pressure washing the whole surface.
- For oil or grease stains: apply a poultice paste, cover with plastic film, leave overnight, remove and rinse.
- Pressure wash the full surface as above. For very soft or older natural stone, reduce pressure or switch to a soft-wash approach with a lower-pressure rinse rather than a full jet.
- Rinse the entire patio and surrounding areas thoroughly.
- Allow to dry for at least 24 hours before assessing and deciding whether to seal or treat the surface.
Medium DIY repairs: re-sanding joints, fixing edges, rebedding and replacing slabs
Once the surface is clean and dry, you will have a much clearer picture of what structural work is needed. Medium-tier repairs are things a reasonably confident DIYer can handle in a day or a weekend, but they do require the right materials and some patience. Rushing them is how you end up with the same problems in a year.
Re-sanding and re-pointing joints
Empty or crumbling joints are one of the most common reasons a patio looks and performs badly. Without jointing material, slabs can shift, water gets underneath, and weeds take hold easily. The fix is straightforward but timing matters.
Standard kiln-dried silica sand is the basic option and works fine, but polymeric (stabilised) jointing sand is much better for longevity. Polymeric sand contains binders that harden when activated with water, making it resistant to wash-out and much harder for weeds to colonise. The trade-off is that it costs more (roughly $0.50 to $4 per square foot of paving depending on the product) and the installation has to be done correctly or it fails badly.
Fixing edges
Broken or missing edging lets the perimeter slabs spread outward and can cause a whole patio to gradually loosen. For mortar-bedded edges that have cracked away, chip out the old mortar, clean the area, and re-bed using a suitable sand and cement mortar mix. For block-paved or modular patios with plastic or concrete edge restraints, check that the restraint itself is still pegged or haunched in place and replace any sections that have lifted or broken.
Re-bedding sunken slabs
A slab that has sunk or is rocking because of soft-sand bedding failure is a DIY repair, provided the sub-base underneath is still solid. If the ground under the sub-base has moved (soft spots, clay heave, tree root action), that is a bigger problem that needs more than a re-bed. For a straightforward soft-sand failure: lift the slab carefully with a couple of bolster chisels or flat pry bars, remove the old bedding material, check the sub-base is compact and intact, and re-bed on fresh sharp sand or dry mortar to the correct level, reinstating the original falls. Let it settle before re-pointing the joints.
For widespread slab sinkage across a large area, particularly if multiple adjacent slabs have sunk by similar amounts, professional slab-lifting techniques are worth considering. Mudjacking (slabjacking) pumps a grout slurry under the slab to raise it, costing roughly $3 to $10 per square foot. Polyurethane foam injection (poly-jacking) uses expanding foam injected through small drilled ports, cures much faster, and typically costs $5 to $25 per square foot. Foam is cleaner and quicker but costs more in materials; mudjacking is cheaper but the slurry is heavier and takes longer to cure. For a patio rather than a driveway or large concrete slab, DIY lifting and re-bedding individual units is usually the better starting point.
Replacing cracked or damaged slabs
A hairline crack in a mortared slab can be filled with a flexible concrete filler or polyurethane crack filler as a cosmetic fix. A slab that is broken into pieces or structurally compromised needs to come out and be replaced. The tricky part is usually sourcing a matching replacement, if your patio is more than a few years old, the exact slab may be discontinued. Take a fragment to a builder's merchant and match as closely as possible on thickness, colour, and texture. When you lift the broken slab, use the opportunity to check the bedding and sub-base and fix anything that contributed to the failure in the first place.
Tools and materials for medium repairs
- Polymeric jointing sand: buy a product rated for your joint width (check the label — some are formulated for narrow joints under 10 mm, others for wider gaps up to 25 mm or more).
- Kiln-dried silica sand: a cheaper option for basic re-sanding if you are not concerned about long-term weed resistance.
- Sharp sand and cement (or pre-mixed mortar): for re-bedding mortar-set slabs and repointing.
- Plate compactor or hand tamping block: for compacting re-sanded joints properly. Renting a small plate compactor is worth it for anything over about 10 square metres.
- Bolster chisels and a club hammer: for lifting slabs without breaking them.
- Flat pry bars: useful alongside bolster chisels for getting purchase under a slab edge.
- Replacement slabs: measure the existing ones carefully (length, width, and thickness) before ordering. Take a photo of the surface texture and colour.
- Edging restraints and fixing pins: for replacing failed perimeter edging on block-paved areas.
- Straight edge or long spirit level: essential for checking levels and falls during re-bedding.
- Stiff broom: for sweeping polymeric sand into joints.
- Garden hose with a fine spray attachment: for activating polymeric sand.
Step-by-step: re-sand joints, lift and re-bed sunken slabs, replace cracked slabs, repair edges
How to re-sand patio joints with polymeric sand
- Check the weather forecast. You need at least 24 to 48 hours of dry weather after activation. Do not start this job if rain is forecast.
- Make sure the patio surface and existing joints are completely dry. Sweep and blow out old sand and debris from the joints — a stiff brush and a leaf blower work well together.
- Pour polymeric sand across the patio surface and sweep it into the joints with a stiff broom. Work it in from multiple directions to fill any voids.
- Compact the filled joints using a plate compactor (with a protective rubber pad or cardboard sheet over the surface) or a hand tamping block. This is important — under-compaction is a common cause of failure.
- Sweep a second pass of sand across the surface and repeat the compaction step until joints are consistently filled to about 3 to 5 mm below the slab surface.
- Blow or brush away all residual sand from the slab surfaces. Binder residue left on the slab face can leave a haze after activation.
- Activate the binder with a light, gentle water mist — not a full jet. Work section by section, allowing the water to soak in rather than flood the surface.
- Allow to cure undisturbed for 24 hours minimum before foot traffic. Keep off for 48 hours if possible, and keep dry for that full period.
How to lift and re-bed a sunken slab
- Clear the joints around the target slab — remove jointing sand with a screwdriver or oscillating tool.
- Insert bolster chisels into opposite joints at the slab edge and gently lever up. Work around the slab gradually rather than forcing one side up. Have a second person ready to take the weight once it breaks free.
- Set the lifted slab aside face-up on a soft surface to avoid scratching.
- Remove the old bedding material down to the sub-base. Check the sub-base: it should be hard, compact, and not crumbling or wet. If it is soft, compact it with a hand tamper and add a layer of compacted hardcore if needed.
- Add fresh sharp sand (or dry mortar for a mortar-bed installation) to bring the level up to the correct height. Use your straight edge and spirit level to check the fall angle matches the surrounding slabs.
- Lower the slab back onto the bed and tap down firmly with a rubber mallet until level. Check with the spirit level and adjust the bedding as needed.
- Re-fill and compact the joints once the slab is stable and the mortar bed (if used) has set.
How to replace a cracked or broken slab
- Remove jointing material from all four sides of the damaged slab.
- Break out the slab if it cannot be lifted whole — use a cold chisel and club hammer to fragment it, working from the centre out. Wear eye protection; fragments fly.
- Remove all debris and old bedding material from the void.
- Inspect the sub-base and remedy any problems before proceeding.
- Dry-lay the replacement slab in the void to check the fit and confirm the thickness matches surrounding slabs.
- Bed the new slab on sharp sand or mortar as appropriate, checking level and falls carefully.
- Re-point the joints and allow full cure before trafficking.
How to repair a broken mortar edge
- Chip out all loose or failed mortar from the edge channel using a cold chisel and club hammer.
- Brush and vacuum the area clean. Dampen the concrete or stone slightly to improve mortar adhesion.
- Mix a sand-cement mortar (typically 4: 1 sharp sand to cement) or use a pre-mixed repair mortar.
- Press the mortar firmly into the repair area and shape it to match the original profile.
- Allow to cure slowly — keep it slightly damp if the weather is hot or windy to avoid shrinkage cracking. Full cure takes around 28 days, though it will be firm enough to walk past within 24 to 48 hours.
Longer-term surface updates: sealing, painting and resurfacing
Once the patio is clean, structurally sound, and properly jointed, you can look at surface treatments that change how it looks and protect it for years. This is where you can really revive or update the appearance, going from washed-out and dull to vibrant and protected. Think of these as the finishing layer: they only work properly on a surface that has been properly prepared.
Sealing patio slabs
Sealing is the most universally useful treatment. For detailed, step-by-step instructions on how to update patio slabs, see how to update patio slabs. See a detailed step‑by‑step guide on how to revamp patio slabs for a full walkthrough of cleaning, repairs, and finishing techniques. A good penetrating sealer soaks into the pore structure of concrete or natural stone and repels water and staining agents without changing the appearance much (impregnating sealers are nearly invisible). Topcoat or enhancing sealers add a sheen and can deepen or enhance the colour of natural stone. Both types make future cleaning much easier. Apply sealer only to a fully clean, completely dry surface, residual moisture trapped under a sealer causes white hazing or delamination. Most sealers need reapplying every two to five years depending on traffic and weathering.
Painting and staining concrete patio slabs
Painting or staining is a cost-effective way to update the look of tired concrete or reconstituted stone slabs. Concrete floor paints and exterior stains are widely available, and many are formulated specifically for outdoor horizontal surfaces. For an area that gets wet, look for a product with a built-in anti-slip aggregate or plan to add one (broadcasted fine grit or sand into the wet topcoat works well and is a sensible precaution on any painted outdoor surface). Prep is everything here: the surface must be clean, sound, and free of existing sealer. Etch the surface with a diluted acid wash if the paint manufacturer specifies it, rinse thoroughly, and allow to dry completely. Thin coats applied consistently beat thick coats every time, thick coats peel.
Resurfacing worn concrete
If concrete slabs are heavily spalled, pitted, or worn beyond what a clean and seal can address, a thin resurfacing overlay can restore the surface without full replacement. Micro-topping and concrete overlay products bond to the existing surface and are typically applied 3 to 10 mm thick. They work best on concrete that is structurally sound but cosmetically poor, if the concrete is crumbling, cracked through, or moving, an overlay will follow the same fate. This is a more skilled application than cleaning or sealing, and getting a good finish takes practice on a test area first.
Anti-slip considerations
Any sealed or painted surface becomes more slippery when wet, this is not optional information if you have children or elderly users. Address this during application by adding a fine silica or aluminium oxide aggregate to the final coat of paint or sealer, or by choosing a product that includes anti-slip grit in its formulation. For natural stone that has become polished over time, a dedicated anti-slip treatment product is available specifically for outdoor use. On a clean, properly textured unsealed surface, most concrete and natural stone paving has adequate slip resistance; it is the topcoat treatments where you need to be deliberate about it.
Realistic costs and time expectations
| Task | DIY material cost (approx.) | Pro cost (approx.) | Time (DIY) |
|---|---|---|---|
| Pressure washing and cleaning | $30–$100 | $100–$350 | Half a day |
| Biocide soft-wash treatment | $20–$60 | $80–$200 | 2–3 hours |
| Stain treatment (rust, oil) | $15–$50 per product | $100–$250 | 1–3 hours |
| Polymeric sand refill | $50–$200+ depending on area | $200–$500+ | Half a day |
| Re-bedding 1–3 sunken slabs | $20–$60 in sand/mortar | $200–$500 | Half to full day |
| Replacing cracked slabs (1–3) | $30–$150 per slab | $250–$600 | Half to full day |
| Sealing (penetrating) | $60–$200 in product | $200–$600 | Half a day |
| Painting/staining concrete | $80–$250 in product | $300–$800 | Full day |
| Professional slab lifting (polyfoam) | N/A | $5–$25/ft² | N/A — pro job |
| Professional mudjacking | N/A | $3–$10/ft² | N/A — pro job |
These are order-of-magnitude figures for planning purposes. Actual costs vary by region, product brand, and project scope. Always get multiple local quotes for any professional work.
Safety and environmental notes
A few things worth repeating plainly. Always wear chemical-resistant gloves and eye protection when handling patio cleaners, biocides, bleach, or acid-based stain removers. Never mix bleach with any acid-based product or with ammonia. Keep runoff from cleaning chemicals away from ponds, waterways, and storm drains wherever possible, dilute heavily with water if direct containment is not practical. Pressure washers above about 2,000 PSI can cut through skin; treat the lance with the same respect you would a power tool. When using oxalic acid for rust removal, follow the manufacturer's safety data sheet instructions, neutralise thoroughly with water, and do not use on limestone, marble, or other calcareous stone without testing first. Dispose of chemical containers following local hazardous waste guidance.
When to call a professional
I will be straight with you: most of what is in this guide is genuinely DIY-friendly if you take it step by step. But some situations need a professional, and trying to DIY them usually makes the problem worse and more expensive to fix properly later.
- Cracks that radiate from or run toward the house foundation — these need a structural or geotechnical assessment before any surface work.
- Recurring settlement in the same area despite previous repairs — something is moving underneath and needs to be identified.
- Drainage that directs water toward the building — this is a defect, not just a cosmetic issue, and needs professional remediation.
- More than about 25 to 30 percent of the patio surface sounding hollow — widespread bedding failure across a large area is a substantial re-bedding or lifting job that typically benefits from professional equipment.
- Any situation where the level or alignment of the patio is affecting access or creating trip hazards that cannot be corrected by re-bedding individual slabs.
- Resurfacing overlays on large areas if you have no experience with the product — bad overlay application is expensive to remove.
Maintenance schedule to keep the patio looking good
The work you put in now is worth protecting. A simple annual maintenance routine keeps a patio looking good and dramatically reduces the need for bigger interventions.
| Frequency | Task |
|---|---|
| Monthly (autumn/winter) | Clear fallen leaves promptly — tannins stain concrete and encourage moss |
| Every spring | Apply a biocide treatment to prevent moss and algae establishing |
| Every spring | Check joints for loss of sand and top up as needed |
| Every spring | Check for rocking or sunken slabs and address early before the bedding deteriorates further |
| Every 1–2 years | Pressure wash or soft-wash the full surface |
| Every 2–5 years | Re-apply sealer (check the product recommendation for your specific product) |
| Every 3–5 years (or as needed) | Full re-sand of joints if polymeric sand has degraded or weeds are returning |
Prevention is always cheaper than repair. Keeping joints filled, biological growth treated annually, and sealant in good condition means the heavy-duty cleaning and repair jobs are something you do occasionally rather than every couple of years. The slabs that need full replacement are almost always the ones that were left without maintenance for a decade, the base degrades, water gets in and freezes, and the damage compounds year on year.
Putting it all together
The right order of operations matters. Assess first, clean second, do structural repairs third, then finish with sealing or surface treatments. Doing it the other way around, sealing before cleaning, or painting before fixing a sunken slab, wastes both money and effort. Every one of the improvements in this guide builds on the one before it. A cleaned and re-jointed patio that has been properly sealed will look genuinely good and stay that way for years with minimal upkeep. Whether you are going for a quick brighten-up before summer, a more involved refresh of the whole area, or a full renewal that takes the patio back to how it looked when it was laid, the steps here will get you there. For a concise, step-by-step walkthrough on how to revive patio slabs, see how to revive patio slabs. For a step-by-step walkthrough and material list on how to renew patio slabs, see our detailed guide on how to renew patio slabs. For step-by-step methods and product recommendations on how to refresh patio slabs, see our detailed guide. For step-by-step tips on how to brighten up patio slabs, see our dedicated guide.
FAQ
How do I assess the condition of my patio slabs to decide what work is needed?
Do a structured inspection: (1) Surface: look for staining, biological growth, cracks, chips and lippage between slabs; (2) Bedding/base: perform a sounding grid by tapping slabs with a rubber mallet—hollow/resonant sounds indicate voiding; map clusters (>25–30% of area is a red flag); (3) Drainage: check for ponding after rain and run a small infiltration test (150 mm/6 in hole filled with water) to spot poor drainage; (4) Movement: step on slabs to check deflection and look for settlement or cracks radiating to the building. Compare observed tolerances to guidance (e.g., lippage ~3 mm and flatness ±10 mm over ~3 m as common limits). Use these findings to triage: cosmetic cleaning, local DIY repairs, structural repair or professional intervention.
What quick cosmetic fixes will immediately make patio slabs look better?
Quick brightening steps: sweep and remove loose debris; kill and remove moss/algae using a biocide or diluted household bleach (follow SDS, protect plants); soft‑wash or pressure‑wash on a low setting (start wide nozzle, 6–12 in/150–300 mm distance, ~1,500–2,700 PSI max for DIY); remove rust with oxalic acid cleaners; extract oil using a poultice or absorbent degreaser. After cleaning, allow to dry and inspect for remaining stains or damage before further work.
How should I clean biological growth and stains safely and effectively?
For moss/lichen/algae: use soft‑wash (low pressure) with a biocide or diluted sodium hypochlorite, allow 10–30 minutes dwell, then rinse; protect plants and follow product label/SDS. For rust: use oxalic‑acid based rust removers; test a small area first and rinse. For oil/grease: apply a poultice (absorbent powder + solvent/oxidiser), cover, let dwell hours–days, then remove. Always wear PPE, avoid mixing chemicals, and rinse thoroughly to limit environmental impact.
What medium DIY repairs can I do to improve appearance and function?
Re‑sand and re‑point joints with kiln‑dried silica sand or polymeric sand (sweep dry sand, compact, remove residue, mist to activate and follow cure window 24–48 hrs). Replace cracked slabs by removing the slab, checking and correcting the base, re‑bedding on sharp sand or mortar as appropriate, and re-pointing joints. Lift small sunken slabs: lift, remove old bedding, compact base, re‑bed. Use correct tools (plate compactor/tamping block, chisel, masonry saw if cutting, mortar mix) and follow step‑by‑step guidance.
When is slab lifting/re‑bedding a DIY job and when should I call a pro?
DIY is reasonable for small localized soft‑sand bedding failures affecting a few slabs where base issues are shallow: lift slabs, recompact base, re‑bed and re‑joint. Call a professional if: widespread hollowing/subsidence (>25–30% area), large or structural cracks, repeated settlement after repair, drainage directing water to structures, or suspected foundation movement. For larger voids/deep subsidence consider professional slab lifting (mudjacking or polyurethane foam injection) or replacement.
What are the typical professional methods for lifting sunken slabs and their pros/cons?
Mudjacking (slurry grout): lower material cost, lifts slabs by filling voids; heavier under slab and slower cure. Polyurethane foam (poly‑jacking): lightweight, fast cure, smaller drill holes; higher material cost. Both require contractor expertise to assess voids and ensure permanent fix. Expect costs in broad ranges: mudjacking ~$3–$10/ft², polyfoam $5–$25/ft² (local quotes vary).
Next Article
How to Update Patio Slabs: DIY Cleaning, Repair & Sealing
How to update patio slabs: practical DIY steps for cleaning, repairing, levelling, resurfacing, costs & pro tips.