You can absolutely install lights directly into an existing concrete patio slab, and when done right, the result looks sharp and lasts for years. The key is using low-voltage in-ground or recessed fixtures rated for wet locations, cutting clean holes with the right tools, routing conduit so water can't follow the wire into the slab, and sealing everything properly before you call it done. Skip any of those steps and you'll be pulling a cracked, waterlogged fixture out in two winters.
How to Put Lights in Patio Slabs: DIY Step by Step

Talia Lang
24 Jun 2026
This guide walks through the full process from picking fixtures to final sealing, including the common failure points that trip people up. If you've already got a patio slab that has existing cracks or structural concerns, sort those out first, installing lights into a compromised slab only makes the damage worse. If you are trying to extend the patio slab itself, focus on proper subgrade preparation and a structural connection plan before you pour new concrete.
Choosing the right fixtures and power type

For most homeowners, low-voltage (12V) LED in-ground or recessed puck lights are the right choice. They run off a transformer plugged into a standard outdoor outlet, the wiring is safe to handle yourself, and modern LED versions draw so little current that you can run a long string of them without serious voltage drop concerns. The fixtures you want are specifically marketed as in-ground or recessed path lights, with a round or square housing designed to sit flush with a hard surface. Avoid surface-mount path lights that bolt on top of the slab, they're a tripping hazard and they look like an afterthought.
The critical spec to look for on any fixture is a wet location or submersible rating, along with UL listing to UL 1838 for low-voltage landscape lighting systems. UL 1838 is the applicable safety standard for low-voltage landscape lighting systems and components. That standard covers the whole system: the transformer (called an isolating power unit), the low-voltage cable, and the luminaires themselves. Don't buy fixtures that only say 'damp location', concrete collects and holds water, and a damp-rated fixture will fail. Look for IP67 or IP68 ingress protection ratings if the spec sheet lists them; IP67 handles temporary submersion, which is exactly the kind of exposure a patio light faces during heavy rain.
If you want line-voltage (120V) lights in the slab, stop and call a licensed electrician. Running 120V conduit through a concrete slab, meeting code with proper junction boxes and GFCI protection, and doing it safely is not a casual DIY project. UL notes that line-voltage luminaires are evaluated for compliance to UL 1598, including applicable wet-location requirements wet-location requirements for luminaires. The rest of this guide focuses on 12V low-voltage systems, which are legal and safe for homeowner installation in most jurisdictions.
Planning the layout: measurements, spacing, and your wiring route
Sketch your patio on paper before you touch a drill. Mark where each light goes, where the wiring will run across or under the slab to reach the transformer, and where the transformer itself will sit. The transformer needs to be within about 6 feet of a weatherproof 120V GFCI outlet, that's a practical limit imposed by most transformer installation guides, and the outlet must be rated for wet locations while in use (look for a while-in-use cover, not just a standard flip-up cover).
For spacing, in-ground accent lights look best at 4 to 6 feet apart along a walkway edge or patio perimeter. Once the spacing looks right, you can also plan the best way to point patio slabs around each fixture so the surface stays level and waterproof. Closer than 3 feet and it starts to look like a runway; farther than 8 feet and the gaps feel dark and uneven. Mark your intended locations with chalk or painter's tape so you can step back and look at the layout before committing.
Voltage drop is the hidden problem in low-voltage systems. As the wire gets longer and the current increases, the voltage reaching the far end of the run drops below 12V and your lights look dim or flicker. As a rule of thumb, keep any single wire run under 100 feet when using standard 12-gauge landscape wire, and don't daisy-chain more than 100 to 150 watts on a single run from the transformer. Use an online voltage drop calculator to check your specific run length and total wattage before you buy wire. Running 24V fixtures with a 24V transformer gives you more headroom on long runs, but make sure your fixtures and transformer are matched to the same voltage.
Plan the conduit route carefully. The wire from each fixture needs to exit the slab somewhere, either through a groove cut into the slab edge, through a hole drilled to exit under the slab, or through a conduit run that was already embedded during the original pour (rare, but occasionally present in newer construction). The goal is to avoid leaving bare wire exposed on top of the slab surface, which is both a tripping hazard and a UV-degradation issue.
Getting the slab ready: tools and protecting what's already there
Concrete is hard and brittle, which means the margin between a clean cut and a cracked slab is smaller than most people expect. Before you drill or cut anything, do two things: check for reinforcement, and check the slab condition.
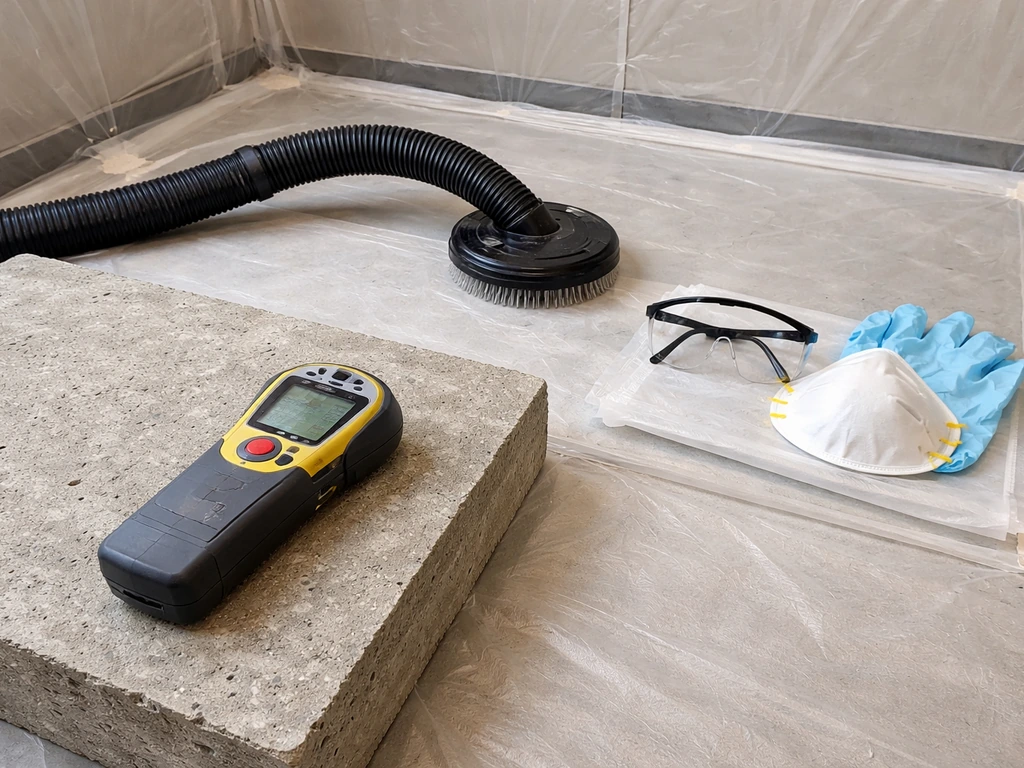
A rebar or mesh scanner (sometimes called a covermeter or rebar locator) can be rented at most tool rental stores for $30 to $60 a day. Run it over the area where you plan to drill. Standard residential concrete patios are often unreinforced or reinforced with 6x6 wire mesh sitting roughly 1.5 to 2 inches below the surface. If your slab has rebar, the scanner will show you where the bars are so you can position your holes between them. Hitting rebar with a core drill bit is a bad situation: it ruins the bit, and trying to force through it can crack the slab. Reposition the hole rather than fight it.
While you're assessing the slab, look for existing cracks, spalling, or areas that sound hollow when you tap them. A hollow thud usually means delamination, the top layer is separating from the body of the slab. Installing a light into a delaminated area is pointless; the housing won't have solid concrete to grip, and water will make the problem worse. If you're dealing with existing slab damage, fix those issues first. The guides on repairing patio slabs and repairing patio slab pointing on this site cover those steps in detail. If you need help fixing damaged patio slab sections, consult the detailed steps in how to repair patio slabs.
Gather these tools before you start:
- Rotary hammer drill with SDS-Plus chuck (a standard drill will overheat and fail in concrete)
- Diamond-tipped core drill bit sized to match your fixture housing (typically 3 to 4 inches diameter)
- Angle grinder with diamond blade (for cutting wire channels/grooves)
- Wet/dry shop vacuum to collect concrete dust during drilling
- Eye protection, dust mask rated N95 or better, and hearing protection
- Chalk line or straightedge for marking cut lines
- Painter's tape to mark hole centers and protect slab surface
- Rebar/mesh scanner (rental)
Silica dust from cutting or drilling concrete is a genuine health hazard. Either drill wet (some core bits accept a water feed) or vacuum at the bit continuously while drilling dry. Don't blow the dust off with compressed air, that puts it airborne.
Drilling and setting the light housings
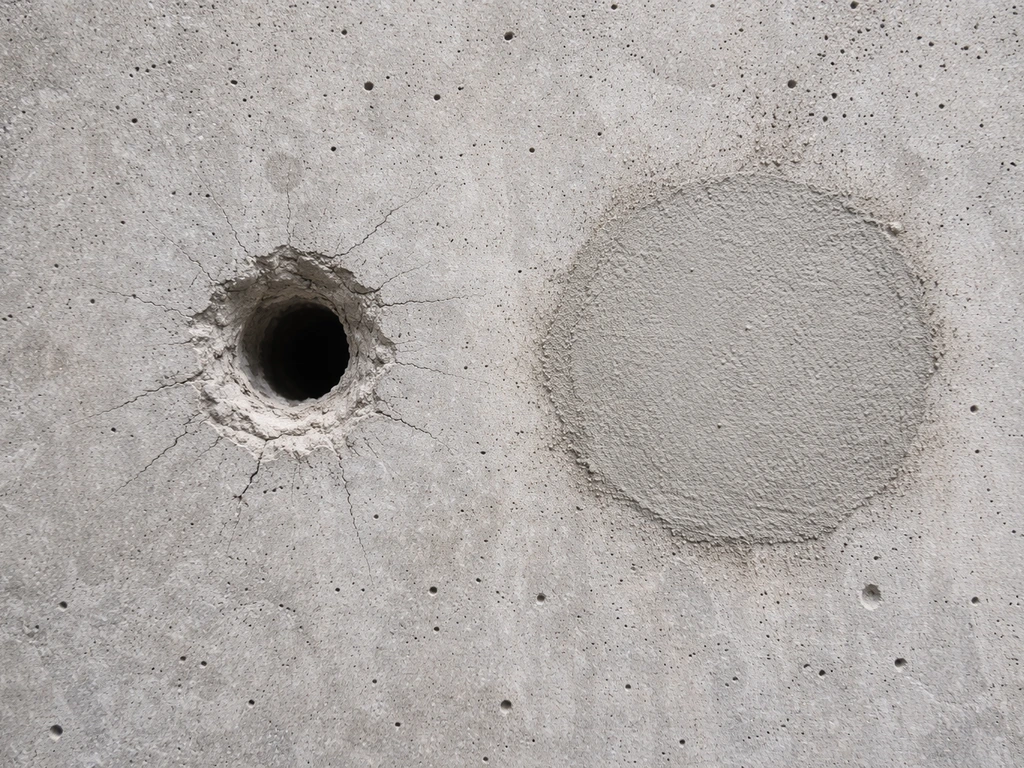
Once you've confirmed your hole locations are clear of reinforcement, mark the center of each hole with chalk and apply a ring of painter's tape around the area to protect the surface finish from grinder or drill slippage. Use the core drill bit to drill straight down. Keep the drill perpendicular to the slab, tilting causes the bit to bind and can crack the concrete at the surface. Go slowly and let the diamond bit do the work. Most residential slabs are 3.5 to 4 inches thick, so you'll be drilling through the full depth.
For the wire channels connecting holes to the slab edge, use an angle grinder with a diamond blade to cut a groove roughly 0.75 to 1 inch wide and about 1.5 inches deep. Cut in straight lines and use a cold chisel to knock out the material between two parallel cuts. Keep the groove as shallow as possible while still giving the conduit room to sit below the slab surface. Curves are easier to manage when you plan your layout and keep your cuts shallow and controlled so the slab stays strong how to cut curves in patio slabs. Removing too much material weakens the slab between fixtures.
Before setting any fixture, dry-fit everything. Drop the housing into the hole, run your conduit through the groove, and make sure nothing is pinched or sitting proud of the surface. In-ground fixture housings are typically set in a bed of non-shrink hydraulic cement or a rapid-set anchoring compound, not regular mortar. Regular mortar shrinks as it cures and will leave a gap around the housing that water will find.
Mix the anchoring compound per the instructions, pack it around the housing evenly, and use a straightedge or small trowel to make sure the housing rim sits perfectly flush with the slab surface. A housing that sits even 1/8 inch high becomes a tripping hazard; one that sits low collects standing water on the lens.
Let the anchoring compound cure fully before putting any load on it or running wire through. Most rapid-set compounds are workable in 15 to 30 minutes but reach full strength in 24 hours. Don't rush it.
Wiring, conduit, weatherproofing, and testing
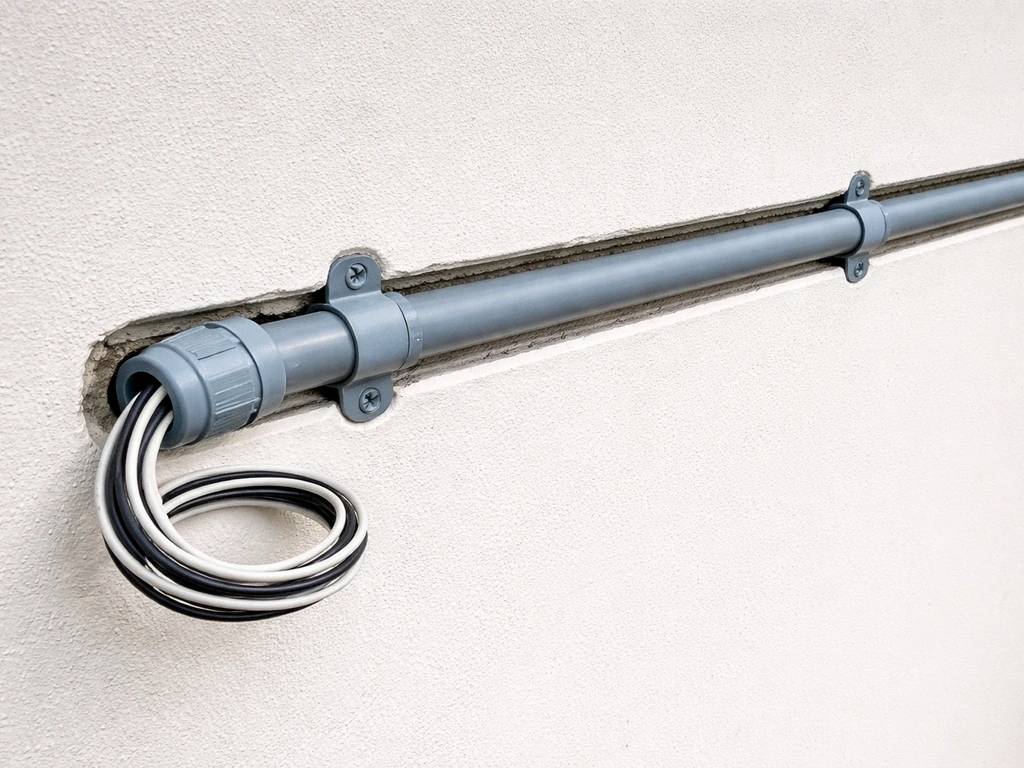
Run your low-voltage wire inside conduit through the groove rather than directly in the groove. Schedule 40 PVC conduit (the gray electrical type) or liquid-tight flexible conduit works well here. The conduit protects the wire from abrasion, from the alkaline environment inside concrete, and from future repair work that might involve cutting the slab surface. Use 1/2-inch conduit for most low-voltage runs, it's small enough to fit in a shallow groove and large enough to pull wire through easily.
At each fixture location, leave a service loop: about 6 to 8 inches of extra wire coiled in the housing cavity. This gives you slack to reconnect the fixture if the connection ever needs servicing without having to re-pull wire. Connect wires to fixtures using the manufacturer's supplied connectors or waterproof wire nuts rated for direct burial (the blue gel-filled type). Standard wire nuts are not acceptable here, they let moisture wick in along the wire strands.
The transformer connects to a GFCI-protected outdoor outlet rated for wet locations while in use. This isn't optional, it's a safety requirement. A GFCI will trip if water gets into any part of the circuit, which is exactly what you want. Mount the transformer on a wall or post at least 12 inches above grade so it doesn't sit in lawn runoff. Most transformers have built-in timers or photocell sensors; set these before you seal everything up so you can test the full system.
Test every fixture before you fill the grooves. Turn the transformer on and walk the circuit. Check that every light comes on, that the brightness looks even across the run (dim fixtures at the far end usually mean voltage drop or a loose connection), and that the transformer doesn't trip its internal breaker. If a fixture doesn't light, check the connection first, then the fixture itself. LED in-ground lights can occasionally arrive with a dead diode, swap it out before it's buried.
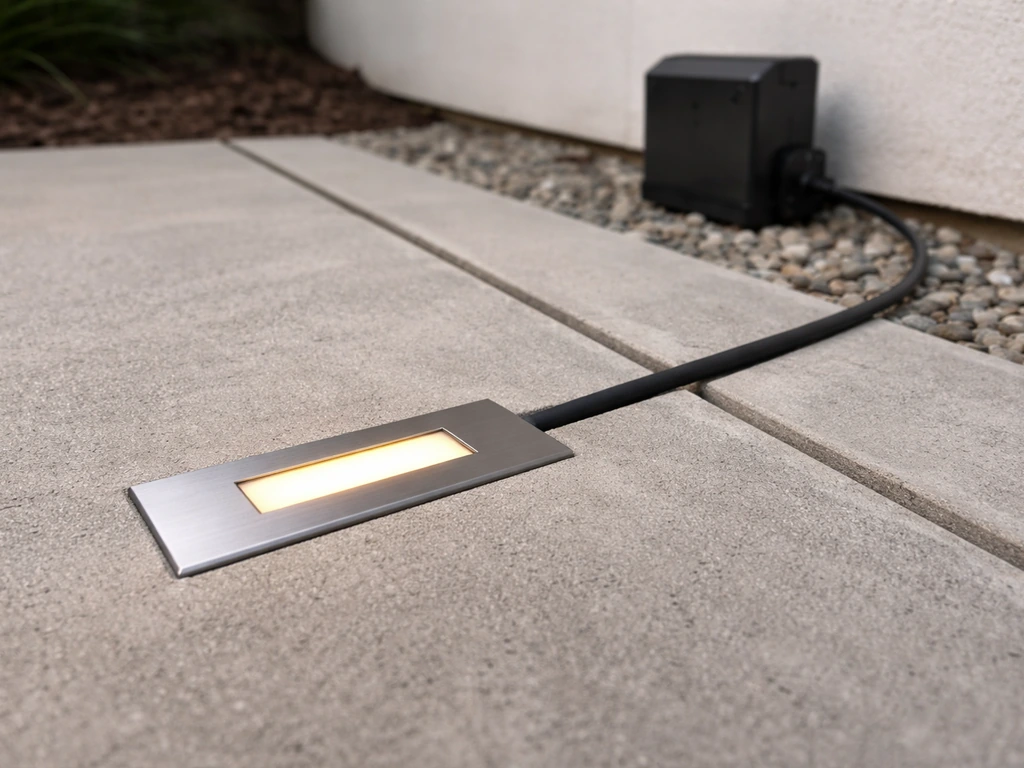
Once everything tests clean, seal the conduit entry points at both ends with a self-leveling polyurethane or silicone sealant rated for concrete and outdoor use. At the fixture end, run a thin bead of sealant around the housing rim where it meets the concrete. This is the most important waterproofing step in the whole project, water that gets under the housing rim will freeze, expand, and heave the fixture right out of the slab over a couple of winters.
Sealing and re-finishing the slab surface
After the housings are set and tested, the grooves and any patched areas need to be filled and finished so the patio surface is seamless and durable. Use a concrete patching compound (not plain mortar) that's rated for feathered edges, this lets you bring the fill material right up to the conduit and fixture rims without a thick buildup that will delaminate. Pack the groove in layers no more than 1/2 inch at a time if the groove is deep, letting each layer firm up before adding the next.
Once the patch is cured, the whole slab surface, old concrete and new patches both, should get a coat of penetrating concrete sealer. A penetrating siloxane or silane-siloxane sealer soaks into the concrete rather than sitting on top, so it won't peel or trap moisture. It also slows the freeze-thaw water infiltration that causes concrete to spall over time. Apply it with a pump sprayer and roller on a dry day when temperatures are between 50°F and 85°F. One coat is usually sufficient for a patio; two coats gives better protection around the fixture housings where there's a lot of patching.
If your patio had a surface treatment before, stenciling, a color coat, or a texture finish, you'll need to match that around the patches. If you want to stencil patio slabs, plan your pattern and timing around the existing finish so the results match how the concrete is cured and textured stenciling. A stenciled or stamped patio is harder to re-finish invisibly after drilling, which is worth factoring into your fixture placement plan before you cut. Positioning holes in lower-traffic areas or near the slab edge minimizes how visible the repair work is.
Common problems and how to fix them
Even a well-planned install can run into trouble. Here are the problems that come up most often and what to do about them.
Cracked or chipped concrete around the hole
This usually happens when the drill is run at too high a speed, the bit is pressed too hard, or the concrete is already weakened at that location. Small surface chips around the rim can be filled with hydraulic cement and feathered smooth before the housing is set.
Cracks radiating out from the hole are more serious, if a crack runs more than a few inches from the hole edge, the housing will work loose over time as the concrete moves. Fill the crack with a polyurethane concrete crack filler (the flexible type, not rigid epoxy) and let it cure before proceeding. If the crack extends to the slab edge or meets another crack, reconsider that location entirely and drill a new hole elsewhere.
Water getting into the fixture or housing
Water intrusion almost always comes from one of two places: a failed seal around the housing rim, or water wicking along the wire inside the conduit. For the housing rim, remove the fixture lens, dry the cavity thoroughly, and apply a fresh bead of self-leveling polyurethane sealant around the rim. Press the lens back into place. For conduit wicking, the fix is to seal the conduit ends with foam backer rod and sealant at both the fixture end and wherever the conduit exits the slab.
Loose or rocking fixtures
A fixture that moves means the anchoring compound either didn't bond properly, was applied too thin, or was a standard mortar that shrank. Remove the fixture, chip out the old compound, clean the hole walls with a wire brush, dampen the concrete (but no standing water), and reset with non-shrink hydraulic anchoring compound. Pack it firmly and hold the housing in position while it sets.
Dim or flickering lights
Nine times out of ten this is a voltage drop problem or a loose wire connection. Start by checking the connection at the dim fixture, unscrew it, inspect the wire nut, and make sure the wire strands are fully seated. If the connection is solid, measure the voltage at that fixture with a multimeter. Anything below 10.8V at a 12V fixture will cause dimming. If voltage is low, you need to shorten the wire run (add a second homerun back to the transformer), reduce the number of fixtures on that circuit, or upgrade to 16-gauge or 14-gauge wire which has lower resistance.
Drainage problems around the fixtures
If water pools around the housing after rain, the fixture rim is sitting slightly low or the patch around it has settled. Surface water sitting in the fixture recess accelerates lens fogging, gasket failure, and freeze-thaw damage. Add a small amount of self-leveling sealant around the housing rim to bring the surface level up just enough to redirect water flow away from the opening. Don't build up a raised lip that creates its own trip hazard, just enough to stop the pooling.
When to stop and call a pro
Call a licensed electrician if your layout requires 120V wiring anywhere in or under the slab, if the existing GFCI outlet is not within a realistic distance of the transformer location, or if scanning the slab reveals a dense rebar grid that makes hole placement genuinely difficult. Call a structural engineer or concrete contractor if the slab has significant existing cracking, shows signs of heaving, or is hollow in multiple areas, lights in a slab that's failing structurally are a short-term cosmetic fix on a long-term problem. Installing lights is a good excuse to get a proper assessment of your slab's condition, and if you discover problems, the guides on this site on repairing patio slabs and slab drainage can help you figure out what you're dealing with. You can also review our step-by-step advice on how to patio slabs for planning, measurements, and safe prep before you cut and drill.
FAQ
Can I install patio slab lights if my slab is already sealed or has a coating on top?
Yes, but you should plan for removal or disruption of the coating where you drill and patch. Many sealers, stains, and film-forming coatings can reduce bonding of patching compound to the surrounding concrete. Scrape back to sound concrete around each hole location so the patch can feather into bare substrate and seal the entire repaired area afterward.
How do I choose between in-ground versus recessed puck lights for a patio slab?
In-ground fixtures are usually better for walkway lighting and accenting edges because their lens sits lower and can shed water more effectively. Recessed puck lights can work well for a more uniform surface-level look, but you must confirm the exact housing depth so the rim lands flush (or slightly proud, only if the design calls for it) to prevent pooling in the recess.
What wire type is safest to use inside the conduit under a patio slab?
Use the low-voltage landscape cable type recommended for the system, then protect it with conduit as described. Avoid mixing copper and aluminum conductors, and avoid direct burial wire outside of the burial-rated path the manufacturer specifies. If you are extending runs, splice only where you can access it later (or follow the manufacturer instructions for buried splices).
Can I run the lights off an existing outdoor transformer or landscape lighting circuit?
Often yes, but only if the existing transformer voltage matches (12V with 12V, 24V with 24V) and the total wattage stays within that transformer’s rated output and the system’s wiring gauge. Also confirm the circuit is protected by a GFCI and that adding your new load does not exceed the transformer’s maximum cable length for the gauge you plan to use.
Do I need conduit if the wire is already in the groove and will be covered with patch?
It is strongly recommended to run the cable inside conduit. Without conduit, the wire insulation can be abraded during future slab repairs, and the cable is more exposed to concrete alkalinity and moisture movement. Conduit also makes troubleshooting and replacing a single fixture much more realistic.
How many fixtures can I put on one transformer run?
The limiting factors are transformer wattage capacity and voltage drop at the farthest fixtures, not just total fixture count. Start with your fixture wattage, multiply by how many lights will be on simultaneously, then verify you stay under the transformer’s rated wattage and within the voltage drop targets for the planned wire gauge and run length.
What if I discover rebar or mesh after I already drilled holes?
If you hit reinforcement, stop and reassess the hole locations. Don’t try to brute-force a core bit through steel. In most cases, you will need to fill and patch the damaged hole properly, then relocate the fixture to a clear zone. If you have multiple near-misses, you may need a different layout that respects the slab’s reinforcement pattern.
How can I prevent the hole from chipping or cracking at the concrete surface?
Use low pressure and let the diamond bit cut, keep the drill perpendicular, and keep speeds appropriate for the bit size. Also ensure the slab area is not already cracked or delaminated at that point. Small rim chips can be repaired, but if you see a propagating crack, switch to crack-filler repair and consider moving the fixture.
Can I connect lights in series daisy-chain style between fixtures?
For patio slab installs, it’s usually better to avoid daisy-chaining when you can, because voltage drop and troubleshooting get worse with each additional connection. A home-run approach (or structured branches sized for wattage and voltage drop) helps keep brightness consistent and makes a single-fixture service less disruptive.
What should I do if a fixture fails after the slab is sealed and patched?
Most of the time you will have limited access once everything is sealed and finished. That is why the service loop and pre-sealing testing matter. If a fixture fails later, you typically remove the lens to access connectors if the design allows it, otherwise you may have to remove the fixture housing and patch the opening again.
Is a while-in-use GFCI cover always required, or is standard outdoor protection enough?
The goal is to keep the energized transformer connections and outlet protected when it rains and while you plug or unplug seasonal devices. A while-in-use cover helps shield the outlet during wet exposure, even if the outlet is already weather-rated. If your setup uses an existing outlet, verify its wet rating and cover type match outdoor use requirements.
How do I know if my dim light problem is voltage drop versus a bad fixture?
A quick diagnostic is to measure voltage at the dim fixture while the system is on. If you are significantly below the system’s nominal voltage (for common 12V setups, anything close to or below about 10.8V at the fixture can cause noticeable dimming), treat it as voltage drop or a loose connection. If voltage is normal, swap the fixture or inspect the waterproof connector specifically at that location.
Do I need to seal the grout lines or only the conduit entry points?
Focus sealing where water can enter the system: conduit entry points at both ends and the rim where the housing meets concrete. Sealing every surface crack or hairline joint in the patio is not always necessary, and some sealers can interfere with patch feathering. If the patio has known seepage pathways, address those separately before relying on fixture sealant.
Can I install these lights on a patio that gets freeze-thaw hard?
Yes, but prioritize rim-level sealing, correct housing flushness, and frost-resisting patching. The most freeze-thaw sensitive failure mode is water pooling in the fixture recess, so plan for slight slope or enough rim sealant to redirect runoff away from the opening. Let patch and sealants cure fully before the first winter season.
Next Article
How to Extend a Patio Slab: DIY Concrete Guide
Step-by-step DIY on how to extend patio slab with prep, reinforcement, drainage checks, matching concrete, curing, and f