You can extend an existing concrete patio slab by excavating and compacting a proper sub-base, tying the new pour into the old slab with rebar dowels or epoxy anchors, and pouring new concrete that matches the thickness and slope of the original. Done right, the extension will sit level, drain correctly, and stay bonded to the old slab for years. Done wrong, you get a cracked, sinking addition that pulls away from the house within a season or two. This guide walks you through every step so you get it right the first time.
How to Extend a Patio Slab: DIY Concrete Guide

Talia Lang
22 Jun 2026
First: concrete or pavers, and is your existing slab worth tying into?
Before you touch a shovel, you need to make two decisions: what material you're extending with, and whether the existing slab is actually in good enough shape to connect to.
Concrete vs. pavers: which extension makes sense?
If your original patio is a poured concrete slab, extending it with more poured concrete gives you a seamless surface that's easier to finish uniformly and structurally solid. Pavers are a valid alternative, especially if you're trying to avoid a visible cold joint (the seam between old and new concrete), but they sit slightly higher than a flat slab, need their own sand-set base, and won't bond to the original concrete at all. For most homeowners extending a concrete slab, pouring new concrete is the right call. Pavers make more sense if your existing slab is in rough shape and you'd rather work around it than tie into it.
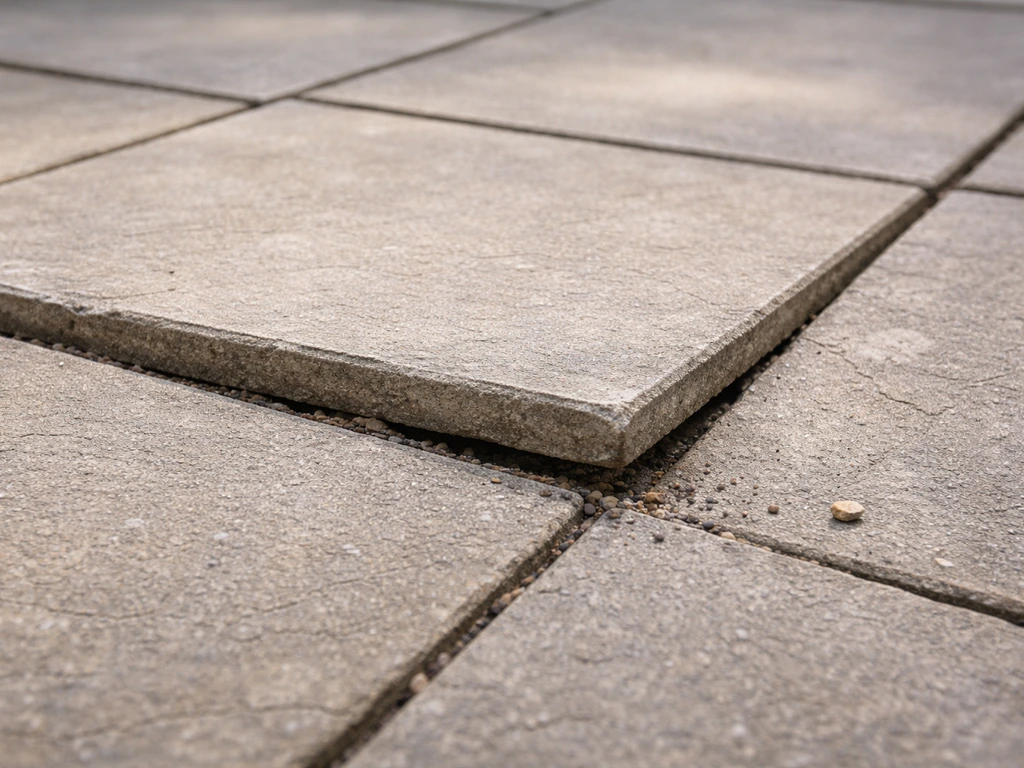
Assess the existing slab honestly
Walk your existing slab and look for active problems. Cracks wider than about 1/4 inch, areas that flex or rock when you step on them, sections that have sunk more than an inch, spalling (surface flaking), or undermined edges all signal that the slab has a base problem underneath. If the existing slab is moving or sinking, tying new concrete into it just means your extension will move and sink too. A structurally compromised slab needs repair before you extend it, not after. If you see minor hairline cracks and the surface is generally solid and level, you're fine to proceed.
| Condition | What it means | What to do before extending |
|---|---|---|
| Hairline cracks, surface solid | Normal shrinkage cracks, slab is stable | Seal cracks, proceed with extension |
| Cracks wider than 1/4 inch | Possible base movement or settling | Investigate and stabilize base first |
| Slab rocks or flexes underfoot | Void or eroded sub-base underneath | Repair base before any extension work |
| Sunken sections (1 inch or more) | Sub-base has settled or washed out | Releveling or replacement needed first |
| Spalling / surface flaking | Surface damage only (usually) | Can proceed if slab is otherwise stable |
| Crumbling edges | Concrete integrity is compromised | Repair or form new edge before tying in |
Plan the measurements, slope, and drainage before you dig anything
Drainage is the single biggest cause of extension failures. If the new slab doesn't slope away from the house at the right angle, you'll have standing water pooling at the joint between old and new concrete, which freezes, expands, and pushes the slabs apart over winter. The standard rule is a slope of at least 1/8 inch per foot away from the structure, and 1/4 inch per foot is better in wet climates. Measure your existing slab's slope first with a 4-foot level and a tape measure so you know what you're matching.
For the extension area itself, measure the footprint carefully and mark it out with stakes and string lines. Use the string lines to confirm your planned slope before you excavate. Also check what's at the perimeter: are you going to run into a buried downspout, tree roots, irrigation lines, or a utility corridor? Call 811 (the US national Dig Safe line) before any digging. In the UK, contact your local utility locating service before breaking ground.
Decide on your slab thickness now, because it determines everything else. Residential patios are typically 4 inches thick. If your existing slab is 4 inches, match it exactly. Going thinner creates a weak point right at the joint. If your yard has poor drainage or soft soil, go to 5 or 6 inches and add rebar (not just fiber) throughout.
- Minimum slope: 1/8 inch per foot away from the house (1/4 inch per foot preferred)
- Standard residential slab thickness: 4 inches; match the existing slab exactly
- Control joint spacing: no more than 8 to 12 feet apart for a 4-inch slab (roughly 2 to 3 times the thickness in inches, measured in feet)
- Control joint depth: at least 1/4 of the slab thickness (1 inch for a 4-inch slab)
- Sub-base depth: 4 to 6 inches of compacted gravel below the slab
Excavation and base prep: the part most DIYers skip and regret
The sub-base is what keeps concrete from cracking and sinking. Concrete doesn't hold itself up, the ground under it does. Skimp here and you'll be watching your extension crack within a year or two.
Excavate to the right depth
Dig down to accommodate your slab thickness plus your sub-base depth. For a 4-inch slab on a 4-inch gravel base, you're digging down 8 inches total from finished grade. If you're in a freeze-thaw climate, a 6-inch gravel base is worth the extra work because it improves drainage under the slab and reduces frost heave. Remove all organic material, roots, and soft spots completely. Don't fill soft spots with gravel and hope for the best; dig out the soft material until you hit firm soil, then build back up.
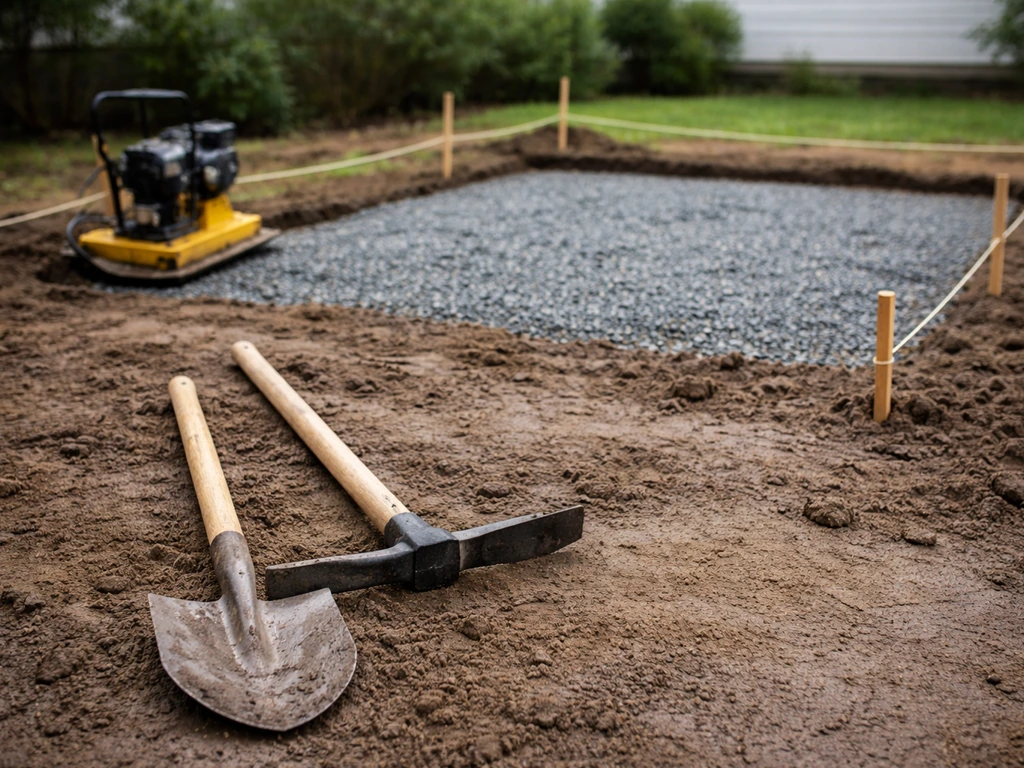
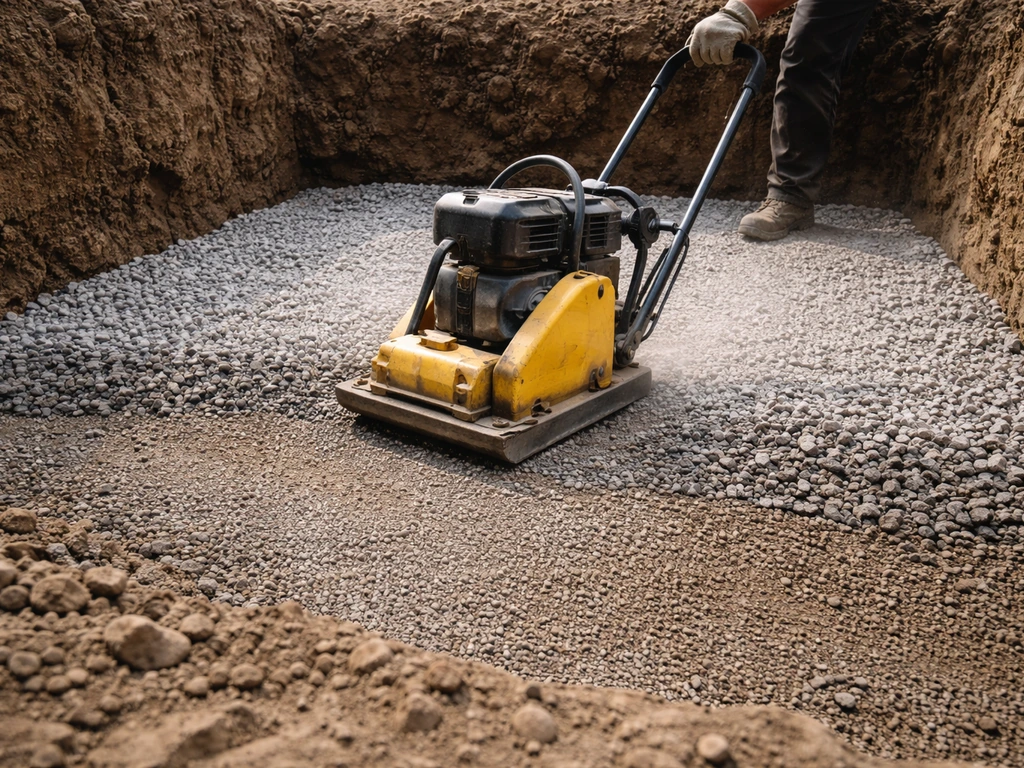
Compact the sub-base in layers
Rent a plate compactor for this job. Hand tamping a large area is inconsistent and won't give you adequate density. Add gravel in 2 to 3 inch lifts (layers), compacting each lift before adding the next. Use clean crushed angular gravel (sometimes called road base or crusher run) rather than round pea gravel, because angular stone locks together under compaction. Once the sub-base is fully compacted and at the right height, check your slope again with a level and string lines before you build forms.
Tools and materials you'll need for excavation and base prep
- Spade and mattock for hand digging, or a mini excavator rental for larger areas
- Plate compactor (rental, typically $50 to $100/day)
- Crushed angular gravel, enough for a 4 to 6 inch compacted base
- 4-foot level and tape measure for slope checking
- Stakes and string line for layout
- Landscape fabric (optional, laid between soil and gravel to limit migration)
How to create a strong connection to the existing slab
This is where most DIY extensions fail. Two slabs poured at different times can't chemically bond the same way a monolithic pour does. But you can create a mechanical connection that keeps them locked together and prevents differential movement. You can plan lighting for a patio slab by routing low-voltage or conduit before pouring, then placing the light fixtures at the finished surface.
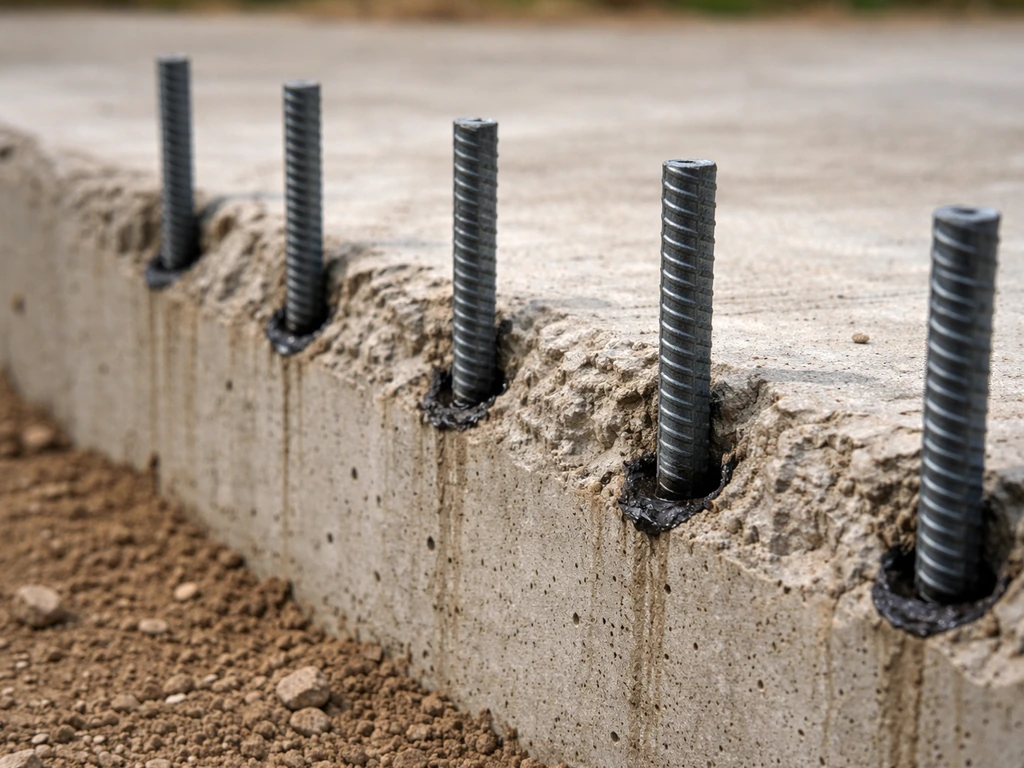
Drilling and setting rebar dowels
The best method for a structural connection is to drill into the existing slab edge and epoxy rebar dowels into the holes. Use a hammer drill with a 5/8-inch bit for #4 rebar (1/2-inch diameter). Drill holes at least 4 to 5 inches deep into the existing slab edge, spacing them every 18 to 24 inches along the joint, at mid-depth of the slab. Clean the holes with compressed air, inject two-part epoxy adhesive (a construction-grade anchor epoxy, not household epoxy), and push the rebar in. Leave 6 to 8 inches of rebar sticking out into the new pour zone. Let the epoxy cure fully per the manufacturer's instructions before pouring, typically 24 to 48 hours at normal temperatures.
Bonding agent at the joint face
Before you pour, clean the existing slab edge thoroughly: chip off any loose concrete, sweep away dust and debris, and wash the face with water. Apply a concrete bonding adhesive (a latex or epoxy-based bonding agent, available at any builder's merchant) to the existing slab face where the new concrete will contact it. These products work by creating a sticky interface that helps the new concrete adhere to the old. Apply it right before the pour, while it's still tacky, following the product's open-time instructions.
Control joint at the connection
Even with dowels and bonding agent, the joint between old and new concrete is always a potential crack location because the two pours will move slightly differently as temperatures change. Plan a control joint right at the connection point. This doesn't mean a gap; it means a deliberate weakened line that directs any cracking to happen in a controlled, straight location that you can seal, rather than as a random jagged crack. You can create this by tooling a joint during the pour or by saw-cutting it within 12 to 24 hours after the pour. The joint should be at least 1 inch deep for a 4-inch slab.
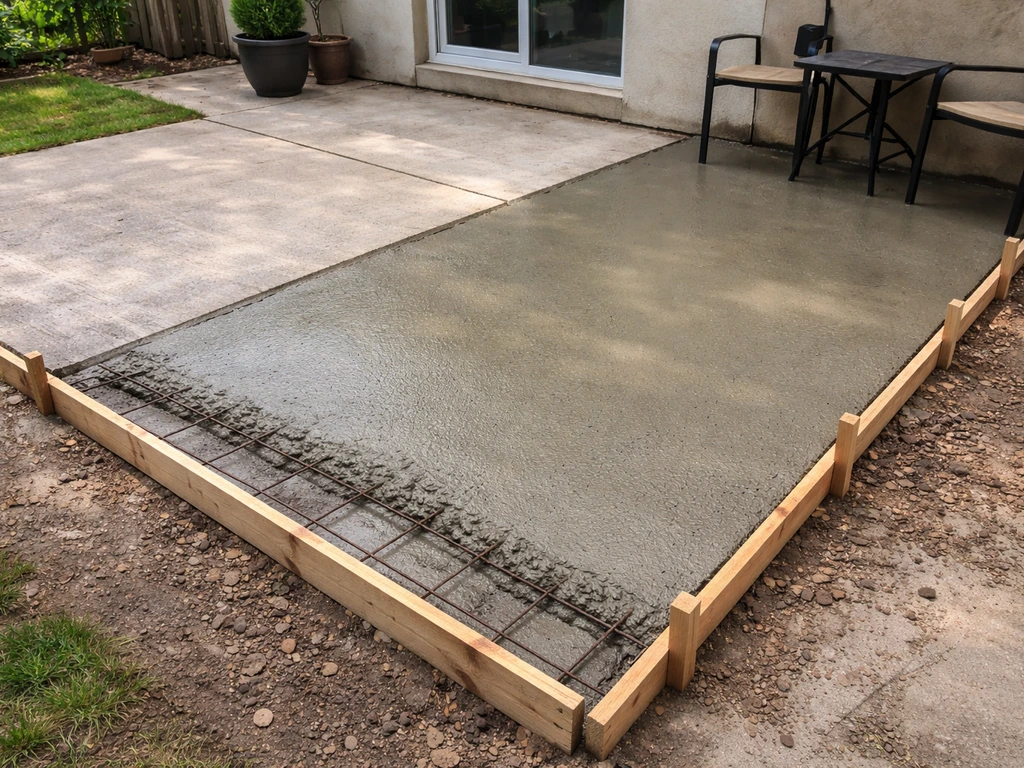
Forming, reinforcing, and pouring the extension
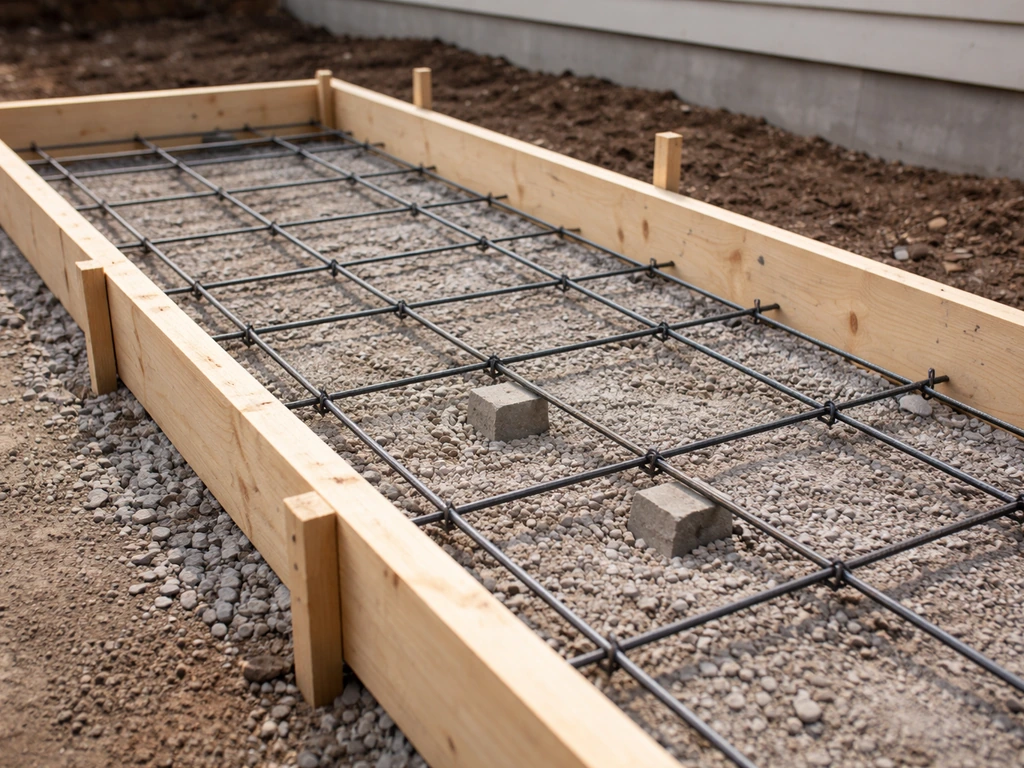
Set your perimeter forms from 2x4 lumber (for a 4-inch slab) held in place with stakes every 2 to 3 feet. The top edge of the form is your finished concrete height, so take time to get the forms level in all directions and sloping away from the house at your planned grade. Double-check everything with your string lines before ordering concrete.
Reinforcement: fiber vs. rebar vs. wire mesh
For a standard 4-inch patio slab, 6x6 wire mesh or #3 rebar on 18-inch centers is adequate reinforcement. Wire mesh needs to be propped up to sit in the middle third of the slab depth, not sitting on the sub-base, so use small concrete or plastic chairs to hold it up at roughly 1.5 to 2 inches above the base. Many DIYers also add polypropylene fiber (a bag mixed into the concrete) for crack resistance. Fiber doesn't replace mesh or rebar, but it's a cheap insurance policy against surface cracking.
Concrete mix and ordering
Order ready-mix concrete for anything larger than a few square feet. Mixing bags by hand for a patio extension is brutal and the mix consistency will be inconsistent. For an outdoor patio slab, specify a 4,000 PSI mix with air entrainment (if you're in a freeze-thaw climate, this is not optional, it dramatically improves frost resistance). Tell the batch plant you're doing a flatwork pour so they can adjust the slump (workability) appropriately, typically around 4 to 5 inches of slump for a patio.
Pouring and screeding
Pour the concrete in one continuous pass if possible. Start at the far end from the truck and work back. Use a screed board (a straight 2x4 or aluminum screed) to strike off the surface level with your forms, using a sawing back-and-forth motion. If you also need curved patio slab edges, keep the forms tight to your layout and use smaller, controlled cuts when shaping the perimeter how to cut curves in patio slabs. Fill any low spots immediately and re-screed. Work quickly once the pour starts. Have at least one extra person helping because you cannot pause a concrete pour and come back to it later.
Expansion joints at perimeter edges
Where the new slab will meet a wall, a footing, or any fixed structure, install a 1/2-inch expansion joint filler (asphalt-impregnated foam strip, available at any builder's merchant) against the structure before you pour. This gives the slab room to expand and contract without cracking against hard edges. Don't skip this step near the house foundation or any masonry walls.
Finishing, curing, and sealing for a durable surface
Finishing the surface
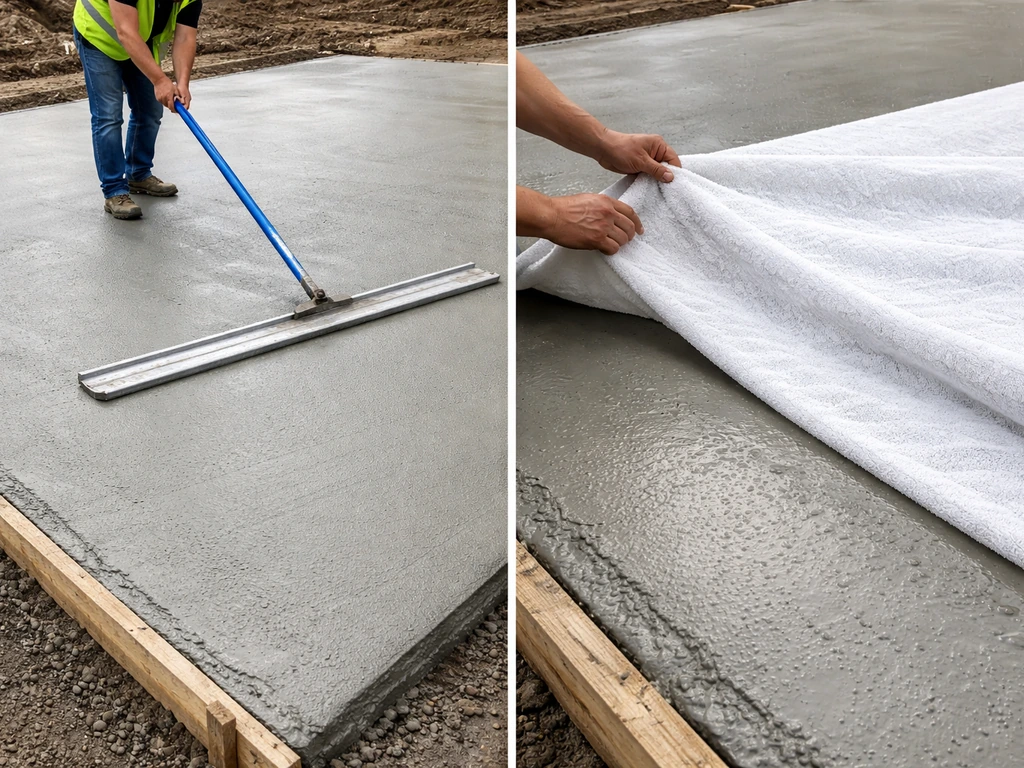
After screeding, use a bull float to smooth the surface and close up any aggregate voids. Once the bleed water (the sheen of water that rises to the surface) has evaporated, you can do final hand floating with a magnesium float and then troweling if you want a smoother finish. For an outdoor patio, a broom finish is the right call: drag a stiff-bristle push broom lightly across the surface in one direction to create a texture that provides grip in wet conditions. If you want a decorative look, stencil patio slabs after curing and before sealing using stencil adhesive and weatherproof patio paint. A smooth-troweled patio looks great but becomes dangerously slippery when wet.
Curing: the step people rush and regret
Concrete doesn't dry, it cures, and curing requires moisture. If the surface dries out too fast, the concrete won't reach its full strength and will be prone to surface dusting and cracking. ACI 308R recommends a minimum 7-day wet curing period for slab-on-grade pours under typical conditions. In practice this means keeping the surface continuously moist for at least a week. The simplest method is to cover the slab with plastic sheeting or burlap wetted down daily. Curing compound (a spray-applied chemical that seals the surface and slows evaporation) is a convenient alternative, especially in hot or windy conditions where keeping wet coverings in place is difficult. Avoid letting the slab dry out in the first 24 to 48 hours especially, because early strength development is critical.
When and how to seal
Wait a minimum of 28 days before applying a penetrating concrete sealer. Concrete reaches roughly 70% of its design strength at 7 days but continues to cure for 28 days, and sealing too early traps moisture inside. For an outdoor patio, use a penetrating silane-siloxane sealer rather than a topcoat film sealer. To protect patio slabs long-term, sealing with the right penetrating product is one of the most effective steps you can take after curing penetrating concrete sealer. Penetrating sealers soak into the concrete and repel water without changing the surface texture or creating a slippery film that can peel. Apply per the product instructions, typically two coats with a roller or pump sprayer. If you've used a broom finish, a penetrating sealer won't fill the texture lines the way a film sealer would, so the finish stays non-slip. Reseal every 2 to 3 years for ongoing protection.
Before sealing, fill the control joint at the connection point with a self-leveling polyurethane joint sealant. This keeps water from infiltrating the joint and undercutting the slab edges, which is one of the most common causes of long-term extension failure.
Full materials and tools checklist
| Item | Notes |
|---|---|
| Ready-mix concrete (4,000 PSI, air-entrained) | Calculate volume: length x width x depth in feet, divide by 27 for cubic yards, add 10% waste |
| Crushed angular gravel | 4 to 6 inches compacted depth under slab |
| 2x4 form lumber and stakes | Match length to perimeter of extension |
| #4 rebar and rebar chairs/supports | Or 6x6 wire mesh if rebar isn't in budget |
| Hammer drill with 5/8-inch bit | For drilling into existing slab edge |
| Two-part construction epoxy adhesive | For setting rebar dowels |
| Concrete bonding adhesive (latex-based) | Applied to existing slab face before pour |
| 1/2-inch expansion joint filler strip | For perimeter edges against fixed structures |
| Plate compactor (rental) | Essential for proper sub-base compaction |
| Screed board (straight 2x4 or aluminum) | For striking off the slab surface |
| Bull float and magnesium hand float | For surface finishing |
| Stiff-bristle push broom | For broom texture finish |
| Plastic sheeting or burlap | For wet curing cover |
| Penetrating silane-siloxane sealer | Applied at 28 days |
| Self-leveling polyurethane joint sealant | For filling control joint at connection seam |
| Polypropylene fiber (optional) | Add to mix for surface crack resistance |
Troubleshooting common extension failures
Even well-planned extensions can develop problems. Here's what typically goes wrong, why it happens, and what you can actually do about it.
The extension is cracking along the joint
A crack right at the joint between old and new concrete is extremely common and doesn't automatically mean failure. If the crack is hairline and stable, fill it with self-leveling polyurethane sealant and monitor it. If the crack is widening over time, or if one side of the crack is higher than the other (called differential settlement), you have a base problem. Either the new slab's sub-base wasn't compacted adequately, or the connection to the old slab isn't restraining movement. Widening or stepping cracks at the joint are a sign to investigate the sub-base rather than just re-filling the crack.
The extension is sinking or tilting
Sinking is almost always a sub-base issue: either inadequate compaction, organic material that wasn't fully removed, or water washing out fines from underneath the slab. If your patio slabs are pointing or the slab edges are pushing up, you’ll need to diagnose the settlement and repair the base, not just patch the concrete surface how to repair patio slabs pointing. If the slab has sunk less than an inch and is still structurally intact, mudjacking (also called slab lifting or foam lifting) is an option where slurry or expanding foam is injected under the slab to raise it back to grade. This is typically a professional job. If the slab has dropped significantly, or if the edge has broken off, it likely needs to be broken out and repoured.
Water is pooling between the old and new slab
Ponding at the joint means either the new slab wasn't poured with enough slope, the joint between slabs has settled unevenly creating a low point, or the joint sealant has failed and water is sitting in the open crack. Check the slope with a level. If it's a sealant failure, clean the joint thoroughly, cut out the old sealant, and reapply fresh polyurethane sealant. If the slope is genuinely wrong, you may need to grind down the high side of the slab or, in severe cases, pour a thin overlay on the low section to redirect water. Chronic ponding in a joint will undermine the slab edges over several freeze-thaw cycles, so don't ignore it.
The new surface looks different from the old slab
Color and texture mismatch between old and new concrete is normal and almost unavoidable. Concrete changes color as it ages due to UV exposure and surface carbonation, and a new pour will always look brighter and lighter than a 10-year-old slab. The gap narrows over time. If the mismatch bothers you, applying a concrete stain or overlay to both slabs after curing is the most reliable way to create a uniform appearance. This is a topic worth exploring if surface aesthetics matter to you as much as structural performance.
When to stop DIYing and call a professional
There are situations where the right answer is to put down the tools and get a concrete contractor involved. Call a pro if: the existing slab is actively moving or has major structural cracking; the grade or drainage situation is complex (for example, water flows toward the house and regrading the entire yard is involved); you're working close to a house foundation and aren't certain of footing depths; the extension is larger than about 100 square feet and you've never poured concrete before; or you discover buried utilities, tree roots, or drainage infrastructure during excavation. A failed DIY extension costs more to fix than a professional pour costs to do correctly the first time.
FAQ
How far can I extend a patio slab in one DIY project without running into major risks?
A good rule of thumb is to stay small enough that you can place and finish in a single continuous window (often the same day from the truck). For anything approaching or exceeding about 100 square feet, the article already recommends a pro, but the practical decision point is whether you can coordinate enough help, forms, and concrete delivery timing to avoid cold joints inside your extension.
Can I connect the new patio slab to a garage slab or foundation wall instead of just the patio edge?
You can, but you should treat the building element as a fixed structure and add an expansion joint filler where the slab meets the wall or footing (the 1/2-inch strip mentioned in the article). Also confirm you are not accidentally restraining the slab in a way that forces cracking, especially if the foundation moves with seasons.
What if my existing patio slab edge is already spalled or crumbling, can I still drill and epoxy rebar dowels?
If the slab edge is visibly undermined or flaky, dowels won’t get a solid bond length. You’ll typically need to remove loose concrete back to sound material before drilling, or you may need to consult a contractor for partial demo and rebuild so the epoxy has clean, dense concrete to grip.
Do I need dowels if I’m extending with the same thickness and slope?
Even with matched thickness and grade, you still want a mechanical connection to reduce differential movement. The bonding adhesive helps at the interface, but dowels or epoxy anchors are what physically restrain shear and help prevent the two pours from shifting relative to each other.
Should I saw-cut control joints at the exact joint line between old and new, or can they be offset?
Plan a dedicated control joint right at the connection point as described, because that is where settlement and cracking tend to initiate. Offsetting the joint often leaves the uncontrolled crack to form wherever restraint and stress concentrate, which can lead to random jagged cracking.
How do I handle drainage if my patio slope is currently wrong but the yard is also sloped toward the house?
If water is already migrating toward the foundation area, matching the existing slab slope can lock in a problem. The decision aid is to verify the drainage direction first using a level and straight string lines, and if you confirm water behavior is unfavorable, the article recommends professional help when regrading is part of the fix.
Is rebar spacing of 18 inches set in stone for every extension?
Not necessarily. The article gives a common DIY reinforcement approach, but the more important check is whether the steel sits correctly in the middle third of the slab depth (using chairs) and whether you match your reinforcement approach to the slab thickness you chose. If you increase thickness for soft soil, you may also need to revisit reinforcement quantity and placement so it is not sitting too low.
Can I use fiber reinforcement alone instead of wire mesh or rebar?
Fiber can reduce surface cracking, but it is not a replacement for mesh or rebar. The article notes that fibers are insurance against small cracks, while mesh or rebar handles reinforcement needs at the right slab depth, and dowels handle movement across the connection.
How soon after pouring can I walk on the new slab or drive something light over it?
The article focuses on curing moisture and when to seal, but for traffic you should follow your concrete delivery guidance and avoid early loads. Practically, don’t treat a fresh patio as walk-ready the way asphalt is, because early surface strength is limited, and concentrated point loads can cause dents or uneven curing.
What’s the correct way to fill the joint where two slabs meet, and when should it be sealed?
After curing, fill the control joint at the connection point with a self-leveling polyurethane joint sealant, as the article specifies. Avoid sealing too early, because trapping moisture or sealing an incompletely cured joint can lead to adhesion problems and water infiltration.
Do I need to seal the extension if I didn’t seal the original patio slab?
You don’t strictly have to, but sealing the new concrete helps it resist water ingress, which is especially important at the connection point. If the goal is matching appearance, remember the article’s note that color and texture mismatch is common, and a stain or overlay on both slabs after curing is usually the most reliable way to make them visually consistent.
If I see a hairline crack at the joint after winter, is my extension doomed?
Not automatically. Hairline and stable cracking can be managed by filling with self-leveling polyurethane sealant and monitoring. If the crack widens, steps, or one side is higher, that points to a base or restraint issue, meaning you should investigate compaction, sub-base drainage, and whether the joint is directing movement correctly.
Next Article
How to Repair Patio Slabs: Fix Loose, Moving, Wobbly Ones
Step-by-step guide to repair loose, moving, or wobbly patio slabs by fixing bedding, voids, leveling, joints, and draina