The best way to re-point patio slabs is to rake out all the failing joint material to a proper depth, let everything dry completely, then pack in a suitable jointing mortar or polymeric sand and give it time to cure before it sees rain. If you are working with curved edging or curved slab sections, the key is to plan your cut lines first and use the right cutting method so the slabs sit cleanly and the joints stay tight how to cut curves in patio slabs. Do that right and your joints can last several years. Rush any part of it, and you'll be back doing the same job next spring.
Best Way to Point Patio Slabs: Step-by-Step DIY Guide

Talia Lang
2 Jun 2026
Why your patio joints are failing in the first place
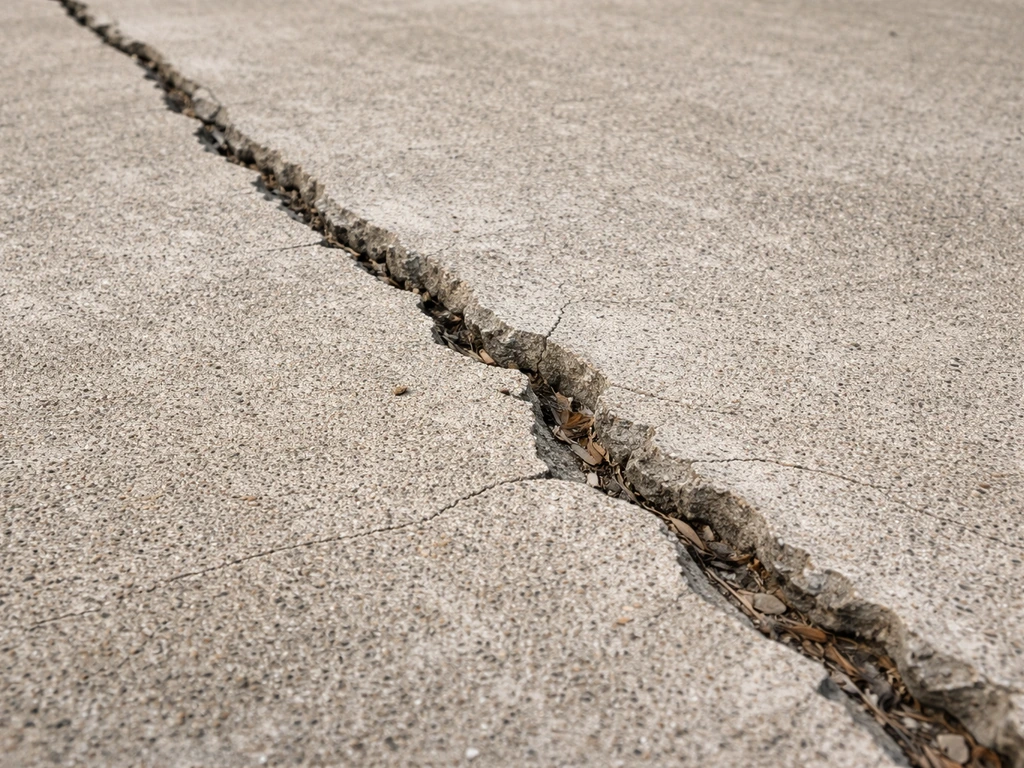
Before you buy a bag of mortar, it's worth understanding what actually caused the joints to fail. If you skip this step and just fill the gaps, the same problem will come back within a season or two.
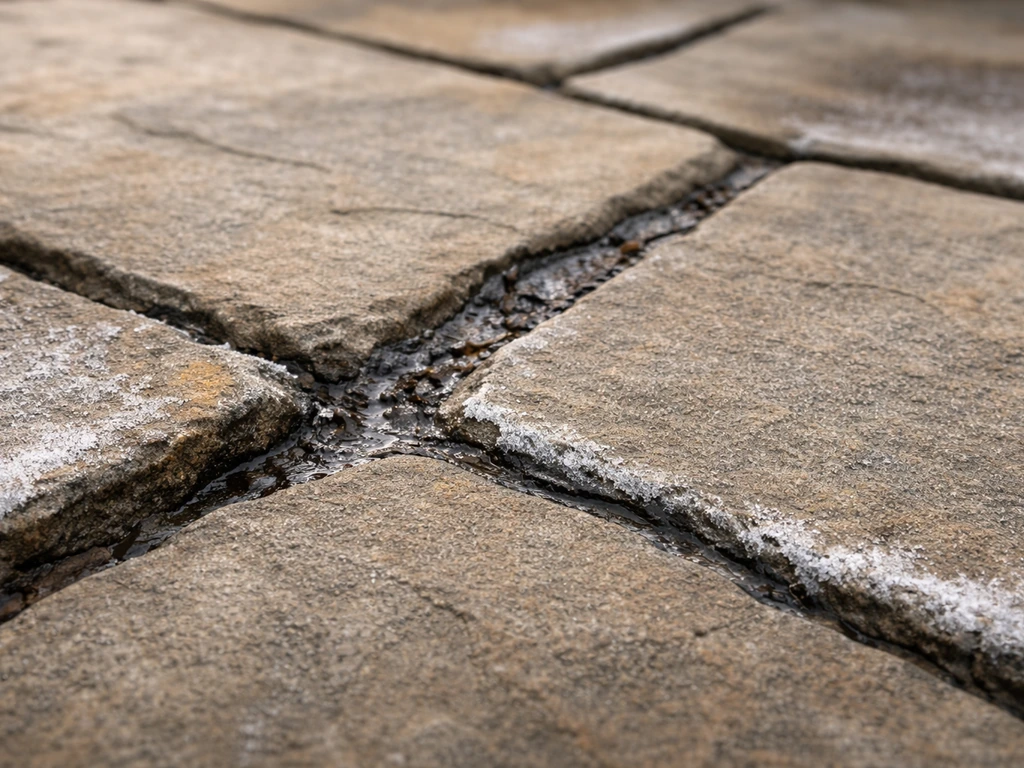
The most common culprits are water and freeze-thaw cycles working together. Water gets into small cracks or gaps in the joints, sits there, and when it freezes it expands and pushes the joint material apart. Each cycle does a little more damage until the joint is loose, crumbling, or completely gone. On sloping patios, surface water sheeting across the slabs can physically wash joint sand or crumbled mortar out of the gaps over time.
Weeds and moss are another sign, but they're a symptom rather than a cause. If plants are rooting into your joints, it means the jointing material is already largely gone and roots are widening whatever gap is left, accelerating movement and undermining the slab edges.
The more serious situation is when the base itself has problems. If you have standing water pooling on the patio, widespread joint failure across many slabs at once, or slabs that actually wobble underfoot, that's not just a jointing issue. Water that gets beneath the paving saturates the bedding layer, and in a freeze-thaw climate that leads to heaving, sinking, and ongoing instability. Re-pointing on top of a failing base is a short-term fix at best. More on when to stop and call a pro later in this guide.
Choose the right material for your joints
Not all jointing products are the same, and the right choice depends on your joint width, the type of paving you have, and how much DIY effort you want to put in.
| Material | Best For | Joint Width | Pros | Cons |
|---|---|---|---|---|
| Polymeric sand | Concrete pavers, natural stone slabs, wider joints | 6 mm (1/4 in) up to 50 mm (2 in) depending on product | Easy to apply, locks firm, weed-resistant, available at most home centers | Must cure before rain; polymer haze if over-wetted; less rigid than mortar |
| Sand-cement mortar (dry or wet) | Larger concrete or natural stone flags in rigid/bound systems | Typically 6–10 mm for bound slab systems | Strong, durable, traditional method | Requires mixing, more skill to apply neatly, needs careful curing |
| Polymer-modified mortar | Rigid patio systems, flags, areas needing extra strength or freeze-thaw resistance | 6–10 mm+ | Better flexibility and adhesion than plain cement, freeze-thaw resistant | More expensive, mixing required, not for loose/unbound systems |
| Kiln-dried jointing sand (unmodified) | Unbound block paving with very narrow joints | 2–5 mm | Cheap, simple to brush in | Washes out easily, not suitable for most slab patios, needs re-topping regularly |
For most homeowners re-pointing a standard concrete or natural stone patio with joints in the 6–15 mm range, polymeric sand is the practical first choice. Products like QUIKRETE HardScapes Polymeric Jointing Sand handle joints up to 50 mm wide, while Sakrete PermaSand works well from 6 mm upward. They're forgiving to apply and don't require a cement mixer. If your patio uses larger flags set in a bound mortar bed and you want a more traditional repair, a polymer-modified mortar is the stronger choice, though it takes more skill to apply cleanly.
Plain dry sand is almost never the right answer for a slab patio. It washes out too easily and doesn't resist weeds. If that's what was in your joints before, that's likely why you're re-pointing now.
What you'll need before you start
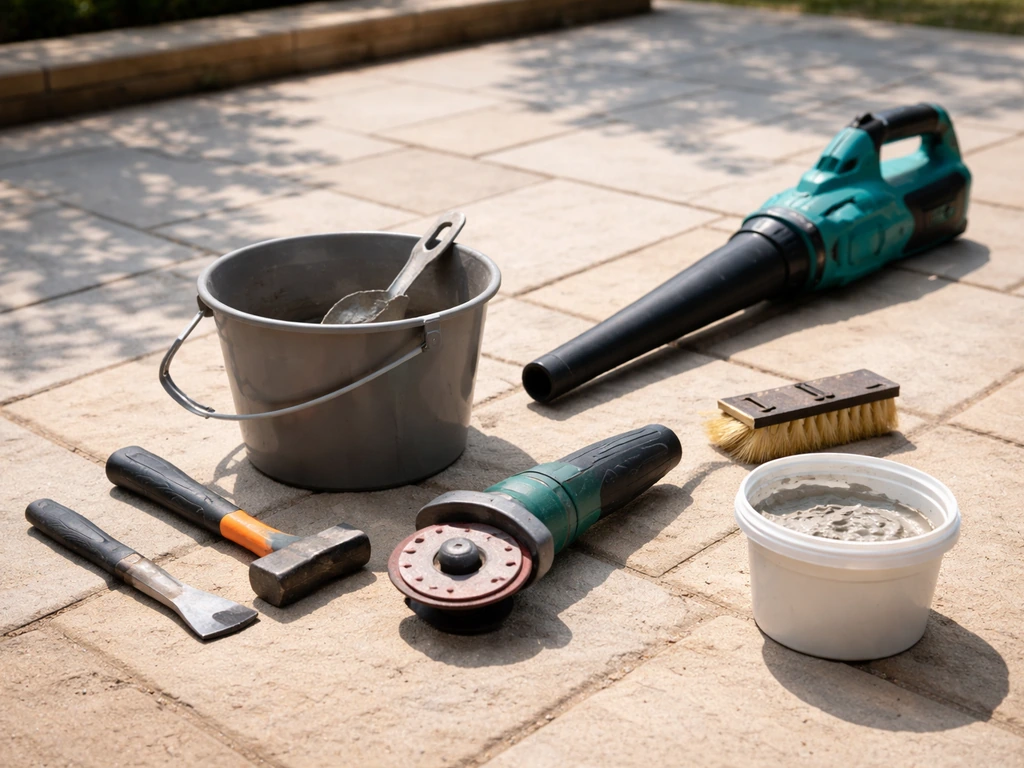
- Plugging chisel or flat cold chisel and hammer (for raking out old mortar)
- Angle grinder with a pointing/mortar-raking disc (for larger areas or stubborn mortar)
- Stiff hand brush or wire brush
- Leaf blower or compressed air (for clearing loose debris from joints)
- Garden hose with fine spray nozzle or pump sprayer (for activating polymeric sand)
- Pointing trowel and a rubber mallet (if using mortar)
- Soft-bristle brush (for sweeping polymeric sand into joints)
- Jointing mortar or polymeric sand (calculate your area; most bags give coverage on the label)
- Bucket and mixing paddle or drill attachment (if using mortar mix)
- Knee pads
- Safety glasses and dust mask (essential when chiseling or grinding)
- Tarpaulin or plastic sheeting (to protect fresh work from unexpected rain)
Step-by-step: how to re-point patio slabs
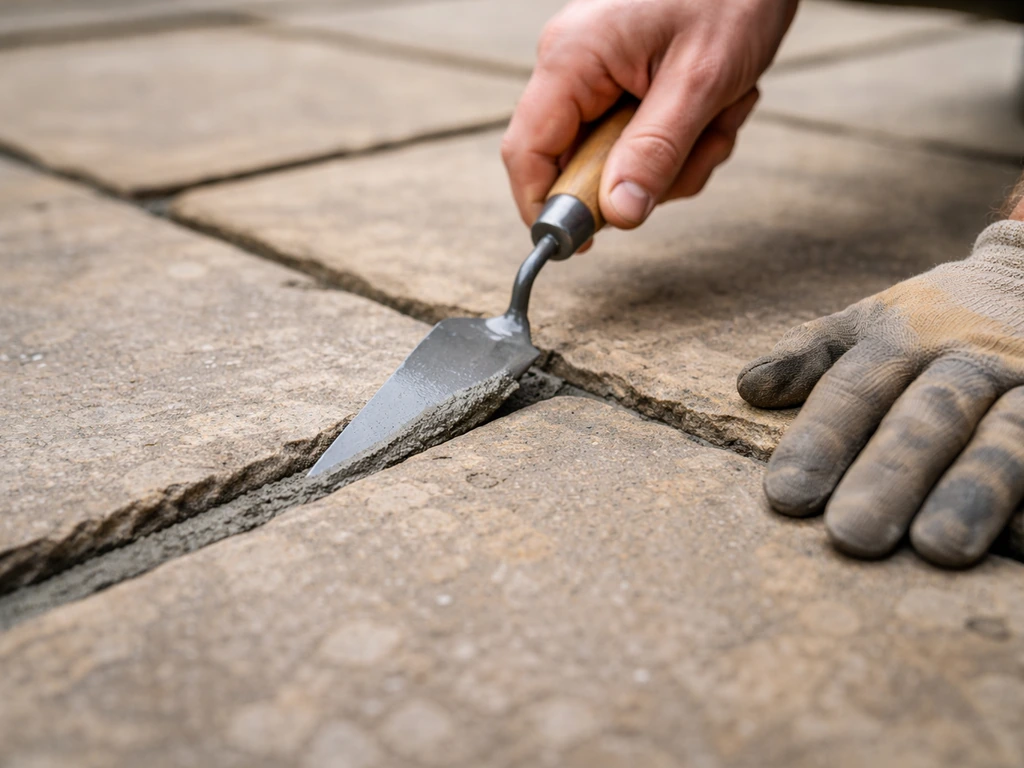
Step 1: Rake out the failing joints
This is the part most people underdo, and it's why their repair fails again. You need to remove all the loose, crumbling, or washed-out material from the joints down to a solid base. Use a plugging chisel and hammer to work along each joint, pulling out anything that isn't firmly bonded. For larger areas, an angle grinder with a raking disc saves a lot of time and effort.
How deep should you go? The old masonry repointing rule is to rake out to a minimum depth of about 2.5 times the joint width. So if your joints are 10 mm wide, you're aiming for around 25 mm deep. In practice, for most slab patios you want to get down to at least 20–25 mm of solid, undisturbed material. If the joint crumbles all the way down or you hit loose sand everywhere, that's a warning sign the base may have issues. Don't just scrape the surface and fill over it.
Step 2: Clean out the joints thoroughly
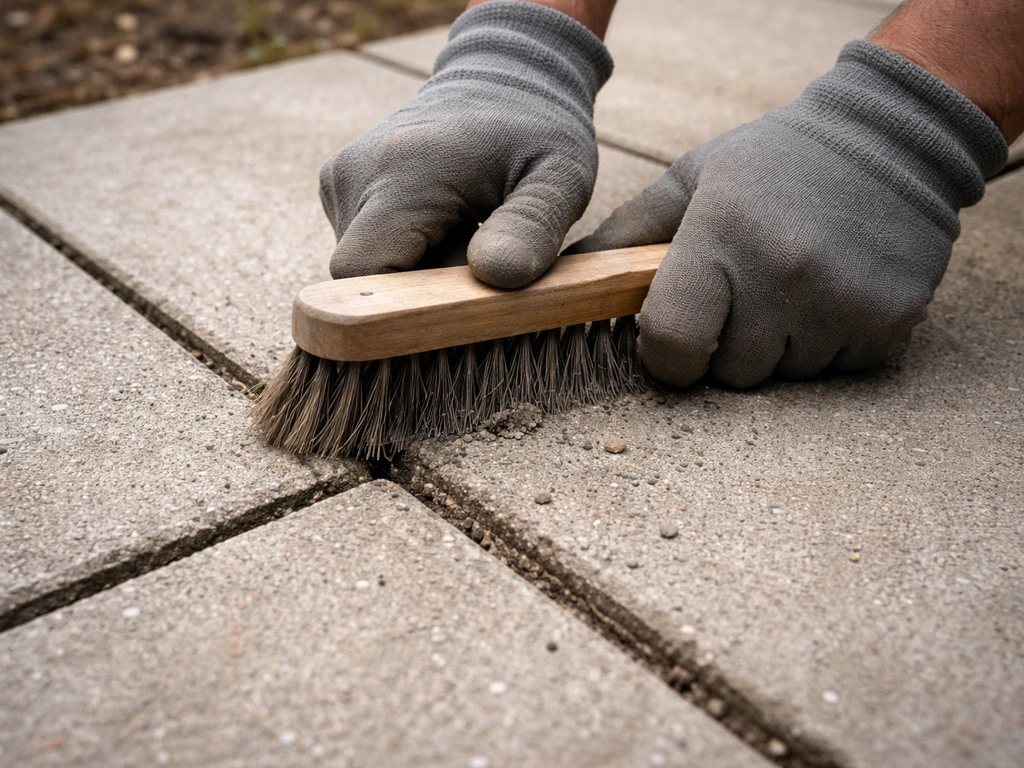
Once you've raked everything out, brush along every joint with a stiff brush to clear dust and small debris. A leaf blower is genuinely useful here for getting into the bottom of joints. If you're using polymeric sand, this step is especially important because any loose material left in the joint will prevent the polymer binder from locking properly. For mortar work, any dust or debris will weaken the bond.
Check that the slabs themselves are stable. Press down on each slab near the joints. If any rock or wobble underfoot, they need to be re-set before you point (re-pointing a loose slab just traps the problem). Repointing only works on slabs that are already sitting firm.
Step 3: Make sure everything is dry
Both mortar and polymeric sand need dry conditions to perform correctly. Don't point on a damp patio or after rain. Ideally, wait at least 24 hours of dry weather after rain before you start. Check the forecast too: you need at least 24–48 hours of dry weather after application for polymeric sand to cure, and temperatures should be reliably above 5°C (41°F). Working in autumn or early spring when nights drop near freezing increases the risk of freeze damage to fresh joints before they cure.
Step 4: Apply the jointing material
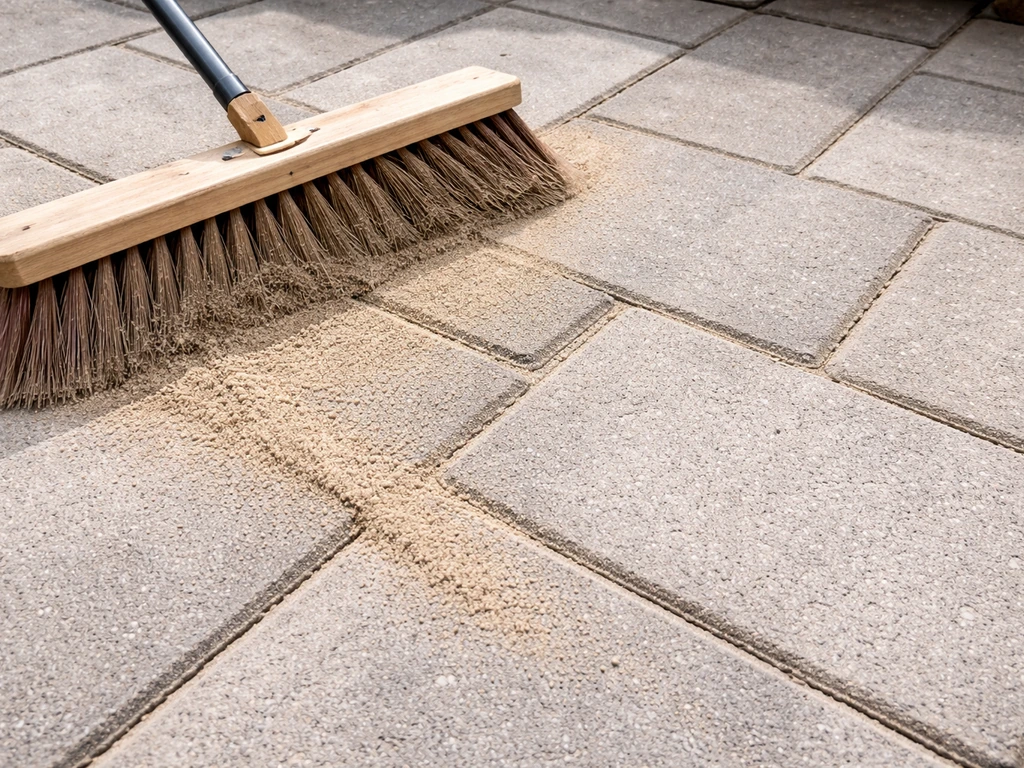
For polymeric sand: pour the sand over the patio surface and use a soft-bristle brush to work it into the joints. Sweep diagonally across the joints, then make passes in multiple directions to fill evenly. Tap each slab with a rubber mallet as you go to help the sand settle. Keep filling and brushing until the joints are full. Then sweep away all excess sand from the slab surfaces before you activate it with water. Any polymer left on the surface will leave a white haze once it cures, and that's very hard to remove.
Leave the joints about 3–6 mm below the slab surface rather than filling flush to the top. Overfilling causes the material to smear across slab faces and looks untidy. That 3 mm of recessed depth also gives the joint a bit of flexibility under foot traffic.
For mortar: mix your polymer-modified mortar or sand-cement mix to a firm, workable consistency (similar to stiff peanut butter, not sloppy). Pack it into the joint using a pointing trowel, pressing firmly to eliminate voids. Work in sections of a metre or two, then go back and strike the surface smooth with the edge of the trowel or a jointing iron. Keep the mortar off the slab faces as much as possible. If any lands on the slab, wipe it off with a damp cloth before it starts to set. On a sloping patio, start at the top and work downhill so any small smears drain away from areas you've already cleaned.
Step 5: Activate polymeric sand (if using)
Once the joints are filled and the surface is clean, activate the polymeric sand with water. Use a fine mist from a garden hose or pump sprayer rather than a direct jet. The goal is to saturate the sand in the joints without puddling on the surface or washing the sand back out. Work slowly across the whole area in overlapping passes. Most products need two passes of gentle misting. Check the specific product instructions because over-wetting is just as bad as under-wetting: too much water floats the polymer to the surface and causes haze or actually washes material out of the joints. Keep the tarpaulin ready in case rain threatens before the joints have firmed up.
Curing, sealing, and stopping it happening again
After pointing, keep foot traffic off the patio for at least 24 hours, and ideally 48. Keep it dry during that time. Polymeric sand typically reaches usable strength within 24 hours in warm dry conditions but continues to cure and harden over the next few days. Mortar joints need at least 24–48 hours before light use and should be kept slightly damp (not soaked) in hot dry weather to prevent shrinkage cracking. Cement-based paving jointing mortars can be polymer-modified, and achieving freeze-thaw resistance depends on getting the correct water-cement ratio and applying the mortar properly to avoid shrinkage cracking and premature failure Mortar joints need at least 24–48 hours before light use.
Sealing is optional but genuinely useful. A penetrating (breathable) sealer or a joint-stabilizing sealer applied after the joints have fully cured helps repel water, inhibit weeds, and slow the freeze-thaw erosion cycle that caused the problem in the first place. If you also plan lighting in patio slabs, choose fixtures and cabling rated for outdoor use and install them in waterproof, serviceable locations before the final sealant sealing helps repel water.
Products like SEK Surebond SB-1300 are specifically designed as joint sand stabilizers and are freeze-resistant down to well below freezing, which makes them a practical choice in cold climates. If you plan to use a paver sealer with sand-locking properties, check compatibility with your jointing product beforehand, as some polymeric sands don't work well with certain film-forming sealers. Apply any sealer only once the joints are completely dry and cured, not the same day as pointing.
To prevent repeat failure, fix the underlying drainage before pointing. If water pools on or beside your patio after rain, re-pointing is just buying time. If you want to protect patio slabs long term, address the water source so freeze-thaw and erosion cannot keep undermining the joints re-pointing is just buying time. Grading issues, blocked drainage channels, or a waterlogged base will keep washing joints out no matter how good your jointing material is.
This is especially true if you're seeing widespread joint failure across most of the patio at once rather than in just a few spots. Inspect joints after every winter and after heavy storms, and top up any sections that show early signs of washing out before they get worse.
When re-pointing isn't enough
Re-pointing assumes your slabs are stable and in the right position. If any of the following apply to your patio, stop and think carefully before spending a day pointing joints.
- Slabs wobble or rock underfoot: they need to be re-bedded before you can point. Pointing a loose slab just locks movement into the joint and it'll crack out again within weeks.
- Slabs have sunk or heaved significantly: this means the base or bedding has failed. Re-pointing the joints won't fix the level, and water will continue to collect in the low spots and undermine everything.
- The same area keeps failing season after season: recurring failure in the same spot almost always means a drainage or base problem beneath that section. A new layer of jointing material is not the answer.
- Standing water pools on the patio regularly: this is a base/drainage issue. Getting the grading sorted out is the first job, not the joints.
- Joint failure is widespread across the whole patio: if nearly every joint is gone, especially on a patio that's only a few years old, the installation or the base was likely flawed from the start.
- Cracks run through the slabs themselves rather than just the joints: this points to movement or settlement that pointing won't address.
In these situations, the honest answer is that re-pointing is a cosmetic fix on a structural problem. Depending on the extent of the damage, you may need to lift sections of the patio, address the base and drainage, relay the slabs, and then point. That's a bigger job, and if it involves widespread re-laying or significant drainage work, it's worth getting a landscaper or groundworks contractor to take a look. Some patio repair problems genuinely do need professional help to get a lasting fix, and it's better to know that before you spend money on materials and a day's work.
If you're dealing with cracked slabs alongside the joint failure, it's worth looking at how to repair patio slabs as a separate step before or alongside re-pointing, since a cracked slab that's still stable in place may be patchable while one that's broken through due to movement probably needs replacing.
If you’re planning stencil work, take care that any cracked or shifting areas are fixed first so the pattern stays crisp and the surface doesn’t move after curing how to repair patio slabs. If you also have cracked or broken slabs, you may need to repair patio slabs before you re-point so the new joints have a stable base.
If you are trying to extend a patio slab, start by assessing the existing slab condition and whether any cracking or movement needs repair first repair patio slabs. If your slabs are cracked or uneven, you may also need to repair patio slabs before you re-point the joints.
Your practical next steps
Start by walking your patio and pressing on each slab. If none wobble and the slabs are level, you're good to move to the cleaning and pointing stage. Pick a dry spell of weather with at least 48 hours of no rain forecast and temperatures above 5°C, rake out all the failing joints properly, and choose a polymeric sand for most situations or a polymer-modified mortar for a more rigid, traditional finish on larger flags. Take the curing seriously, consider a joint stabilizing sealer once everything has dried, and deal with any drainage issues at the same time. Done right, you should get several years out of the repair before it needs attention again.
FAQ
Can I point patio slabs in one weekend, even if the weather forecast looks iffy?
It depends on the jointing type and temperature. For polymeric sand, you want at least 24 to 48 hours of dry weather after activation, and daytime temperatures above about 5°C. If rain is likely within 24 hours, cover with a properly weighted tarpaulin and delay activation and curing until the forecast improves, otherwise you risk weak binding and washout.
What if some joints are wider than others? Should I use one product or adjust the approach?
Use the product that fits your widest and most worn joints, or you may end up under-filling and getting premature loss. If only a small section is significantly wider, that area may need deeper raking and a product rated for that width, while the rest can use the standard jointing sand. Check the product’s stated joint width range before committing.
Is it okay to scrape out loose sand and just top it up?
Usually not. Topping up leaves loose, dusty material in the bottom of the joint, which prevents proper bonding and makes joints re-fail quickly. A reliable fix requires removing material down to undisturbed, solid substrate, then brushing out dust thoroughly before adding new jointing material.
How do I tell if the slabs are stable enough, or if I need to re-lay them first?
Besides pressing down near the joints, look for rocking when you stand at different points, and check whether the joint area has migrated or the slabs are slightly raised at edges. If multiple slabs wobble or you see widespread joint breakdown across many slabs at once, assume the bedding or drainage is compromised and budget for slab resetting rather than only repointing.
What’s the safest way to clean joints before applying polymeric sand?
Aim to remove both loose debris and fine dust. A stiff brush gets the top cleaned, then use a leaf blower to clear material from the bottom of the joint. If dust is left, the polymer binder may not lock, leading to a chalky surface and faster erosion.
How can I avoid the white haze problem after activating polymeric sand?
Two common causes are leaving polymer on the slab faces and over-wetting during activation. Keep joints recessed (around 3 to 6 mm) so you do not overfill, sweep off excess sand before adding water, then use a fine mist rather than a jet. If you see puddling or heavy runoff, pause and let it settle, then reduce the water volume.
Should I flood the patio to cure polymeric sand faster?
No. Polymeric sand needs controlled moisture to activate, not soaking. Too much water can float binder to the surface or wash material out of the joints, both of which weaken the joint and increase haze. Follow the product instructions for misting passes, and prioritize dry, stable weather for curing.
Can I use kiln-dried sand or building sand instead of jointing sand?
For most slab patios, plain dry sand is a poor substitute because it washes out easily and does not lock weed roots as well as jointing products. If you must use sand-based fills, choose a product specifically designed for joint stabilization, ideally one with a polymer or an appropriate mortar system, not generic sand.
If I seal the patio, when should I apply it relative to jointing?
Wait until the joints are fully dry and cured before sealing, not the same day as pointing. Sealing too early can trap moisture and interfere with curing chemistry. After sealing, be mindful that some film-forming sealers may not be compatible with certain polymeric sand systems, so check compatibility rather than assuming.
What signs mean the base or drainage is failing, not just the joints?
Look for standing water, widespread joint loss across most of the patio, and slabs that wobble or shift as a set. If freeze-thaw damage keeps returning quickly even after a good repoint, that’s a strong indicator water is getting beneath the paving and saturating the bedding layer, requiring drainage and base correction.
Do I need to repair cracked slabs before repointing, or can I point over them?
Repair cracked or broken slabs that are moving first. If slabs have active movement, new joints act like filler, not a fix, and will crack or wash out again as the slab edges shift. Patchable, stable cracks can sometimes be addressed separately, but unstable cracked-through slabs often need resetting or replacement before joint work.
How deep should I rake, and what if I hit loose sand partway down?
Rule of thumb is raking to a minimum depth around 2.5 times the joint width, but practical targets are often 20 to 25 mm for typical slab joints. If the joint collapses and you hit loose sand everywhere, that suggests bedding issues, not just joint failure. In that case, consider investigating drainage and base stability before investing in a full refill.
Is it better to choose polymeric sand or polymer-modified mortar for a patio that sees freeze-thaw?
Both can work, but polymeric sand is usually the practical DIY choice for standard joints, while polymer-modified mortar can provide a more rigid, traditional repair for larger flags or wider joint situations. In cold climates, ensure curing conditions are met and consider joint-stabilizing sealing only after full cure, because freeze damage before curing is a major failure driver.
Next Article
How to Fix Cement Patio Cracks: Diagnose and Repair
Diagnose concrete patio crack types and repair with the right sealant or patch, from prep to curing and prevention.