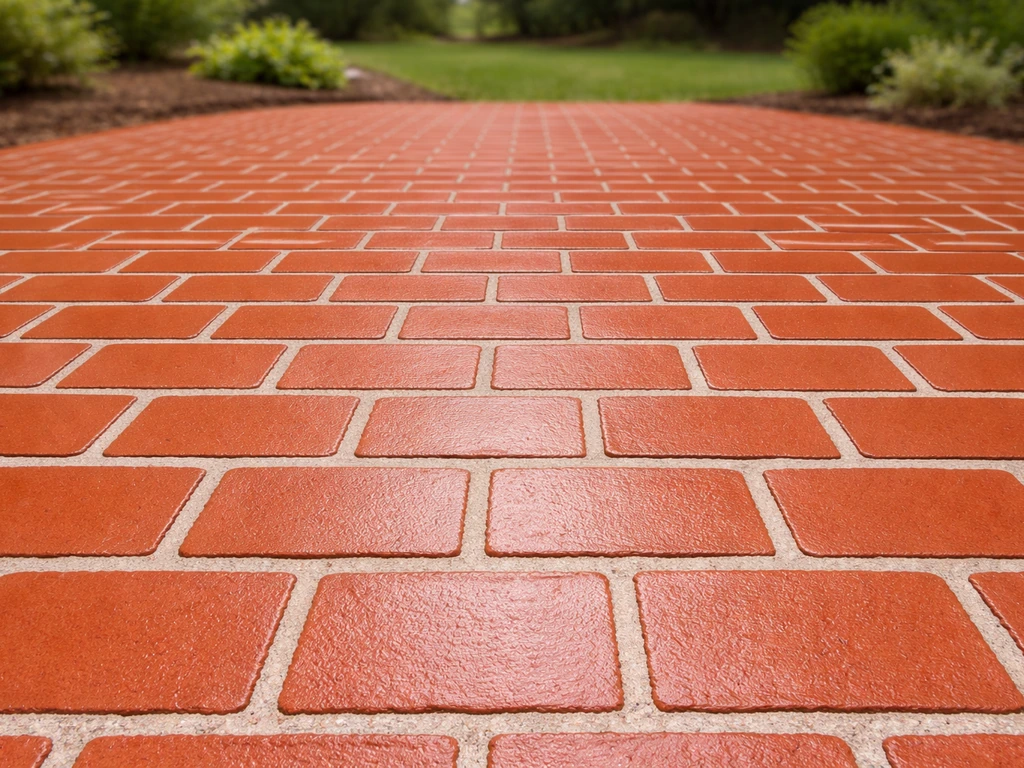
Repointing a brick patio means cutting out the old, failed mortar from between the bricks and packing in fresh mortar that matches the original in strength, color, and joint profile. Done correctly, it stops water infiltration, eliminates weed growth, and stabilizes loose bricks without cracking or staining the surrounding brickwork. The critical word there is correctly: wrong mortar, dry bricks, or rushing the cure will leave you with crumbly joints in another year or two.
How to Repoint a Brick Patio Step-by-Step DIY Guide

Talia Lang
20 Jun 2026

When repointing is actually the right fix
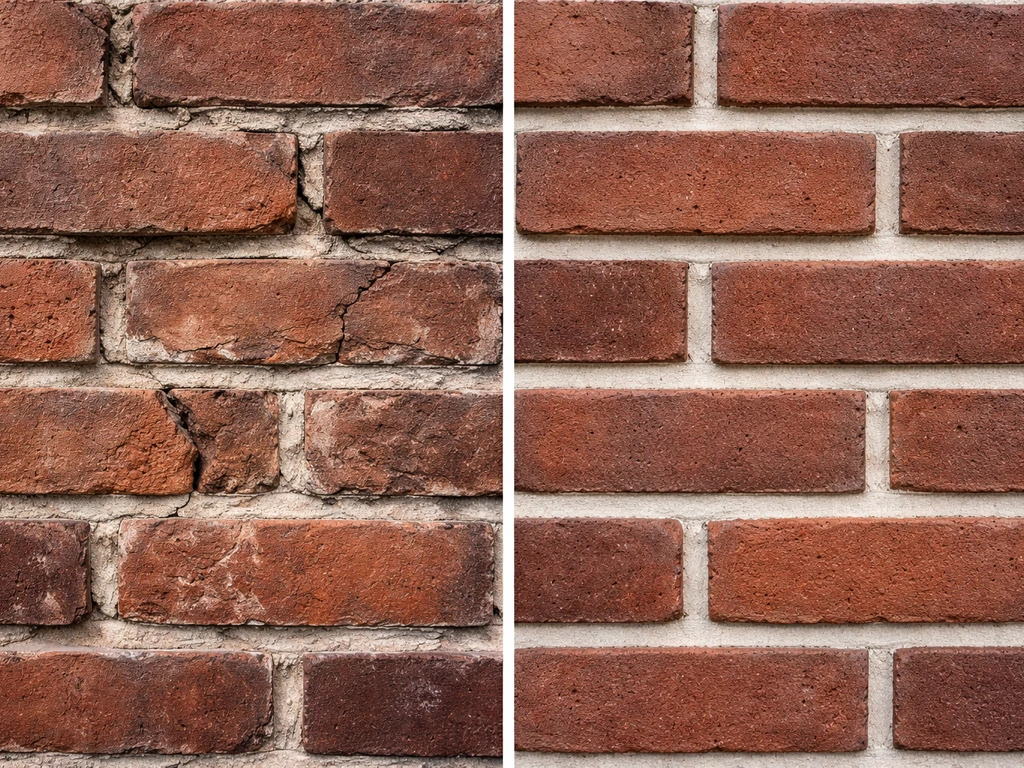
Before you buy a bag of mortar, spend ten minutes confirming that repointing is actually what your patio needs. Run a key or screwdriver along the joints. Engineer Fix also recommends simple probing checks like a scratch or probe test to judge mortar friability, and it notes that water getting behind failed mortar accelerates deterioration.
If the mortar crumbles easily, powders out, or lets the tool sink in more than about 1/4 inch, the mortar has failed and repointing makes sense.
This Old House also includes practical repointing “tipoffs,” such as loose or crumbling mortar (especially when more than about 1/4 inch of original mortar is missing), excessive cracking, dampness on interior walls, spalling or crumbling bricks, and a rule of thumb to repoint when mortar has eroded deeper than twice the joint width repointing “tipoffs”. A useful rule of thumb: if mortar has eroded deeper than twice the width of the joint, it needs replacing.
So on a standard 1/2-inch-wide patio joint, erosion deeper than about 1 inch is a clear signal.
Other signs that point toward repointing: weeds rooting in the joints, bricks that rock slightly when stepped on, water pooling on the surface instead of shedding, or visible gaps where mortar has simply fallen out. If you notice dampness migrating up through the patio near a wall or foundation, that's an especially urgent reason to repoint. Once the problem is identified, you can refresh your brick patio by repointing the failing joints and restoring proper drainage refresh brick patio.
But repointing won't fix everything. If one or a handful of bricks have shifted, sunk, or risen significantly, those bricks need to be reset first before you touch the joints. If you’re specifically wondering how to redo a brick patio, start by confirming whether repointing is enough or whether any bricks need resetting first.
And if the patio has a base failure, soft or eroded base material, tree roots heaving the sub-grade, or large sections that feel springy underfoot, repointing is just cosmetic. You'd be pointing over a moving foundation, and the new mortar will crack right back out. That's the moment to think about a larger repair or a professional assessment.
Drainage problems causing recurring joint failure fall into the same category: fix the root cause first, or you'll be back out here doing this again in 18 months.
Tools, materials, and picking the right mortar
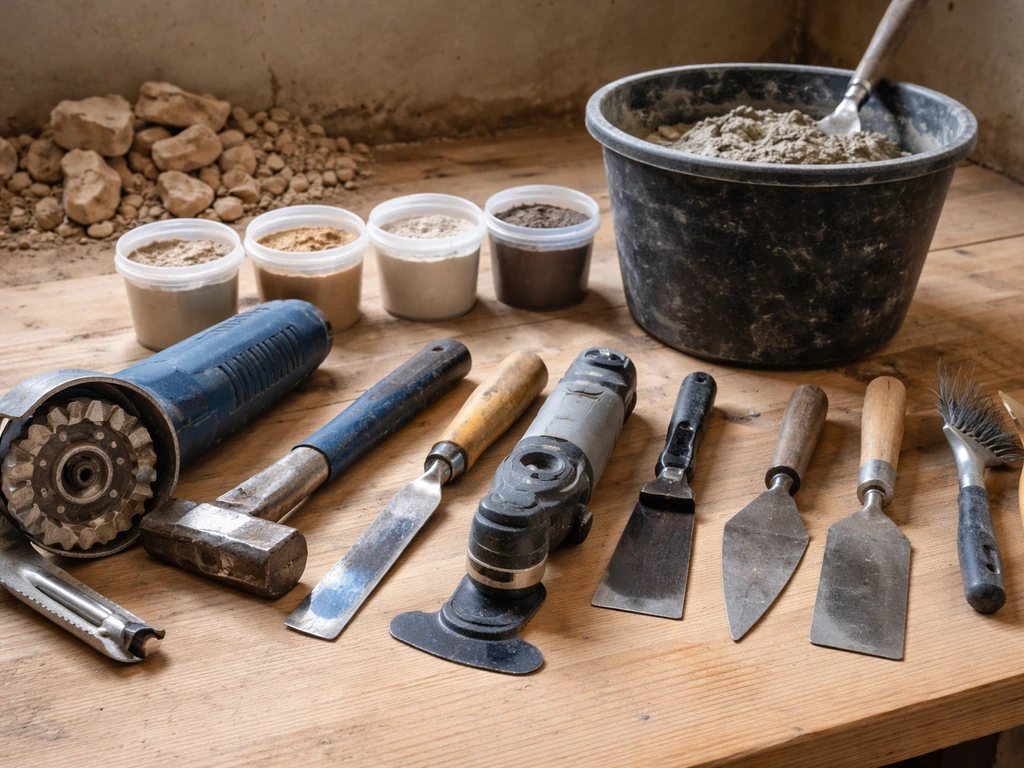
Tools you'll need
- Angle grinder with a mortar-raking blade (for larger jobs) or a cold chisel and hammer (for spot repairs)
- Oscillating multi-tool with a mortar-cutting blade (great for tight joints without an angle grinder)
- Stiff natural-bristle masonry brush and a wire brush
- Margin trowel and pointing trowel (a narrow, angled one sized to your joint width)
- Mortar bag or grout bag for packing joints overhead or at awkward angles
- Jointing tool or a piece of copper pipe bent to a slight curve for tooling the finish
- Garden sprayer or spray bottle for pre-wetting
- Bucket and mixing paddle (or a drill-mounted mixer)
- Safety glasses, dust mask rated N95 or better, and gloves
Choosing the right mortar type
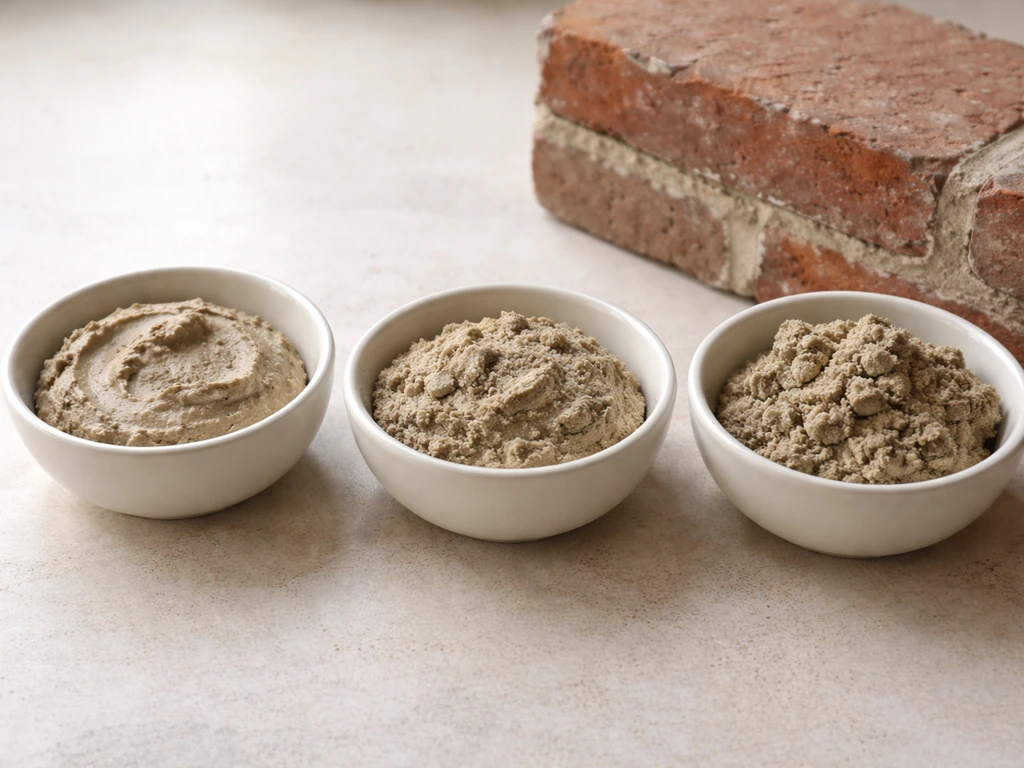
This is where most DIY repointing jobs go wrong. The mortar you use must be equal to or softer (lower compressive strength) than the original mortar and the brick itself. Using a mortar that's too hard, like a straight Portland cement mix on older, softer brick, causes the brick faces to crack and spall because the mortar becomes a rigid constraint that the brick can't expand against during freeze-thaw cycles. When in doubt, go softer rather than harder.
| Mortar Type | Mix Ratio (cement:lime:sand) | Compressive Strength | Best For |
|---|---|---|---|
| Type N | 1:1:6 | 750 psi | Most residential brick patios, good freeze-thaw performance, general exterior use |
| Type S | 1:0.5:4.5 | 1800 psi | Below-grade or ground-contact patio bricks, high-moisture areas |
| Type O | 1:2:9 | 350 psi | Older/soft historic bricks, interior use, low-stress pointing only |
| Lime mortar (NHL 3.5) | Lime-only, no Portland | Variable, very low | Historic or very soft antique bricks where Type N would still be too strong |
For most modern residential brick patios built in the last 40 years, Type N is your go-to. It handles freeze-thaw reasonably well, is flexible enough to avoid cracking the brick, and is widely available as a pre-mixed bag. If your patio uses older, softer handmade or reclaimed bricks, consider Type O or a natural hydraulic lime (NHL) mortar instead. If the patio sits at or below grade, or in a consistently wet spot, Type S is the better pick.
Color matching matters too, especially if you're only repointing sections of the patio. If you want a fresh look beyond the mortar lines, you can also learn how to paint a brick patio safely and evenly. Most masonry suppliers carry pigmented mortar mixes, and pre-mixed bags often come in buff, gray, and tan. Do a small test patch and let it cure for at least 48 hours before judging the color, wet mortar looks much darker than cured mortar. Joint width matters as well: if your original joints are 1/2 inch wide, keep them 1/2 inch wide. Don't fill them wider to hide edge damage.
Removing old mortar without wrecking the bricks
This step is where damage happens if you rush. The goal is to remove failed mortar to a minimum depth of about 3/4 inch (some guidelines suggest at least three times the joint width) until you hit solid, sound mortar. You don't need to go all the way to the bottom of the original joint, just deep enough that new mortar has something stable to bond to and enough depth to cure properly.
For small spot repairs, a cold chisel and a hammer work fine. Hold the chisel at a shallow angle, tap steadily, and work along the joint rather than straight in. The risk with an angle grinder on a patio is that the grinder blade can easily nick brick edges if the blade drifts. An oscillating multi-tool with a mortar blade is slower but gives you much better control in tight spots and around irregular edges. Whatever tool you use, keep it parallel to the joint and never angle it toward the brick face.
Once you've cut to depth, blow out the joint with compressed air or use a stiff brush to remove all dust and loose debris. Any powder or grit left in the joint will prevent proper adhesion. Run your finger inside the cleaned joint, it should feel solid and slightly gritty, not powdery. If mortar keeps crumbling as you brush, keep going deeper until it stops.
The full repointing process, step by step
- Clean the work area thoroughly. Sweep the patio surface and use a stiff brush to remove loose debris from joints. If there's significant algae, moss, or efflorescence (the white salt crust that sometimes forms on brick), treat it with a diluted masonry cleaner and rinse well. Let the surface dry completely before cutting out joints.
- Cut out failed mortar to proper depth. Use your chosen cutting tool to remove deteriorated mortar to at least 3/4 inch deep, or until you reach sound mortar. Work the full length of failing joints before moving to the next step. Remove all dust and debris with a brush and compressed air.
- Pre-wet the joints and surrounding bricks. This is non-negotiable. Dry brick will suck moisture out of fresh mortar before it has time to cure, leaving you with dusty, weak joints. Use a spray bottle or garden sprayer to dampen the bricks and open joints thoroughly. You want them damp but not soaking—no standing water. If water puddles in the joint, wait a few minutes before applying mortar.
- Mix your mortar to the right consistency. Follow the bag instructions for water ratio. Well-mixed mortar should hold its shape when squeezed but not be crumbly. A useful test: press a small ball against a vertical surface. It should stick without slumping. Mix only what you can use in about 30 minutes, especially in warm weather.
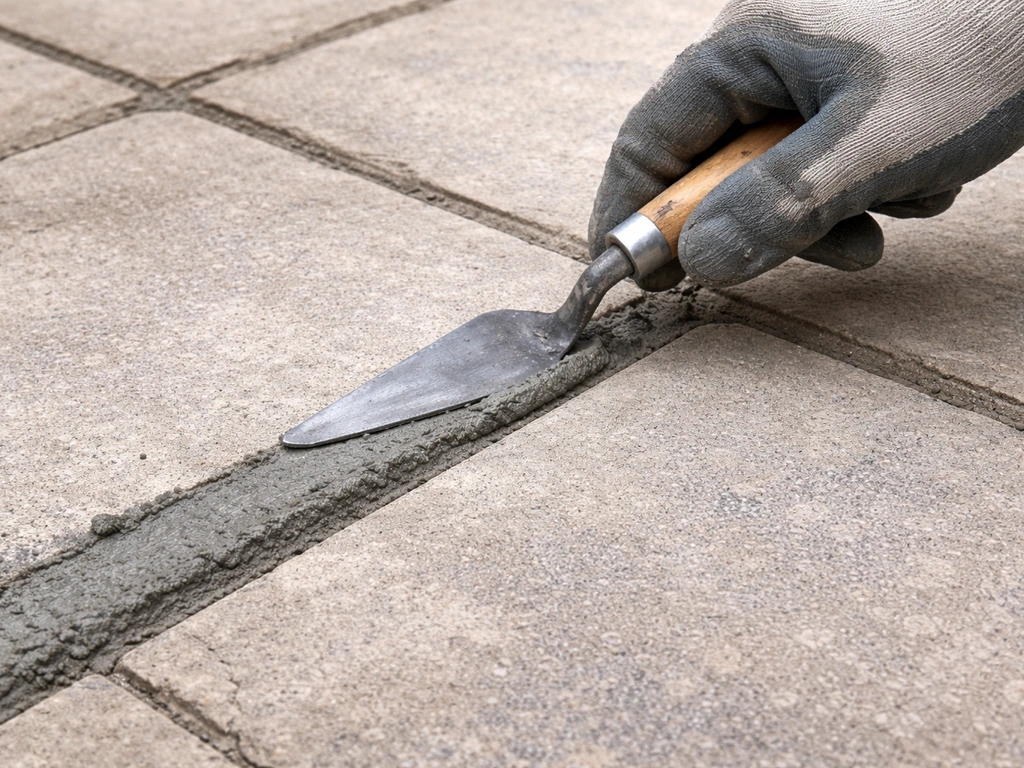
- Pack the mortar into the joints. Use a pointing trowel or mortar bag to load mortar firmly into the joint. Work in layers if the joint is deep: pack the first layer, let it stiffen slightly (about 20 to 30 minutes), then add the next layer. Each layer should be no more than about 3/8 inch deep. Press the mortar in firmly—don't just smear it over the surface—so it makes full contact with the joint walls and bottom.
- Tool the joint to the correct profile. Once the mortar has stiffened enough that a thumb pressed into it leaves a slight impression but doesn't sink in, it's ready to tool. Run your jointing tool or bent pipe along the joint with consistent pressure to compact the surface, match the original joint profile (usually concave or flush for patios), and shed water properly. A concave finish sheds rain better than a flush or raised bead, which is why it's the most common choice for exterior patios.
- Clean mortar smears off the brick faces. As you work, mortar will inevitably get on the brick surface. Let it firm up to a crumbly consistency (don't let it fully harden), then brush it off with a stiff natural-bristle brush. Finish by rinsing with clean water. If mortar dries hard on the brick face, you'll need a diluted muriatic acid wash—follow all safety precautions if you go that route, and rinse thoroughly.
Curing, sealing, and getting the timing right
New mortar needs time and moisture to cure properly, it doesn't just dry, it undergoes a chemical hardening process. Keep the freshly pointed joints damp for at least 72 hours by misting with water two or three times a day, especially in hot or windy conditions. In full sun, you can loosely drape burlap or a tarp over the patio to slow evaporation without cutting off air entirely. Don't let it get rained on hard within the first 24 hours either, a heavy downpour can wash out freshly packed mortar before it has set.
Mortar reaches most of its working strength within about a week, but it keeps curing slowly for 28 days. Avoid heavy foot traffic or moving furniture on the area for at least 48 to 72 hours, and don't pressure wash near the new joints for at least two to three weeks. Once the mortar is solid and cured, you can also refresh the whole patio surface so the brick patio looks new again Avoid heavy foot traffic.
On timing: the ideal temperature range for repointing is 50 to 80 degrees Fahrenheit. In midsummer heat (which is where we are right now in late June), plan to work in the morning before temperatures peak, and keep the surface shaded if possible. Don't repoint when rain is forecast within 24 hours or when temps will drop below 40 degrees at night within 48 hours. If you're in a freeze-thaw climate, avoid any repointing from late fall through early spring unless you can protect the work from freezing during cure.
Should you seal the joints afterward?
For most brick patios, a breathable masonry sealer applied after full cure (wait at least 28 days) is worthwhile, especially in wet climates or if the patio gets a lot of freeze-thaw exposure. The key word is breathable: a film-forming sealer that traps moisture inside the brick will cause more spalling and joint damage over time than no sealer at all. Look for a penetrating silane-siloxane sealer.
It doesn't change the look much, it repels water, and it lets the brick breathe. Avoid glossy topcoat sealers on brick patios, they look unnatural and tend to peel. If you're thinking more broadly about refreshing the overall look of the patio alongside repointing, that's a related but separate project. After repointing, you can move on to decorating your brick patio with outdoor lighting, planters, and complementary outdoor furniture.
Common mistakes and how to avoid them
- Using mortar that's too strong: Portland cement-heavy mixes like Type M or even Type S on soft, older bricks will crack the brick faces over time. Match mortar strength to the brick, not the other way around.
- Skipping pre-wetting: This is probably the single most common mistake. Dry bricks pull moisture from fresh mortar, and the result is weak, dusty joints that fail within a season or two.
- Over-chiseling: Cutting too aggressively, especially with an angle grinder, can clip brick edges and widen joints unevenly. Take your time, work at a shallow angle, and check your depth frequently.
- Mixing too much mortar at once: Mortar that starts to stiffen in the bucket before you've used it is tempting to re-wet and keep using. Don't. Re-wetted mortar loses significant strength. Mix smaller batches.
- Tooling too early or too late: Tool too soon and the mortar smears and pulls. Tool too late and it's too hard to compress properly. Wait for the 'thumb-impression' stage described in step 6 above.
- Skipping the curing step: Walking away after tooling and never misting the joints is extremely common. It leads to surface crazing (fine cracks) and weak, short-lived mortar.
- Pointing over existing mortar without removing the old: Skim-coating new mortar over old failed mortar is not repointing. New mortar bonded to old, crumbling mortar will pop right off. Cut it out to sound material first.
- Ignoring drainage or base problems: If water is pooling on the patio or the base is unstable, repointing alone won't hold. You'll repeat the whole job in a year or two.
When to stop DIY and call a professional
Repointing is a legitimately DIY-able project when the scope is manageable, a few square yards of failing joints, stable bricks, a solid base. But there are situations where pushing forward yourself is likely to make things worse or more expensive in the long run.
- Large sections of brick are shifting, heaving, or sinking: this points to base failure or sub-grade movement. Repointing on top of that is temporary at best.
- You find tree roots encroaching on the base: the roots need to be dealt with and the sub-grade reworked before any surface repair makes sense.
- Joints fail repeatedly in the same spot every season: recurring failure usually means water is entering from below or behind, not just through the joint surface. A drainage fix or waterproofing assessment is needed.
- Historic or soft antique brick is involved: mortar selection for genuinely old masonry is more specialized, and using the wrong mix can damage irreplaceable material. A masonry conservator is worth consulting.
- The scope is very large (more than about 50 to 100 square feet of failed joints): at that scale, the cost and time difference between DIY and a professional mason narrows quickly, and a professional will finish in a fraction of the time with a consistent result.
If you're uncertain whether your patio situation falls into the 'get a pro' category, start by getting the base assessed. A structural mason or experienced contractor can usually tell you within a single visit whether the base is sound enough to justify surface repointing. That assessment is almost always worth the cost before you invest a weekend and a pile of materials in a repair that won't hold.
FAQ
How do I tell if my mortar failure is only joint erosion, or if the patio base is shifting too?
Look for movement indicators. If bricks rock, the surface feels springy, or you see repeated joint breakdown in the same spots, the sub-base or drainage is likely failing. In that case, repointing the joints only creates a new wear layer, so you should reset affected bricks and address drainage or base material first before repointing.
Can I repoint over old mortar that is still firm and well bonded?
Usually no. Repointing is only meant to replace failed material, so if the existing mortar is stable, you can clean and tidy the edges, but the goal is still to remove weak or powdering mortar down to sound, solid material. If you leave intact but degraded mortar, the new joints can look fine initially and then debond as the old mortar continues to crumble.
Should I use Portland cement mortar and just “match the color” for my brick patio?
Color matching alone is not enough, mortar hardness matters. If the replacement mortar is too hard for the original brick and older masonry, you can get brick cracking and spalling during freeze-thaw. If you are unsure, choose a mortar type that is equal to or softer than the existing mortar (Type N is common for newer patios, lime-based options are often safer for older softer brick).
What joint width should I keep when repointing if the old joints are uneven or eroded?
Keep the joint width consistent with the existing pattern wherever the brickwork is still intact, typically matching the original gauge (for example, about 1/2 inch if that is what you see on the patio). Don’t widen joints just to make a nicer look, wide joints tend to crack or erode faster, and they also change how the patio sheds water.
How deep do I need to cut out the old mortar, and what if the joint still crumbles near the surface?
Plan to remove failing mortar until the cavity reaches solid material that stops powdering and feels firm when brushed or checked with a fingertip. The article suggests a practical minimum depth around three quarters of an inch for many patios, but the deciding factor is reaching sound, bondable mortar, not just hitting a number.
Is it okay to use an angle grinder, or is that too risky for brick edges?
It is risky because drift can nick brick arrises, creating new edge damage and exposed points that become weak spots. If you use power tools, prioritize control, keep the blade parallel to the joint, and avoid pushing toward the brick face. For many DIYers, an oscillating multi-tool provides better control in tight joint geometry.
Why does my new mortar look darker after I repoint, and how long until the color stabilizes?
Fresh mortar is darker when wet and while it is still curing. Judge color only after the joints have fully cured, and for a reliable check do a small test patch and wait at least a couple of days before evaluating, with deeper assessment after longer cure time. Wet mortar can mislead you into thinking you used the wrong mix.
Do I need to mist the joints with water, and what happens if I let them dry too fast?
Yes, curing needs moisture so the mortar can complete its chemical hardening. If you let it dry quickly, especially in hot wind, you can end up with weaker joints, crumbling edges, and premature failure. A common approach is light misting multiple times during the first few days, then continuing to protect from harsh weather.
When can I walk on the patio, move furniture, or pressure wash nearby?
Avoid heavy foot traffic and moving furniture on the repointed sections for at least 48 to 72 hours. For pressure washing, keep it away from new joints for at least a couple of weeks because pressure can dislodge partially cured mortar and force water into microscopic voids.
Should I seal my brick patio after repointing, and what type of sealer is safest?
Sealing is optional, but in wet or heavy freeze-thaw climates it can help repel water. If you seal, wait until full cure (about 28 days) and choose a breathable, penetrating silane-siloxane style sealer. Avoid glossy film-forming coatings that trap moisture and can worsen spalling and joint damage.
What’s the best time of year to repoint if my area freezes in winter?
Avoid repointing late fall through early spring unless you can protect the work from freezing during cure. Even if the surface looks set, freezing during early curing can weaken joints and lead to early cracking or spalling, so plan for stable temperatures during the first week and protective conditions at night.
When is it smarter to hire a pro instead of continuing with DIY repointing?
If the base is soft or eroded, large areas feel springy, multiple bricks have shifted significantly, or you have ongoing drainage-related failure, DIY repointing can become cosmetic and short-lived. A structural mason or experienced contractor can evaluate whether you need base stabilization or resetting before investing in mortar and labor.
Next Article
How to Paint a Brick Patio: Step-by-Step DIY Guide
Step-by-step guide to paint a brick patio, including surface prep, moisture checks, coating choices, and troubleshooting