You can seal a pea gravel patio, but it works differently than sealing a flat concrete slab. The gravel needs to be bound in place first (either set in a resin binder, concrete, or compacted base), cleaned thoroughly, and completely dry before you apply a sealer. For loose pea gravel, a penetrating silane/siloxane sealer gives you moisture and stain protection without a visible film. For exposed aggregate concrete (pea gravel embedded in concrete), a wet-look acrylic sealer like Brickform Gem-Seal or W. R. Meadows EXPO-GLOSS OTC will deepen the color and protect the surface. Either way, prep is everything. A sealer applied over damp, dirty, or unstable gravel will peel, cloud, or fail within months.
How to Seal a Pea Gravel Patio: Step by Step Guide

Talia Lang
1 Jun 2026
What sealing a pea gravel patio actually does
A sealer does not glue loose gravel down or fix drainage problems. If your pea gravel is migrating, washing out, or sinking in spots, sealing is not the solution to that problem. What a sealer does is reduce moisture absorption, slow staining, protect against freeze-thaw damage, and (with a film-forming product) enhance color so the stones look richer and more saturated.
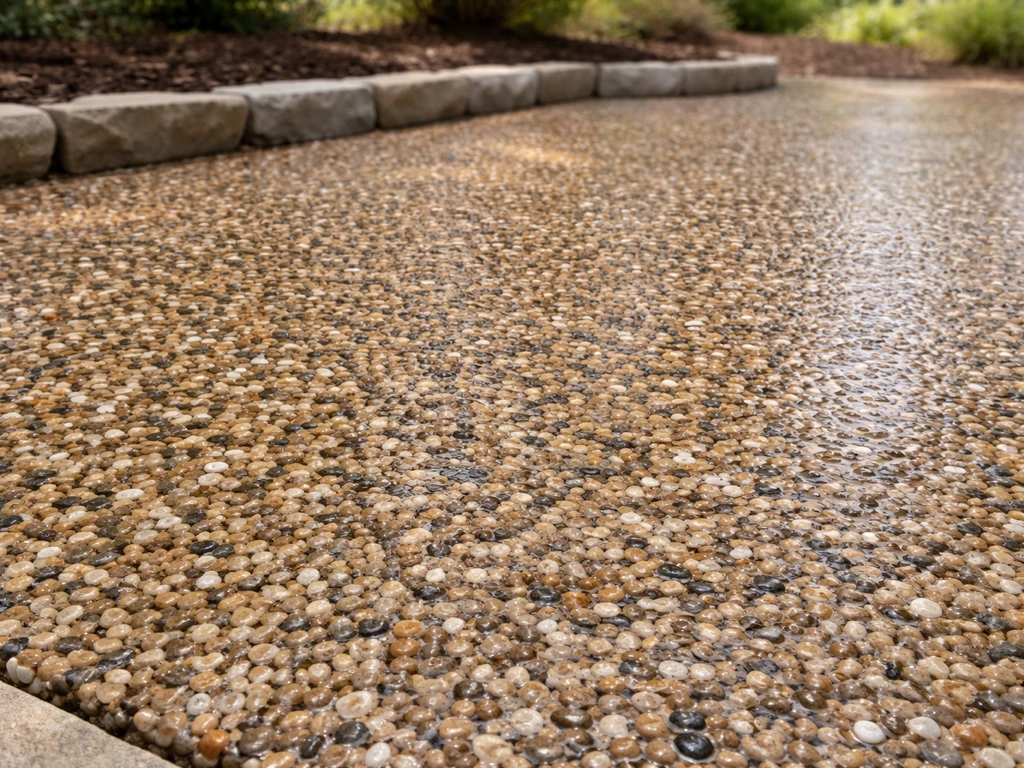
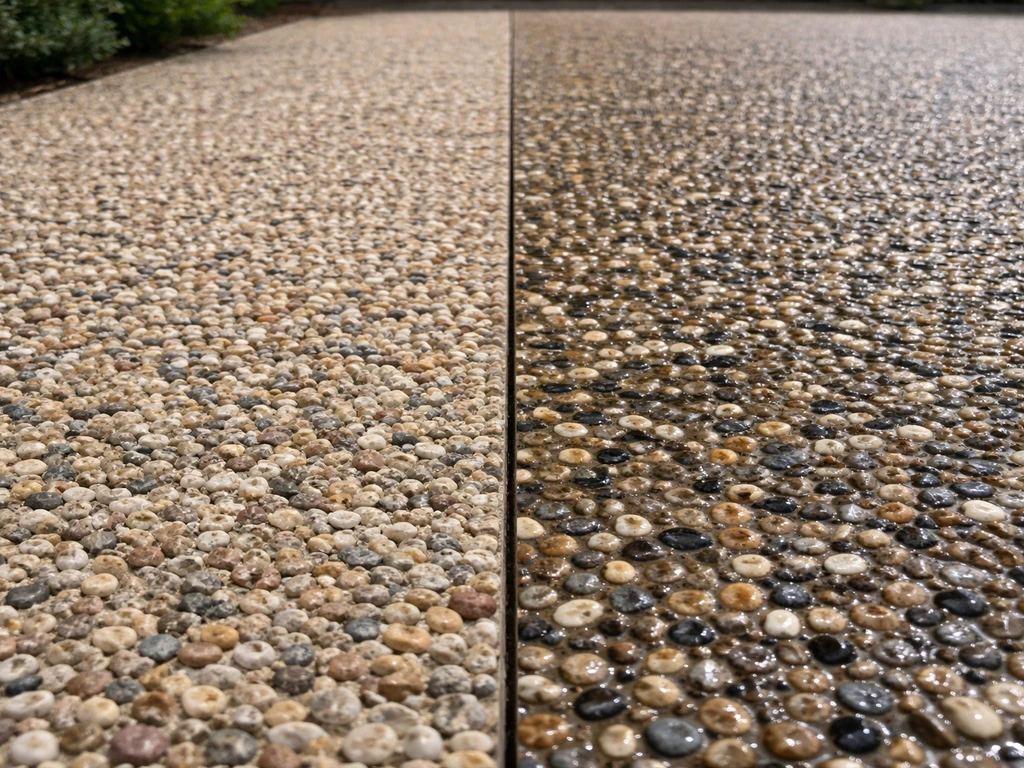
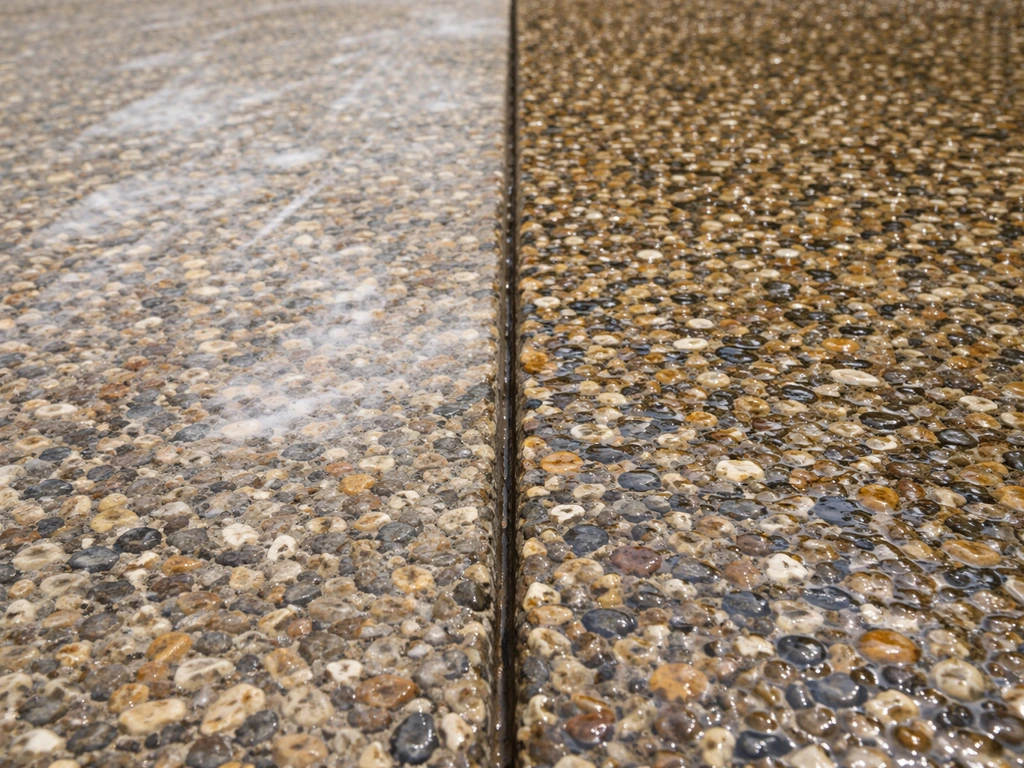
There are two main sealer types and they behave very differently on pea gravel. Penetrating sealers (silane or silane/siloxane blends like Sikagard 440 Clear) soak into the substrate and react chemically with it. They do not change the surface appearance and they stay breathable, meaning moisture vapor can still pass through. Film-forming sealers (acrylic products like Gem-Seal or EXPO-GLOSS OTC) sit on top of the surface and create a protective coating. They produce the glossy, wet-look finish you see on decorative exposed aggregate driveways. They lock in color beautifully but they also trap any moisture that is already in the substrate, which is why prep and drying time are non-negotiable.
For pea gravel embedded in concrete, a film-forming wet-look acrylic is the go-to choice. It highlights the aggregate colors and gives the patio a polished finished look. For a gravel-and-binder system (where the stones are held with a resin or polymer stabilizer), a breathable penetrating sealer is safer because it will not trap moisture underneath a film layer.
When sealing is (and isn't) the right move
Sealing makes sense when your patio surface is structurally sound, the gravel is stable and fully cured (if set in concrete, wait at least 28 days), and you want to protect the surface and keep it looking good. It is also a good move before winter if you live somewhere with freeze-thaw cycles, since moisture intrusion is one of the main causes of aggregate spalling.
Sealing is not the right move in a few specific situations. If your pea gravel is purely loose (not bound in concrete or a stabilizing resin), a sealer will not hold it in place and you will waste your money. If you have significant gravel migration or washout happening, you need to address the base and edging first. Sealing over gravel that keeps shifting is like painting over a wall with structural cracks.
If your pea gravel is moving, the stabilization step (resin binder, concrete embedment, or a properly compacted base with edging) should be handled before you seal stabilize a pea gravel patio. If drainage is the core problem, that has to come first. If the existing surface has widespread sealer failure, active efflorescence (white salt deposits), or the gravel is pulling away from the substrate, stop and fix those things before you reach for a sealer.
- Seal if: surface is stable, clean, dry, and structurally sound
- Seal if: you want color enhancement, stain resistance, or freeze-thaw protection
- Do not seal if: gravel is loose and not bound in a substrate
- Do not seal if: drainage or grading problems are causing washout or shifting
- Do not seal if: the surface has active efflorescence or existing failed sealant layers
- Do not seal if: the surface is damp or rain is expected within 4 hours
If you are not sure whether your patio is stable enough to seal, check out the related guide on how to stabilize a pea gravel patio. That is the step that comes before this one if movement is an issue.
Prep steps: cleaning, weed removal, repairs, and grading
This is the part most people rush and then wonder why their sealer failed. Spend more time on prep than on the actual sealing and you will get dramatically better results. Every manufacturer says it, and they are right: sealer applied over contaminated, damp, or unstable substrate will not bond properly.
Weed and organic growth removal
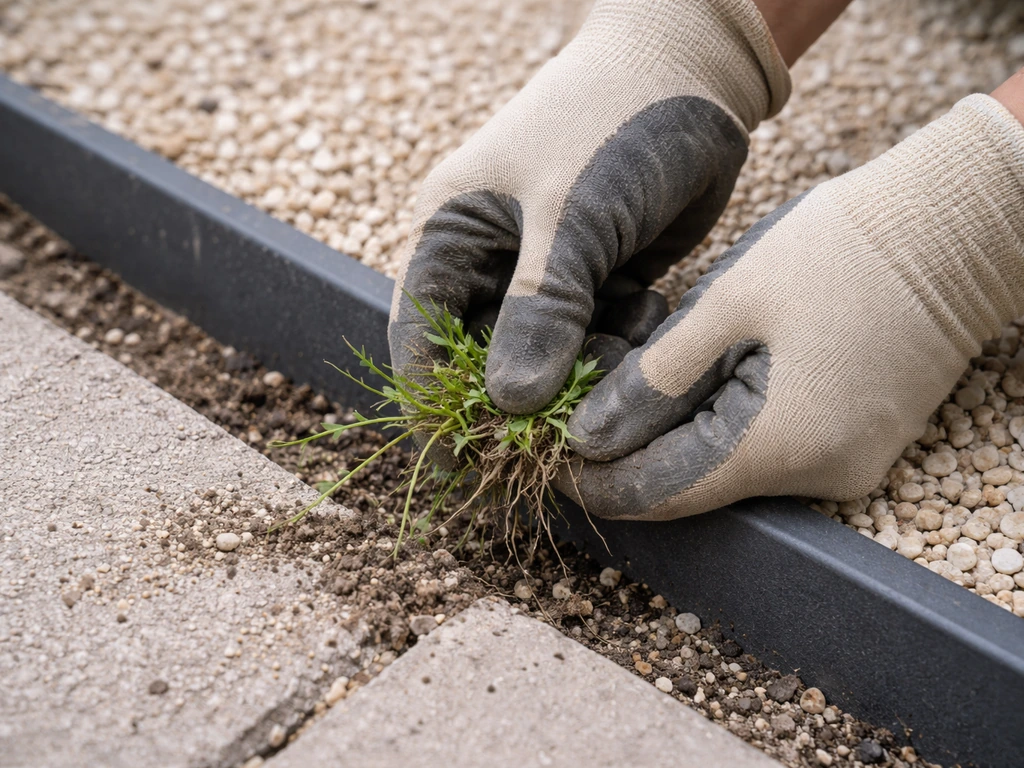
Pull any weeds by hand or treat with a non-residue-leaving herbicide at least a week before you plan to seal. Make sure the area is completely clear of plant matter, moss, and algae. If you have green or black organic staining on the stones, scrub it off with a stiff brush and a diluted cleaning solution, then rinse well. Sealing over organic growth locks it in and gives it something to hide behind.
Cleaning the surface
For exposed aggregate concrete, pressure wash the entire surface to clear dirt, dust, cement paste residue, and any loose debris. W. R. Meadows specifically warns that cement paste residue must be removed before applying their wet-look sealer, because sealing over a weak, milky residue layer leads to poor performance and appearance. After pressure washing, scrub with a degreasing soap and rinse clean. Let the surface dry completely, which typically means at least 24 to 48 hours of dry weather depending on your conditions. No standing water, no damp spots.
Addressing repairs and grading
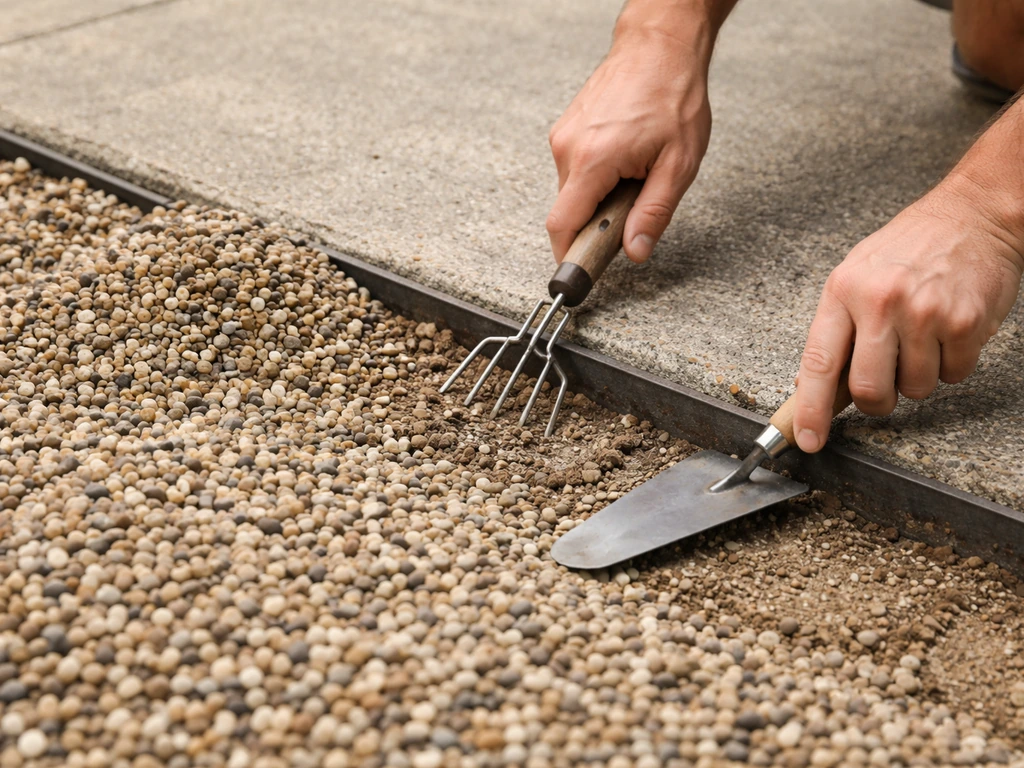
Check the edges of the patio for voids or areas where gravel has migrated away from the border. Repack loose areas and repair any edging that has shifted. If you have low spots where water pools, address grading before sealing. A sealer applied over an area with drainage problems will get tested hard every rain, and trapped moisture is one of the leading causes of sealer failure. The surface should have at least a 1 to 2 percent slope away from the house or toward a drainage point.
Dealing with existing sealant
If the patio has been sealed before, you need to check whether the old coating is still bonded. Try the tape test: press a strip of strong tape onto the surface and pull it off sharply. If chunks of sealer come with it, the old coating has failed and needs to come off before you apply anything new. W.
R. Meadows recommends that if you are applying over a competitive product (not their own), you do a test patch first or strip the old sealer entirely. Stripping typically involves applying a sealer stripper, letting it dwell, scrubbing with a stiff brush, and rinsing thoroughly with clean water.
Concrete Decor also notes that sealer removal may require thorough rinse or vacuuming to remove residue and that color or appearance can be impacted if residue is left behind sealer stripper, letting it dwell, scrubbing with a stiff brush, and rinsing thoroughly with clean water. Do not apply a new sealer over a failed or peeling old one.
Choosing the right sealer and finish
The choice of sealer comes down to two things: what your patio substrate is made of, and what finish you want. Here is a side-by-side comparison of the main options.
| Sealer Type | Best For | Finish | Breathable? | Reapply Every |
|---|---|---|---|---|
| Silane/Siloxane Penetrating (e.g., Sikagard 440 Clear) | Bound gravel, concrete aggregate, brick | Natural/invisible | Yes | 5–10 years |
| Solvent-Based Acrylic Film-Forming (e.g., Gem-Seal, EXPO-GLOSS OTC) | Exposed aggregate concrete patios | Wet-look/high gloss | No | 2–4 years |
| Water-Based Acrylic Film-Forming | Light-duty decorative aggregate | Low to medium gloss | Slightly | 2–3 years |
For a pea gravel patio set in concrete, a solvent-based wet-look acrylic is usually the most satisfying choice because it brings out the natural color and depth of the stones dramatically. Products like Brickform Gem-Seal and W. R. Meadows EXPO-GLOSS OTC are specifically formulated for exposed aggregate finishes. Gem-Seal is marketed as non-yellowing and dries clear with a high gloss, which matters a lot for decorative surfaces. If you want a more understated, natural look, a penetrating silane like Sikagard 440 Clear gives you moisture protection without altering appearance at all.
On finish options: matte or low-sheen sealers hide imperfections better and look more natural on a casual backyard patio. Wet-look or high-gloss finishes are striking and dramatic but also show every footprint, leaf stain, and water spot more readily. Think about how much ongoing maintenance you want to do before choosing the glossiest option on the shelf.
If you are applying over an existing solvent-based sealer, you can generally apply another solvent-based product over it as long as the existing coat is still in good shape and well bonded. W. R. Meadows notes that a water-based sealer can go over a solvent-based one if both are their products, but they recommend a test patch if you are mixing brands. When in doubt, test before you commit to the entire surface.
Application walkthrough: tools, coverage, coats, and curing
Tools and materials you will need
- Pump garden sprayer or low-pressure airless sprayer (for penetrating sealers)
- 9-inch roller with a 3/8-inch nap cover (for film-forming acrylics on textured aggregate)
- Paint tray and extension pole
- Stiff-bristle brush for edges and tight areas
- Solvent-resistant gloves and eye protection
- Respirator rated for organic vapors if using solvent-based products
- Painter's tape and plastic sheeting to protect adjacent surfaces
Weather and temperature conditions
This is not optional advice. Sika specifies that Sikagard 440 Clear should not be applied if temperatures are expected to drop below 20 degrees Fahrenheit (-7 Celsius) within 12 hours or if rain is expected within 4 hours of application. The maximum application temperature is 95 degrees Fahrenheit (35 Celsius). Those limits exist for every quality sealer, not just that product. Applying in direct hot sun causes solvent-based products to flash off too quickly, leading to uneven coverage and streaking. Ideal conditions are a dry, overcast day between 50 and 85 degrees Fahrenheit with low humidity. Check the forecast for at least 24 hours post-application.
Application steps
- Confirm the surface is completely clean and dry. No exceptions.
- Mask off any surfaces you do not want sealer on, including house siding, adjacent pavers, and plant beds.
- Stir (do not shake) the sealer if using an acrylic product. Shaking creates bubbles that show up in the finish.
- For penetrating sealers: apply with a pump sprayer in a consistent, even pattern. Work in manageable sections of about 10 square feet at a time. Apply generously enough that the substrate absorbs it, but do not let it puddle.
- For film-forming acrylics: use a roller for the main field and a brush for edges and corners. Apply thin, even coats. Thick coats are the number one cause of hazing and peeling. W. R. Meadows specifically warns that over-application of EXPO-GLOSS OTC causes discoloration, peeling, hazing, and poor adhesion.
- Work from one end of the patio toward an exit point so you do not walk over freshly sealed areas.
- Allow the first coat to dry completely. Sikagard 440 Clear has a typical drying time of 4 hours at 70 degrees Fahrenheit and 50 percent relative humidity. In cooler or more humid conditions, extend that window.
- Apply a second coat in the same manner, perpendicular to the first to ensure even coverage.
- Keep foot traffic off the surface for at least 24 hours after the final coat. Allow 72 hours before placing furniture.
Coverage rates vary by product and surface texture. Rough exposed aggregate absorbs more sealer than a smooth slab, so budget extra material. Most film-forming sealers cover around 150 to 250 square feet per gallon on textured aggregate surfaces. Read the product data sheet for the specific product you choose and plan accordingly.
Common problems and how to fix them
White haze or milky appearance
This is the most common sealer failure on aggregate surfaces, and it almost always comes down to one of three causes: the surface was damp when the sealer was applied, the sealer was applied too thick, or humidity was too high during application. Trapped moisture pushes against the sealer film from underneath and turns it cloudy. In mild cases, the haze sometimes clears as the surface dries out and moisture escapes through micro-imperfections in the film.
In worse cases, the sealer has delaminated and needs to come off. Nox-Crete notes that a frosty white appearance can indicate delamination, and that a pressure washer may remove it. For stubborn cases, a chemical sealer stripper followed by a full reprepand and reapplication is the proper fix.
Streaks and roller marks
Streaks usually happen when the sealer is applied unevenly, when you stop and start in the middle of a section, or when overlap lines are not blended while the product is still wet. W. R. Meadows flags that roller application can leave visible overlap marks if technique is poor. The fix is to back-roll immediately to blend the overlap, and to maintain a wet edge throughout the application. If streaks have already dried, light sanding and another thin coat can sometimes hide them. If the streaking is severe, stripping and starting over gives you the cleanest result.
Peeling or flaking sealer
Peeling is almost always a prep failure or an incompatibility issue with an existing coating. If the sealer never bonded properly, it will start to flake and peel as soon as it gets foot traffic and weather exposure. The solution is full removal of the failed coating using a stripper, mechanical scrubbing, and thorough rinsing before starting over. There is no patch fix for widespread peeling. You have to strip it and start clean.
Discoloration or uneven color
Patchy or uneven color after sealing often means the sealer was applied at different thicknesses across the surface, or that the surface absorbed unevenly because it was not uniformly clean. Areas with leftover cement paste residue or contamination will look different from clean areas once a glossy sealer goes over them. Prevention is the real answer here: thorough cleaning before application. If you are already dealing with it post-application, a light uniform second coat can sometimes even things out if the first coat is properly bonded.
How long the seal will last (and how to maintain it)
Realistically, a film-forming acrylic sealer on a pea gravel patio will last 2 to 4 years with normal use before it needs reapplication. High traffic areas, harsh winters, or patios in full sun will trend toward the shorter end of that range. Penetrating silane/siloxane sealers last longer because they are chemically bonded into the substrate rather than sitting on top. Ghostshield puts the typical service life of silane/siloxane products in the 3 to 15 year range, and a WisDOT study measuring silane on concrete surfaces found a useful lifespan of 5 to 6 years under demanding conditions. Foundation Armor claims up to 7 to 10 years for some penetrating products.
The Concrete Network recommends resealing exposed aggregate surfaces every few years as needed, which aligns with those timelines. Do not wait until the sealer is visibly failing before you reseal. Inspect the surface annually. Pour a small amount of water on it and watch what happens. If the water absorbs quickly instead of beading up, the sealer is wearing thin and it is time to clean the surface and apply a fresh coat.
Ongoing maintenance between seal coats
- Rinse the patio periodically to remove dirt, leaves, and debris before they stain
- Avoid harsh chemical cleaners that can break down the sealer film
- Promptly clean up oil, grease, or organic spills before they penetrate
- Reapply sealer when water no longer beads on the surface
- Address any weeds or plant growth immediately so roots do not disrupt the surface
- Check edges and borders seasonally for gravel migration or voids
When to call a professional
Most homeowners can handle sealing a pea gravel patio on their own. Where it gets complicated is when the underlying problems are bigger than the sealer can solve. If your patio has significant drainage failures, a compromised base, widespread sealer delamination across the entire surface, or structural cracking in the concrete substrate, those are jobs where a professional will save you time, money, and the frustration of watching a new sealer fail for the same reasons the old one did.
Sealing is maintenance, not a structural fix. If you are trying to restore a slate patio, the same principle applies: address the underlying condition first, then seal only after the surface is fully cleaned and dry. Get the foundation right first, and the sealing part is genuinely manageable on a weekend. If you want a step-by-step plan for restoring the look of your outdoor space, this includes how to refurbish a patio from prep through sealing.
If what you need instead is to re-sand patio pavers, focus on the joint sand removal and replacement process before you consider any protection steps how to re-sand patio pavers.
FAQ
Can I seal pea gravel if the stones are currently loose or uneven?
Only if the stones are already stabilized (set in concrete, or bound with a compatible resin or polymer stabilizer). If they move underfoot, sealers will not hold them in place and you can get rapid peeling or washout around the edges.
How do I tell whether I should use a penetrating sealer or a wet-look acrylic?
Penetrating products are the safer choice for systems designed to stay breathable (resin/binder-held gravel). Wet-look acrylics are typically for pea gravel embedded in concrete or an exposed-aggregate surface where you want color enhancement and a film finish. If you are unsure of the substrate type, do a small test patch and confirm whether water behavior changes without any visible film failure later.
What test can I do to check if my patio is too damp to seal?
After thorough cleaning, run a moisture check by taping a small plastic sheet (or using a tape test style approach) to the surface for several hours. If condensation forms underneath, wait longer. Sealing over trapped moisture is a common cause of cloudiness and delamination.
Will sealing stop weeds from growing through pea gravel?
No. Sealers usually reduce moisture and staining, but they do not act like a weed control system. For best results, remove weeds and prevent regrowth by addressing the bedding and using a pre-planned weed strategy before sealing.
Is it okay to seal if it rains the day after I apply the product?
Rain soon after application can ruin bond and coverage. Plan around the product’s recoat and rain window, and assume you need at least a full dry period before exposure to wet conditions. If rain hits early, do not “hope it cures,” wait and inspect, and consider a test patch for any tacky or cloudy areas.
Do I need to strip off old sealer before applying a new coat?
Not always, but you must confirm the old coating is still firmly bonded. Use the tape test on multiple spots. If it peels or transfers, removal is required, because sealing over a failed layer almost guarantees new peeling.
Why does my sealed patio look cloudy or hazy after application?
Most haze comes from moisture trapped under a film-forming coating, or from high humidity during application. Sometimes it improves as the surface fully dries, but if the haze persists, it may indicate delamination, and you may need to remove the coating and reseal.
What’s the best way to prevent streaks and overlap marks while sealing?
Maintain a continuous wet edge, apply in thin, even passes, and back-roll immediately if you see overlap lines (especially with roller application). Avoid stopping mid-section, and keep your overlap consistent so the film thickness stays uniform.
Can I fix patchy color without stripping the whole patio?
Sometimes a uniform second thin coat helps if the first coat is well bonded. If the patchiness is caused by contamination or cement paste residue, uneven absorption will keep showing, and the more reliable fix is deeper cleaning and full reapplication.
How do I handle leftover cement paste residue on exposed aggregate?
You need it removed before applying wet-look sealer. After pressure washing, scrub with a degreasing soap and rinse thoroughly, then verify the surface is completely dry. Any milky or weak residue layer can cause dull spots and poor adhesion.
What slope or drainage should my patio have before sealing?
Aim for a small, consistent slope (often referenced as about 1 to 2 percent away from the house or toward a drainage point). Low spots and pooling will test the sealer every storm cycle and increase the chance of trapped moisture and early failure.
How much sealer should I buy for coverage on textured aggregate?
Rough or porous exposed aggregate absorbs more product, so buy extra and plan based on the specific product’s coverage chart for textured surfaces. If you are doing a second coat, treat it as an additional full coverage requirement unless the label states otherwise.
How long should I wait before walking or placing furniture on the sealed surface?
Follow the label for foot traffic and full cure timing. Even if it feels dry, film-forming acrylics can be vulnerable to scuffing and imprinting during cure, so wait longer for high-traffic areas and heavy objects.
Will sealing change the color permanently, or can it yellow over time?
Wet-look acrylics can deepen and saturate color, and some products may yellow depending on formulation and sun exposure. Penetrating sealers typically do not create a glossy film, but they can still slightly darken stones. Use a test patch if color permanence is important to you.
How do I know when it’s time to reseal?
Use a simple water behavior check. If water starts absorbing quickly instead of beading, the protective effect is thinning. Reseal before failure is obvious, especially before freeze-thaw seasons.
When should I hire a professional instead of sealing myself?
If you have widespread movement, compromised base or major grading issues, extensive old-coating delamination, or structural cracking in a concrete substrate, sealing will not address root causes. In these cases, professionals can stabilize and repair first so the new sealer has a chance to last.
Next Article
How to Re-Sand a Patio: DIY Steps, Tools, and Tips
Step-by-step DIY guide on how to re-sand a patio, choose tools and grit, control dust, and finish with the right sealant
