Restoring a slate patio means lifting the damaged tiles, fixing whatever caused them to fail in the first place (usually the base or drainage, not just the tiles themselves), re-setting them properly in fresh mortar, repointing the joints, and sealing the surface. If you skip the base work and just relay the slates, they'll be rocking and gapping again within a season or two. This guide walks you through the whole process in the right order.
How to Restore a Slate Patio: Step-by-Step Fixes

Talia Lang
4 Jun 2026
Quick diagnosis: what's actually wrong with your slate patio
Before you pull anything up, spend ten minutes walking the patio and pressing on tiles with your foot. That simple test tells you a lot. A tile that rocks or shifts when you step on it has lost support underneath, there's either a void in the mortar bed or the base has settled. That's a base problem, not a cosmetic one. A tile that's cracked or broken but sits completely flat and solid is a tile-level issue you can fix without disturbing the whole section. Gaps between tiles that have opened up slowly over time usually point to the bedding layer or sub-base settling unevenly.
Look for water pooling on the surface after rain. If puddles sit there for more than a few minutes, the slope (grade) is wrong or has shifted, and that standing water is likely what's accelerating your damage. Saturated soil weakens support and creates voids, which is why tiles near low spots tend to be the worst. Also check the perimeter edges: if edge tiles are dropping or tipping outward, you've got edge restraint failure contributing to the whole patio spreading apart.
Here's a simple way to sort your damage into two categories before you start:
| What you see | What it means | Repair scope |
|---|---|---|
| One or two cracked/broken tiles, rest are solid | Tile-level damage only | Replace individual tiles |
| Tiles rocking when stepped on | Void or bedding failure beneath | Lift, re-bed, check drainage |
| Multiple tiles at different heights | Sub-base settling unevenly | Lift section, regrade base |
| Wide gaps, weeds growing through joints | Joint failure undermining bedding | Repoint at minimum, possibly re-bed |
| Water pooling on surface | Grade/slope has shifted | Re-establish pitch before relaying |
| Tiles shifting after every heavy rain | Drainage or subsurface washout | Full base and drainage repair |
Safety, tools, and materials checklist
Slate contains respirable crystalline silica, which is a serious lung hazard when cut or ground dry. Any time you're cutting slate or chipping mortar, use a wet-cutting method: an angle grinder or cut-off saw with a water attachment keeps dust suppressed at the source. NIOSH, OSHA, and the UK's HSE all identify wet cutting as the primary engineering control for this hazard. At minimum, wear an N95 or P100 respirator if any dry cutting or grinding is unavoidable, and work outdoors with good airflow.
Tools you'll need
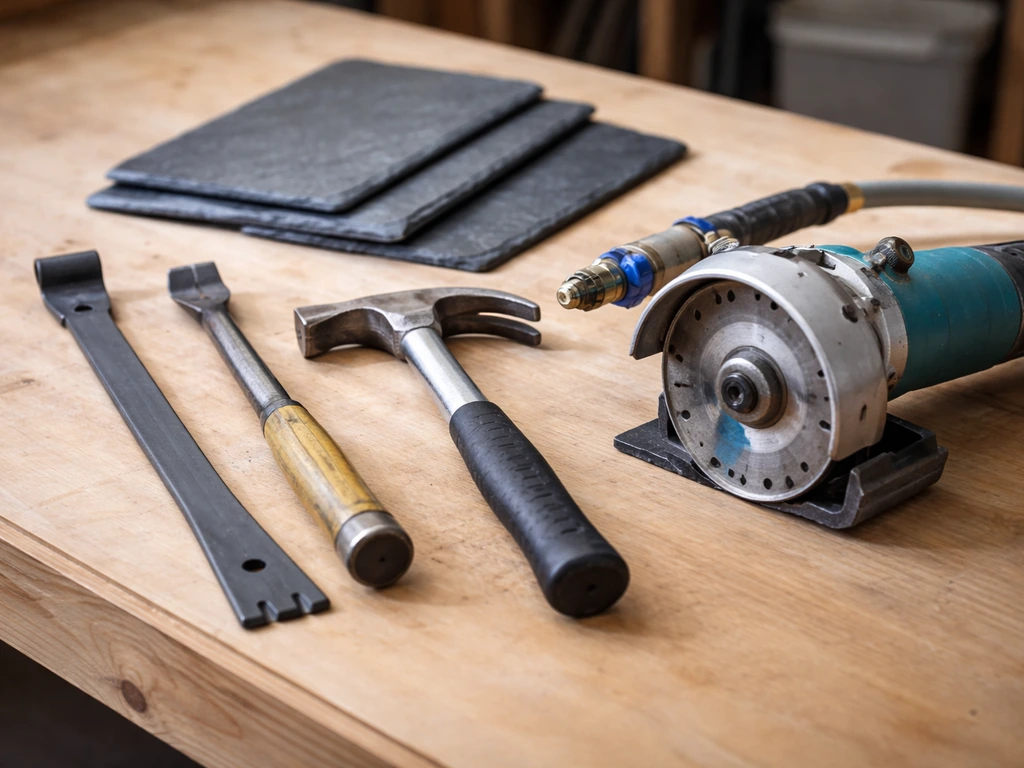
- Flat pry bar and cold chisel (for lifting tiles and chipping old mortar)
- Hammer
- Angle grinder or wet-cut saw with diamond blade (for cutting replacement tiles to size)
- Margin trowel and notched trowel (for spreading mortar)
- Spirit level, at least 4 feet long
- Rubber mallet
- Stiff brush and garden hose
- Bucket and mixing paddle (or cordless drill with paddle attachment)
- Plate compactor or hand tamper (if you're rebuilding the base)
- Safety glasses, knee pads, N95/P100 respirator
Materials you'll need
- Replacement slate tiles (match thickness as closely as possible — slate varies, so buy a few extras)
- Polymer-modified medium-bed mortar (ANSI A118.4 compliant — products like Custom Building Products' large-tile mortar or TEC PermaLastic 100 work well for slate)
- Pointing/repointing mortar (a dense exterior joint mortar like LATICRETE MVIS Pointing Mortar is a solid choice for exterior stone)
- Compactable aggregate base material (crushed stone, if the sub-base needs rebuilding)
- Penetrating/impregnating sealer rated for natural stone or slate
- Stone cleaner or diluted muriatic acid (for cleaning before sealing)
- Grout sponge and bucket
On mortar choice: use a polymer-modified medium-bed mortar, not basic thin-set. Slate tiles vary in thickness from piece to piece, and medium-bed mortar is designed to handle that variation and provide full support across the tile's face. Thin-set applied too thickly can slump; medium-bed gives you the adjustment room you need without compromising bond strength.
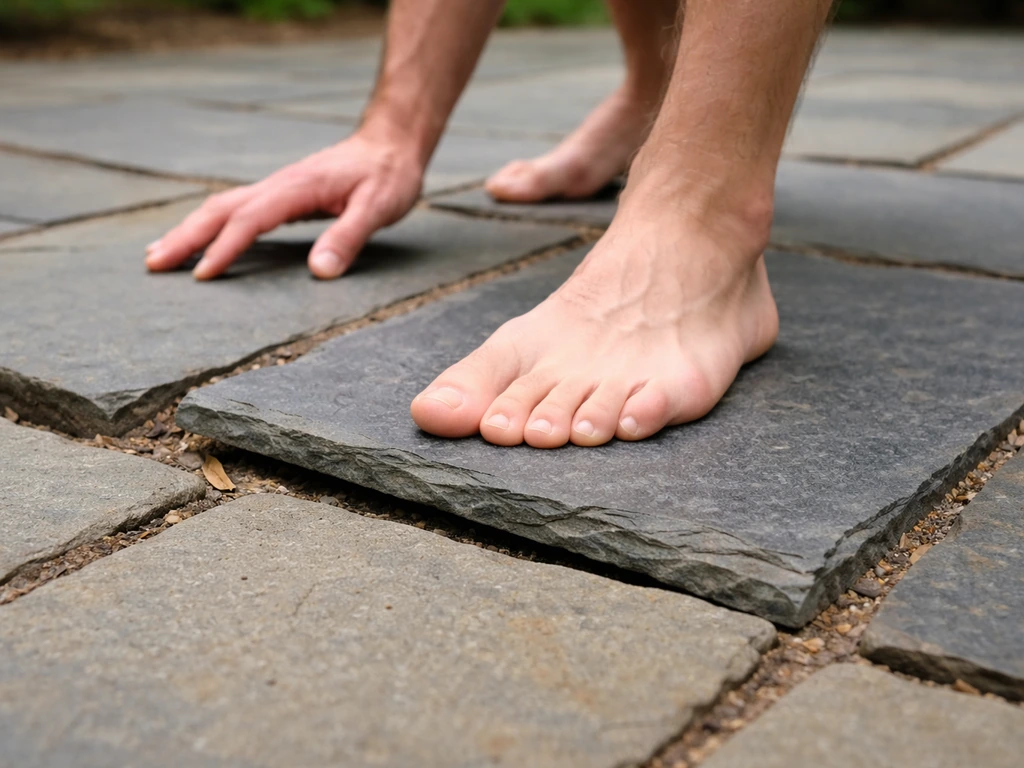
Remove and replace broken or loose slate tiles
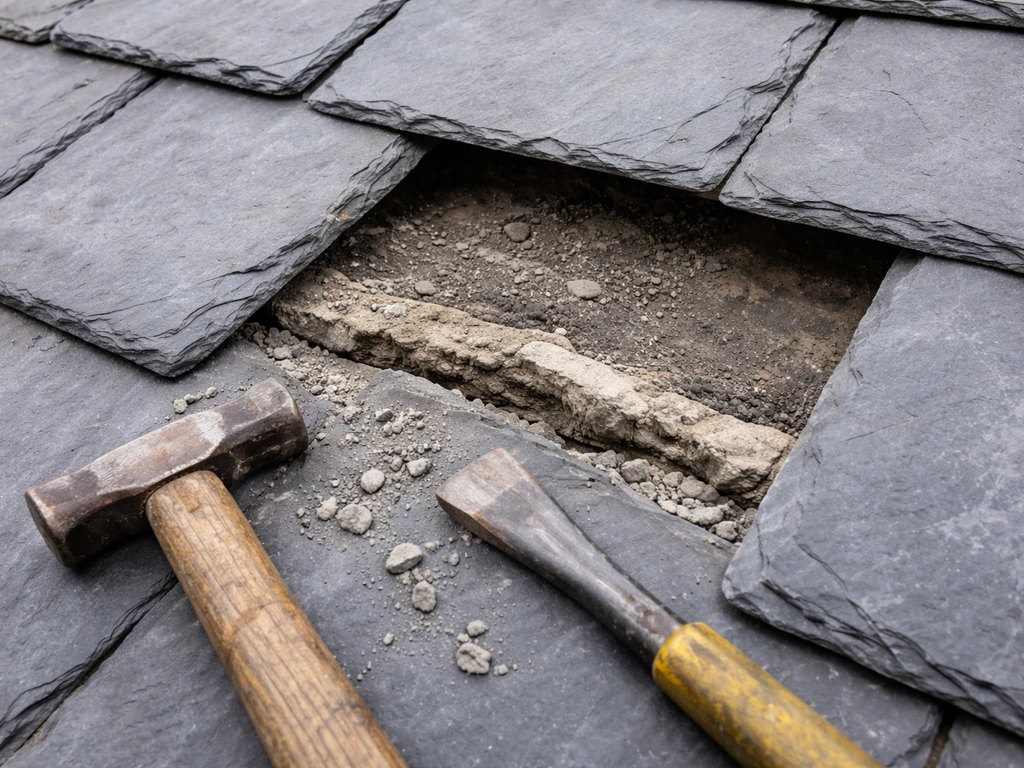
Start by clearing the joint material around the tiles you're removing. Use a cold chisel and hammer to chip out the grout or pointing mortar in the joints on all four sides. Take your time here. Rushing with too much force will crack adjacent tiles you weren't planning to replace. Once the joints are cleared, slide a flat pry bar horizontally under the edge of the tile. Slate set on a mortar bed can be stubborn, if the tile is well-bonded, you may need to work the bar around all four sides before it breaks free. Lift steadily rather than levering hard at one point, which can snap the slate.
Once the tile is out, chip away the old mortar from the substrate below. You want to get back to a clean, solid surface. If the old mortar comes off in large chunks and the surface underneath looks sound, that's fine. If chunks of the base come up with it, or you find soft, sandy, or wet material underneath, you have a base problem that needs addressing before you do anything else, see the next section.
Set removed tiles aside carefully. Even cracked tiles can be useful as size references when cutting replacements. When cutting new slate to fit, always wet-cut. The UK HSE also advises using water suppression when cutting masonry products, since uncontrolled cutting can generate high silica-containing dust always wet-cut. Score and snap works for some cuts on thinner slate, but a wet saw gives you clean edges and keeps silica dust out of your lungs.
Fix the base and drainage before you relay anything
This is the step most DIYers skip, and it's exactly why their patio fails again. If tiles were rocking, if water was pooling, or if the base material came up soft and crumbly when you removed the tiles, you cannot just fill the hole with fresh mortar and relay. For a complete overview of the full refurb process step by step, see our guide on how to refurbish a patio. You need to address the root cause.
The standard layered structure under a mortar-set slate patio is: compacted subgrade (native soil) at the bottom, then a compacted aggregate base (typically 4 to 6 inches of crushed stone), then a mortar bed, then the slate. A pea gravel patio can fail in a similar way if the base layers and drainage are not stable, so start by rebuilding the support before you relay the surface mortar-set patio. Each layer serves a purpose. When any layer fails, usually the aggregate base washing out or the subgrade soil compressing unevenly, everything above it moves.
Rebuilding a failed base section
- Excavate the area down to firm, stable soil. Remove all soft, saturated, or loose material.
- Check for drainage issues: look for signs that water is flowing under the patio or that soil is eroding. If the ground stays perpetually wet, you may need a French drain or to redirect downspouts before you proceed.
- Add compactable aggregate base in layers no thicker than 3 to 4 inches at a time. Compact each layer thoroughly with a plate compactor or hand tamper. Compaction is what gives the base its load-bearing capacity — loose aggregate will just settle again.
- Establish the correct grade before you start the mortar bed. You need roughly a 2% slope (about 1/4 inch of drop per linear foot) pitching away from the house or toward a drain. Check this with a long level and a tape measure. Getting the slope right at this stage is far easier than trying to correct it with mortar thickness.
If the problem is localized, one or two tiles with small voids, you can fill the voids directly with fresh mortar before relaying. But if multiple sections are affected, or if the whole patio has a drainage problem, doing a partial fix just shifts the problem to the next weakest spot. It's worth doing it right once.
Re-set slate properly: bedding, leveling, and spacing
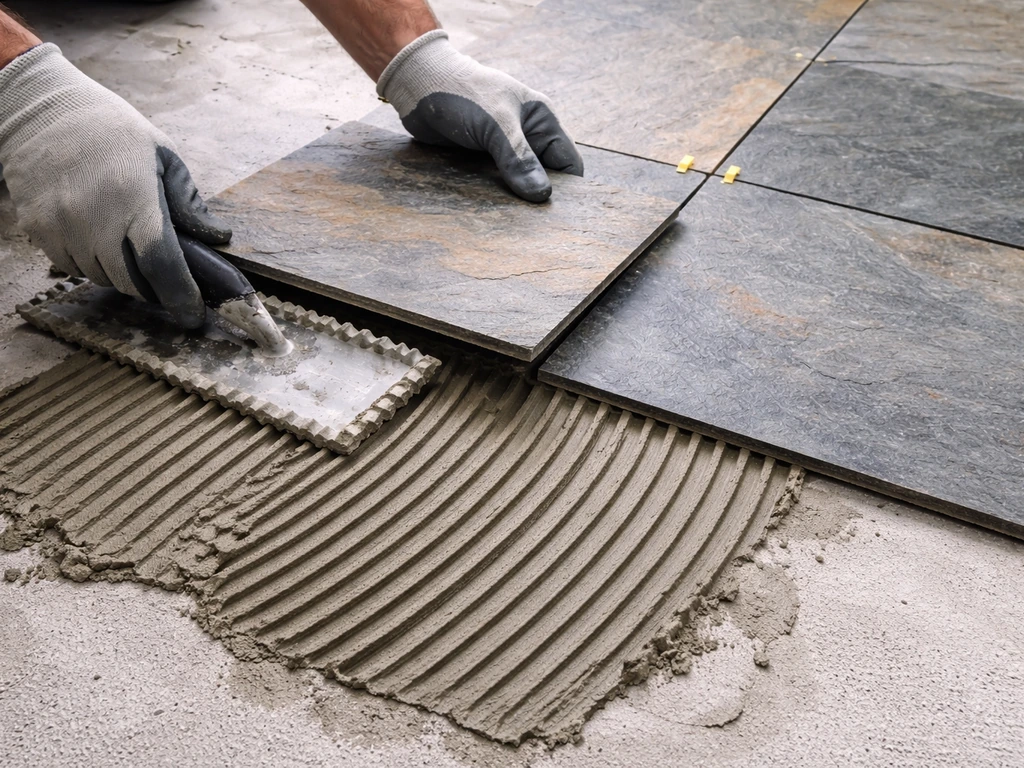
Mix your polymer-modified medium-bed mortar to a peanut butter consistency, stiff enough to hold a notch, wet enough to bond. Back-butter each slate tile as well as the substrate. Back-buttering (applying a thin layer of mortar directly to the back of the tile) dramatically improves bond strength with natural stone, which can be dense and low-absorption.
- Apply mortar to the base with a notched trowel, then comb it flat so the ridges collapse uniformly when the tile is pressed down.
- Set the tile into position and press firmly, then give it a few taps with a rubber mallet while moving across the tile's surface — you want full contact with no hollow spots underneath.
- Check level in both directions. Adjust by pressing the tile down further or adding a small amount of mortar to one edge. Work quickly because polymer-modified mortars start to skin over.
- Maintain consistent joint spacing. Slate traditionally uses wider joints — at least 3/16 inch minimum, and often 3/8 inch or more — to accommodate the natural thickness variation between tiles. Wider joints also make repointing easier. Use tile spacers or cut pieces of wood to keep spacing consistent while the mortar sets.
- Check that the new tile is level with adjacent tiles. A 4-foot level across three or four tiles at once will catch any high or low spots before the mortar cures.
- Let the mortar cure fully before walking on the tiles or filling the joints — typically 24 hours minimum, 48 hours in cooler or humid weather.
One thing worth knowing about slate specifically: it's fragile at the edges and corners compared to porcelain or concrete pavers. Don't lever against a freshly set tile to adjust a neighbor, and avoid setting heavy loads on the patio until the mortar has fully cured.
Repointing the joints and finishing the surface
Repointing the joints
Once your tiles are set and the mortar bed has cured, you can repoint the joints. For an exterior slate patio, use a dense, hard exterior pointing mortar rather than standard sanded grout. Products like LATICRETE MVIS Pointing Mortar are designed specifically for exterior stone applications and hold up much better to freeze-thaw cycles and moisture than interior grout products.
Dampen the joints lightly before applying the pointing mortar, this slows absorption and helps the mortar cure properly rather than drying out too fast. Press the mortar firmly into the joints using a margin trowel or a grout float, working it in completely with no voids. Strike the joints slightly below the tile surface so they're recessed rather than flush or crowned. Crowned joints collect water and fail faster.
Clean up excess mortar from the tile faces as you go, before it hardens. Wet a sponge and wipe carefully, avoid dragging mortar back into the joints you just filled. Mortar staining on slate can be stubborn to remove once it's cured, especially on textured or rough-cleft surfaces. If you do get dried mortar haze on the tiles, a diluted solution of muriatic acid (follow the product's safety instructions and dilution ratio exactly, and rinse thoroughly) will usually lift it.
Cleaning the whole patio before sealing
Before you apply any sealer, the entire patio surface needs to be clean and dry. For a pea gravel patio, sealing is similar in that you still want a surface that is clean and dry before applying the right type of sealer for the material how to seal a pea gravel patio. Sweep off loose debris, then scrub with a stiff brush and a stone-safe cleaner. Mildew and algae are common on slate patios because the texture and porosity hold moisture. A diluted bleach solution or a proprietary algae remover handles most biological growth. Rinse thoroughly and let the patio dry completely, at least 24 to 48 hours of dry weather before sealing. Applying sealer over damp stone traps moisture underneath and can cause the slate to spall or the sealer to fail.
Sealing the slate
For an outdoor slate patio, use a penetrating (impregnating) sealer, not a topical film-forming sealer. Penetrating sealers soak into the stone's pores and form a barrier while still allowing moisture vapor to escape from within the stone. Topical sealers look glossy and attractive in the store, but they can trap moisture in a porous natural stone and eventually cause surface spalling, exactly what you don't want. To check whether your existing sealed areas still have protection, do a simple water-drop test: if a few drops of water darken the stone or absorb within a minute or two, the sealer is depleted and it's time to re-seal.
Apply the penetrating sealer with a brush, roller, or pad applicator. Work it into the surface and let it penetrate for about 3 to 5 minutes (follow the specific product's instructions), then wipe off the excess before it dries on the surface. Dried sealer residue on stone creates a white, streaky haze that's difficult to remove. Apply a second coat after the first has cured if the stone is very porous. Plan to re-seal every 1 to 3 years depending on how much sun, rain, and traffic the patio gets.
Preventing the same problems from coming back
Most recurring slate patio failures come back to drainage. If water can get under the tiles in volume, from pooling on the surface, from a gutter downspout discharging too close to the patio, or from soil that doesn't drain freely below, you're going to keep fighting the same battle. Make sure downspouts are directed well away from the patio. Make sure the surface still has its 2% slope after all repairs are done. Keep the joints clean and intact so water doesn't get in a pathway straight down to the base.
Check the joints every spring. Small joint cracks or gaps are a five-minute repointing job when caught early. Left alone, they let weeds in, which makes gaps wider, which lets more water in, which undermines the bedding. It's a fast-moving failure once it starts. Reseal the surface every couple of years and you also reduce how much water the slate itself is absorbing, which extends the life of both the tiles and the mortar bed.
On a related note: if you're also dealing with loose sand washing out of paver joints in another section of your outdoor space, the re-sanding process for pavers follows similar logic about addressing drainage before refilling joints rather than just topping them up. To re-sand a patio, you first fix any drainage issues, clean out the old joint material, then apply the right sand and sweep it fully into the joints. For more details, see how to re-sand patio pavers and keep the joints protected while you manage water flow.
When to call a professional
Some slate patio situations are genuinely beyond practical DIY scope, and it's worth being honest about that. If a large section of the patio (more than a third of the total area) is uneven at multiple levels, the sub-base has failed broadly and you're looking at a significant excavation and rebuild. That's not just a weekend project, it requires equipment and material quantities that change the cost-benefit calculation. Similarly, if the patio is sinking because of tree root intrusion, a high water table, or significant soil erosion, those underlying problems need to be solved before any surface work makes sense. Laying a new mortar bed over a continuing subsidence problem just means doing the work twice. In those cases, a patio contractor or civil engineer who can assess the drainage situation properly is money well spent.
If you've relaid tiles twice and they keep rocking or shifting after storms, that's a strong signal that water movement or soil compression beneath the patio is ongoing. No amount of better mortar or more careful tile-setting will fix a drainage problem. The repair has to start below ground, not at the surface.
FAQ
Can I replace only the cracked slate tiles, or do I need to lift the whole patio?
If only a few tiles are cracked but they still sit fully firm (no rocking, no movement), you can replace just those units. Start by clearing the joints around each target tile, remove it without prying against neighbors, then chip back to a clean, solid substrate. Rebuild only the immediate mortar bed under the replacement, but still inspect for dampness or soft base material in that spot, since hidden base failure can cause the new tile to fail again.
What should I do if the patio looks fine but water still pools after rain?
Yes, but treat it as a drainage and base indicator, not just an aesthetic issue. If water pools after rain, verify the 2% slope still exists after your repairs, and check that downspouts are discharging well away from the patio. Also look for voids at low points, because water can track down through weakened joints into the bedding and keep undermining support even if the surface looks intact.
Is it ever OK to do a partial repair instead of rebuilding the whole base?
Do not assume you can “patch” a mortar void and then set the tile back if multiple areas are affected. Local void filling can work when it is isolated (one or two tiles), but when rocking shows up across a section or the base material is coming up soft, you likely have aggregate-base movement or subgrade compression. In that situation, partial fixes shift the failure to the next weakest spot and you end up repeating the work sooner.
How do I know whether I should re-seal, and how can I tell if the old sealer is still active?
Slate sealer decisions depend on current performance. If an existing penetrating sealer is still working, water drops will not be fully absorbed quickly, and the stone may not darken and absorb as rapidly. If it does darken or absorb within a minute or two, re-seal. Also make sure the patio is fully dry (generally 24 to 48 hours of dry weather) before applying, otherwise trapped moisture can lead to spalling or premature sealer failure.
What type of sealer should I use on an outdoor slate patio, and is a glossy sealer ever acceptable?
For slate, prioritize a penetrating, impregnating sealer rather than a glossy topical film. A film can trap moisture in a porous stone, which increases the risk of surface damage over freeze-thaw cycles. When applying, work the product into the stone, let it dwell briefly, then wipe off excess before it cures, because residue haze on slate textured surfaces can be difficult to remove.
What’s the best way to handle small joint gaps or cracks before they get worse?
If your grout or pointing has small cracks, early repointing is the best fix. Clear and remove loose material from the joints, dampen lightly before applying dense exterior pointing mortar, and pack the joint fully with no voids. Aim for a slightly recessed finish, not crowned, since crowned joints encourage water pooling and faster joint breakdown.
Do I really need wet cutting for slate, or is a respirator enough?
Yes. If you cut or grind dry, use dust control at the source. Use a wet-cutting setup (angle grinder or cut-off saw with water attachment) to suppress silica dust. If wet cutting is not possible, at minimum use a properly fitted P100 or N95 respirator and work outdoors with strong airflow, but understand that dust suppression is still safer than relying only on respirators.
How do I choose the right mortar if my slate tiles vary in thickness?
Slate often varies in thickness, so the mortar has to fill and support properly without slumping. Using a polymer-modified medium-bed mortar helps achieve full contact across the tile face and tolerates thickness variation. If you use a thin-set designed for smaller thickness differences, it can be too runny in practice, leaving voids under the slate which leads to rocking.
What does it mean if the slate patio starts rocking again after storms?
If tiles are rocking again after storms, the root cause is usually ongoing water movement or soil compression under the patio. Check for continued pooling, confirm slope is correct, and ensure downspouts are directed well away from the patio. If rocking persists even after careful re-setting, you likely need to address drainage and sub-base stability below grade rather than improving surface mortar.
How long should I wait before using the patio after re-laying slate?
Avoid setting the patio back into heavy use too soon. Slate edges and corners are more fragile than many paver types, and moving loads can disturb the fresh mortar bond before it fully cures. Plan to keep foot and vehicle loading off the surface until the mortar has cured per the product guidance, and when adjusting tiles, do not lever against freshly set neighbors.
Next Article
How to Seal a Pea Gravel Patio: Step by Step Guide
Step-by-step how to seal a pea gravel patio with prep, sealer choice, application, drying times, and common fixes.