A sinking patio almost always comes down to one of three things: the base underneath was never compacted properly, water has been washing soil or sand out from below, or the ground itself has shifted over time. The good news is that most cases are fixable without a full rebuild, but you do need to find out which cause you're dealing with before you touch anything. Fix the symptom without fixing the cause and you'll be doing this again in two years.
Patio Is Sinking: DIY Causes, Checks, and Repair Steps

Talia Lang
10 Jul 2026
How to confirm your patio is actually sinking (not just settling or low spots)
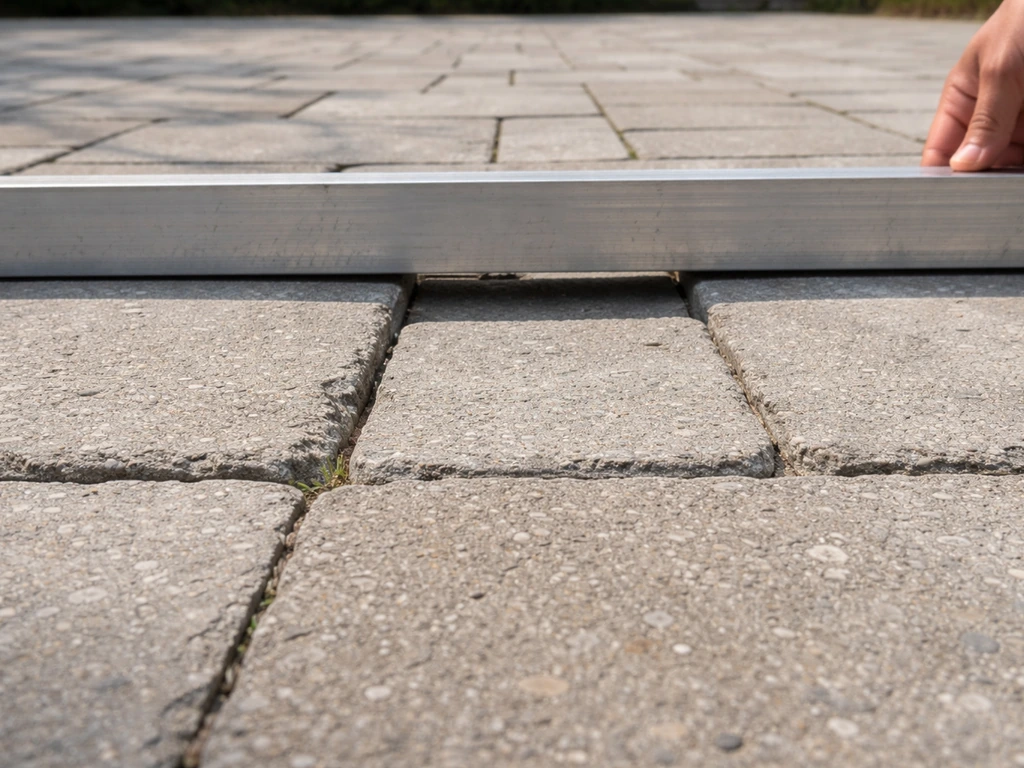
Not every uneven patio is sinking. Normal settling in the first year or two after installation can leave minor low spots, especially at the edges. What you're looking for is active, ongoing movement or a drop that's significantly worse than it was a season ago. Here's how to check:
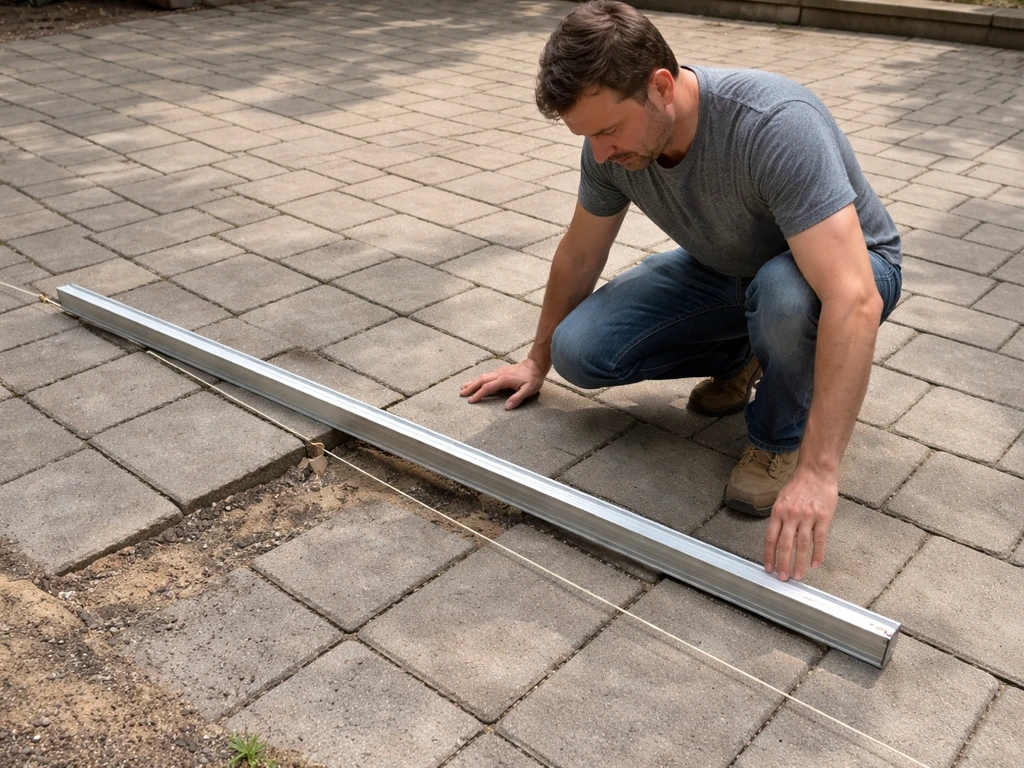
- Lay a long straightedge or pull a string line across the surface. A true sinking area will show a consistent low zone, not just a single raised or dipped paver.
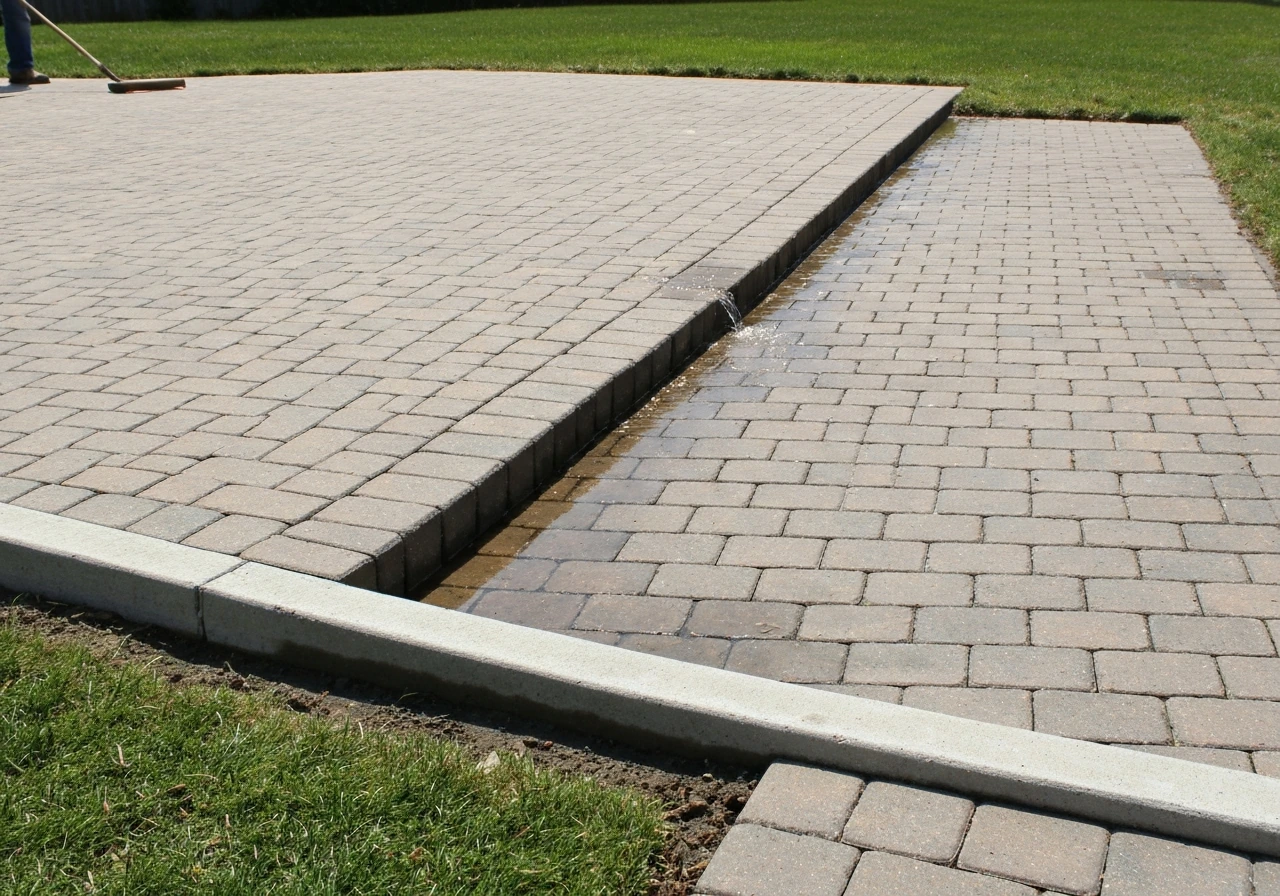
- Check your drainage path. Pour a bucket of water on the surface and watch where it runs. If it flows toward the house or pools in the center, the grade has changed, which is a sign of movement rather than original construction error.
- Look at the edges and perimeter. If paving is dropping away from a wall, step, or door threshold it was once flush with, that's sinking, not just a shallow low spot.
- Photograph it. Come back in 30 days and compare. If the gap at a threshold or the depth of a puddle is measurably worse, the movement is ongoing.
- Probe the soil at the lowest area. Push a long screwdriver or metal rod into any exposed soil near the edge. If it sinks easily more than 6 inches with hand pressure, the subbase is compromised.
If the dip is minor, relatively consistent, and hasn't changed since it was installed, you may just be dealing with an uneven patio from original construction rather than active sinking. If you keep noticing that my patio is uneven over time, it helps to confirm whether it's settling or actively sinking so you choose the right repair approach. That's a different problem with a different repair path. But if it's moving, getting worse after rain, or pulling away from adjoining structures, treat it as a sinking issue and work through this guide.
The most common causes, and how to spot each one on-site
Poor base prep or inadequate compaction
This is the single most common reason patios sink, and it usually shows up within the first two to five years. If the gravel base layer wasn't compacted properly before the sand or concrete went down, it will compress under load and traffic over time. You'll typically see gradual, broad sinking across a large portion of the patio rather than a localized hole. When you lift a paver or chip out a small section of concrete, you'll find the base material is loose, dusty, or thinner than the standard 4 to 6 inches it should be. Proper installation requires compacting the base in lifts (layers no thicker than about 4 inches at a time) and then doing a final pass with a plate compactor over the finished pavers.
Washout and erosion from drainage problems
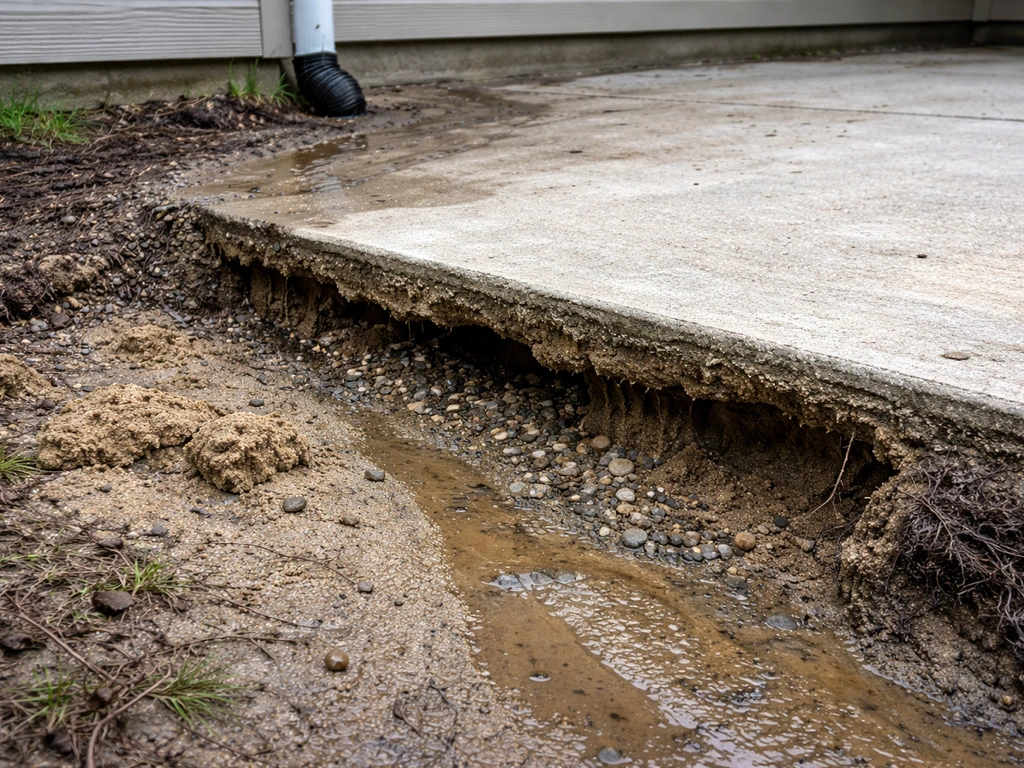
If your patio is near a downspout, sits at the bottom of a slope, or gets sheet flow from the yard or driveway, water can slowly wash the sand and fine material out from under the surface. This causes faster, more localized sinking, often near edges or at corners where water exits. The giveaway is that the sinking gets noticeably worse after heavy rain, and if you look under the edge of a paver or slab, you may see a void or a cavity rather than solid base material. Staining, efflorescence (white mineral deposits on the surface), or muddy joint sand also points to chronic water intrusion. Drainage problems and sinking almost always go hand in hand, and you won't fix one without addressing the other.
Soil settlement and organic material decomposition
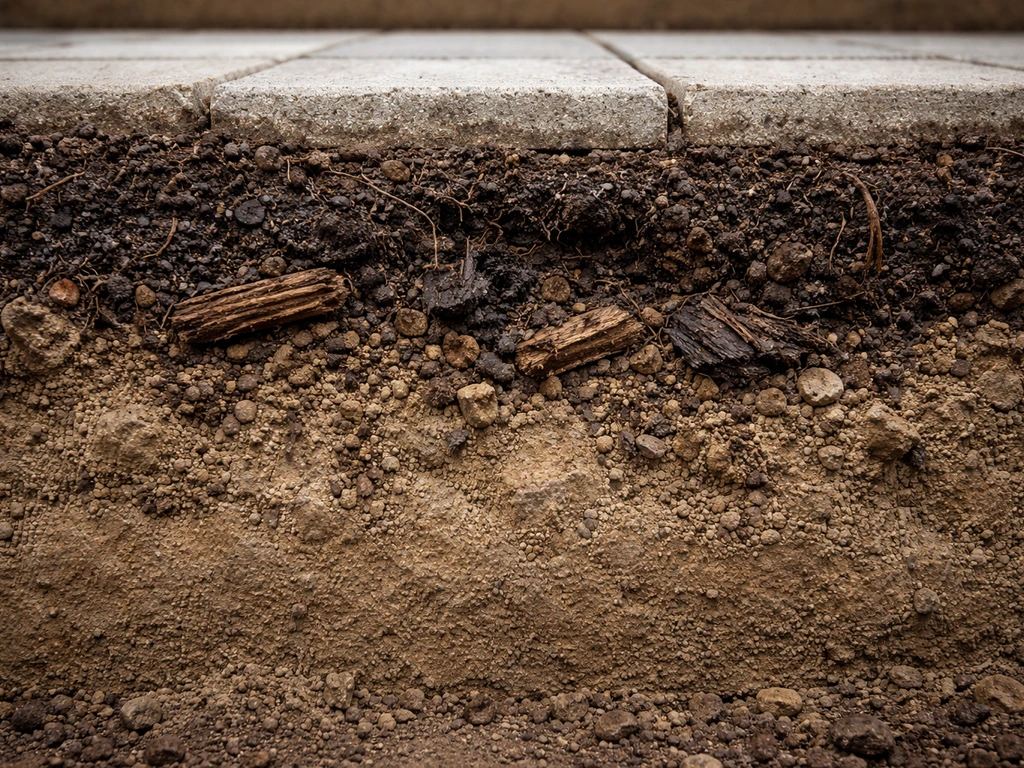
If the patio was built over fill soil, topsoil, or an area that previously had vegetation or wood debris buried in it, that material will compress and decompose over years. Settlement from fill soil is usually slow, broad, and affects the whole patio somewhat uniformly. If you know the area was graded and filled before construction, this is a likely contributor. There's not much you can do about the soil itself without excavating, so the realistic repair involves re-leveling and improving drainage to prevent water from accelerating the process further. If you are dealing with water pooling or runoff that overwhelms the base, learning how to keep a patio from flooding by improving drainage can prevent recurring damage.
Frost heave
In climates that freeze and thaw repeatedly through winter, water trapped under the slab or in the base expands when it freezes and pushes sections upward, then drops them back unevenly when it thaws. Frost heave causes more of a tilted, cracked, or heaved pattern than a simple sinking, but over multiple seasons it can leave sections lower than they started. FHWA distress-survey guidance emphasizes recording pavement surface distress manifestations such as crack pattern, staining or exudate presence, and prevailing cracking location and extent when diagnosing material-related distress causes. If one corner or edge keeps moving season to season and your area gets hard freezes, frost is likely involved. Proper base depth (below the frost line) and good drainage are the prevention, but that means existing patios with shallow bases will keep moving until they're rebuilt correctly.
Tree roots
Tree roots under a patio cause uplift more often than sinking, but when roots die, decompose, or get cut, the void they leave can cause a localized collapse of the base above them. If you have a sunken area near a tree, check for a corresponding bump or crack on the opposite side (the tree may be lifting that side while the dead root area sinks on the other). Root-related damage is usually quite localized and shows a distinct edge between the affected and unaffected area.
Failed or missing edge restraints
For paver patios specifically, if the plastic or concrete edge restraints at the perimeter were skipped, installed incorrectly, or have since failed, pavers will migrate outward at the edges and the whole surface gradually loses structural cohesion. You'll see widening joints, pavers rotating or rocking, and the perimeter dropping first. This is fixable without a full rebuild if the base is otherwise sound.
Concrete slab vs pavers: how the diagnosis and repair differ
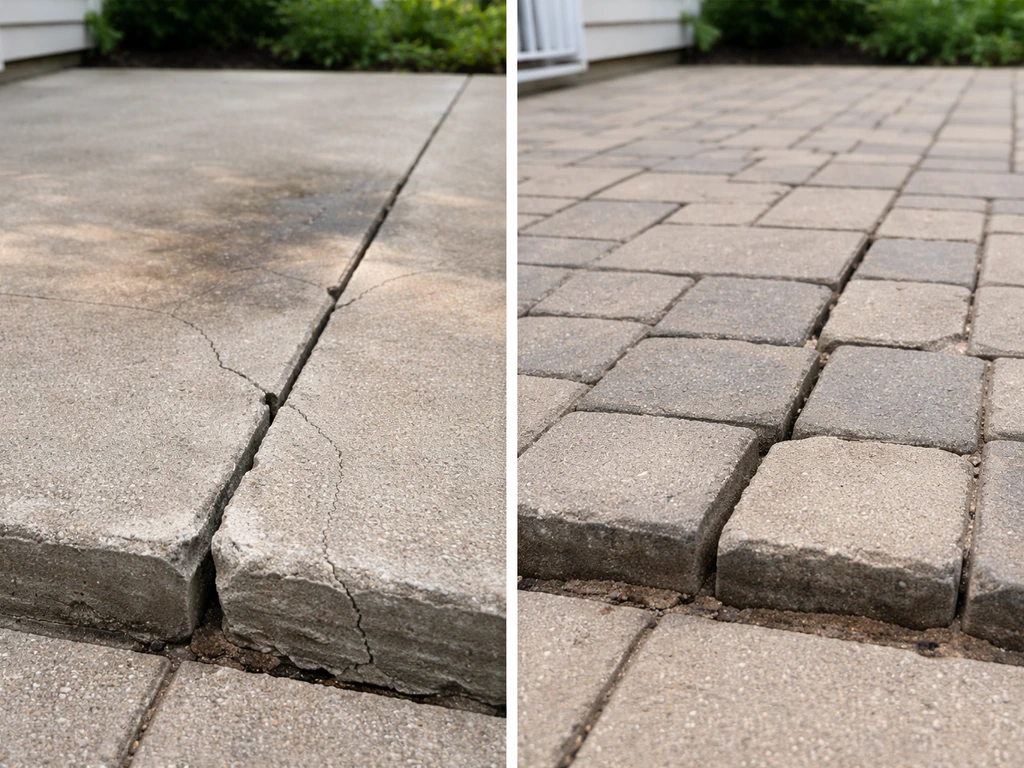
The cause of sinking is usually the same regardless of patio type, but what you can do about it is very different. Here's a side-by-side breakdown:
| Factor | Concrete Slab | Pavers |
|---|---|---|
| Spotting the cause | Look for cracks, staining, and where cracks pattern across the slab. FHWA distress survey guidance recommends noting crack pattern, staining/exudate, and cracking location as diagnostic clues. | Lift individual units at the low spot to inspect base and bedding sand. Rocking pavers mean sand or base failure. |
| Access to base | Difficult without demolition. You're working from the top or edge. | Easy. Remove pavers, inspect and repair base, reset pavers. |
| DIY leveling option | Mudjacking or polyurethane foam injection (usually a pro job). Self-leveling concrete for minor surface dips only. | Screed fresh bedding sand to 1 inch nominal thickness, relay pavers, compact with plate compactor. |
| Drainage fix during repair | Hard to improve base drainage without breaking out the slab. | Straightforward to add or improve base drainage while pavers are pulled. |
| Cost if DIY isn't enough | Slab removal and replacement runs $6–$15/sq ft depending on thickness and access. | Paver reset with base repair is $8–$18/sq ft professionally, but more of it is DIY-friendly. |
| When to replace vs repair | Cracks wider than 1/4 inch, multiple sections moving independently, or voids under more than 30% of the slab. | Almost always resettable unless base is completely failed or pavers are cracked beyond use. |
The practical takeaway: if you have pavers, you have a real DIY path even for significant sinking. If you have a concrete slab, your options are more limited and more expensive once the base has failed. Minor surface dips in concrete can be filled, but anything involving actual movement of the slab is usually a professional job.
Do these things right now to stop it from getting worse
Before you plan any repair, take these steps immediately. Once you’ve identified the cause, you can follow the right steps to how to fix a slanted patio before the slope gets worse. They cost almost nothing and prevent a fixable problem from becoming a major one.
- Redirect any downspouts that discharge near or onto the patio. Even a flexible downspout extender that moves water 4 to 6 feet away makes a significant difference in how much water is saturating the base.
- Check your sprinkler zones. If any heads are spraying onto or under the edge of the patio, adjust or cap them temporarily. Chronic irrigation water is one of the sneakiest causes of base washout.
- Fill obvious voids at the perimeter with coarse gravel or paver base material packed by hand. This isn't a repair, but it stops water from channeling directly under the surface until you do the real fix.
- Stop heavy use of the sunken area. Furniture legs and foot traffic on a sinking section accelerate the collapse of any remaining base structure. Keep people and heavy pots off the worst spots.
- If the sinking has created a trip hazard at a door threshold or step, put down a rubber threshold ramp or mark it visibly. Safety first before aesthetics.
- Do not fill the sunken area with topsoil or dirt. This traps moisture and makes the base problem worse.
Choosing your repair path based on how bad it is
Level 1: Minor sinking, stable base, no drainage issues
If the sinking is less than about 1 inch, the base feels solid when you probe it, and there's no active water problem, you're in patch-and-level territory. For pavers, this means pulling the affected units, adding bedding sand, re-screeding, and resetting. CMHA recommends using a string line to establish the undisturbed bedding-sand thickness by measuring from the string line to the base surface and subtracting the paver thickness. For concrete, a polymer-modified concrete resurfacer or self-leveling underlayment can address surface dips, but only if the slab itself isn't moving. This is a half-day job for most homeowners.
Level 2: Moderate sinking with base failure or drainage contributing
If the drop is 1 to 3 inches, the base material is loose or has washed out, and you can see water is a factor, you need to fix the base and the drainage together, not just re-level the surface. If you're asking how to fix patio drainage problems, start by tracing where the water is coming from and where it's pooling fix the base and the drainage together. For pavers this is still very DIY-friendly: pull them, excavate to fix the base properly, improve drainage if needed, recompact, re-screed, and reset. For concrete slabs, this level of failure usually means mudjacking (pumping a slurry under the slab to lift and fill voids) or polyurethane foam injection, both of which are professional jobs. DIY concrete repair at this severity usually fails within a few seasons.
Level 3: Severe sinking, ongoing movement, or structural concerns
If sections are dropping more than 3 to 4 inches, multiple areas are affected, movement is continuing after each rain event, or you're seeing cracks and movement near your house foundation, stop and call a professional. This isn't overcaution: ongoing soil movement near a foundation can affect more than just your patio, and no DIY patch is going to address the underlying cause at that level.
Step-by-step repair: the paver reset (the most common DIY fix)
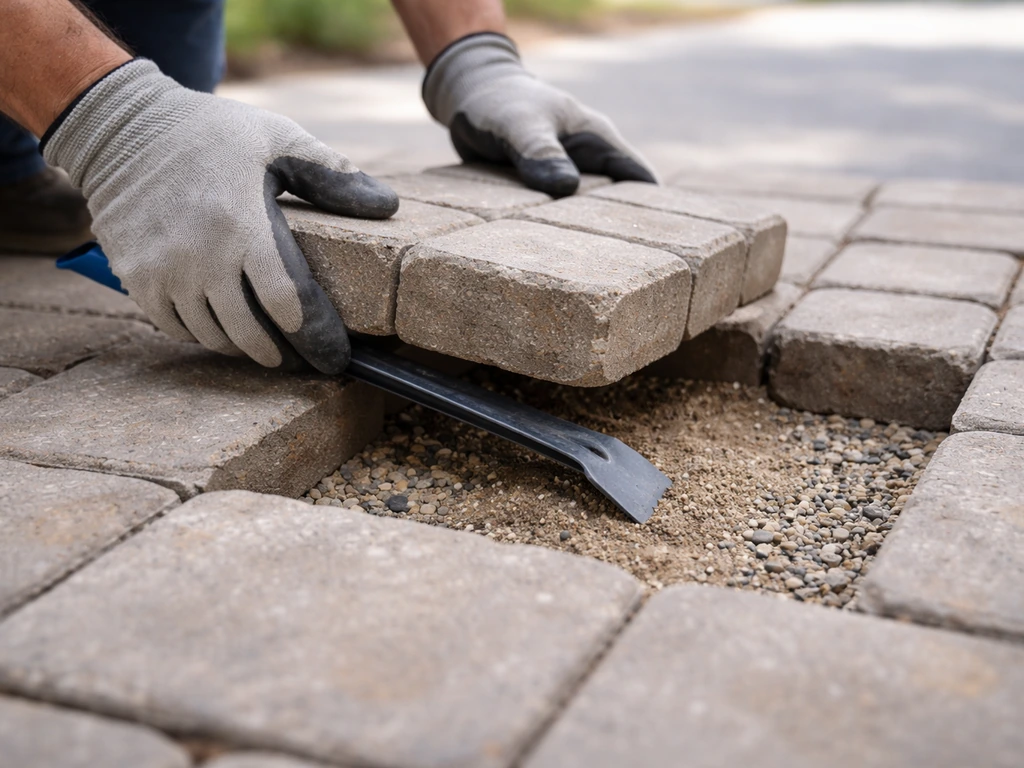
This covers the Level 1 and Level 2 paver repair, which is what most homeowners are dealing with. Gather your materials before you start. Once you know the problem is consistent movement or base failure, it helps to map out the layout and do the tiling math problem of how many pavers or what coverage you need before you start resetting tiling a patio math problem.
What you need
- Flat pry bar or paver extractor tool
- Wheelbarrow and shovel
- Coarse crushed stone (gravel base material, also called Class II base or road base) for any base repair
- Coarse sand (bedding sand, not polymeric sand) for screeding
- Two screed rails or straight metal pipes of the same diameter
- Long straightedge or 6-foot level
- Plate compactor (rent one for roughly $60 to $100 per day, do not skip this)
- Polymeric jointing sand for finishing
- String line and stakes
- Tamper (hand tamper for spot work around edges)
The process
- Mark the affected area with a few inches of overlap into stable paving on all sides. You want to expose enough to properly feather the repair back into solid surface.
- Pull all pavers in the marked area using a flat pry bar. Stack them neatly and note their orientation if you have a pattern.
- Excavate any failed, loose, or washed-out base material until you hit solid, compacted ground. If the base is simply low but still solid, you may only need to add material on top.
- Add coarse gravel base material in layers no deeper than 4 inches at a time, and compact each layer firmly with the plate compactor before adding the next. Your total compacted base depth should be 4 to 6 inches for most residential patios.
- Set two screed rails parallel to each other on top of the compacted base, separated by the length of your straightedge minus a few inches. Use a string line stretched from undisturbed areas on both sides to set the correct height and slope (typically 1 inch of drop per 8 feet away from the house). CMHA guidelines specify bedding sand should be screeded to a nominal 1 inch thickness before paver installation.
- Pour bedding sand between the rails and drag your straightedge across them to create a smooth, flat 1-inch sand bed. Do not compact the sand at this stage and do not walk on it after screeding.
- Set pavers back down carefully into the screeded sand, working from a stable edge inward. Use knee boards (scraps of plywood) to spread your weight if you need to kneel on set pavers.
- Once all pavers are placed, run the plate compactor over the entire repaired area with at least two full passes. This forces sand up into the joints and locks the pavers in place. CMHA specifies using a minimum 5,000 lbf plate compactor for this step.
- Spread polymeric jointing sand over the surface and sweep it into the joints, then do one more light pass with the plate compactor. Mist with water per the product directions to activate the binding agent.
- Check your final surface with a level and verify water drains away from the house before you call it done.
Fixing the drainage while you're in there
If water was a contributing factor, now is the time to address it while the base is exposed. Adding a perforated drain pipe at the low edge of the excavated area, wrapped in filter fabric, gives water somewhere to go other than through your base. Alternatively, sloping the compacted base slightly (1 percent grade) toward the outer edge ensures any water that does get under the surface moves out rather than pooling. Skipping this step when you have an obvious water problem means the repair won't last.
Concrete slab options: what actually works
For concrete, the honest DIY options are narrower. If the slab is sunken but intact (no significant cracking, no sections moving independently), you can try mudjacking or polyurethane foam injection, but both are professional services. What you can do yourself is fill hairline or narrow cracks with a concrete crack filler before water makes them worse, and use a vinyl concrete patcher or self-leveling floor compound to fill minor surface depressions up to about half an inch deep. These are cosmetic and structural maintenance steps, not a solution to a slab that's actively moving. If the slab is cracked into separate sections that shift relative to each other, the only real fix is slab removal and replacement with a properly prepared base.
When to stop and call a professional
Some sinking situations are genuinely beyond DIY, and trying to push through them yourself usually costs more in the long run. Here are the clear signs it's time to bring in a professional:
- The sinking is within 6 to 8 feet of your house foundation and you can see cracks in the foundation wall, or doors and windows are sticking in ways they didn't before. This may not just be a patio problem.
- Multiple slab sections are dropping independently and the gaps between them are widening over time. No surface-level fix will address ongoing soil movement beneath.
- You've repaired the same area twice and it keeps sinking. That means the cause hasn't been fixed and a professional needs to diagnose what's actually happening underground.
- There are large voids visible under the slab edge that extend more than a foot or two inward. Walking on a slab over a large void risks collapse.
- The entire patio needs to be rebuilt from the base up. A full rebuild with proper excavation, base compaction, and drainage installation is labor-intensive and requires equipment that most homeowners don't have economical access to.
- You suspect a broken underground utility, pipe, or drain as the cause of washout. Digging into that zone without knowing what's there is a safety issue.
A reputable hardscape or concrete contractor can give you a diagnostic opinion before you commit to a repair approach. Many will do a site visit at low or no cost. If the quote sounds like overkill compared to what you're seeing, get a second opinion. But if two experienced contractors are telling you the same thing, take it seriously. A sinking patio that's connected to a drainage failure or foundation issue is worth getting right the first time.
FAQ
How can I tell whether the patio is still sinking or it was just installed unevenly?
Do a quick seasonal comparison. Mark the lowest point with a temporary stake, then re-check its elevation after the next heavy rain or after winter thaw (use a string line and tape measure or a simple level). If the gap grows over time, or it correlates with wet weather, it is active sinking rather than one-time unevenness.
Is it safe to start lifting pavers if I suspect water is washing out the base?
Yes, but do it with caution and only in small sections first. Stop digging if you find unstable, sandy voids that collapse when touched, or if you see water actively coming from the side. In those cases, you should expand the excavation enough to capture the drainage path and address it, otherwise the washed-out area will just return.
What is the fastest way to confirm drainage is the culprit before I order materials?
Run a controlled test: use a hose to direct water to the highest flow area for 10 to 15 minutes, then watch the patio edges and joints. If dips worsen, joints darken quickly, or you notice efflorescence forming over the next days, you likely have a concentrated flow path that needs rerouting or under-base drainage.
Why do some paver repairs fail again even after I reset the pavers?
Most failures come from skipping base prep, not from the pavers themselves. Common mistakes are not compacting in proper lift thickness, reusing contaminated bedding sand, or resetting pavers without correcting the drainage route. If you don’t restore a stable base and keep water from entering under the surface, rocking will return.
Can I fix a sinking concrete patio by resurfacing instead of rebuilding?
Only if the slab is not moving independently. Resurfacing materials can hide minor surface depressions, but they cannot correct voids under the slab or differential settlement. If you see cracking that grows, or one section shifts relative to another, resurfacing is usually cosmetic and temporary.
Do frost heave and sinking look the same?
They can be similar, but frost heave often presents as heaving or tilting patterns that change after freeze-thaw cycles. If the patio’s movement repeats seasonally and worsens during the thaw, prioritize base depth and under-surface drainage (or plan for reconstruction) rather than just leveling the top.
What should I check near my house foundation before repairing a sinking patio?
Look for settlement indicators like new or widening gaps at the patio-to-house interface, cracks that extend toward the foundation, or movement that progresses after rain. If movement is ongoing and near foundation elements, treat it as a higher-risk scenario and get a site assessment before any DIY excavation.
How do edge restraints affect sinking or paver migration?
If perimeter restraints are missing, improperly installed, or failed, pavers can spread outward and the perimeter drops first, which can mimic sinking. Before investing in re-leveling, verify the perimeter is tied down correctly and that jointing and base support are continuous at the edges.
When probing the base, what does “solid” vs “washed out” feel like?
Solid base feels firm and does not crumble when you press or probe at multiple points. Washed-out material feels loose, dusty, or hollow, and the probe may penetrate deeper than expected. If you find voids, you need base and drainage correction, not just bedding sand adjustments.
Should I add a drain pipe or change the slope of the base, which is better?
Choose based on where the water comes from and where it wants to go. If water concentrates along one low edge, an under-drain at that edge is often most effective. If water seeps broadly, improving the base grade toward the exit point (around a 1 percent slope) can help, but it must still lead somewhere safe, not back into the patio base.
How deep should I excavate for a DIY paver repair?
Plan to remove enough material to reach a stable, compactable base, not just the top layer where dips appear. In typical installs, the target is restoring base depth and proper compaction before adding new bedding sand. If you keep finding loose or thin base while digging, excavate further rather than patching on top of weak material.
What are the clear “stop DIY and call a pro” situations besides large drops?
Call a professional if the patio is connected to drainage failure affecting your home, if there are signs of foundation interaction, or if multiple sections move at different rates after rain. Also stop if you uncover active voids that keep collapsing during excavation, because that usually means the base and drainage correction is more extensive than a simple re-level.
Next Article
How to Fix a Slanted Patio: Diagnose and Relevel Steps
Diagnose why your patio slants and follow the right DIY repair for concrete, pavers, or overlays to relevel it safely.