To fix a loose patio stone, lift it out, figure out why it moved (usually eroded sand, a soft base, or missing edge restraint), rebuild the base layer properly, re-level the bedding, and set the stone back flush with its neighbors. The exact method depends on whether your patio is dry-set with sand joints or mortar/thinset-set, but the core fix is the same: you have to deal with what's underneath, not just drop the stone back in place.
How to Fix a Loose Patio Stone Step-by-Step

Talia Lang
4 Jul 2026
Quick assessment: what 'loose' is actually telling you
Before you grab any tools, spend two minutes figuring out what kind of loose you're dealing with. Press down on the stone and rock it side to side. A single stone that rocks but its neighbors are solid usually means the bedding sand underneath it has washed out or compacted unevenly. That's the easiest fix. Multiple stones rocking or shifting together, widening gaps between them, or a border that's slowly spreading outward points to something bigger: missing or failed edge restraint, loss of joint sand across a wide area, or a base that was never properly compacted. Persistent low spots where water puddles after rain are a red flag too, because standing water accelerates exactly the kind of base erosion that loosened the stone in the first place.
The distinction between dry-set and mortar-set also matters here. Dry-set patios use loose sand or polymeric sand in the joints and rely on a compacted gravel base plus a thin bedding sand layer. Mortar-set or thinset-set patios bond each stone directly to a concrete substrate. They come apart differently and get repaired differently, so identify which type you have before you read any further.
- One stone rocking, neighbors are solid: washed-out or settled bedding sand under that stone
- Several stones rocking in the same zone: base erosion or compaction failure in that area
- Gaps widening and border stones spreading: missing or broken edge restraint
- Recurring puddle in the same spot: drainage is funneling water under the patio
- Stone is cracked and rocking: the stone itself may need replacing, not just resetting
Tools, materials, and a few safety notes before you start
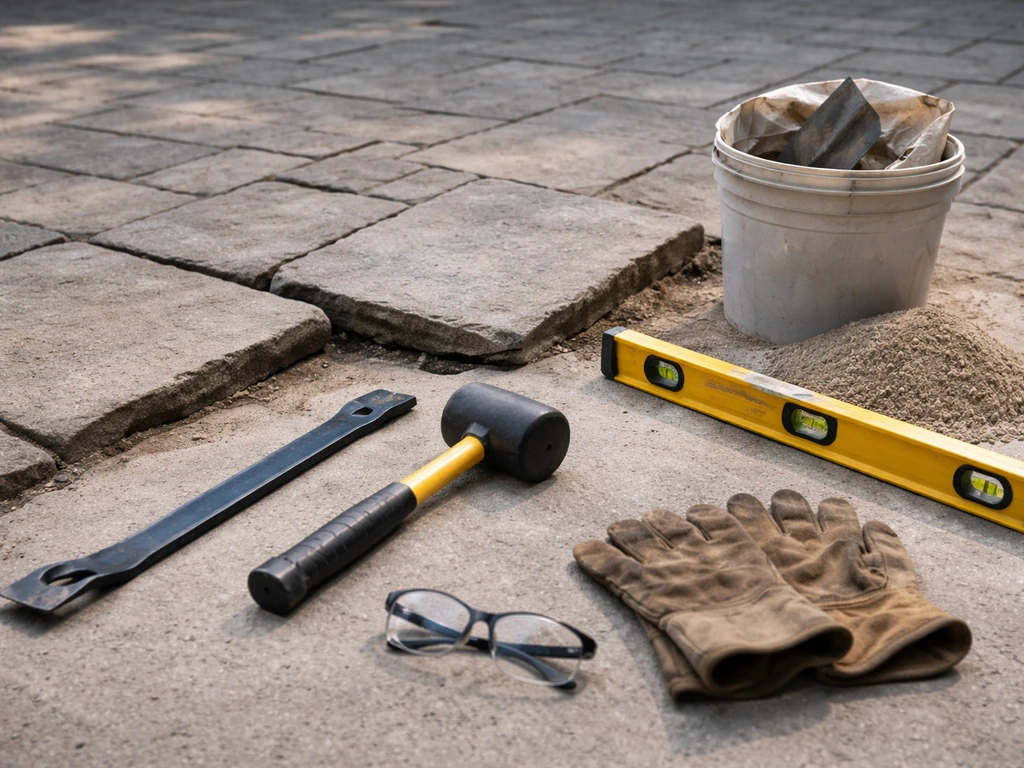
Most of this repair is doable with gear you probably already own. For a dry-set repair on one to three stones, you need a flat pry bar or two, a rubber mallet, a level (24-inch minimum), a margin trowel, a stiff brush, and a garden hose. For the materials, pick up a bag of coarse concrete sand for bedding and either regular joint sand or polymeric sand for the joints. Polymeric sand is worth the extra cost: it hardens when wet and resists washout far better than plain sand, which is often what failed in the first place.
For a mortar or thinset repair, add a cold chisel and hammer for breaking out old mortar, a margin trowel, a notched trowel if you're using thinset, and a bucket for mixing. Pick up a bag of Type S mortar for setting natural stone or a polymer-modified thinset for concrete pavers on a slab. Type S is flexible enough for outdoor use and handles temperature swings better than standard mason's mix.
Safety is straightforward but worth saying: patio stones are heavy. A 24x24 inch concrete paver can weigh 60 to 80 pounds, and large flagstone slabs can top 100 pounds. Lift with your legs, ask for a second set of hands on anything larger than 18 inches square, and wear work gloves. Edges on cut stone and broken mortar are sharp. If you're using a plate compactor (which you should for any repair involving more than a few square feet of base), wear hearing protection.
How to reset loose patio stones: dry-set vs. mortar-set
Dry-set repair (sand bedding and sand joints)
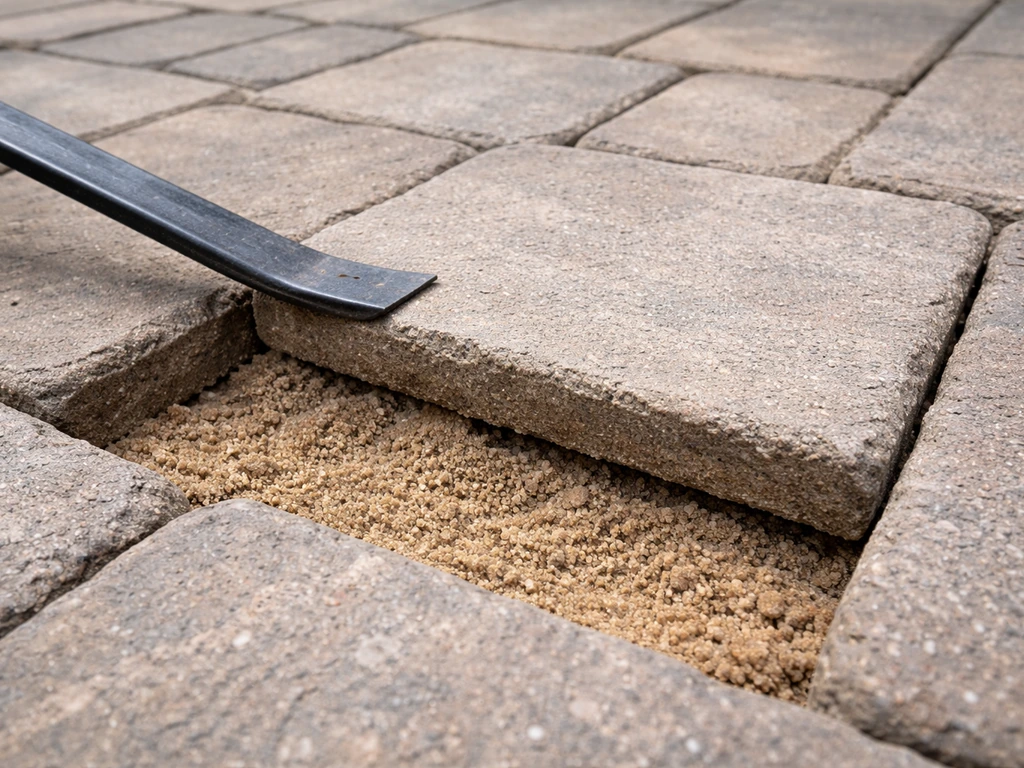
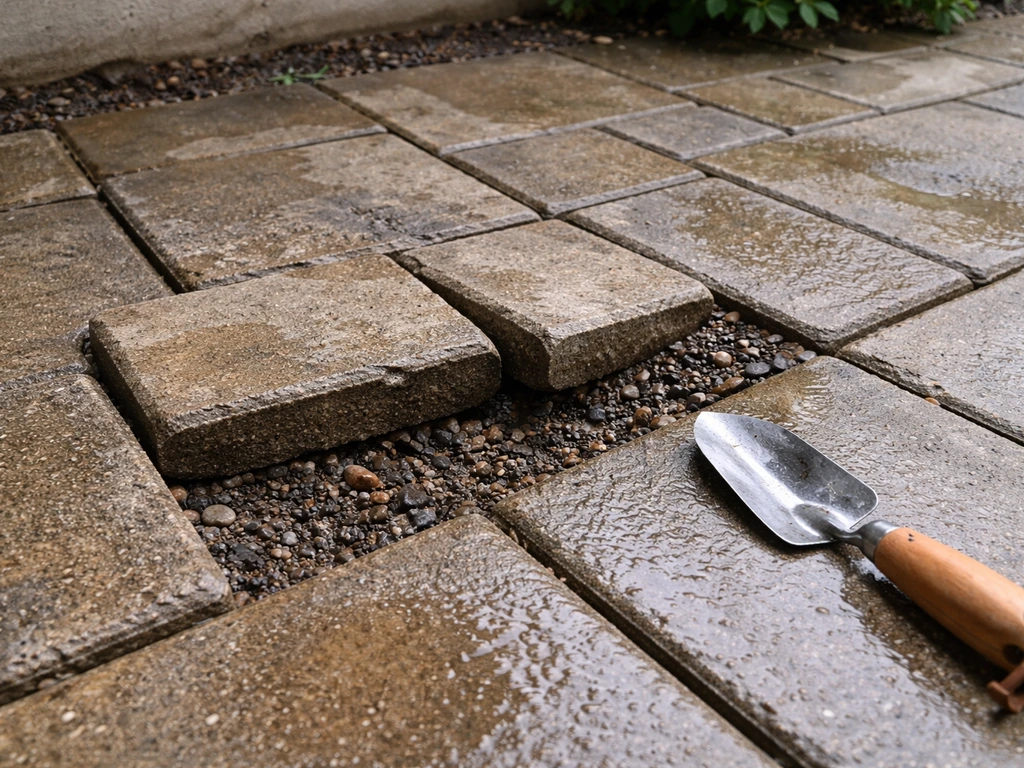
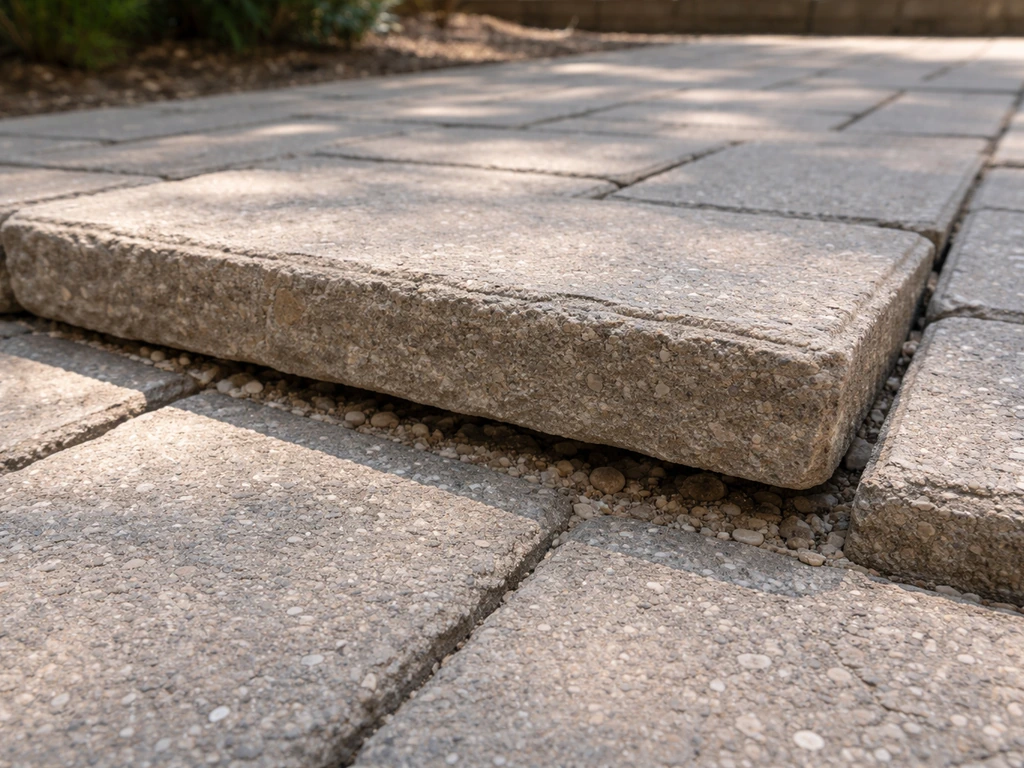
Start by removing the loose stone carefully. Slip a flat pry bar into the joint on one side and lever it up enough to get your fingers under it. If you can't get a bar in, a second bar on the opposite side helps. Lift straight up and set the stone aside face-down on grass so you don't chip the surface.
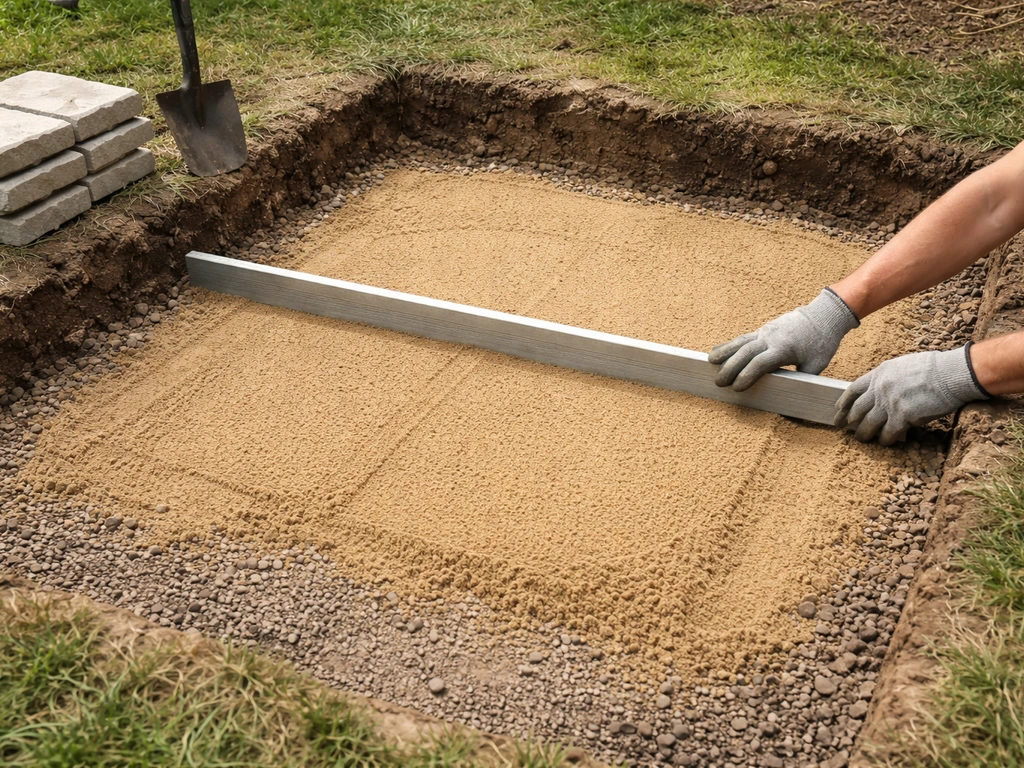
Now look at what's underneath. Healthy bedding should be a firm, flat, 1-inch layer of coarse sand. What you'll usually find is a hollow, an uneven mess of washed-away material, or sand that's compacted into a hard depression right where the stone was sitting. Scrape all the old bedding sand out of the cavity and check the base below it. The compacted gravel base should feel solid when you press on it with your thumb. If it feels soft or crumbles, you have a base problem, not just a bedding problem, and you need to read the re-leveling section below before going further. If the pavers are uneven, the re-leveling section explains how to rebuild the base and reset the stones so they sit level again.
If the base is solid, fill the cavity with fresh coarse sand, screed it level with a straight edge so it sits about 1/8 inch high (the stone will compress it down when you set it), and lower the stone back in. Use your rubber mallet to tap it flush with the surrounding stones. Check it with your level in both directions. If one corner is high, tap that corner. If the whole stone is high, pull it, remove a little sand, and reset. Once it's flush, sweep polymeric sand into all the joints around it, mist it with water, let it dry, and mist again. Give it 24 hours before foot traffic.
Mortar-set or thinset-set repair
Mortar repairs are slower and messier, but the process is logical. First, remove all the old mortar or thinset from both the concrete substrate and the back of the stone. Use a cold chisel and hammer to break it off in chunks, then clean both surfaces with a wire brush. The stone won't bond well to old, cured mortar, so don't skip this. If the concrete substrate has a crack running through the area where the stone came loose, fill it with a polyurethane caulk and let it cure fully before proceeding, otherwise the crack movement will just break the bond again.
For natural stone on concrete, mix Type S mortar to a peanut butter consistency and spread a 3/4-inch layer on the substrate using a margin trowel. Back-butter the stone as well (spread a thin skim coat of mortar on the back face). Set the stone in place, press it down firmly, and tap it flush with a rubber mallet. Check your level. For concrete pavers on a slab, polymer-modified thinset applied with a notched trowel gives a stronger bond. Either way, don't walk on the repair for at least 24 hours, and don't let it get rained on for the first 6 to 8 hours if you can help it. Once cured, regrout the joints with a matching sanded grout or mortar and tool the joints smooth.
Re-leveling and fixing the base: the part most DIYers skip
If the base under your stone was soft, hollow, or eroded, simply replacing the bedding sand will just buy you a few months before the same stone (or a neighbor stone) starts rocking again. You have to fix the base first.
Excavate the area down to undisturbed, firm soil. For most residential patios, that means removing the old gravel base material until you hit ground that doesn't move when you press on it hard with a post or your foot. A properly built base uses at least 4 inches of compacted crushed stone (often called crusher run or road base). If what came out was less than that, or if it was plain dirt or decomposed organic material, that's your root cause. Persistent low spots can also come from a base that was never properly compacted, so re-leveling the base may be required how to fix low spot in paver patio.
Fill the excavated area with fresh crushed stone in 2-inch lifts, compacting each lift before adding the next. For a small area (one to three stones), you can tamp by hand with a hand tamper. For anything larger, rent a plate compactor. It's worth the rental cost because hand tamping a large area just doesn't get you the density you need. Once the base is built back to within about 1 inch of the bottom of where the stone will sit, add your bedding sand layer and proceed with resetting the stone. If your patio still feels uneven after resetting a few stones, the next step is to re-level and rebuild the base beneath the pavers.
While you have things torn up, check the perimeter edge restraint. Edge restraint is the plastic or metal border that runs around the outside of your patio and keeps the whole system from slowly spreading outward. If it's missing, cracked, or pulling away from its spikes, that's likely contributing to the looseness of stones near the edges. Re-spike loose restraint sections and add restraint anywhere the perimeter is unprotected. Gaps in this border allow pavers to migrate outward, which then opens up joints and triggers the sand washout cycle all over again. Unilock also notes that pavers separating from each other can indicate an improper base and or missing edge restraints around the perimeter, a key symptom of restraint failure pavers migrate outward, which then opens up joints and triggers the sand washout cycle.
Reinstalling the stone and locking it in place
With the base rebuilt and the bedding layer screeded flat, you're ready to lock the stone back in permanently. The reinstallation itself is covered in the dry-set and mortar-set steps above, but here's what to pay attention to when it comes to locking the repair in for the long term. If you still have loose patio bricks after resetting them, focus on the base, joint sand, and edge restraint so the repair holds loose patio stones.
For dry-set patios, polymeric sand is not optional if you want this to last. Regular joint sand washes out with rain, which is probably what caused the problem originally. Polymeric sand activates with water and cures into a semi-rigid, water-resistant compound that holds the stones together while still allowing very minor movement. Sweep it into every joint in the repair area (not just around the stone you fixed), compact it lightly by tapping the stone surface, then mist with water until the sand is damp all the way through but not pooling. Let it cure 24 hours before use.
For mortar-set repairs, tool the grout joints with a jointing tool or the tip of a trowel to press the mortar firmly into the joint and create a slight concave profile. This sheds water rather than collecting it.
Sealing is optional but genuinely useful on dry-set patios. A penetrating paver sealer applied after the polymeric sand has fully cured (give it at least 48 to 72 hours) helps lock the joint sand and makes the surface easier to clean. It won't substitute for correct installation, but it adds a layer of protection. On mortar-set natural stone patios, a penetrating stone sealer helps prevent water absorption that accelerates freeze-thaw damage.
How to prevent it from coming loose again
The reason patio stones come loose almost always traces back to one of three things: water getting under them, the base being inadequate from the start, or freeze-thaw cycles that expand and contract the ground under them season after season. If you have loose patio pavers, follow the same diagnostic path to find whether water, base problems, or freeze-thaw cycles caused the movement. Fix all three and you won't be doing this repair again.
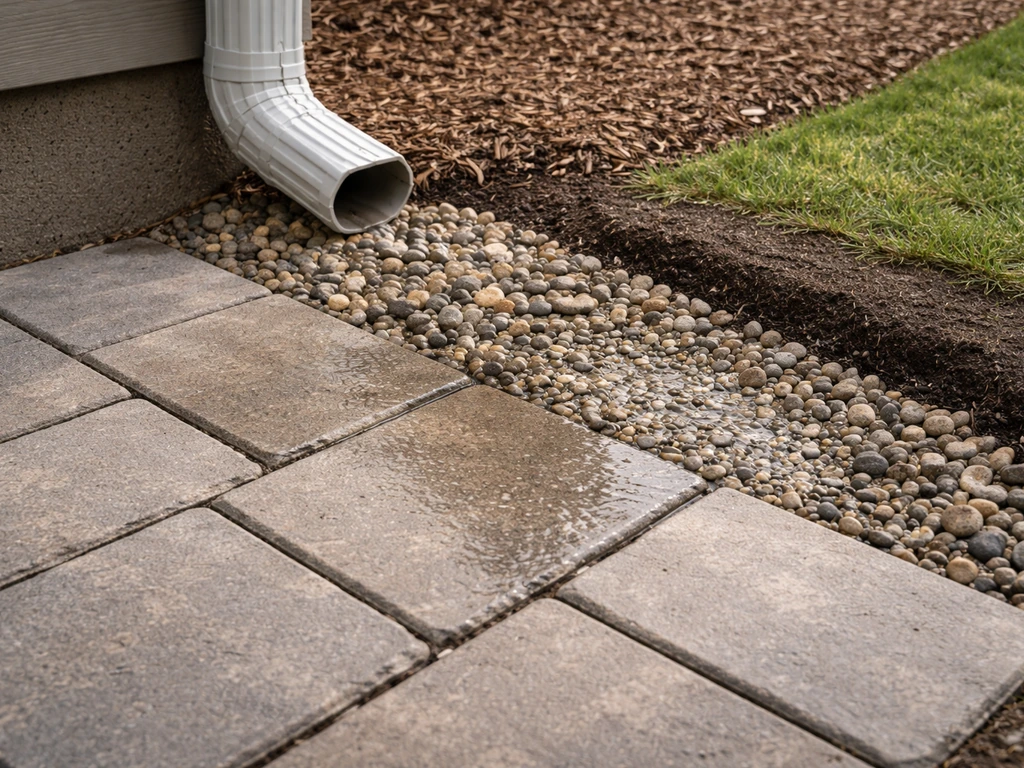
Water management is the most important preventive step. Check where water flows when it rains. Downspouts discharging onto or near the patio, irrigation heads spraying the surface, or a patio that slopes toward the house instead of away from it are all common culprits. Grade should slope away from any structure at a minimum of 1/8 inch per foot. If you can't regrade, extending downspout extenders so they discharge well past the patio edge makes a significant difference.
Freeze-thaw damage is especially common in climates with hard winters. Water gets into joints or under stones, freezes, expands, and physically lifts the stone. Polymeric sand in the joints reduces water infiltration significantly, and making sure the surface drains quickly so water doesn't sit and soak in is the other half of that fix. If you're in a cold climate and your patio has been heaving every spring for years, the base may need to go deeper than the standard 4 inches to get below the frost line.
For ongoing maintenance, walk your patio once a year in spring (right after the ground thaws if you're in a cold climate) and press down on each stone. Catch a wobbly stone early and resetting it takes 20 minutes. Catch it after the joint sand has washed out around it and the base has started to erode and you're looking at a half-day job. Reapply polymeric sand to joints that look thin or washed out every two to three years. Keep the surface swept so debris doesn't trap moisture against the joints.
When to stop DIYing and call a professional
Most single-stone or small-area repairs are genuinely DIY-friendly. But there are situations where doing it yourself means you'll just be pulling the same stones up again in a year, or where the underlying problem is beyond what a homeowner can realistically fix without equipment and experience.
Call a professional when you see widespread settlement across large portions of the patio, not just a single stone or small cluster. If five or more stones are loose and the patio surface has noticeably dropped in an area, the base has failed significantly and likely needs to be fully excavated and rebuilt. That involves heavy equipment, a lot of material, and proper drainage engineering that's hard to execute correctly without experience.
Also call a pro if you discover the patio was originally built without any compacted gravel base at all (just sand or dirt under the stones), if there's visible soil erosion or a void under the slab, or if the problem keeps coming back after you've already repaired it correctly. Recurring looseness despite proper repairs usually points to a drainage or soil stability issue that needs professional diagnosis.
One more situation: if the loose stone is part of a step or an elevated patio section, the structural stakes are higher. A wobbly step is a trip hazard, and setting it correctly requires the same care you'd give a retaining wall. If you're not confident in your structural repair skills, that one is worth calling in.
| Situation | DIY or Pro? | Why |
|---|---|---|
| One to three stones rocking, base is solid | DIY | Simple bedding sand repair, 1 to 2 hours |
| Small area with base erosion under a few stones | DIY with care | Needs base rebuild but manageable in scope |
| Widespread settlement across large patio area | Pro | Full base excavation and rebuild needed |
| No compacted gravel base originally installed | Pro | Requires full demo and correct reconstruction |
| Recurring looseness after correct prior repair | Pro | Underlying drainage or soil issue needs diagnosis |
| Loose stone on steps or elevated section | Pro if unsure | Structural safety concern, not just aesthetics |
| Border stones spreading, edge restraint failed | DIY | Respiking or replacing edge restraint is straightforward |
FAQ
Can I just push the loose patio stone back in and fill the gap with more sand?
You can do that temporarily, but it usually fails because the stone will rock again once the washed-out area under it is still hollow or uneven. A more reliable fix is to lift the stone, remove the old bedding, confirm the base is solid, then re-screed bedding sand at the correct height before resetting.
How do I tell quickly if the base is failing versus the bedding sand?
After you lift the stone, press the exposed gravel/base with your thumb or the handle of a tool. If it feels soft, crumbles, or there is a void, treat it as a base problem. If the base feels firm and dense but the bedding sand area is washed out or indented, you likely only need bedding replacement and re-leveling.
What if the stone is loose and the joints are already filled with weeds or mud?
That is a sign the joint material has broken down and water was moving through the joints. Remove all loose debris down to clean, sound joint material, then re-sweep the correct joint sand (polymeric for dry-set) and mist it until damp through (not pooling).
Should I use polymeric sand on an existing patio that already has regular joint sand?
Yes, but only after you remove and clean out the failing regular sand from the joints in the repair area. If you top off polymeric sand over compacted, wet, or cemented old sand, it can limit proper activation and the joints may not lock up.
How much above level should I set the stone before tapping it flush?
Slightly high. A practical target is about 1/8 inch above the surrounding surface so the bedding sand compresses when you set it, leaving the stone flush. If you set it dead level at removal, it often ends up low after compaction.
Do I need to compact the bedding sand layer, or just screed it smooth?
Screed it smooth and let it sit, do not over-compact the bedding like the base. Compacting the bedding too aggressively can create a hard spot that prevents the stone from settling evenly. The compaction you want is in the crushed-stone base layer.
What’s the correct way to mist polymeric sand without washing it out?
Mist gradually in short passes so the sand darkens and becomes damp all the way through. Stop if you see water pooling on the pavers, because that can move the sand out of the joints. Let it cure for about 24 hours before walking on it.
How long should I wait before driving on, or placing heavy items on the repaired area?
Plan on at least 24 hours for foot traffic. For heavy loads, wait longer than 24 hours to allow bedding and joints to fully set, especially in cool or damp weather. If you need the patio available sooner, consider having a dry-set pro advise based on your material and temperature conditions.
What if the stone rocks again after the first repair?
Re-check water and the underlying base. If only one stone re-loosened, the bedding height or jointing sand coverage may have been inconsistent. If multiple stones loosened, or the area near edges is involved, inspect edge restraint and confirm the base thickness and compaction.
Can I repair a loose stone during freeze-thaw season?
It’s not ideal because water management and curing are harder when temperatures drop below freezing soon after the repair. If you must repair, avoid misting and keep the surface from getting wet for the full cure window, and understand polymeric sand activation and mortar curing can be slower in cold weather.
How do I handle a crack in the concrete substrate under a mortar-set stone?
Do not bond over an active crack. Fill the crack with an appropriate crack-filling material (polyurethane caulk is commonly used for this purpose) and allow it to cure fully before resetting. Otherwise, movement will break the new bond.
Is sealing required for mortar-set patio stones to prevent future looseness?
Sealing is mainly about reducing water absorption and slowing freeze-thaw damage on natural stone. It does not replace fixing the base, drainage, and joint integrity, since looseness typically starts when water gets under the pavers.
What edge restraint issues should I look for near the perimeter?
Look for missing or cracked border pieces, loosened spikes, or gaps where you can see joint sand washout or joint widening over time. Re-spiking or adding restraint helps stop outward migration, which is a common reason loose stones keep recurring at edges.
When does a loose patio stone become unsafe enough to call a professional?
If the patio area shows widespread settlement (for example, several stones are loose and the surface has noticeably dropped), or the problem keeps returning after correct repairs, call a pro. Also call if the loose stone is part of a step or elevated section, because the stakes are higher for structural stability.
Next Article
How to Fix Loose Patio Pavers: Step-by-Step DIY Guide
Step-by-step DIY to fix loose patio pavers, reset sunk sections, rebuild base, re-bed sand, and prevent future washouts.