Loose patio pavers almost always come down to one of three things: the bedding sand underneath them has washed out or shifted, the base beneath the sand has failed or settled, or the edge restraints have given way and let the whole field creep. In most cases you can lift the affected pavers, correct the bedding, reset everything level, and lock it back in place in a single afternoon. If you want a quick way to get started, follow the step-by-step section so you know exactly how to lift, re-bed, reset, and compact the loose pavers how to fix patio pavers. The trickier situations, like a sunken section with a compromised gravel base or a drainage problem that keeps washing everything out, take more work and sometimes more honesty about whether it's a DIY job at all.
How to Fix Loose Patio Pavers: Step-by-Step DIY Guide

Quick diagnosis: why are your pavers loose?
Before you lift anything, spend five minutes figuring out what actually failed. Press down on the loose paver with your foot. Does it rock side to side, or does it sink? Rock side to side usually means the bedding sand around it has eroded or shifted but the base is still solid. A paver that sinks or springs back when you step off it is a sign the base underneath has compacted unevenly or the material below has moved. That's a different, deeper fix. If your pavers are uneven, the most effective fix usually depends on whether the problem is bedding sand, a failed base, or drainage moving material over time how to fix uneven patio slabs.
Check the edges of your patio too. If the pavers along the perimeter are splaying outward, your edge restraints have failed or were never installed properly, and that migration is the real cause of the looseness. Also look for low spots that collect standing water after rain. That's a red flag for drainage problems that will keep washing out your bedding no matter how many times you reset the pavers.
- Paver rocks but doesn't sink: bedding sand has shifted, base is likely fine
- Paver sinks underfoot: base failure or voids below the sand layer
- Pavers spread outward at edges: edge restraint failure or missing restraints
- Low, wet area with multiple loose pavers: drainage issue washing out bedding
- Recurring looseness in the same spot: almost always drainage or base failure, not just sand
Tools and materials you'll need
For a straightforward re-bedding repair on a small area, you don't need much. For bigger sections or base work, the list grows.
| Item | What it's for | Notes |
|---|---|---|
| Paver puller or flat pry bar | Lifting pavers without chipping edges | A dedicated paver puller makes this much easier |
| ASTM C33 concrete sand (bedding sand) | Re-bedding the pavers | Not play sand or mason sand, which compact poorly |
| Screed board and screed rails | Setting a consistent 1 to 1.5 in. sand depth | Even a scrap 2x4 works for small areas |
| Rubber mallet | Tapping pavers into final position | Avoid steel hammers, they chip pavers |
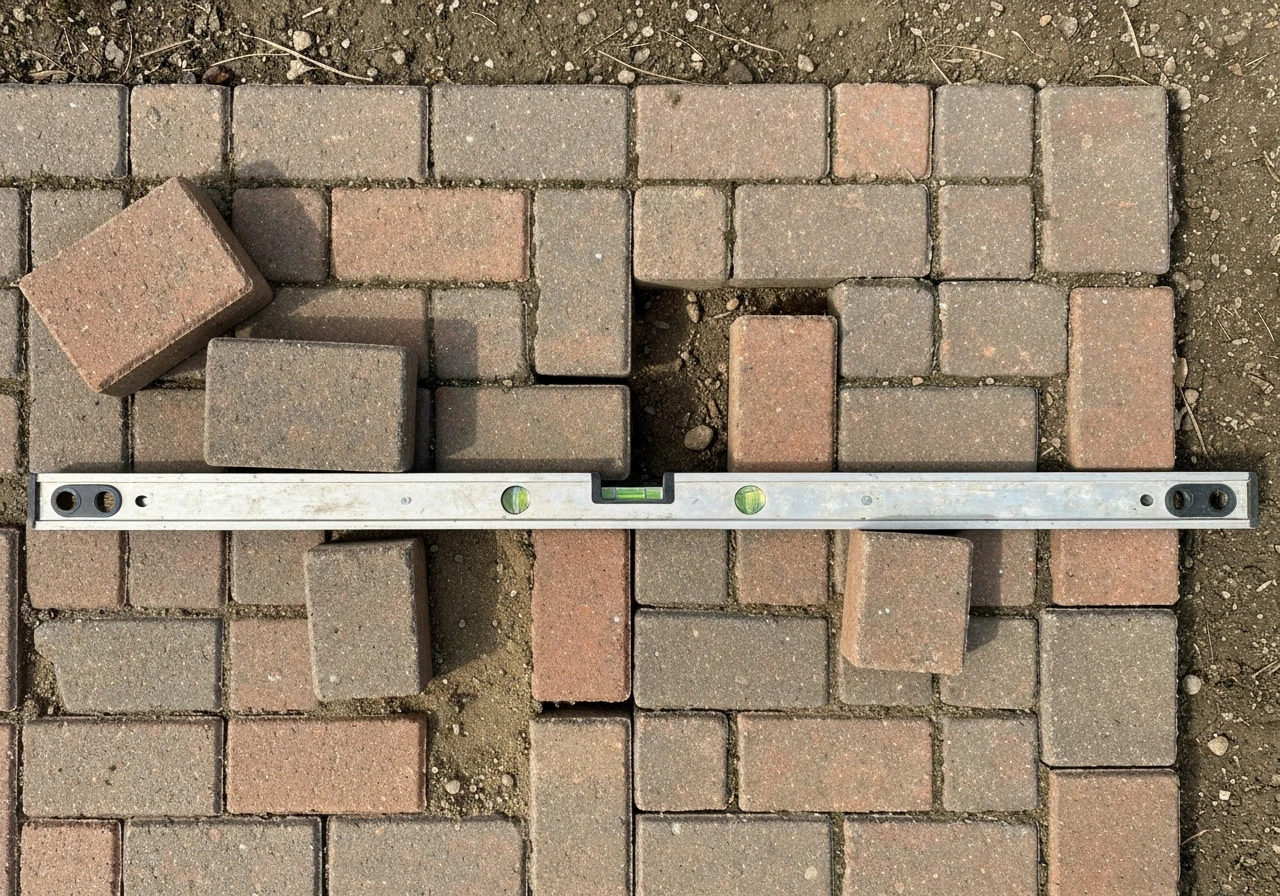
| Long level or straightedge (4 ft minimum) | Checking flatness and slope | Essential for catching low or high spots |
| Plate compactor or hand tamper | Compacting sand and seating pavers | Rent a plate compactor for anything over 20 sq. ft. |
| Polymeric sand | Filling joints and locking pavers together | Activates with water, hardens within 24 hours |
| Leaf blower | Clearing excess polymeric sand before wetting | Prevents haze on paver surface |
| Garden hose with shower nozzle setting | Activating polymeric sand | Fine mist only, never a strong stream |
| Plastic edge restraints and spikes | Securing patio perimeter | Required if edges aren't bounded by a fixed structure |
| Gravel (crushed stone, 3/4 in. compactible) | Base repair if needed | Added in 4 in. lifts with compaction between each lift |
Step-by-step: lifting, re-bedding, and resetting loose pavers
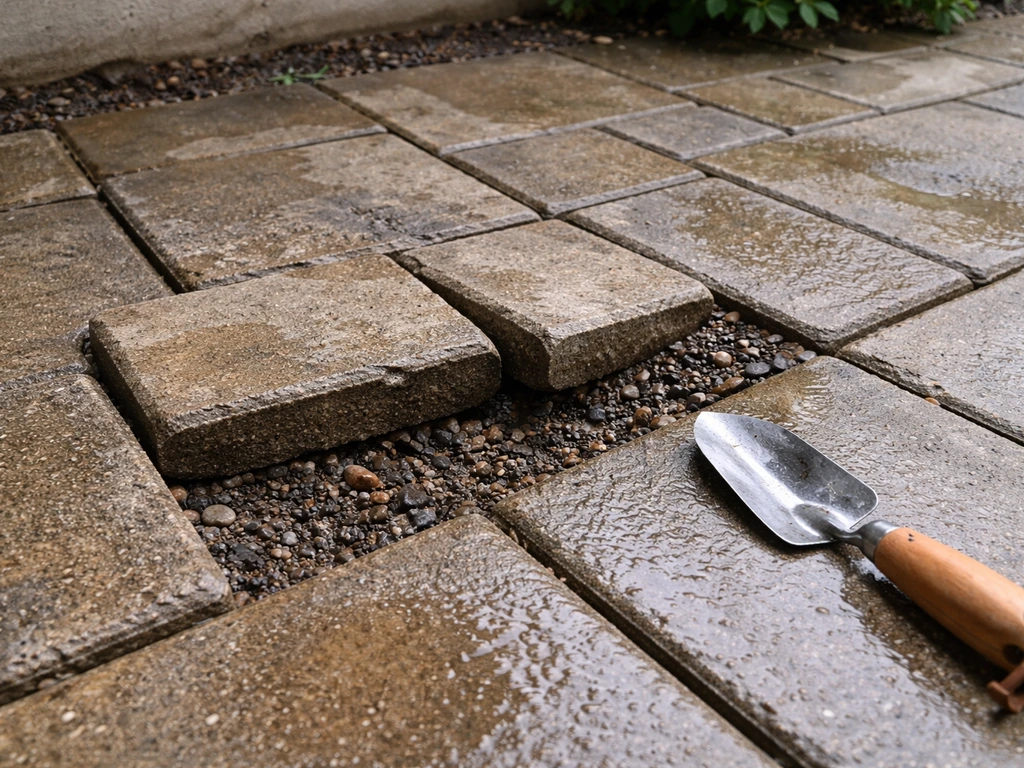
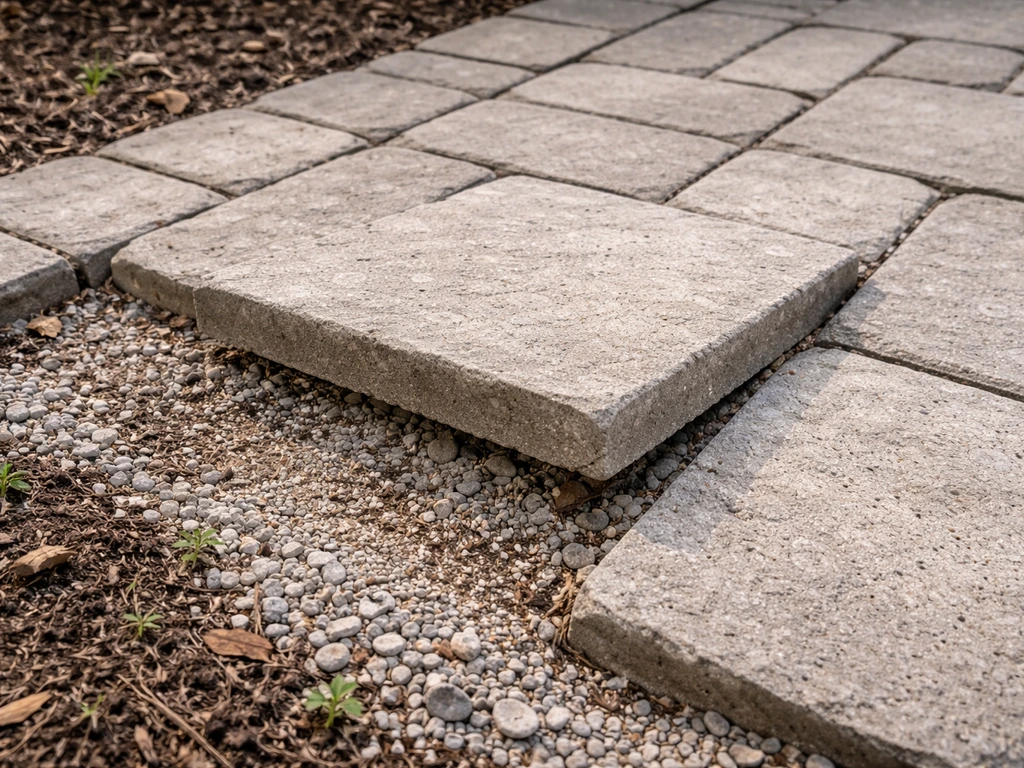
Step 1: Remove the loose pavers carefully
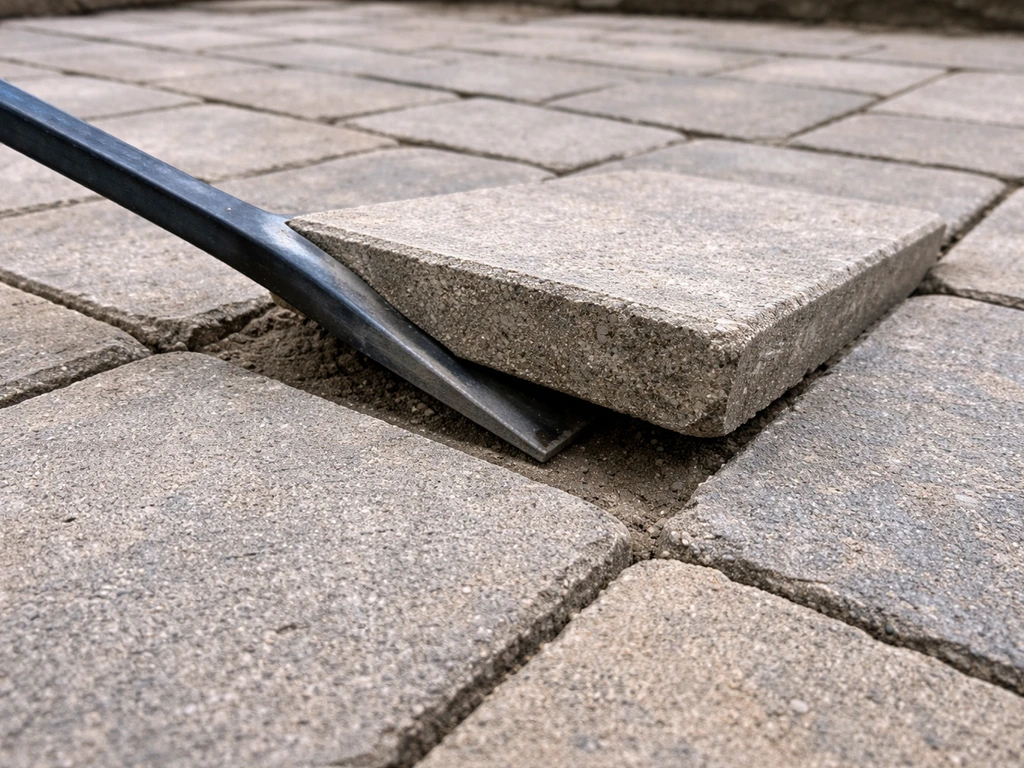
Start with the loosest paver and work outward. Slide a paver puller or flat pry bar into the joint and lever the paver up from one corner. Don't force it straight up or you risk chipping the edge. Once the first paver is out, the rest come out much easier since you now have a gap to work from. Stack them nearby in the same orientation so you can put them back in the right order, especially if your pattern is a herringbone or running bond.
Step 2: Clear out the old bedding sand
Scoop out the existing bedding sand with a trowel or small shovel. Get down to the base layer, which should be compacted crushed stone or gravel. If you see roots, washed-in soil, or the base material itself looks disturbed, make note of it because you'll need to address that before putting sand back in. Brush the underside of each paver clean while you have them out.
Step 3: Check and correct the base
This is the step most people skip, and it's why their repair fails six months later. Press down on the exposed base with your hand or stomp on it with your foot. It should feel firm and not give at all. If it's soft or you can push your finger into it, skip ahead to the drainage and base repair section before continuing. If the base is solid, just rake it level and make sure you have a consistent surface to screed sand onto.
Step 4: Screed fresh bedding sand to the right depth
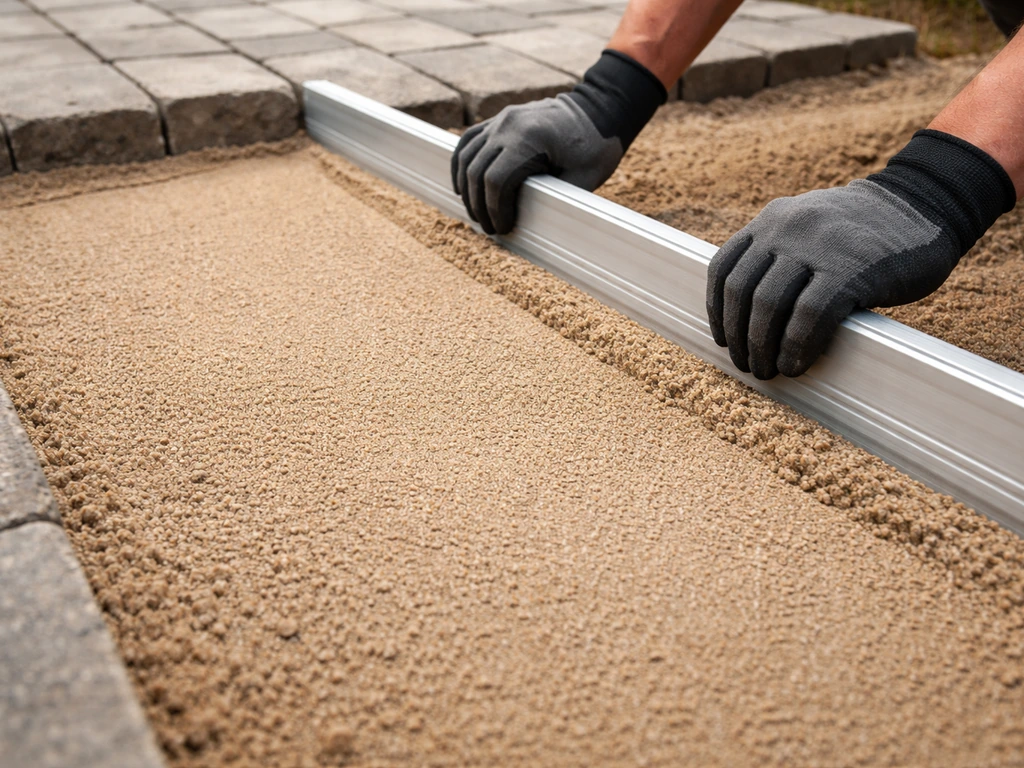
Pour in fresh ASTM C33 concrete sand (sometimes just sold as bedding sand or coarse sand at landscape suppliers, not play sand or mason sand). Screed it to a loose depth of 1 inch to 1.5 inches. That range matters: ICPI guidance is clear that bedding sand should never exceed 1.5 inches after compaction, and going thinner than 1 inch gives you no room to fine-tune the level. Screed rails set at the right height are the easiest way to stay consistent across the area. Once the pavers are set and compacted, the sand will compress down to roughly 3/4 inch to 1.25 inches, which is exactly where it should be.
Step 5: Reset the pavers
Place each paver back into position by setting it down rather than sliding it, which displaces sand and creates ridges under the paver. Use a rubber mallet to tap each one gently into the sand. Check alignment with your straightedge as you go. Don't walk on pavers until a section is complete and you're ready to compact.
Step 6: Compact the reset pavers
Run a plate compactor over the reset area to seat the pavers firmly into the bedding sand. For small patches (under about 10 square feet), a hand tamper works, but a plate compactor does a far better job of achieving uniform seating. Make at least two passes in perpendicular directions. After compacting, check your level again. If a paver is still slightly high or low, pull it, adjust the sand underneath, and reset it.
Re-sanding, leveling, and edge restraints
Once the pavers are seated and compacted, the joints need to be filled. This is what actually locks the pavers together as a rigid surface. Empty or partially filled joints are a big reason individual pavers work loose over time.
Filling joints with polymeric sand
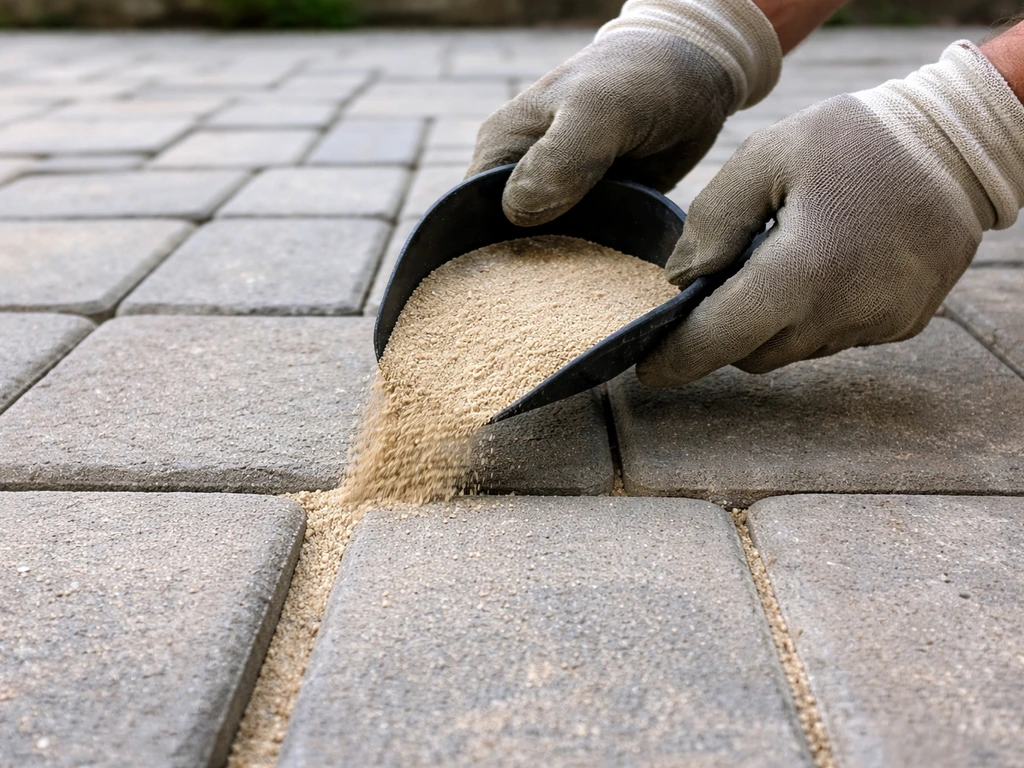
Polymeric sand is worth using on any repair you want to last. It contains polymer binders that harden when activated with water, making the joints far more resistant to washout and weed intrusion than regular sand. Pour it over the reset area and sweep it into the joints with a push broom, working it in multiple directions to make sure every joint is packed. Blow off excess sand from the paver surface with a leaf blower before wetting, because any sand sitting on top of the pavers will haze when the polymers activate.
One important detail: the sand should not sit flush with the top of the paver surface. It should be slightly recessed in the joint, roughly 1/8 inch below the paver face. Flush joints trap water on the surface and the sand tends to pop out when traffic hits it.
Activate the polymeric sand by wetting the area with a garden hose set to a shower or fine mist setting. ICPI Tech Spec 5 explains that joint-stabilizing products stiffen and stabilize joints when the joint sand is activated by water activated by water applied to joint sand. The guidance from most polymeric sand manufacturers is to wet roughly 200 square feet for about 30 seconds, let it absorb, then repeat once more. Do not use a strong stream or pressure washer: that blows the polymer binders right out of the joints. Let the sand cure for 24 hours before heavy foot traffic, and don't do this repair if rain is forecast within 24 hours.
Checking and fixing edge restraints
If your patio edges aren't bounded by a foundation wall, steps, or a fixed structure, you need plastic or metal edge restraints to keep the field from slowly migrating outward. Dig down along the perimeter to expose the edge of the base layer. The restraint should be pinned directly against the last row of pavers and spiked down into the compacted base, not just the sand. Drive the spikes so the collar sits about 1/4 inch above the restraint collar as shown in most manufacturer guides. Spacing spikes every 12 inches along straight runs and every 6 inches on curves gives solid anchoring.
If your existing restraints have pulled away from the pavers or the spikes have lifted, it usually means the base material didn't extend far enough behind the edge to give the spikes anything solid to grip. In that case you'll need to add and compact base material behind the restraint before re-spiking.
When the problem is really drainage or a failed base
If you've got a recurring soft spot, a section that keeps sinking, or pavers that get loose every time it rains hard, you're dealing with something below the bedding sand. Resetting those pavers without addressing the underlying issue is wasted effort, and it's worth being honest about that before you spend a Saturday on a fix that lasts six months.
Base failure: what it looks like and what to do
A failed base usually presents as a low, sunken section rather than individual rocking pavers. When you pull the pavers and sand, the base material beneath will feel soft, may look muddy, or will have voids where material has washed away. The fix is excavation: remove the base material in the affected area, assess whether the subgrade soil underneath is stable, and rebuild in compacted gravel lifts no deeper than 4 inches each. Each lift should be compacted with a plate compactor before the next goes in. The target is 95% compaction (a standard called Modified Proctor, ASTM D1557, if you're dealing with a contractor who needs a spec). For most residential patios, you're looking at 4 to 8 inches of compacted crushed stone as a base, depending on soil type and climate.
Drainage problems causing persistent washout
Water is the most common reason paver repairs fail repeatedly. If your patio sits in a low spot, is pitched toward the house, or has no clear path for water to exit, the bedding sand will keep washing out during heavy rain no matter how well you re-bed. The patio needs to slope away from the house at a minimum 1/8 inch to 1/4 inch per foot. If the existing slope is wrong, correcting it means lifting a significant portion of the patio and re-grading, which often also means rebuilding the base. At that point, especially if you're dealing with significant downspout discharge or runoff from a slope above the patio, getting a landscape contractor or hardscape professional involved is worth it. Getting the drainage wrong again means doing this a third time.
For more detail on sunken sections specifically, the guidance on fixing a low spot in a paver patio goes deeper into base excavation and re-grading. If you're dealing with pavers that are also uneven across a wider area rather than just loose, the article on how to fix uneven patio pavers covers leveling strategies across a larger section.
Keeping pavers from getting loose again
The best time to prevent paver movement is right after a repair. A few habits make a real difference in how long the fix lasts.
- Inspect joints every spring and fall and top up polymeric sand anywhere it has settled or washed out, especially in high-traffic areas
- Keep downspouts and gutters directed away from the patio surface, not onto it
- Don't use a pressure washer to clean the patio: it strips joint sand and can undermine the bedding below
- Check edge restraint spikes annually and re-drive any that have lifted above the collar
- Pull weeds as soon as they appear in joints: roots accelerate sand displacement and the organic matter they leave behind holds moisture against the base
- If you live in a freeze-thaw climate, expect more joint sand displacement in spring and plan to re-sand early in the season before the sand is gone and pavers start rocking
When to call a professional
A standard re-bedding and re-sanding repair is a solid DIY project. The situations where I'd recommend getting professional help are: any repair that requires excavating and rebuilding more than about 50 square feet of base, persistent drainage problems where the source isn't obvious, any area near a foundation where grading changes could affect water against the house, or anywhere the subgrade soil looks unstable or saturated. These jobs need proper compaction equipment and sometimes engineering judgment on drainage solutions. A hardscape contractor who works with ICPI-compliant installation practices will know what's needed.
If you're unsure whether your situation is a surface fix or a base problem, err toward pulling a few pavers first and checking what's underneath before committing to a repair approach. An hour of diagnosis saves a lot of rework. If loose bricks rather than concrete pavers are part of the picture, the approach to fixing loose patio bricks follows a very similar process but with some differences in how the base and bedding interact with the brick material. If your problem is loose patio bricks, follow the same diagnostic steps and then adjust the bedding and base so the brick can seat firmly and drain correctly fixing loose patio bricks. For more targeted steps, see the guide on how to fix uneven brick patio fixing loose patio bricks.
FAQ
Can I fix loose patio pavers without lifting all of them?
Sometimes, yes, if the problem is limited to a few units and the base feels firm. Lift only the loose pavers, remove and replace bedding sand in those joints, then compact before re-sanding. If multiple pavers loosen in a line or a whole section shifts after rain, assume the base or drainage is involved and lift a larger area to avoid repeating the same failure.
How do I know if the base is solid before I re-bed?
After you expose the base layer, press it firmly with your hand. If it feels springy, sandy loose, muddy, or your finger leaves an indentation, treat it as failed and stop the re-bedding approach. Also look for washed-out voids or disturbed gravel, these are early signs the base must be excavated and rebuilt.
What’s the biggest mistake people make when re-setting patio pavers?
Skipping compacting. Even if the sand depth looks correct, leaving the base or bedding un-compacted causes future settlement, rocking, and joint washout. Use a plate compactor for best uniform seating on anything more than a small patch, then re-check level before filling joints.
Should I use play sand or mason sand for bedding?
Avoid play sand and mason sand, they can compact differently and wash out more easily. For bedding, use concrete sand commonly sold as ASTM C33 concrete sand, or a landscape supplier product labeled for paver bedding. Using the wrong sand often leads to recurring looseness and loose joints.
How deep should the bedding sand be under the pavers?
Aim for about 1 to 1.5 inches of loose bedding depth before setting pavers, because compaction brings it down to the correct finished thickness range. Too thin gives you no ability to fine-tune height, too thick increases the chance of settlement and soft spots.
Do I need polymeric sand for every repair?
You don’t always, but it’s a strong choice for repairs that see washout, heavy rainfall, or active weed pressure. If you choose regular sand, joints are more likely to erode and allow pavers to loosen again. Also note polymeric sand must be used and activated correctly, if rain is expected soon after installation, postpone the repair.
Why shouldn’t the sand be flush with the top of the pavers?
When joints are packed flush, they trap water on the surface and are more likely to pop out during traffic or freeze-thaw cycles. Keep joint sand slightly recessed (around 1/8 inch below the paver face) so water has less chance to pool on top.
Can I activate polymeric sand with a pressure washer?
No. Use a garden hose on a shower or fine mist setting, strong streams can remove the polymer binders from the joints before they fully cure. If you see disturbed joint sand after wetting, it usually means the activation was too aggressive and the joints may not lock reliably.
What if pavers still rock after re-bedding and compacting?
Pull the specific paver or small group and correct the sand thickness and leveling underneath. Rocking after compaction usually means the base bedding is uneven at that spot, or a sand void formed because the paver was slid into place. Reset by setting the paver down gently, tap in with a rubber mallet, then compact the area again.
How far should I dig for edge restraints if my patio has no fixed border?
Expose the base layer along the perimeter and pin the restraint against the last row of pavers, not just into the bedding sand. The restraint needs to be spiked into the compacted base for real anchoring. If the spikes only contact sand, the edge can pull away again.
What causes loose pavers only on one side of the patio?
That pattern often points to drainage direction, missing or failed edge restraint on that side, or a slope that pushes water and soil toward the looseness. Check for standing water after rain and verify the patio slopes away from structures, if the water path is wrong, resetting pavers alone won’t hold.
When should I stop DIY and call a pro?
If you need to excavate and rebuild more than about 50 square feet of base, if the subgrade is unstable or saturated, if you have recurring washout with an unclear water source, or if the area is close to a foundation where grading affects water against the house, professional assessment is usually the safest and most cost-effective choice.
How long should I wait before using the patio after polymeric sand?
Let the joints cure at least 24 hours before heavy foot traffic. Avoid heavy loads right away and do not do polymeric sand repairs if rain is forecast within 24 hours, moisture timing affects how well the polymer bonds form in the joints.
How to Fix Uneven Brick Patio: Diagnose and Repair Steps
Step by step DIY guide to diagnose and fix uneven brick patio: reset bricks, rebuild base, restore drainage, prevent rep