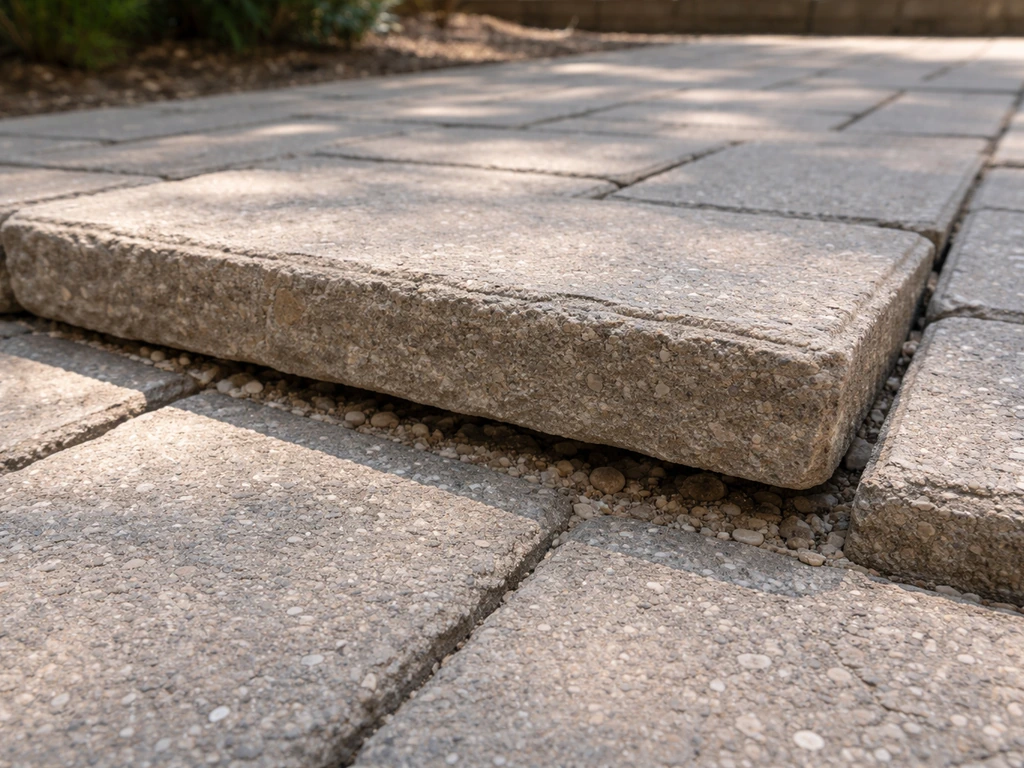
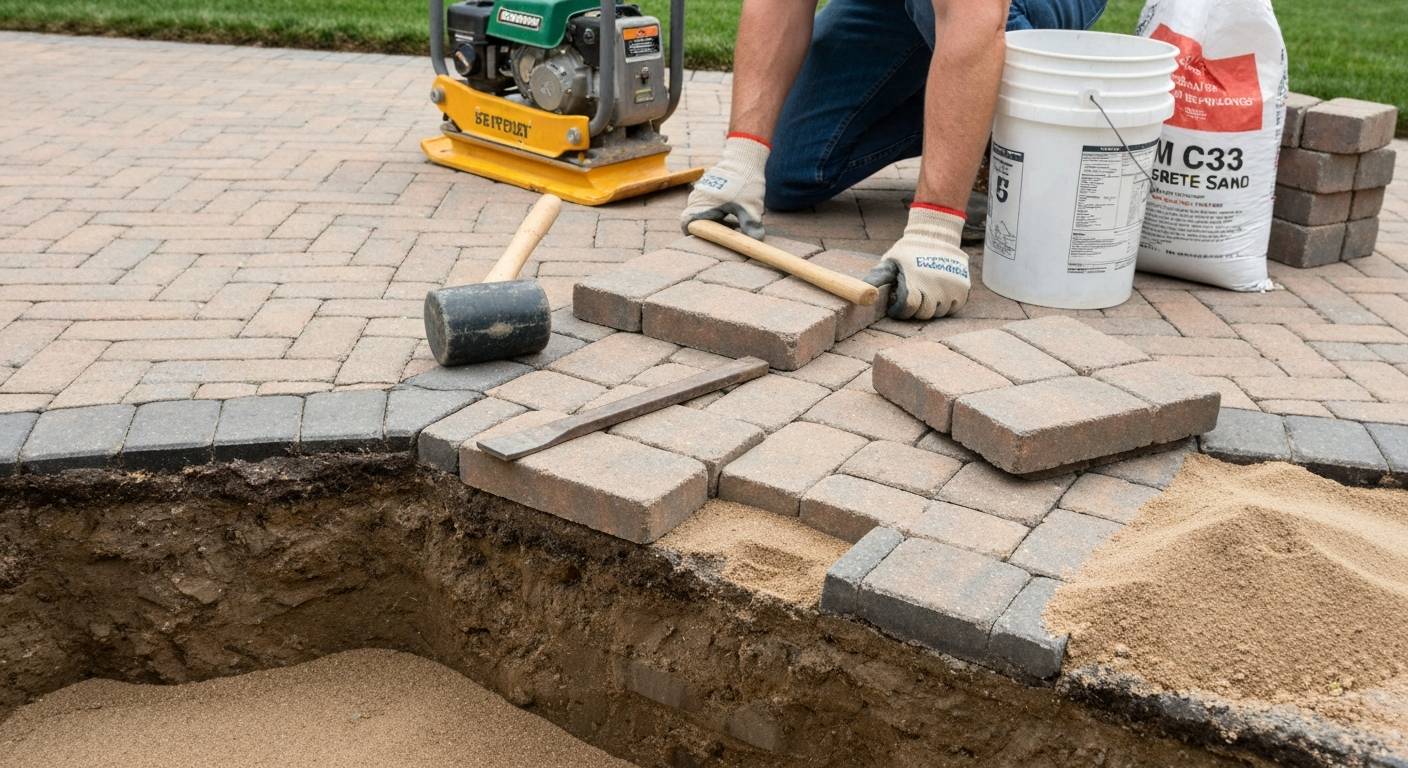
To fix a low spot in a paver patio, you lift the sunken pavers, rebuild the compacted aggregate base to the correct depth and slope, screed a fresh 1-inch layer of ASTM C33 concrete sand, relay the pavers, compact them with a plate compactor and protection pad, and finish with polymeric joint sand. That is the full repair. How long it takes and how much it costs depends on whether you are dealing with one rocking paver or a broad area of settlement, but the core method is the same. This guide walks you through diagnosing the problem first so you do not waste time repairing the wrong thing, then takes you step by step through every repair scenario. For step-by-step instructions on how to fix patio pavers, see the detailed repair procedures below.
How to Fix Low Spot in Paver Patio: Repair & Prevent

What this guide covers and who it is for
This is a practical repair guide for homeowners and DIYers dealing with low spots, sunken areas, rocking pavers, and pooling water on a paver patio. The methods here apply to concrete interlocking pavers, brick, flagstone, and large patio slabs. Whether you have one corner paver that tips when you step on it or a whole section of the patio that has dropped an inch or more, you will find the right repair approach here. I have worked through all of these scenarios and I will be straight with you about what is realistic to do yourself and what is worth handing off to a professional.
Quick diagnostic checklist: what kind of problem do you actually have?
Before you pull up a single paver, spend 10 minutes diagnosing the pattern of failure. The repair method and the amount of base work needed depend almost entirely on what caused the low spot, and a misdiagnosis is the number one reason DIY paver repairs fail a second time. Here is how to read what your patio is telling you.
Single sunken or rocking paver
Step on each paver in the suspect area and press down on the corners. A paver that tips, clicks, or rocks is not fully supported underneath. Look at the surrounding pavers: if they are solid and at the right height, the problem is localized. This is almost always bedding sand that has washed or shifted under that one unit. It is the easiest fix and usually takes under an hour.
Widespread settlement (multiple pavers, broad area)
Lay a 4- to 10-foot straightedge or a long level across the low section and measure the gap between the straightedge and the paver surface. A drop of more than 3/8 inch over 10 feet is outside the ICPI construction tolerance and needs a proper repair. When multiple adjacent pavers are all low together and the edges of the low zone are gradual rather than abrupt, the base itself has settled or was never adequately compacted in the first place. This repair requires pulling up the whole depressed zone plus one row beyond it and rebuilding the aggregate base.
Drainage washout
After a rain, check the joint sand. If the sand between pavers is noticeably lower than before, or if you can see channels in the sand where water flowed, the joint fill is washing out. Also probe through an open joint with a screwdriver: if it sinks more than 2 inches easily, the bedding sand underneath has been eroded. Drainage washout often appears near downspout discharge points, low-lying patio edges, or anywhere runoff concentrates. If you fix the paver without addressing the water source, the spot will fail again within a season.
| Symptom | Most Likely Cause | Repair Approach |
|---|---|---|
| 1–2 pavers rock or tip | Local bedding sand loss | Lift and rebed those pavers |
| Broad area low, gradual edges | Base settlement or poor original compaction | Lift all affected pavers plus one border row, rebuild base |
| Joint sand disappearing after rain | Drainage washout, no polymeric sand | Fix water source, refill joints with polymeric sand |
| Area re-sinks after every repair | Ongoing water source or soft/saturated subgrade | Fix drainage or hydrology before rebuilding |
| Heaved patches in spring | Frost heave from water in base | Improve drainage, rebuild base above frost depth |
| Edge pavers spreading outward | Failed or missing edge restraint | Reset pavers, install proper edging with anchors |
Why low spots happen: the real causes
Paver patios settle and develop low spots for a handful of predictable reasons. Understanding which one applies to your patio is what separates a repair that lasts from one that fails again next spring.
- Poor or insufficient base: The ICPI standard for a pedestrian patio is 4 inches of compacted aggregate base. Many DIY and contractor installs use less material, skip compaction lifts, or use the wrong aggregate. An under-built base compresses under load and foot traffic over time.
- Erosion and washout: Water running under or through the patio carries fine particles away with it. This hollows out support under individual pavers or whole sections, especially near downspouts, garden beds, or low perimeter edges.
- Freeze-thaw cycles: Water in the base or subgrade expands when it freezes, lifting pavers up, then drops them back down as it melts — but not always to the same position. After several winters, a poorly drained base can create significant unevenness.
- Edge restraint failure: Without a properly anchored edge restraint, the outer pavers have nowhere to push against and they gradually migrate outward. The gap this creates lets the whole field lose support from the edges inward.
- Compaction mistakes: The aggregate base must be compacted in layers (called lifts) of 2 to 4 inches at a time. Dumping 6 inches of gravel and running a plate compactor over it once does not achieve proper density. The bottom of a thick, single-lift base stays loose and settles later.
- Buried organic material: If the patio was built over an area with old tree roots, sod, or buried debris, those materials decompose over time, leaving voids. This is a common cause of surprisingly rapid settlement in newer patios.
- Plumbing, utilities, or sinkhole risk: Persistent settlement in the same spot despite multiple repairs, or a depression that appears suddenly and grows, can indicate a broken water line, failed drain, or in rare cases a developing sinkhole. These are not DIY repairs — stop work and call a professional before going deeper.
Tools and materials you will need
The tool list scales with the size of the repair. A single paver reset needs almost nothing; a 20-square-foot base rebuild needs a plate compactor (rent one for about $75–$120 per day from a local equipment rental). Here is what to have on hand before you start.
| Item | What It Is For | Notes |
|---|---|---|
| Paver puller or flat pry bar | Lifting pavers without chipping edges | Plastic shims work for tight joints |
| Hand maul or rubber mallet | Seating pavers and tapping into place | Never use a steel hammer directly on pavers |
| Plate compactor | Compacting aggregate base and final paver set | Rent one; use a paver protection pad on the last pass |
| Hand tamper | Compacting small areas or tight spots | Useful where a plate compactor will not fit |
| Screed rails (lengths of conduit or pipe) | Screeding a uniform 1-inch sand bed | 1-inch OD pipe sets the correct bedding depth |
| Straightedge or long level (4–10 ft) | Checking grade and flatness | Essential for diagnosing and confirming the repair |
| Compacted aggregate base (Class II or crushed stone) | Building the structural base layer | 4 inches minimum compacted depth for pedestrian patios |
| ASTM C33 concrete sand (bedding sand) | The 1-inch setting bed under pavers | Do NOT substitute stone dust or mason sand |
| Polymeric joint sand | Filling joints to resist washout and weeds | Follow manufacturer instructions exactly for activation |
| Replacement pavers or bricks | Replacing cracked or damaged units | Bring a sample to match color and thickness |
| Plastic or metal edge restraint with spikes | Locking the perimeter of the paver field | Spikes at 12-inch spacing for pedestrian areas |
| Geotextile fabric | Separating subgrade from base on wet or soft soils | Not always required, but worth adding in problem areas |
| Safety glasses, gloves, knee pads, steel-toed boots | Personal protection | Knee pads matter more than you think on a full-day repair |
A note on bedding sand: this is where a lot of repairs go wrong
Stone dust (also called crusher fines or screenings) is cheap and easy to find at landscape suppliers, which is why so many people use it. Do not use it as your bedding layer. Stone dust retains moisture and pumps under load, meaning it squeezes and migrates out from under the pavers when weight is applied, which leads directly back to low spots. ICPI specifies ASTM C33 coarse washed concrete sand for the bedding layer. It is a little coarser and does not compact into a slab under the pavers. Stone dust is also not the same as ASTM C144 mason sand, which is too fine. Get the right material and the repair will hold.
Safety, site prep, and permits
Most patio repairs do not require a permit, but check with your local municipality if you are doing any significant excavation, changing drainage patterns, or rebuilding more than a few square feet. The bigger safety issue is what is underground. Call 811 (in the US) before you dig anything more than a few inches. Gas lines, water supply, irrigation, and electrical conduit can all run shallower than you expect under a patio. This is a free service and takes a couple of days to schedule, so plan ahead.
- Wear safety glasses when prying pavers — chipped edges can throw fragments.
- Wear gloves; paver edges and compacted stone are rough on hands.
- Knee pads are genuinely useful for a repair that takes more than 30 minutes.
- If you are working on a sloped patio or near a retaining wall, pay attention to lateral soil pressure — do not undercut support for structures adjacent to your work area.
- Move potted plants and outdoor furniture well clear of the work zone before you start; a plate compactor vibrates more than you expect.
- If you are rerouting drainage as part of the repair, direct water away from the foundation and from neighboring properties.
Choosing the right repair method
Not every low spot needs the same fix. Using the diagnostic information above, match your situation to one of these four approaches before you pull a single paver.
| Situation | Right Method | Estimated Time | Estimated DIY Cost |
|---|---|---|---|
| 1–3 rocking or sunken pavers, solid base around them | Lift and rebed | 1–2 hours | $20–$50 |
| Loose or wobbly pavers (brick, flagstone, slab) | Reset with correct bedding material, re-point joints | 2–4 hours | $30–$80 |
| Low area 2–20 sq ft, base has settled | Lift pavers, rebuild compacted base, rebed and relay | Half to full day | $100–$300 |
| Low area >20 sq ft or recurring problem | Full section rebuild with proper excavation, grade, drainage fix | 1–2 days | $250–$600+ |
| Active drainage failure, standing water at subgrade | Fix hydrology first (downspout reroute, drain install), then rebuild | Variable | Variable — may need pro |
When to use a mortar bed instead of sand
Sand-set systems use a loose 1-inch concrete sand bed and rely on edge restraints and tight joints to keep everything in place. Mortar-set systems (common with flagstone, large format slabs, and some brick) use a stiff mortar bed and mortar joints. If your patio was originally mortar-set and you relay it on sand without mortar, the surface will feel hollow and joints will crack. Match the original installation method. When in doubt, look at the joints: tight sand-filled joints with no visible mortar residue indicate sand-set. Wide joints with gray or tan hardened material between units indicate mortar-set.
Step-by-step: lifting and rebedding single pavers or small sunken areas
This method covers repairs where the base itself is solid and you are only dealing with a local bedding sand problem. If you probe through the joint with a screwdriver and it sinks deeper than about 2 inches without resistance, or if you can feel the base is loose and crumbly when you excavate, move to the larger base-rebuild method below.
- Mark the repair zone. Mark out the low paver and at least one row of pavers all the way around it. Removing the border row gives you room to work and lets you verify the base condition around the edges of the problem.
- Remove the joint sand. Use a stiff brush or a shop vac to clean out the joint sand around the pavers you plan to lift. This prevents sand from falling into the base when you pull pavers.
- Lift the pavers. Insert a flat pry bar or paver puller into the joint and lever the paver up from one corner. Stack pavers face-up nearby in the order you removed them so you can relay them in the same pattern. Number them with chalk if the pattern is complex.
- Inspect the base. Scoop out the old bedding sand with a trowel or small shovel. Look at what is underneath. You want to see a firm, stable layer of compacted crushed aggregate. If it is muddy, soft, or you see standing water, stop and address the drainage issue before going any further.
- Add and compact aggregate if needed. If the base has dipped, add compacted aggregate in 2- to 4-inch lifts, compacting each lift before adding the next. A hand tamper works for small areas; rent a plate compactor if you are working more than about 4 square feet.
- Check your slope. The finished paver surface should drain at roughly 1/4 inch per foot (about 2%) away from the house or toward a drain. Set that slope in the aggregate base now — do not try to compensate with the sand bed.
- Screed the bedding sand. Set two lengths of 1-inch OD pipe (conduit works fine) on the compacted base as screed rails, parallel and about 2 feet apart. Pour ASTM C33 concrete sand between them and drag a straight board across the top of the rails to create a perfectly flat 1-inch sand bed. Remove the rails and gently fill the channels they leave.
- Do not walk on the screeded sand. Relay the pavers directly from the edge of the area, setting each one straight down without sliding it into position. Sliding drags the sand and creates low points.
- Set the pavers. Place each paver back in its original position and pattern. Use a rubber mallet to seat them lightly. They should sit just a hair above the surrounding pavers at this point — the compaction step will bring them down.
- Compact the pavers. Make two passes with the plate compactor using a paver protection mat (a rubber pad that attaches to the bottom of the compactor plate). This seats the pavers firmly into the sand and brings the surface to final grade.
- Sweep in polymeric joint sand. Pour polymeric sand over the surface and sweep it into the joints in multiple passes. Do not use regular play sand or mason sand for this step — it will wash out. Once the joints are full, blow or sweep off all excess sand from the paver faces.
- Activate the polymeric sand. Mist the surface with water according to the manufacturer's instructions. Most polymeric sands need 2–3 light misting passes, not a soaking. Let it cure for the time specified on the bag (usually 24 hours) before foot traffic.
Step-by-step: resetting loose patio stones and bricks
Loose pavers, bricks, and flagstone are closely related to the sunken paver problem but the fix depends on the original installation method and the paving material. For a focused walkthrough on how to fix loose patio pavers (resource id 0688a811-bbdf-483a-b17f-cf3ce1b03867), see the dedicated reset and bedding instructions. See our detailed guide on how to fix loose patio bricks for step-by-step instructions on resetting mortar- and sand-set brick. The bedding material differs across paver types, and getting this right is what makes the reset last.
Concrete interlocking pavers
Follow the lift-and-rebed steps above exactly. For step‑by‑step instructions specific to individual units, see our guide on how to fix a loose patio stone. ASTM C33 concrete sand for the bed, polymeric sand for the joints. Interlocking pavers work as a system where every unit depends on tight joints and edge restraints for stability, so make sure the edge restraints along the perimeter are intact and properly anchored with spikes at 12-inch intervals. A loose paver near the edge of the patio is often a sign that the edge restraint has failed or was never installed. Fix the edge first, then reset the pavers.
Brick
Brick can be installed either sand-set (same method as pavers) or mortar-set. For step-by-step instructions specific to brick installations and uneven or sunken bricks, see how to fix uneven brick patio. Sand-set brick uses the same 1-inch ASTM C33 bed and polymeric or dry-mortar joints. Mortar-set brick uses a 1/2- to 1-inch dry-pack or wet mortar bed. For a mortar-set reset, chip out the old mortar from under the loose brick and from the surrounding joint faces with a chisel and maul, clean the surfaces, butter the base with fresh Type S mortar (stiff consistency, not soupy), and set the brick. Point the joints with fresh mortar and keep the repair damp for 24–48 hours so the mortar cures properly. Do not walk on mortar-set repairs for at least 24 hours.
Flagstone and large format slabs
Flagstone is almost always mortar-set or dry-laid on a compacted sand/stone-dust bed. For step-by-step instructions specifically for flagstone, see our guide on how to fix uneven flagstone patio. For dry-laid flagstone on a sand or stone-dust bed (stone dust is acceptable for flagstone because the stone's irregular weight distribution is different from interlocking pavers), lift the stone, re-grade the base, add material as needed to bring the stone to the correct height, and reset it. For mortar-set flagstone, remove all old mortar from the base and the stone edges, re-bed on fresh Type S mortar, and repoint the joints. Large flagstones can weigh 80–150 pounds per piece, so plan for a helper or rent a paver lifting tool. The same principles apply to fixing uneven patio slabs, the base work is identical, the mortar bed just needs more surface area.
Step-by-step: rebuilding a larger sunken area
When the low area is bigger than a few square feet or the base has clearly failed, a partial fix will not hold. Industry practice is to pull the pavers for the entire depressed zone plus one full row around the perimeter, excavate to sound soil, and rebuild from scratch. Industry guidance (blank" rel="noopener noreferrer">ICPI Tech Spec / installation guidance (rebuild base for larger repairs)) recommends removing the pavers for the entire depressed zone plus one full row, rebuilding the compacted aggregate base to ICPI-specified depths and compaction (density), then re-bedding and relaying the pavers to prevent re-failure. The standard lift‑and‑relay procedure, remove affected pavers and a border row, clear contaminated bedding sand, rebuild and compact the base in compacted lifts to design depth, screed a 1‑inch ASTM C33 bedding sand layer, relay and compact pavers with a plate compactor and protection pad, then finish with polymeric joint sand, is detailed at FixBrokenPatio, how to fix sunken/uneven pavers (lift, rebuild base, relay) FixBrokenPatio — how to fix sunken/uneven pavers (lift, rebuild base, relay). This takes a full day for a 10- to 20-square-foot area and is genuinely satisfying work when you know it is going to hold.
- Mark the full repair boundary. Include the depressed zone plus one paver row all the way around it. Snap chalk lines or mark with spray paint.
- Remove and label all pavers in the zone. Stack them face-up and in order. Inspect each one for cracks or damage and set aside any that need replacement.
- Excavate the base material. Dig out all the existing base aggregate down to subgrade (native soil). For a standard 4-inch compacted base, you are typically excavating 5–6 inches deep below where you want your finished paver surface to sit (4 inches of base + 1 inch of bedding sand + paver thickness, usually about 2.375 inches for standard pavers).
- Inspect the subgrade. If the soil at the bottom is saturated, soft, or has visible water, stop. You have a drainage problem that must be addressed before you rebuild. See the drainage section below.
- Set your slope. Use a level and stakes to mark the target grade across the excavated area. Aim for 1/4 inch per foot (2%) running away from the house. This slope needs to be set in the compacted base — the sand bed is not the place to correct it.
- Install geotextile fabric if needed. On soft, wet, or clay-heavy subgrades, lay a geotextile fabric before adding aggregate. It prevents the aggregate from mixing with and sinking into the subgrade over time.
- Add and compact aggregate base in lifts. Pour 2–4 inches of crushed aggregate, compact it thoroughly with a plate compactor, check grade, then add the next lift. Repeat until you reach the target base depth. Each lift needs to be compacted before the next goes on — this is non-negotiable for a repair that holds.
- Install or repair edge restraints. If the edge of the repair zone is also the perimeter of the patio, check that your edge restraints are properly secured. Drive spikes at 12-inch intervals. A failed edge is one of the most common reasons a repaired area re-fails.
- Screed the bedding sand. Set 1-inch screed rails on the compacted base and screed ASTM C33 concrete sand to a uniform 1-inch depth across the entire repair zone. Remove rails and fill channels.
- Relay the pavers. Work from one corner of the repair zone outward, setting pavers down without sliding. Maintain consistent joint width and pattern alignment with the surrounding patio.
- Compact, sweep polymeric sand, and activate. Same final steps as the single paver repair: two passes with a padded plate compactor, multiple sweeping passes of polymeric joint sand to fill joints flush, blow off excess, and activate with a light mist.
Fixing the drainage before you fix the pavers
If the same spot keeps sinking despite repeated repairs, water is the culprit. The most common sources are a downspout that discharges directly onto or near the patio, an irrigation head pointed at the patio edge, a cracked buried drain pipe, or simple grading that directs lawn or roof runoff across the patio. No amount of base work will fix a spot that is being constantly soaked from underneath. Route downspouts at least 6 feet away from the patio or connect them to an underground pop-up drain that daylights past the patio perimeter. Check irrigation zones. Regrade the soil along the patio edges so surface water flows away from the paved area rather than under it. Only after the water problem is solved should you rebuild the base and relay the pavers.
Common troubleshooting: when the fix does not hold
- Pavers re-sink within one season: Almost always a base issue. Either the base was not compacted in proper lifts, the depth was insufficient (less than 4 inches compacted), or you used stone dust as a bedding layer instead of ASTM C33 sand. Pull the pavers again and do the base correctly.
- Polymeric sand keeps washing out: The sand was activated with too much water (flooding instead of misting), excess sand was not fully swept off before activation, or the joints were wet when the sand was applied. Remove the failed poly sand, let joints dry completely, reapply on a dry day with no rain in the forecast for 24 hours.
- Weeds growing through joints: Polymeric sand inhibits weeds but is not permanent. Re-apply polymeric sand every few years as part of routine maintenance. Pull weeds before they establish and before their roots crack the joint sand.
- Edge pavers spreading outward: The edge restraint has failed or is missing. Reset the outer pavers, install a new edge restraint anchored with spikes at 12-inch spacing, then compact the edge row.
- Pavers crack after repair: A cracked paver after a repair usually means the base has a high spot underneath it — a paver sitting on a ridge of aggregate with unsupported edges will crack under load. Recheck the base flatness against the ICPI tolerance of ±3/8 inch over 10 feet before relaying.
Prevention and maintenance to avoid future low spots
The single best thing you can do to prevent low spots from coming back is to manage water correctly and inspect the joint sand every year. Most patio failures are water failures. Here are the maintenance habits that actually make a difference.
- Refresh polymeric joint sand every 3–5 years, or sooner if joints look visibly depleted. Topped-off joints resist weeds, insect activity, and the water infiltration that erodes the bedding sand below.
- Check edge restraints every spring. Push on the outer row of pavers. If they have any lateral movement, the restraint spikes have pulled loose or the restraint itself has broken. Reseat and re-spike before any pavers migrate further.
- Keep downspout discharge well away from the patio edge. Extend downspouts or install underground drain extensions to carry roof water past the patio.
- Watch for the first signs of a low spot: a paver that rocks slightly, a joint that looks lower than its neighbors, or water pooling after rain where it did not pool before. Small repairs done early are much cheaper than waiting for the base to fail broadly.
- Consider sealing the paver surface every 3–5 years on high-traffic patios. Sealer does not prevent base settlement but it does slow joint sand erosion and makes the surface easier to clean.
- Do not let tree roots grow under the patio. If you planted trees within 10 feet of the patio after installation, inspect the patio perimeter near those trees each spring.
When to call a professional
Most paver patio repairs are genuinely DIY-friendly, but there are situations where the honest answer is to stop and get professional help. Trying to DIY around these problems can make them worse and more expensive to fix.
- The same spot keeps sinking despite multiple proper repairs, especially if the depression grows over time or appears suddenly. This can indicate a broken water or sewer line, a failing underground drain structure, or in rare cases a developing sinkhole. Get a professional with a camera inspection or soil assessment before digging.
- You find active water flow at the subgrade level when you excavate. This is a drainage or hydrology problem that may require grading work, retaining structures, or a perforated drain system that goes beyond a simple paver repair.
- The patio repair zone is larger than about 50–100 square feet. At that scale, renting equipment, sourcing materials, and achieving proper compaction across a large area is genuinely difficult without experience. A contractor can often complete this faster and at a cost that is competitive with your time and equipment rental.
- The patio sits against a foundation wall or retaining wall and the settlement is in that zone. Settlement near a structure can indicate soil movement that may affect the structure itself.
- You are in a climate with heavy freeze-thaw cycles and the heave is happening year after year despite good drainage. The base may need to be rebuilt below the local frost depth, which is a more significant excavation project.
FAQ
Quick diagnostic checklist: how do I tell if my low spot is a single sunken paver, widespread settlement, or drainage washout?
Start with a visual and physical check: (1) Press or rock the suspect paver(s). A single rocking unit with surrounding pavers solid usually means local bedding sand erosion. (2) Use a 4–10 ft straightedge across the patio to find deviations; many adjacent low pavers or a broad shallow depression (>1 ft²) points to base settlement or inadequate compaction. (3) Look at joints after rain—missing joint sand and channels washing through joints indicate drainage washout. (4) Probe the bedding through a joint or remove one paver: standing water, wet soil, or washed-out aggregate at the bottom means a drainage/saturated subgrade problem. Record depression depth with a ruler/tape. These simple tests separate single-unit bedding issues, base failure, and hydrology problems so you can choose the right repair method.
What are the common causes of low spots or sinking in paver patios?
Typical causes: poor or insufficient aggregate base (too thin or not compacted), erosion/washout of joint or bedding sand from surface runoff or poor drainage, freeze–thaw frost heave followed by settlement, edge restraint failure allowing lateral movement, improper use of stone‑dust for bedding (fines pump and settle), and soft or saturated subgrade under the base. Repeated repair failure usually indicates an ongoing water source (downspout/irrigation) or a subgrade issue that wasn’t fixed.
What are the general repair options and when do I use each?
Single loosened/sunken paver: lift-and-rebed (remove paver, clean bedding, add/screed proper bedding sand, replace paver, compact, refill joints). Small group or broad depression (<1–2 ft²) with solid base: remove affected pavers plus one border row, clean and re‑level bedding and joints, compact and relay. Large or repeated settlement: excavate pavers and base, correct subgrade/drainage, install or deepen compacted aggregate base to ICPI-recommended depths, screed bedding sand, relay. If bedding is mortar-set (brick/masonry) use appropriate mortar bed repair. If there's active drainage or saturated soil, fix hydrology (reroute downspouts, install drainage pipe/swale) before rebuilding base.
Step-by-step: how do I lift and permanently re-bed a single or a few sunken pavers?
1) Remove surrounding furniture and clear area. 2) Pry up the affected paver(s) using a flat bar and gloves; remove joint sand as needed. 3) Inspect bedding and base—if bedding sand is contaminated or eroded, remove it to the compacted base. 4) If base is sound, screed a nominal 1 in (25 mm) layer of coarse washed ASTM C33 concrete sand over guide rails. ICPI warns bedding should be uniform and not used to correct base grade errors. 5) Re-seat paver(s) to match adjacent elevation and pattern. 6) Compact with a plate compactor fitted with a pad/protection mat. 7) Brush joint sand (ASTM C144 or polymeric sand per manufacturer) into joints and compact again; if using polymeric sand follow activation/misting instructions. 8) Check final grade and slope for drainage.
How do I repair a larger sunken area or a patch of many pavers so it won’t re‑sink?
For a larger area remove the pavers for the entire depressed zone plus one row around it. Excavate down to the compacted base or subgrade and correct any soft spots. Rebuild aggregate base in 2–4 in loose lifts, compacting each lift to industry density targets (ICPI: ≥98% of Standard Proctor for pedestrian areas) and achieving a smooth base within ±3/8 in over 10 ft. Install geotextile on weak/wet subgrades where required. Create the designed surface slope (1.5–2% typical). Screed a uniform 1 in bedding layer of ASTM C33 sand, relay pavers, compact with a plate compactor and refill joints. Edge restraints must be restored or upgraded so the pavement has lateral support.
Are there differences in repair method for concrete/segmental pavers vs brick vs flagstone/slabs?
Yes. Segmental concrete pavers (interlocking) are normally sand‑set: lift, clean bedding, rebuild base if needed, screed 1 in ASTM C33 bedding sand, relay, compact, and joint sand. Brick often uses either sand‑set or mortar beds: for sand‑set follow paver steps; for mortar beds you must remove and rebuild the mortar bedding and repoint joints with compatible mortar—mortar repairs are more permanent but require masonry skill. Flagstone/slabs are typically set on compacted aggregate with a thicker bedding (stone dust or concrete sand or a thin mortar bed depending on style). Irregular stones may need more bedding/bed shaping and jointing (polymeric sand or mortar). For slabs, ensure contact across the underside—voids cause rocking; re‑lift and add compacted aggregate and bedding material to fill voids, or install a concrete mud bed for a permanent fix.
How to Fix a Loose Patio Stone Step-by-Step
Diagnose loose patio stone causes and reset correctly with sand or mortar, leveling, compaction, and drainage tips to pr