To seal a stone patio table, you clean the surface with a pH-neutral cleaner, let it dry completely (at least 24 hours), apply a thin coat of penetrating impregnating sealer with a soft brush or foam applicator, wipe off every bit of excess before it dries, and keep it dry for at least 24 to 72 hours while it cures. That's the core of it. The details below matter a lot though, because skipping the water test, trapping moisture under the sealer, or leaving excess on the surface are exactly what cause the streaks, haze, and blotchy dark patches that frustrate most people.
How to Seal a Stone Patio Table: Step-by-Step DIY Guide

Talia Lang
2 Jul 2026
Quick check: what stone you have and whether it actually needs sealing
Before you buy anything, figure out what you're working with. Most outdoor stone patio tables are granite, marble, slate, travertine, limestone, or outdoor stone tile. Each behaves differently when it gets wet and wears differently over time. Granite is dense and relatively forgiving.
Marble, travertine, and limestone are calcium-based (acidic cleaners and etching are real risks with these). Slate is layered and can delaminate if water gets trapped. If you specifically want to seal a slate patio, the same penetrating sealer approach works best, but pay extra attention to avoiding trapped moisture in slate’s layered structure how to seal slate patio.
Outdoor stone tile is often porcelain or ceramic glazed over a stone look, and those don't need sealing at all since the glaze is already non-porous.
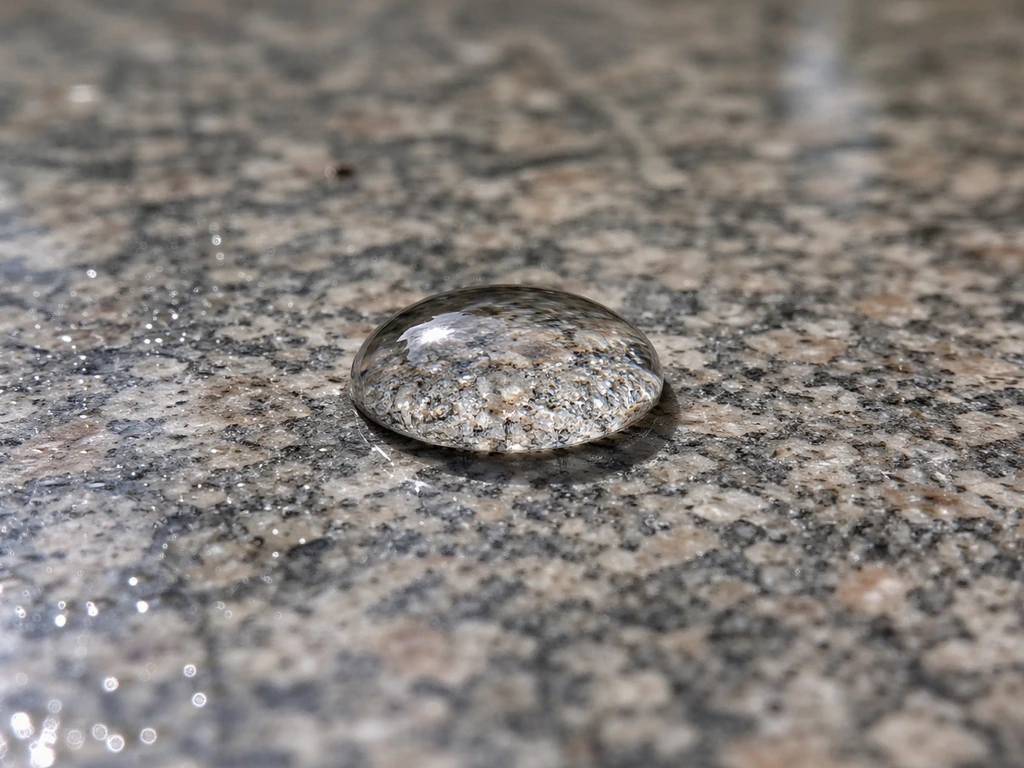
Once you know your stone type, do a simple water test to find out whether it's already sealed. Drop about a tablespoon of water onto the surface and watch what happens over 10 to 15 minutes.
If the water beads up and stays on the surface without being absorbed, the stone is likely sealed and may not need treatment yet. If the water soaks in and the stone visibly darkens, the surface is unprotected and sealing will help. If the water sits but slowly absorbs, it might have some sealer left but it's getting thin.
This test, sometimes called a water repellency or absorption test, is the most practical way to make a call before committing to a full project. For more ambiguous cases, a RILEM-tube style approach is described as a more “scientific” way to assess absorbency and infer sealing and porosity behavior (useful when the water-drop test is unclear).
It's also worth being honest about what sealing does and doesn't do. A good penetrating sealer slows down liquid absorption, reduces staining from spills, and helps the stone resist moisture damage over time. It does not fix etching (those dull, acid-burned spots on marble or limestone), fill cracks, or improve structural integrity. If your table has deep cracks, spalling edges, or loose pieces, sealing won't solve those problems and in some cases can make repairs harder to do later.
Gather supplies: sealer type, cleaners, and safety gear
For almost every natural stone patio table, you want a penetrating impregnating sealer, not a topical film-forming sealer. Penetrating sealers soak into the pores of the stone and work from the inside out, which means they don't change the look of the surface dramatically and they allow the stone to release moisture vapor (breathe). Topical sealers sit on top and can trap moisture underneath, change the sheen, peel, and generally cause more problems than they solve on outdoor natural stone. Products like Miracle Sealants 511 Impregnator or similar penetrating formulas are what most professionals reach for. Water-based versions are easier to work with and have less fume, which matters when you're working outside in the heat.
For cleaning, you need a pH-neutral stone cleaner. This is non-negotiable if you have marble, travertine, or limestone, where anything acidic (vinegar, citrus-based cleaners, most bathroom tile cleaners) will etch the surface. Even for granite and slate, a pH-neutral cleaner is still the right call because residue from the wrong cleaner can block the sealer from bonding properly. Products like Aqua Mix Concentrated Stone and Tile Cleaner, or any cleaner labeled pH-neutral and safe for natural stone, work well diluted per the instructions.
- Penetrating/impregnating sealer rated for your stone type (water-based or solvent-based)
- pH-neutral stone cleaner (not vinegar, bleach, or citrus-based)
- Soft-bristle scrub brush or non-abrasive scrubbing pad
- Bucket and clean water for rinsing
- Lint-free cloths or clean dry towels (several, you'll go through them)
- Foam brush, soft paintbrush, or foam roller for application
- Nitrile gloves and eye protection
- Painter's tape if you want to protect the table frame or edging
Skip anything labeled 'wet look' or 'color enhancer' unless you specifically want to darken or deepen the tone of your stone and have tested it on a small inconspicuous area first. Some people do want that effect on slate or travertine, but for a patio table where you want a natural appearance, a standard clear penetrating sealer is the better default.
Deep cleaning and removing old sealant or stains
This step takes the most time and is the most skipped. A sealer can only penetrate and bond to a clean, residue-free surface. If there's dirt, algae, mildew, old wax, or cleaning product residue on the stone, the sealer will lock that in rather than penetrate the pores properly, and you'll end up with uneven absorption, blotchy darkening, or haze.
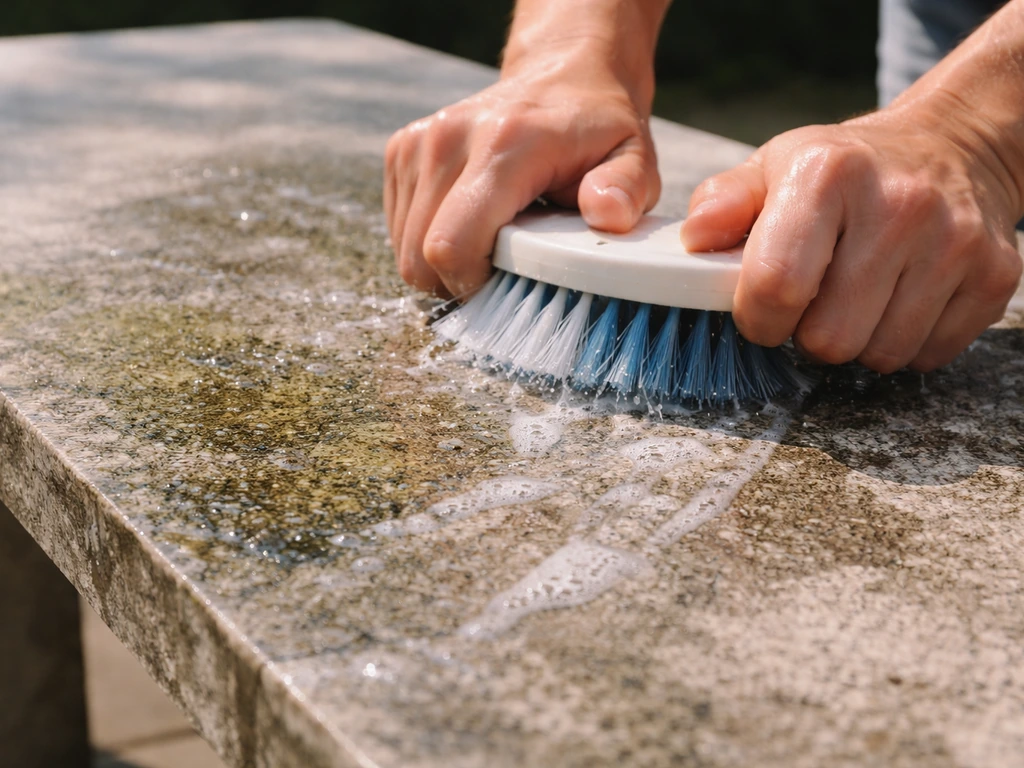
Start by removing loose debris and wiping the table down. Mix your pH-neutral cleaner per the instructions and scrub the entire surface with a soft brush. For outdoor tables that have been sitting through weather, there's often a greenish or blackish biological film, which is mildew or algae. Use a cleaner specifically labeled safe for natural stone and exterior use, not bleach straight from the bottle, which can discolor some stones and leaves residue. Scrub in small sections, rinse thoroughly with clean water, and repeat if the stone still looks grimy. The rinse step matters: cleaning product left on the surface will interfere with the sealer.
If there's an old topical sealer or wax on the surface, you'll need to strip it before applying a new penetrating sealer. Signs of an old topical coat include peeling, flaking, or a glossy plastic-looking surface. Use a sealer stripper rated for natural stone, follow the directions for dwell time, and scrub it off. After stripping, rinse very well and allow the stone to dry completely, at least 24 hours before you move to the next step.
For stubborn stains like rust, oil, or food, poultice treatments are more effective than scrubbing. A poultice is a paste that draws the stain out of the pores as it dries. You can buy premixed stone poultices or make a rough version with baking soda and water for some stain types. Leave it on the stain for 24 hours covered with plastic wrap, then remove and rinse. Be realistic: some stains that have been sitting for months are set into the stone and may not fully come out, and that's okay. Sealing won't remove them but it will help prevent new ones.
Surface repairs and drying requirements before sealing
Inspect the table top carefully after cleaning. Small surface chips in granite or slate are common and don't necessarily prevent sealing, but they should be filled first. Use a color-matched stone epoxy or repair compound, smooth it level with the surface, and let it cure fully per the manufacturer's instructions before proceeding. Sealer applied over uncured repair compound can bond poorly or cause the repair to look different from the surrounding stone.
If there are cracks that run through the thickness of the stone, or if sections feel loose or hollow when you tap them, that's a structural problem that sealing won't fix and may make harder to address later. At that point, evaluate whether the table top needs professional stone repair or replacement before you invest time in sealing.
Drying time is not optional. The stone must be completely dry before you apply sealer, full stop. If you plan to point or repair the joints, it is best to wait until the pointing work is fully set and cured before sealing the patio surface pointing patio before sealing. Moisture trapped under a penetrating sealer causes white haze, cloudiness, and uneven curing that is genuinely difficult to fix.
After cleaning, give the table at least 24 to 48 hours of dry weather to air out. If you pressure-washed it or used a lot of water, wait longer. Run your hand across the surface, feel for any cool or damp spots, and check the underside and edges too. On a humid summer day, even stone that looks dry on top can hold moisture in its pores.
How to apply sealer evenly on a patio table top
Pick a day when the temperature is between 50°F and 80°F, there's no rain in the forecast for the next 24 to 48 hours, and ideally lower humidity. If you want a complete walkthrough, follow this guide on how to apply patio sealer from cleaning to the final wipe-down Pick a day when the temperature is between 50°F and 80°F. Direct hot sun on the stone surface is also a problem because it speeds up evaporation and the sealer can flash-dry on the surface before it has time to penetrate, causing haze. Work in shade if you can or do it in the morning before the table gets hot.
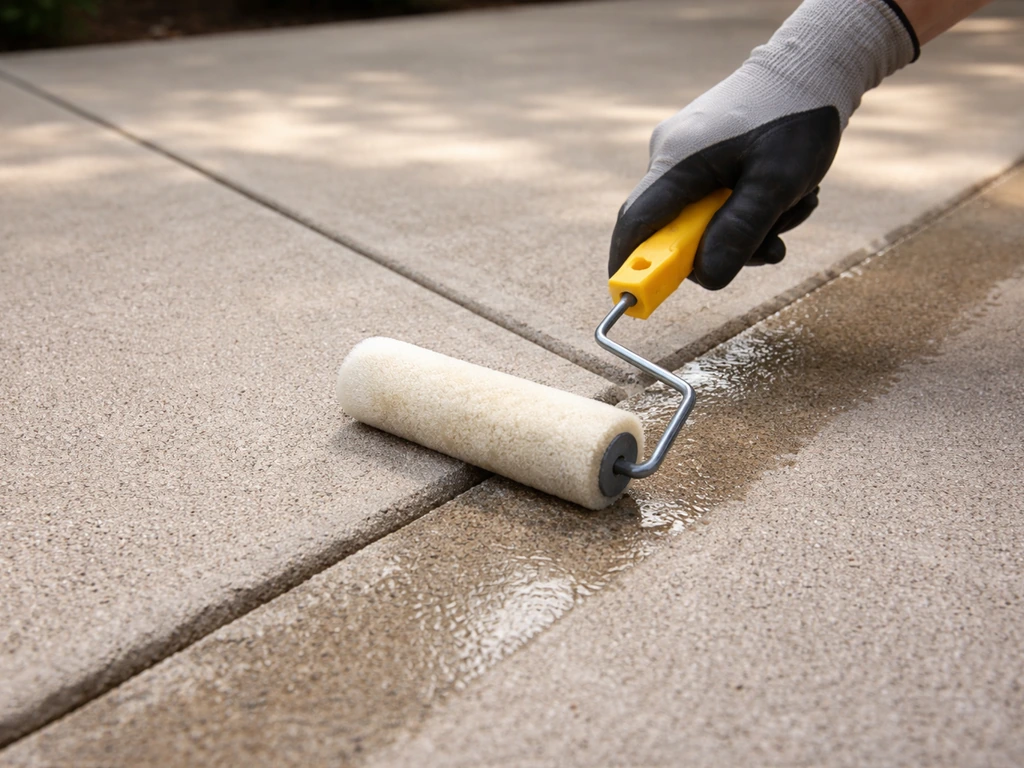
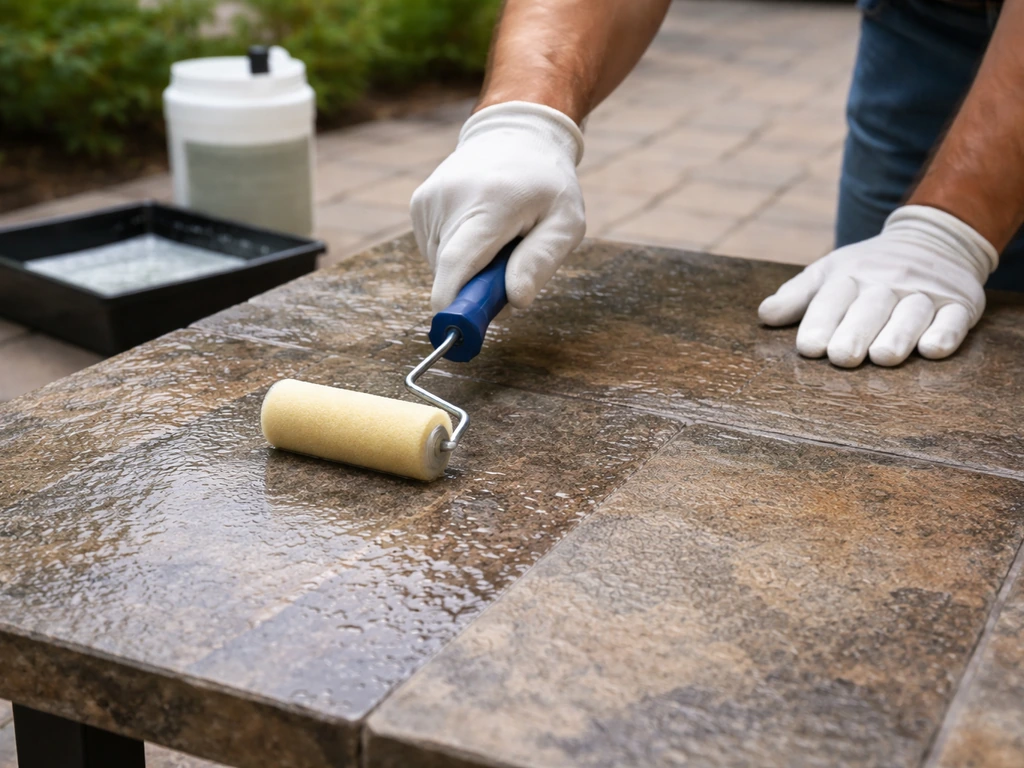
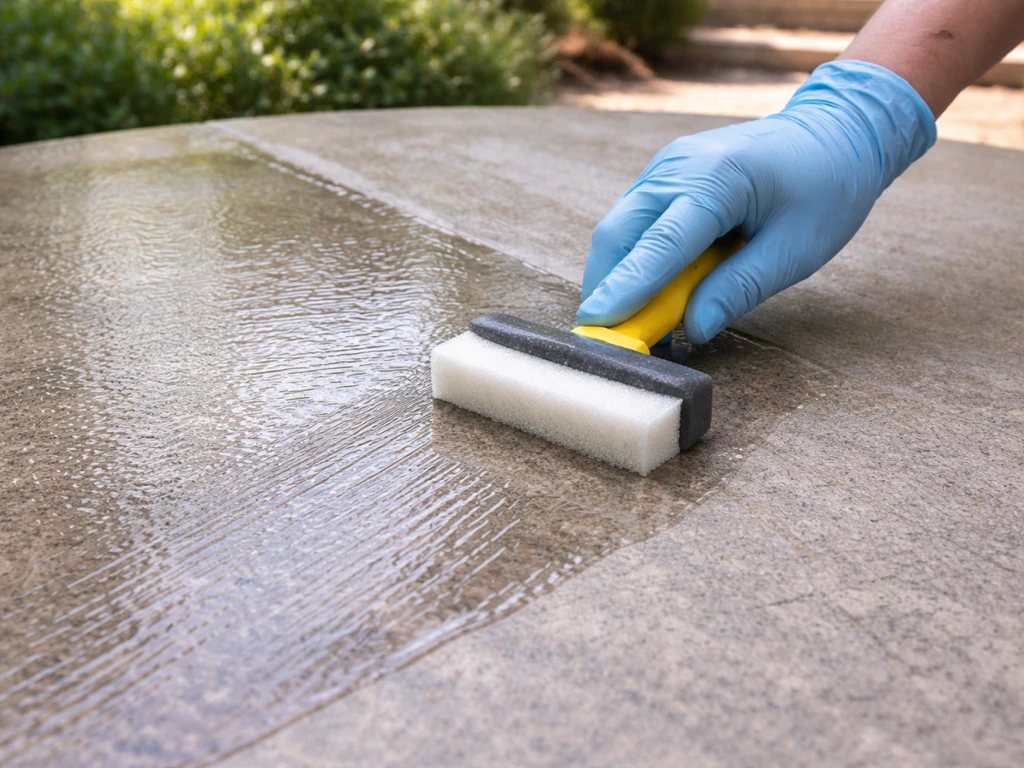
Pour a small amount of sealer into a tray or directly onto the stone. Use a foam brush, soft natural-bristle brush, or foam roller and work in thin, even strokes across the surface. Don't glob it on. A thin coat that the stone can actually absorb is better than a heavy one that sits on top. Work in sections and maintain a wet edge so you don't get lap marks where one area dried before you connected the next pass.
Here's the step most people get wrong: wiping off the excess. After you've applied the sealer and given it a few minutes to penetrate (check your product's instructions, usually 5 to 15 minutes), go back over the entire surface with a clean, dry, lint-free cloth and wipe off all excess sealer. Any sealer sitting on top of the stone that hasn't been absorbed will dry as a hazy film. This is where haze, streaks, and that blotchy darkening come from. Wipe in one direction with a fresh cloth, replace cloths as they get saturated, and buff the surface until it looks clean and even.
For most natural stone tables, one coat is enough. For porous stones like travertine, unsealed limestone, or highly absorbent slate, a second coat applied after the first has dried (usually 2 to 3 hours) can improve protection. Apply it the same way and wipe off excess just as carefully. Don't apply more than two coats unless the manufacturer specifically recommends it for your stone type.
| Stone Type | Porosity | Coats Needed | Special Notes |
|---|---|---|---|
| Granite | Low to medium | 1 coat (2 for unsealed/rough surfaces) | Dense; excess sealer is very visible, wipe thoroughly |
| Marble | Medium | 1 to 2 coats | pH-neutral cleaner only; etching is a separate issue sealing won't fix |
| Travertine | High (voids/pores) | 2 coats | Fill voids first; very absorbent, second coat common |
| Limestone | High | 2 coats | Acid-sensitive; use only stone-safe cleaners |
| Slate | Medium (varies) | 1 to 2 coats | Check for delamination before sealing; can use enhancer if desired |
| Outdoor stone tile (natural) | Medium | 1 coat | Confirm it's natural stone, not glazed porcelain/ceramic which doesn't need sealing |
Curing, weather timing, and protecting the table
After the final coat is wiped down, the sealer needs time to cure inside the stone. Most penetrating sealers reach their initial cure in 6 to 12 hours, but full water repellency often takes 24 to 72 hours depending on the product, the stone, and the conditions. During that window, keep the table surface dry and don't use it. No drinks, no flower pots, no tablecloths that might trap moisture against the stone.
Rain is the main enemy during curing. If rain hits the surface before the sealer has set, water can work into the partially cured sealer and cause whitish or cloudy patches that are difficult to remove. Check a reliable forecast and don't start the job if there's any chance of rain in the next 48 hours. If rain comes unexpectedly, cover the table with a tarp or outdoor furniture cover immediately, making sure the cover doesn't touch the wet surface (a few prop sticks to tent the cover can help).
Once cured, do a quick water test on a small section to confirm the sealer took. Water should bead and roll off rather than soaking in. If it still absorbs readily in spots, those areas may have had insufficient coverage or a small amount of residue that blocked penetration. You can spot-treat those areas with a fresh thin coat, wipe off excess, and let them cure again.
Maintenance and re-sealing schedule, plus fixing common problems
How often to re-seal
For an outdoor stone table that sees weather, UV, and regular use, plan on re-sealing every 1 to 2 years for porous stones like travertine and limestone, and every 2 to 3 years for denser stones like granite and slate. After sealing, you should plan for periodic re-sealing of patio slabs so they keep resisting water and staining. The water drop test tells you when it's time: if water soaks in and darkens the stone instead of beading, the sealer has worn down. Between sealings, clean the table with a pH-neutral stone cleaner and dry it after rain to extend sealer life.
Troubleshooting common problems after sealing
Haze or cloudiness is the most common complaint after sealing. It almost always comes from excess sealer that dried on the surface instead of being wiped off. If it's fresh (within a few hours), try applying a small amount of the same sealer to the hazy area to re-emulsify the dried residue, then immediately buff it off with a clean cloth. If it's already hardened, you may need a sealer remover rated for your stone type, followed by a re-application after the stone dries.
Tackiness or a wet-look that won't go away is the same problem: too much sealer on the surface. Reapply a small amount of sealer to the tacky area to soften it, then wipe and buff off aggressively with a lint-free cloth. Work fast before it dries again. This is genuinely annoying to fix so it's much better to wipe thoroughly during application.
Blotchy or uneven darkening usually means the stone had inconsistent moisture or residue in certain spots when you sealed it. Some areas absorbed more sealer than others. Unfortunately, this often means stripping the sealer from the affected areas, re-cleaning, re-drying, and re-applying. It's a good argument for taking the cleaning and drying steps seriously the first time.
Missed spots show up as areas where water still soaks in after curing. These are easy to fix: apply a thin coat of sealer just to those spots, wipe off excess, and let cure. Do the water test again after 48 hours to confirm.
Streaks usually mean you applied sealer in overlapping passes and let edges dry before connecting them. Apply a thin coat to the streaky area to re-wet it, then buff evenly across the seam. If the streaks have fully cured, use a sealer remover and start that section over.
When to call a professional
Most stone table sealing is genuinely DIY-friendly if the surface is in decent shape. But call a stone care professional if: the stone has deep structural cracks or sections that feel hollow, there's heavy biological staining (black algae, mold that's penetrated deep into the stone) that scrubbing won't shift, the surface has old topical sealer that's peeling and bonded tightly, you've had repeated haze or residue problems and aren't sure why, or the table is high-value stone (book-matched marble, high-end imported granite) where a mistake would be expensive. The same applies if the mortar or seams where the stone meets the table frame look cracked or crumbling. That's a structural issue, and sealing over failing joints will trap moisture and speed up deterioration rather than slow it down.
If you're also thinking about sealing the patio surface beneath the table or other stone surfaces nearby, the same prep-and-apply workflow applies, but there are some differences in tools and coverage rates between a small tabletop and a full patio floor. If you're sealing more than a tabletop and wondering how do you seal a patio floor, the same prep steps and sealer choices apply, just with larger coverage and different drying conditions. Working through the process on the table first is actually good practice before tackling a larger area.
FAQ
How can I tell if my stone patio table is already sealed more than once or with a topical film?
Do more than the basic water drop test. After the surface dries, inspect for an oily or glossy sheen, and wipe with a clean, white paper towel. If the towel shows residue or the water starts to bead immediately but the stone darkens differently only in certain areas, it may be an older topical coat that needs stripping before applying a penetrating sealer.
Can I seal over old sealer residue if the water test still beads?
Usually you should not guess. If the stone beads fully but looks patchy, you may still have residue that blocks penetration. The safe approach is to clean thoroughly, let it dry completely, and do a small test patch with your sealer. If you get haze or uneven darkening, strip and restart for that area.
What should I do if it rained right after I sealed the table?
Cover and stop the job immediately, but do not try to “dry it out” with heat guns or fans blowing on a wet surface. Once the surface has fully dried, reassess with a water test in 48 hours. If you see whitish haze or cloudy patches, you will likely need to remove the affected areas with a sealer remover rated for your stone, then re-clean, re-dry, and re-seal.
How long should I wait before putting the table back into use after the final wipe-down?
Even if it feels dry, give penetrating sealers a full cure window. For most outdoor stone, plan to keep it unused and dry for 24 to 72 hours. Avoid placing anything that can trap moisture against the surface (covers, planters, damp coasters) during that period.
Is it okay to use a “wet look” or “color enhancer” sealer if I want the stone to look darker?
It can work, but treat it as a separate product category. “Wet look” products are more likely to create a film that can alter sheen and trap moisture, especially on layered stones like slate. Test on a hidden spot, then repeat the water test after curing to confirm it still sheds water consistently without a sticky or hazy finish.
Do I need to seal the underside of the tabletop and the edges too?
At minimum, seal the stone face, but edges are often where moisture gets in first. If the table top has exposed stone sides, sealing those edges helps reduce side-to-top moisture migration. Check the underside seams and any stone-to-frame gaps, because cracked or crumbling mortar should be repaired before sealing to avoid trapping moisture.
Can I speed up drying with a heat source or dehumidifier?
You can improve conditions, but avoid forcing heat directly on the wet stone surface. Gentle air movement in dry conditions is better than hot air, which can contribute to uneven drying and flashing during application. The key requirement remains complete dryness, including checking for cool or damp areas by hand and at the edges.
Will sealing prevent etching on marble or limestone?
No. Sealing slows absorption and reduces staining risk, but it does not reverse acid damage. If you see dull spots or roughened etched areas, you may need the right stone cleaner process, professional assessment, or in some cases restoration. Sealer over etching will not make the etched surface “smooth again.”
What’s the best way to remove haze if it happens?
Act based on timing. If haze is fresh (within a few hours), reapply a small amount of the same penetrating sealer to re-wet the residue, then buff immediately with clean, lint-free cloths. If it has hardened, you will likely need a stone sealer remover matched to your stone type, followed by thorough cleaning and re-drying before reapplying.
How do I deal with tackiness that feels like residue after sealing?
Tackiness is almost always excess sealer that stayed on the surface. Reapply a small amount to soften, then wipe and buff aggressively with fresh lint-free cloths. Work in small sections so the area does not dry while you are still removing residue.
Why do I see blotchy dark patches only in some spots after sealing?
Most blotchy results come from uneven surface cleanliness, remaining biological residue, or inconsistent moisture before sealing. If the patchiness is significant after curing, spot-removal and rework are often required rather than adding more sealer everywhere, because the extra product can worsen the look on already saturated zones.
Can I seal if there are hairline surface cracks or chips?
Small chips are usually sealable after repair, but deep cracks and loose or hollow areas are not. Fill and level chips with a color-matched stone epoxy or repair compound and let it fully cure before sealing. For cracks through thickness or movement when tapped, sealing can trap problems, so get a repair assessment first.
How do I know it is time to reseal my patio table?
Use the water drop test again after normal use and cleaning. If water starts to soak in and darken rather than bead and roll off, the sealer performance has declined. For porous stones, plan earlier re-sealing, while denser stones usually last longer, even though weather and cleaning products can change the timeline.
What precautions should I take when sealing around the table frame or joints?
Do not seal over failing seams. If mortar at joints is cracked or crumbling, repair it first so you are not trapping moisture behind deteriorating material. Keep sealer off metal hardware and caulk, and if you must protect nearby materials, mask carefully so you do not smear sealer during wipe-off.
Next Article
Can You Seal Patio Slabs? When, Prep, and How to Seal
Know when to seal patio concrete, how to prep and apply the right sealer, and how to avoid bubbling, flaking, and haze.