For most patio tile gaps, you have three realistic options depending on gap width: unsanded or sanded grout for narrow joints under 1/8 inch, polymeric jointing sand for paver joints between 1/8 and 1/2 inch, and a bagged mortar repair compound or pointing mortar for anything wider or deeper. Pick the wrong one and it washes out, cracks, or falls apart within a season. Pick the right one, prep the joint properly, and a weekend fix can last years.
How to Fill Gaps in Patio Tiles: DIY Step-by-Step

Talia Lang
28 May 2026
Quick diagnosis: what kind of gaps you're actually dealing with
Before you buy anything, spend five minutes figuring out why the gaps are there. The cause changes the fix. Gaps in patio tiles usually come from one of a handful of problems, and some of them are symptoms of something bigger.
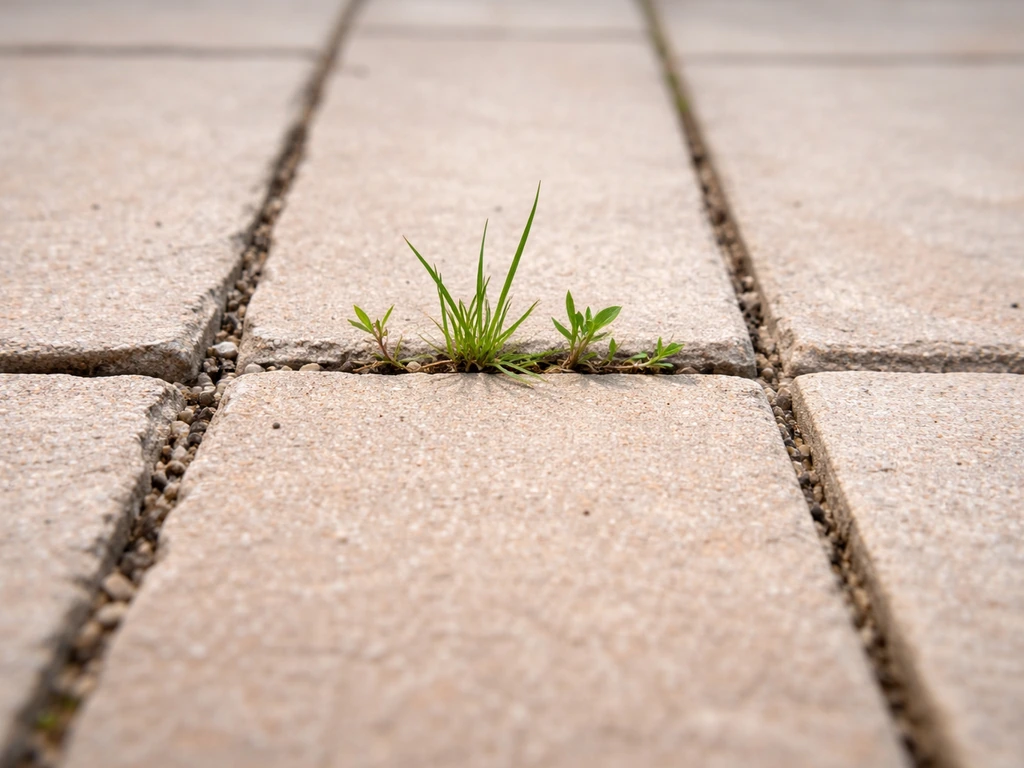
- Eroded or crumbling mortar/grout: The original jointing material has worn away or cracked from freeze-thaw cycles, age, or foot traffic. This is the most common scenario and the most straightforward to fix.
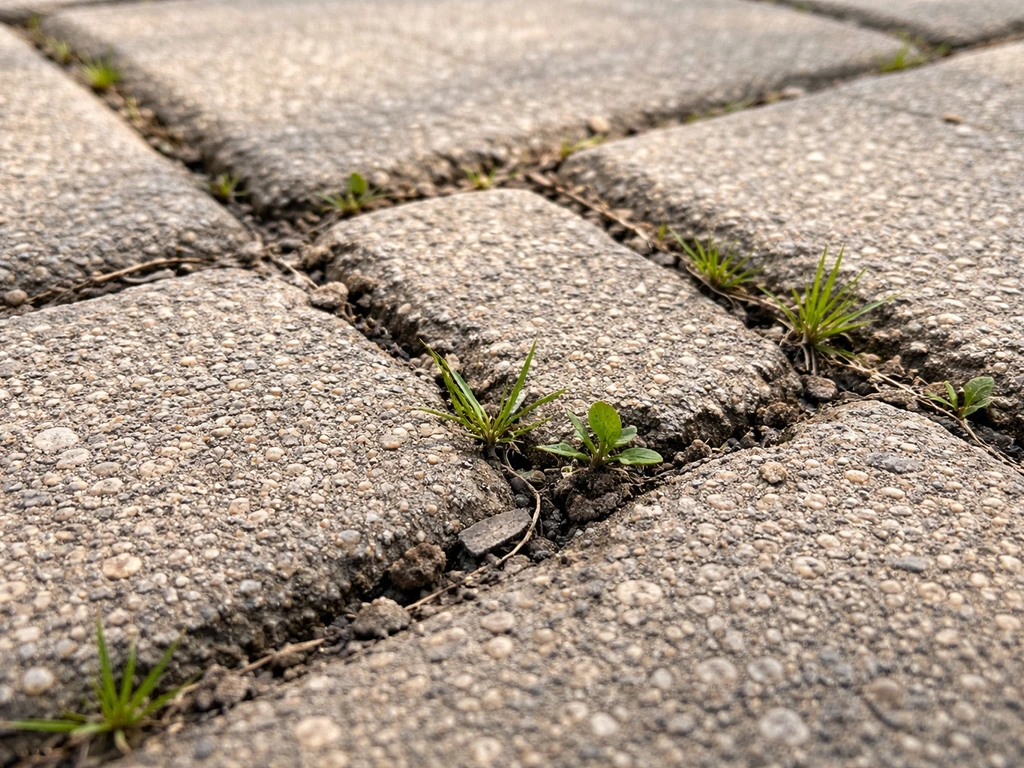
- Weed and root damage: Roots and organic growth have pushed joints apart or eaten away at the grout. The fix here needs to include proper weed removal, not just filling over the top.
- Paver or tile movement: Individual tiles have shifted, creating uneven gaps or lippage (one tile sitting higher than its neighbor). If the tiles themselves have moved, filling the joint is a temporary patch at best.
- Base failure or settling: The sub-base beneath the tiles has settled unevenly, causing tiles to rock, sink, or separate. You'll notice this if tiles flex or wobble when you walk on them.
- Drainage or water erosion: Joint sand or mortar has washed out due to poor drainage, no edge restraints, or water channeling across the surface. The joint material is gone but the tiles are mostly stable.
- Failed sealant over joints: A previous sealant application has broken down, trapping moisture and causing the material underneath to fail.
Press down on tiles near the worst gaps. If they rock or flex, you likely have a base or bedding issue, not just a joint problem. That needs more than filler. I'll come back to this in the troubleshooting section. If the tiles are solid and flat, you're in good shape to fill.
Choose the right filler for your tile type and gap size
There is no single universal product for patio tile gaps, and this is where most DIY repairs go wrong. The right choice depends on two things: what your patio is made of, and how wide and deep the gaps actually are.
| Gap width | Tile/paver type | Best filler | Notes |
|---|---|---|---|
| Under 1/8 inch | Ceramic, porcelain, or natural stone tile | Unsanded grout (indoor/outdoor rated) | Thin joints; sanded grout will scratch polished surfaces |
| 1/8 to 3/8 inch | Ceramic, porcelain, or natural stone tile | Sanded grout or epoxy grout | Epoxy grout (e.g. MAPEI Kerapoxy) is more durable but harder to work with |
| 1/8 to 1/2 inch | Concrete pavers, brick pavers, tumbled stone | Polymeric jointing sand | Must fill the full joint depth, not just the top layer |
| 1/2 inch to 1 inch | Concrete pavers, flagstone, larger format tiles | Pointing mortar or bagged mortar repair compound | Trowel in layers; don't try to fill deep voids in a single pass |
| Over 1 inch or irregular | Flagstone, irregular natural stone | Mortar mix or polymeric mortar jointing compound | Large voids need a proper mortar bed, not patch compound alone |
| Any width, movement-prone joint | Any | Polyurethane sealant/caulk | Only use where tiles meet a wall, step, or dissimilar surface—not for field joints |
A quick word on epoxy grout: it's genuinely the most durable option for tiled patios with narrow joints. MAPEI Kerapoxy, for example, requires the installation to be blank" rel="noopener noreferrer">protected for at least 7 days and should cure for 10 to 14 days at around 73°F before it's exposed to prolonged water or immersion. That curing window matters, so don't schedule this right before heavy rain. For most homeowners filling standard paver joints, polymeric sand is the practical workhorse. For most homeowners filling standard paver joints, polymeric sand is the practical workhorse polymeric sand for patio joints. For actual tile with grout lines, stick with sanded or unsanded grout matched to your joint width.
Tools and materials checklist
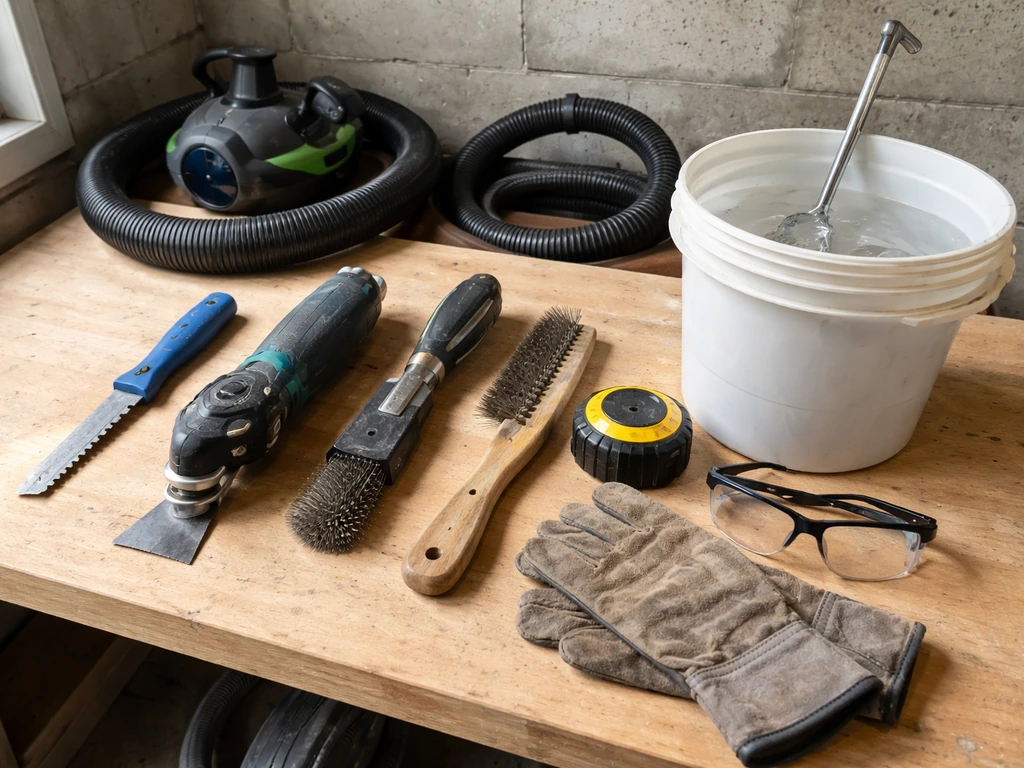
Get everything together before you start. Running to the hardware store mid-job with wet joints or mixed mortar open is a pain you don't need.
- Stiff-bristle brush or wire brush (for scrubbing out loose material)
- Grout saw, oscillating multi-tool, or cold chisel and hammer (for removing old grout or mortar)
- Leaf blower or shop vac (for clearing out debris after cleaning)
- Garden hose with adjustable nozzle or pressure washer on low setting
- Weed killer or torch weeder (for killing weed roots in joints)
- Jointing material: polymeric sand, bagged pointing mortar, grout, or epoxy grout depending on your gap type
- Rubber mallet and plate compactor or hand tamper (for polymeric sand applications)
- Grout float or margin trowel (for mortar and grout applications)
- Pointing trowel or jointing iron (for finishing mortar joints)
- Sponge and bucket of clean water
- Plastic sheeting or drop cloths (to protect tile surfaces from staining, especially with epoxy grout)
- Knee pads (non-negotiable for a full patio job)
- Safety glasses and gloves
Prep the joints properly before you fill anything
This is the step that separates a repair that lasts from one that falls apart in three months. New filler will not bond to old crumbling material, and it won't stay put if weeds or loose debris are still in the joint. Take your time here.
Remove old material and weeds
Use a grout saw or oscillating tool to cut out any old grout or mortar that is cracked, hollow, or loose. If you're trying to make an easy fix for patio joint mortar, start by removing any loose or cracked material so the new mortar can actually bond easy fix patio joint mortar. Tap it with a screwdriver or cold chisel: if it sounds hollow, it has to come out. For paver joints, use a stiff brush to rake out as much of the old sand as you can get. For weeds, pull them out by the root. Then treat the joint with a weed killer rated for hardscaping, or use a torch weeder to kill the root system. Skipping this step means the weeds push out your new filler within weeks.
Clean and dry the joint
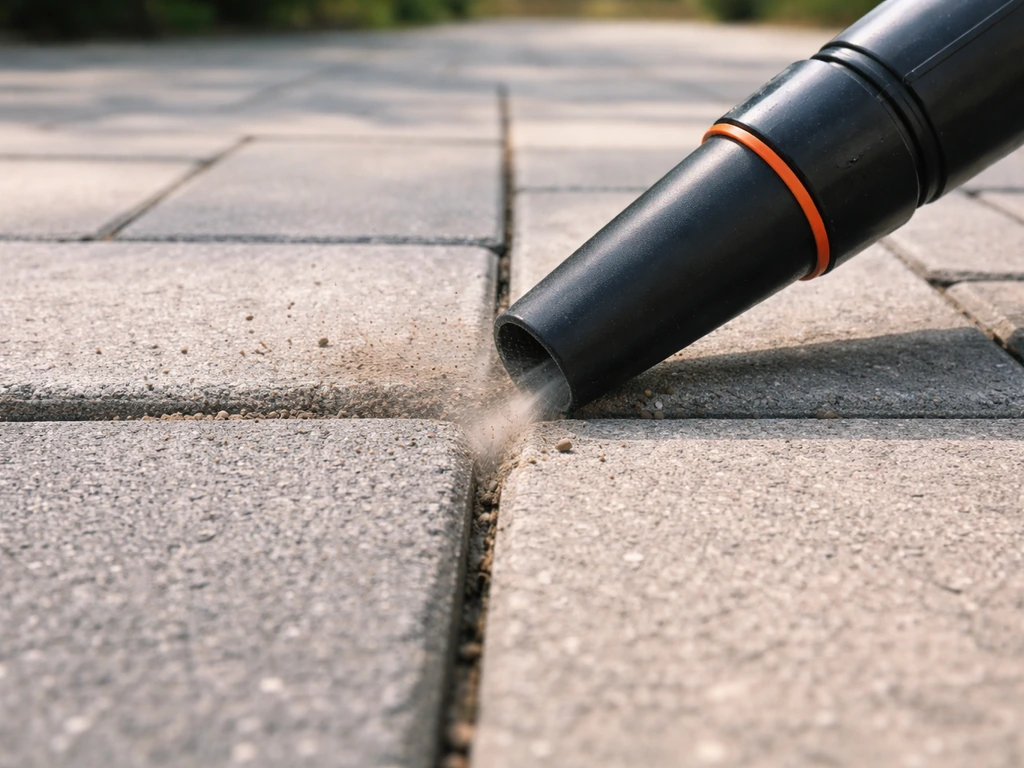
Blow out all the loose debris with a leaf blower or shop vac, then rinse the joints with water. For stubborn algae or grime, scrub with a stiff brush and a diluted outdoor cleaner. Let everything dry fully before you fill. Moisture trapped under grout or mortar is one of the main reasons repairs fail. In warm weather, a full dry day is usually enough. In cooler or humid conditions, give it 48 hours. For polymeric sand specifically, the tiles themselves also need to be surface-dry at application time.
Check your joint depth
For paver joints filled with polymeric sand, the sand needs to fill the full depth of the joint, not just sit as a thin layer on top. Measure the depth. If the joint is 3 inches deep and you're only filling the top half inch with polymeric sand, it won't perform correctly and will wash out or shift. You can fill deeper voids with regular coarse sand first, then top with polymeric sand for the final inch or so. For mortar and grout repairs, the joint should be at least 3/8 inch deep for the material to have enough thickness to bond and stay put.
How to fill small gaps vs wide gaps: step by step
Method 1: Grout repair for narrow tile joints (under 3/8 inch)
- Remove all old grout to a depth of at least 3/8 inch using a grout saw or oscillating tool. Don't just fill over the surface of existing crumbling grout.
- Clean the joint thoroughly, rinse, and let it dry completely.
- Mix your grout according to package directions. For outdoor use, choose an exterior-rated sanded grout (for joints 1/8 inch or wider) or unsanded grout (for joints under 1/8 inch). For maximum durability, consider epoxy grout.
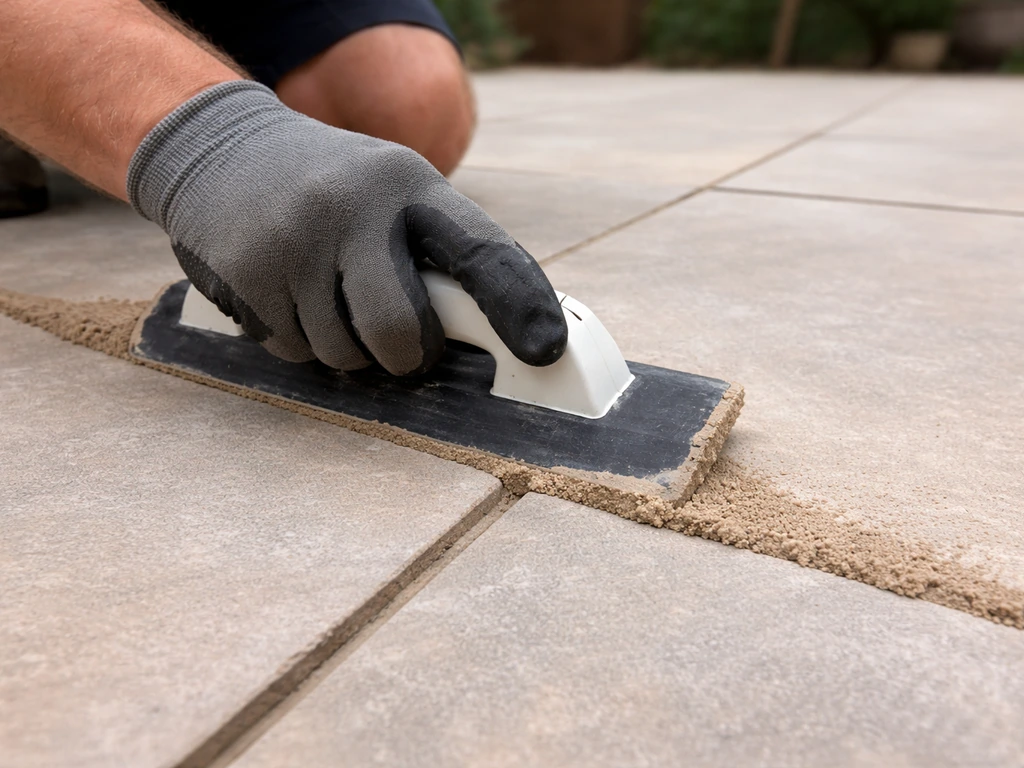
- Apply grout with a rubber float, pressing it firmly into the joint at a diagonal angle so you fully pack the void.
- Scrape off excess with the float edge, working diagonally across the joints.
- Wait 15 to 20 minutes, then clean the tile surface with a damp sponge. Rinse the sponge frequently and work in circles. Don't flood the joints.
- After initial curing (usually 24 hours), buff off any haze with a dry cloth.
- Keep foot traffic off for at least 24 to 48 hours. For epoxy grout, protect the area for 7 days and avoid water immersion for 10 to 14 days.
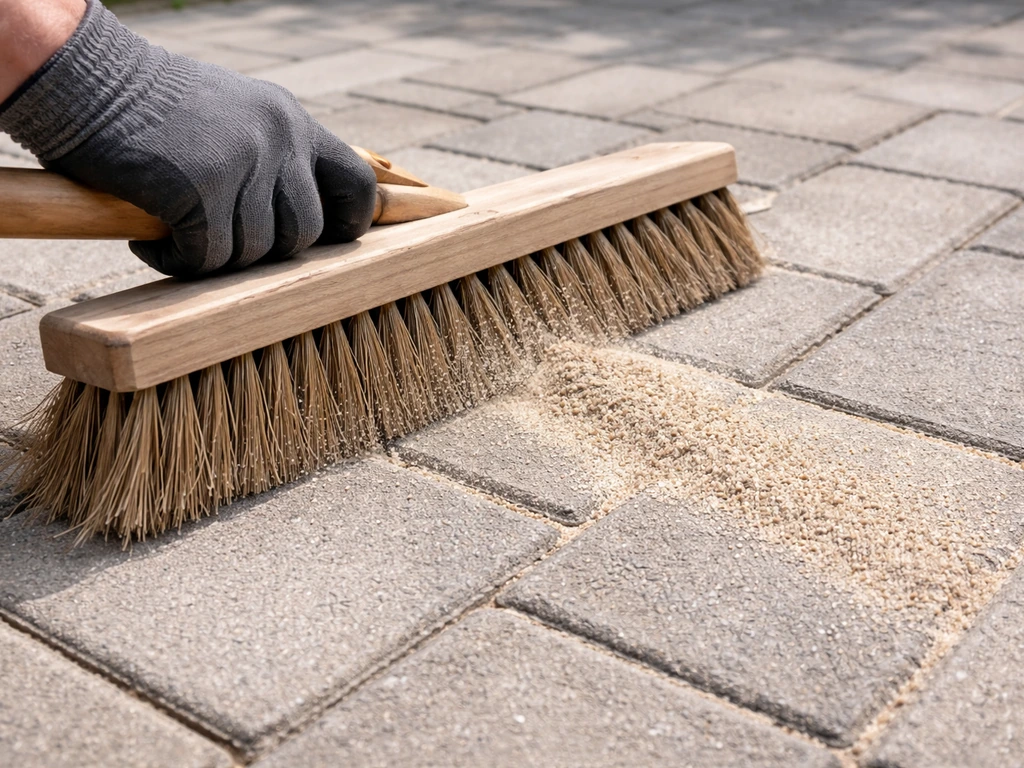
Method 2: Polymeric sand for paver joints (1/8 to 1/2 inch)
- Ensure joints are fully cleaned out to their full depth and completely dry. Tile surfaces must be dry too.
- Pour polymeric sand over the paver surface and sweep it into the joints with a stiff broom. Work in multiple passes.
- Once joints look filled, use a plate compactor or hand tamper to vibrate and settle the sand down. This is critical: the sand compacts significantly and you'll need to add more.
- Sweep more sand in and compact again. Repeat until joints are filled to within about 1/8 inch of the top of the paver. Don't overfill to the surface level.
- Blow off all excess sand from the paver surface with a leaf blower on low. Any sand left on the surface will haze and bond there once you activate it.
- Lightly mist the joints with water. Read your specific product directions here: most polymeric sands require a gentle misting in passes rather than a direct stream. Too much water washes the binder out of the joint.
- Allow to cure according to product directions, typically 24 hours before light foot traffic and several days before heavy use or rain exposure.
Method 3: Mortar repair for wide or deep gaps (1/2 inch and up)
- Remove all loose and deteriorated mortar. Use a cold chisel and hammer or an angle grinder with a mortar-raking disc for larger areas.
- Vacuum and clean the joint, then dampen it slightly with water. This prevents the dry base from drawing moisture out of the new mortar too fast and causing it to cure too quickly and crack.
- Mix a bagged pointing mortar or sand-and-cement mortar to a firm, stiff consistency. It should hold its shape when squeezed in your hand.
- Use a pointing trowel or margin trowel to pack mortar firmly into the joint in layers. For joints deeper than 3/4 inch, do two layers: pack the first layer to about half depth, let it firm up for an hour, then add the second layer.
- Finish the surface with a jointing iron or the edge of the trowel to match the profile of surrounding joints (slightly recessed is usually best for drainage).
- Keep the repair damp for the first 24 to 48 hours by misting it lightly. This slows the cure and reduces cracking, especially in warm or windy conditions.
- Stay off the repaired joints for at least 24 hours, and avoid heavy loads for 72 hours.
When to use caulk or urethane sealant (and when not to)
Polyurethane caulk is not a general gap filler for patio field joints. It's appropriate in one specific situation: where a patio meets a wall, a step riser, a threshold, or any other structure made of a different material. These are expansion joints that are designed to move, and rigid mortar or grout will crack there every time. Use a color-matched urethane caulk in those spots instead. Everywhere else, use the appropriate rigid filler for the joint type.
Curing, cleanup, and keeping it from failing again
Curing is not optional. It's the difference between a repair that bonds properly and one that crumbles in the first frost. Here's what to do after filling.
- Keep foot traffic off grout repairs for at least 24 to 48 hours, and off mortar repairs for at least 72 hours.
- For epoxy grout, protect the area from water for the first 7 days and avoid immersion or prolonged water exposure for 10 to 14 days at normal temperatures (around 73°F). Cooler temps slow curing significantly.
- For polymeric sand, avoid rain for at least 24 hours after activation. Check the weather before you start: an unexpected rain event will wash the activating binder out of the joints before it sets.
- Mist mortar repairs lightly for the first day or two if the weather is hot or windy. This prevents rapid moisture loss that causes surface cracking.
- After grout cures (typically 7 to 10 days for full cure), apply a grout sealer rated for outdoor use to protect against moisture infiltration and staining.
- After mortar repairs cure fully (about 28 days for full strength, though it's walkable much sooner), consider applying a patio or masonry sealer over the entire surface to help protect joints from future erosion and weed growth.
To prevent the same problem coming back, think about why the joints failed. If water is the culprit, check that your patio drains away from the house at roughly a 1 to 2 percent slope (about 1/8 inch drop per foot). If weeds are the problem, a good polymeric sand or a jointing compound with a weed-inhibiting binder is worth the extra cost. The best patio joint repair and maintenance routine involves inspecting joints each spring, clearing any weed growth early, and touching up any gaps before water erosion makes them worse.
Troubleshooting: why repairs fail and when you need more than a patch
Common reasons repairs wash out or crack
- Polymeric sand applied over damp tiles or joints: The binder activates prematurely or hazes onto the tile surface and won't set correctly in the joints.
- Grout or mortar applied too thin: Any joint filler needs enough depth to physically stay in place. Under 3/8 inch of material, especially mortar, is too thin to hold.
- Filling over loose or crumbling existing material: New material won't bond to failing old material. It's the most common prep mistake.
- Too much water during polymeric sand activation: A hard spray washes the sand back out of the joint. Use a gentle mist in multiple passes.
- Applying repairs in very cold weather: Mortar and grout need temperatures above 40°F to cure properly. Anything colder and the cure stalls or the repair freezes and breaks apart.
- Grout haze on tiles: Usually caused by not cleaning promptly enough during application. For severe haze, use a commercial grout haze remover matched to your tile type. Epoxy grout haze is harder to remove and must be addressed while it's still fresh.
Signs you're dealing with a bigger structural problem
Filling gaps is the right move when joints have simply eroded or the original filler has aged out. But some patio gaps are symptoms of a problem that no amount of joint filler will fix. If the gaps you see are part of a bigger base or drainage issue, the best way to fill in gaps on patio will depend on fixing the underlying problem first. Here's when to stop patching and start investigating further.
- Tiles rock or flex when you step on them: The bedding layer (the mortar or sand the tiles sit on) has failed or washed out underneath. Re-filling the joints won't stabilize them. You need to relay the affected tiles.
- Multiple tiles have sunk noticeably lower than surrounding ones: The sub-base has settled. This requires lifting tiles, re-compacting or adding base material, and re-laying the tiles before any jointing work makes sense.
- Gaps keep coming back in the same spots year after year: Repeated joint failure in a specific area usually means ongoing movement from root growth, an inadequate base, or chronic water erosion from a drainage problem that hasn't been addressed.
- Large areas of lippage (tiles sitting at dramatically different heights): This is a trip hazard and a sign of significant base movement. Re-leveling is required.
- Water pooling on the patio surface near the gaps: The slope is wrong. Filling the joints won't solve pooling, and standing water will destroy new joint material quickly. Regrading or adding drainage is the real fix.
If you're seeing any of the above, the honest answer is that you need to re-lay the affected section rather than just re-joint it. For a small area of three to five tiles, that's a manageable DIY job if you're comfortable with it. For a patio-wide base failure or a drainage regrading problem, getting a quote from a hardscaping contractor is worth the call. Patching over a structural issue just means doing the same job again in 12 months.
If you're handling a patio built from full slabs rather than individual tiles or pavers, the jointing principles are similar but the scale of repairs and the products involved differ in a few ways worth knowing about, particularly around how joint depth and slab movement are handled. If your patio is made of full slabs, learning how to joint patio slabs correctly will help you avoid slab movement issues and premature cracking. And if you're working on a larger area where multiple joints need attention at once, a jointing compound designed specifically for patio repairs can make the job considerably faster than hand-pointing individual joints. After you’ve prepped the joint, follow the manufacturer’s directions for how to use jointing compound on patio joints so it fills the depth and cures properly a jointing compound designed specifically for patio repairs.
FAQ
What should I do if the tiles move or feel loose around the gaps?
If the tiles or slabs rock when you press near the gap, stop and treat it as a base or bedding failure. Joint filler cannot compensate for movement, so it will crack or wash out again quickly. In that case, plan for resetting the affected units (or the whole section) after you correct the underlying low spots or voids.
Can I just fill over old grout or old sand without removing anything?
Yes, but only if the joint is truly clean and dry enough for the new product to bond. In general, grout or mortar repairs are not a good fit over glossy, contaminated, or crumbling old material. You usually need to remove loose material first, then let the joint fully dry before refilling.
How do I measure gaps correctly so I choose the right filler?
Use the joint width and depth measurement, not the look of the crack. A joint can be narrow on the surface but deeper underneath, especially where sand has eroded. Measure the depth (for example with a thin ruler or wire) so you can choose a filler that performs throughout the full depth.
Do I need to wet the joints after filling with polymeric sand?
Rinse-free doesn’t mean “don’t water at all.” Polymeric sand typically needs a controlled water activation to lock the grains, while most mortar and grout require curing without heavy washout. Follow the specific product directions for when and how much water to apply, and avoid flooding the joints.
What if rain is coming right after I fill the patio joints?
For polymeric sand, weather matters because it must be able to activate and then remain dry enough to set. If rain is expected during the activation or early set window, you can end up with weak, washed-out joints. Plan around forecasted rain and choose a dry stretch for at least the activation period plus curing time.
Are there special temperature or seasonal tips for filling patio tile gaps?
Temperature swings can cause cracking and poor bonding, especially during curing. Avoid working in freezing conditions, and don’t fill if the patio surface will freeze soon after. In hot weather, work in smaller sections so joints stay surface-dry and the filler does not dry too fast before it beds.
What if my patio joint is much deeper than it looks?
If the joints are very deep, fill the deep voids first with a compatible coarse material, then finish with the specified patio joint filler for the top portion. This keeps the performance layer thick enough and reduces washout from thin, surface-only filling.
When is polyurethane caulk the right choice instead of grout or mortar?
Caulk is for designed movement locations only, like where the patio meets a wall or another dissimilar surface. For general field joints, polyurethane caulk is not a reliable replacement because it is more flexible than rigid grout or mortar and can fail under surface wear and water cycling.
Can I reuse leftover mortar or mix smaller batches and top them up later?
Don’t use leftover mixed mortar or partially cured material. Mixed batches start setting, and even “retempering” with water usually weakens the bond. Mix only what you can place within the product’s working time, and keep it protected from drying out while you use it.
What’s the safest way to prevent weeds from coming back through patio joints?
Weed control goes beyond pulling plants. After raking out old sand and removing roots, use a weed treatment rated for hardscaping, then let it work per the label schedule before you refill. Otherwise, regrowth can force filler out even if the joints are filled correctly initially.
Why do patio joint repairs sometimes fail within the first season?
If the repair looks fine but fails within a season, the most common causes are moisture trapped during filling, insufficient joint prep, or using the wrong filler type for the joint width/depth. Re-check that the joint was cleaned to solid, stable edges and that the surface was dry at application time.
Next Article
U-Can Patio Jointing Repair: Step-by-Step DIY Guide
DIY u-can patio jointing repair guide: diagnose failed joints, remove, weed, choose filler or polymeric sand, and fix ga