The best way to fill gaps in your patio depends on what kind of patio you have and what's causing the gaps. For paver joints, polymeric sand is the go-to fix for gaps between 1/8 in and 2 in wide. For cracked concrete, you want a concrete crack filler or pre-mixed patch product. For perimeter and expansion joints, a flexible polyurethane or silicone sealant is the right call. Using the wrong material is the most common reason these repairs fail within a season, so matching the product to the gap type matters more than anything else.
What Is the Best Way to Fill Gaps on a Patio? DIY Guide

Talia Lang
14 Jun 2026
First, figure out what kind of gap you're dealing with
Not all patio gaps are the same, and lumping them together is where most DIY repairs go wrong. Before you buy anything, take five minutes to figure out exactly what you're looking at.
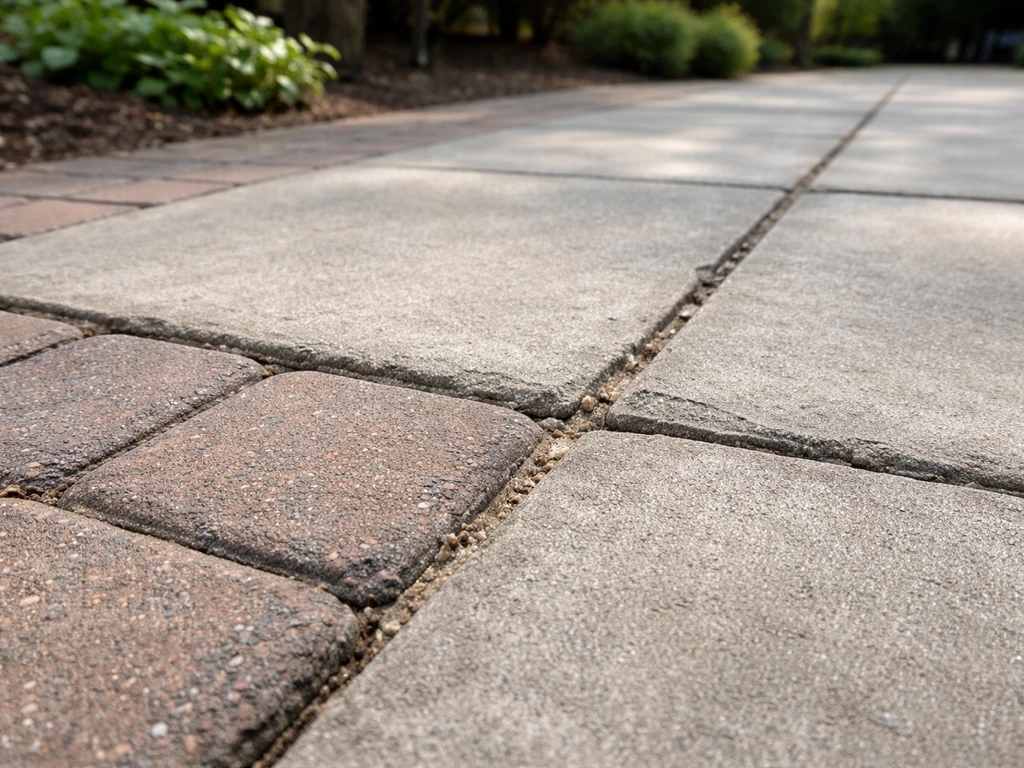
- Paver joint gaps: These are the spaces between individual pavers, bricks, or natural stone slabs. They're supposed to have sand or mortar in them. When that material washes out or degrades, the joint looks open, weeds move in, and the pavers start to wobble.
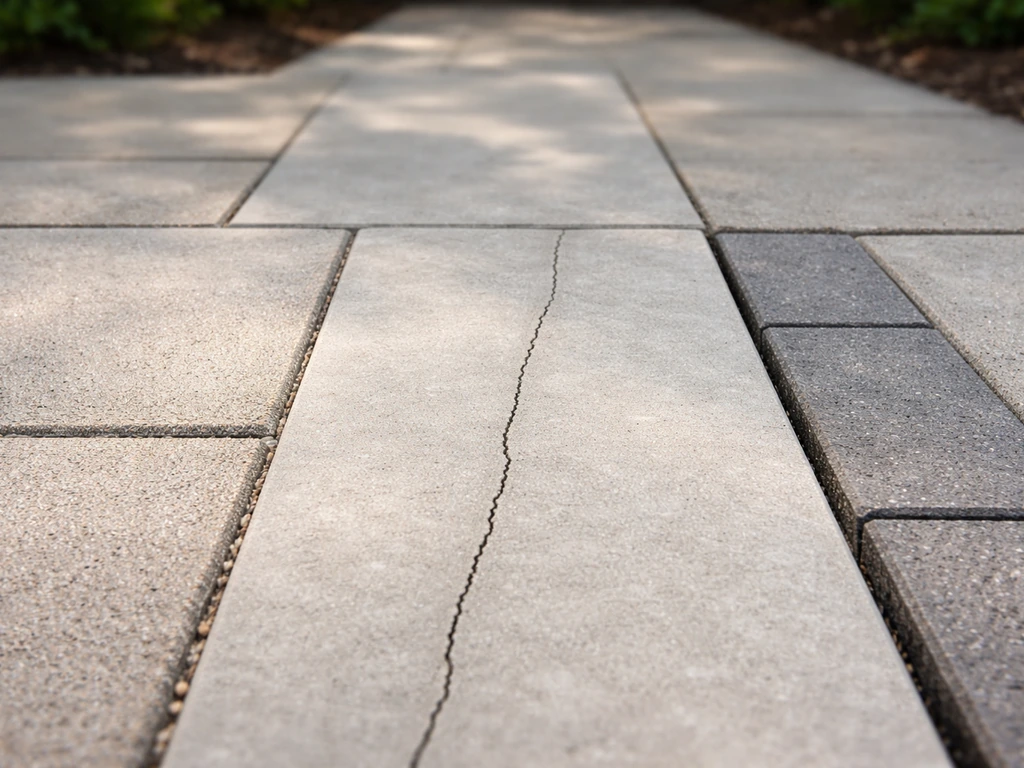
- Cracked concrete: A solid concrete patio that has cracked, whether hairline fractures or wider splits, needs a different approach entirely. The crack itself is the gap, and it can range from a surface blemish to a structural problem.
- Sunken or settled areas: If part of your patio has dropped below the surrounding surface, you may have a void underneath, not just a surface crack. This changes what you need to do significantly.
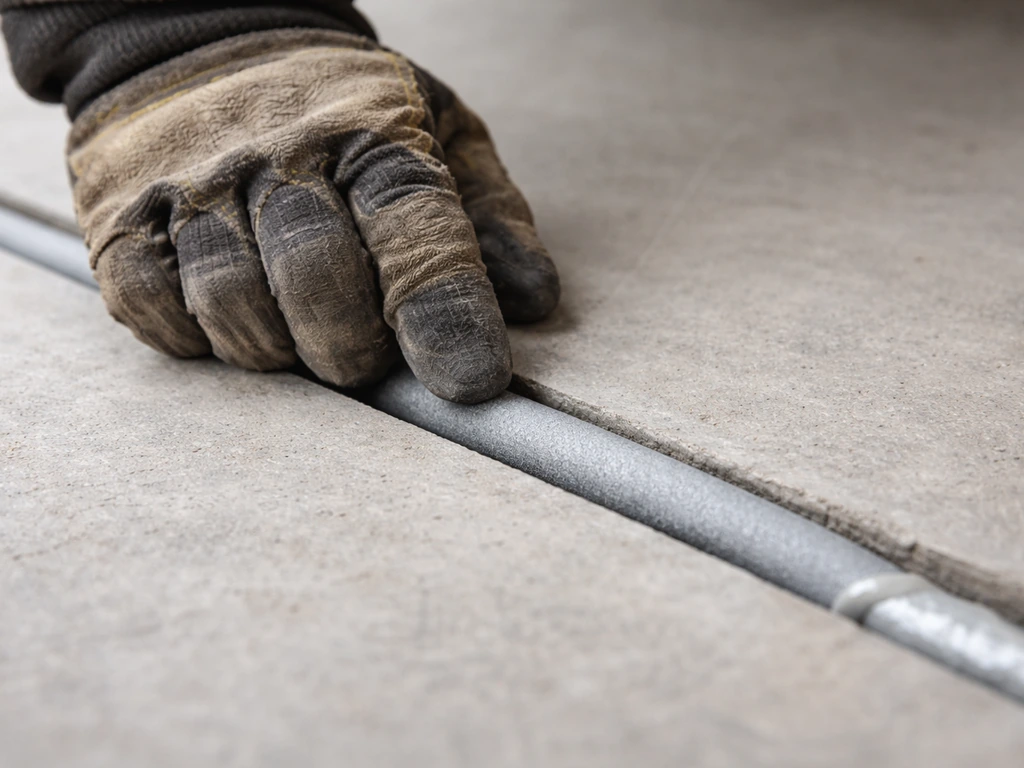
- Perimeter and edge gaps: The joint where your patio meets a wall, house foundation, steps, or a border of a different material is an expansion joint. This one needs a flexible sealant, not mortar or sand.
- Gaps around drains or fixtures: These need waterproof, flexible filler and careful attention to slope so water still moves away from structures.
Once you've identified which type you have, you can pick the right material. If you have multiple gap types on the same patio, you may need more than one product, and that's completely normal.
Why the gaps appeared in the first place
Understanding the cause isn't just academic. If you fill the gap without fixing the underlying problem, it will open up again, usually within a year. Here are the most common culprits.
- Natural settling: Over time, the ground under any patio compresses and shifts slightly. This is normal and causes gradual widening of joints or minor cracking, especially in the first few years after installation.
- Washout from poor drainage: If water pools on your patio or runs under it instead of off it, it erodes the sand or gravel base. This is the number one reason paver joints hollow out repeatedly. You'll often see it paired with pavers that rock underfoot.
- Freeze-thaw cycles: Water gets into joints or cracks, freezes, expands, and forces the gap wider. If you're in a climate with hard winters, this is likely contributing to any gap wider than about 1/4 in.
- Failed base or bedding sand: If the compacted gravel base or the layer of sand your pavers sit on wasn't deep enough or properly compacted at installation, it will shift and compress over time, causing pavers to drop or tilt.
- Tree roots and organic growth: Roots push pavers up and apart. Weeds and moss in joints break down the existing filler and accelerate erosion.
- Thermal movement: Hard surfaces expand in heat and contract in cold. Rigid filler in expansion joints cracks and pops out because it can't flex with that movement.
If the same gap has opened up more than once, or if pavers are visibly sinking or rocking, the base is the problem and you need to address that before any surface repair will stick. Filling the top without fixing the bottom is temporary at best.
The right material for the job

Here's a plain comparison of the main materials and when each one is the correct choice. Using the wrong one isn't just a waste of money, it can actually make the repair harder to redo later.
| Material | Best For | Gap Width Range | Key Limitation |
|---|---|---|---|
| Polymeric sand | Paver joints (pavers, brick, natural stone, concrete slabs) | 1/8 in to 2 in | Needs dry surface; won't set properly under 1/8 in or if rain hits it before curing |
| PowerLoc jointing sand | Narrower paver joints | Up to 1/2 in | Not suitable for wider joints; different polymer blend than full polymeric sand |
| Concrete crack filler / crack seal | Hairline to moderate concrete cracks | 1/8 in to 1/2 in | Surface prep critical; doesn't work on moving/active cracks |
| Pre-mixed concrete patch | Spalls, wider cracks, shallow voids in concrete | 1/2 in and wider (applied in 1/8 in layers) | Must be applied in thin layers with 24 hrs between; needs dry substrate |
| Epoxy repair mortar | Structural or deep voids, high-load areas | Varies; used for deep repairs | Temperature-sensitive; requires mechanical surface prep; harder to work with |
| Polyurethane or silicone sealant | Perimeter joints, expansion joints, edges against walls | Up to 1 in+ (back rod for wider joints) | Must be flexible; rigid materials will crack; slumps in wide joints without backing |
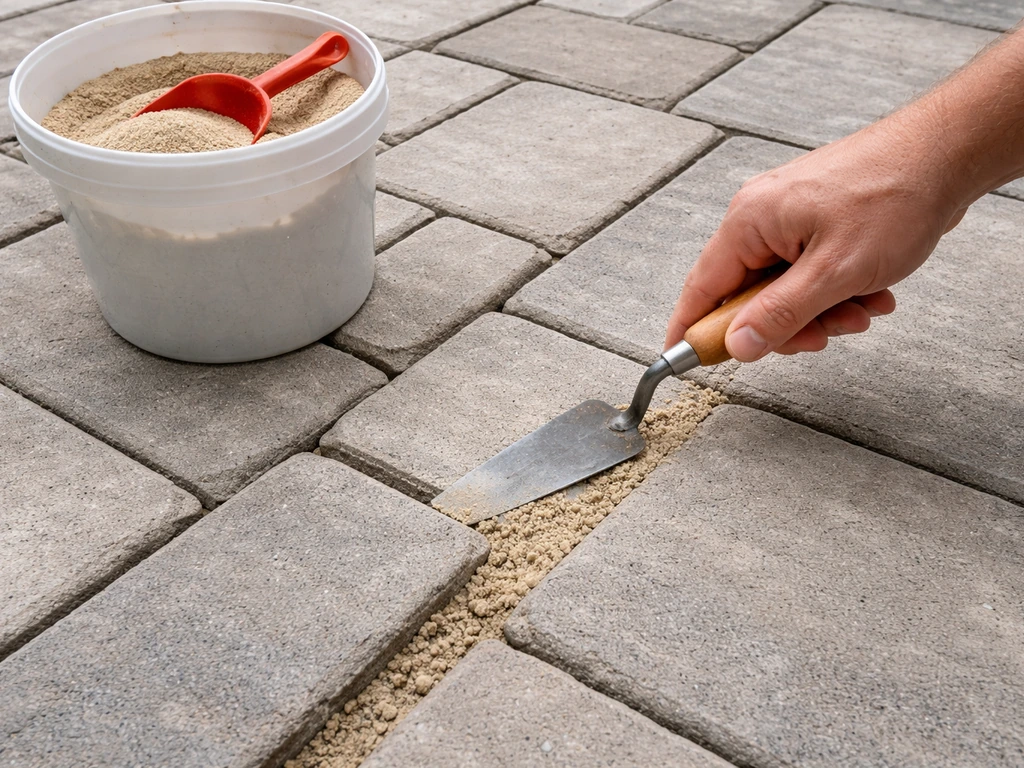
Polymeric sand for paver joints
Polymeric sand is polymer-modified graded sand designed specifically for paver joints. Products like QUIKRETE HardScapes Polymeric Jointing Sand handle joints up to 2 in wide, while QUIKRETE PowerLoc Jointing Sand is better suited for narrower joints up to 1/2 in. The polymer activates with water and hardens the sand into a firm, semi-flexible joint that resists washout and weed growth. Do not use regular playground or construction sand as a substitute. It has no binder and will wash out in the first heavy rain.
Concrete patch and crack filler for concrete patios
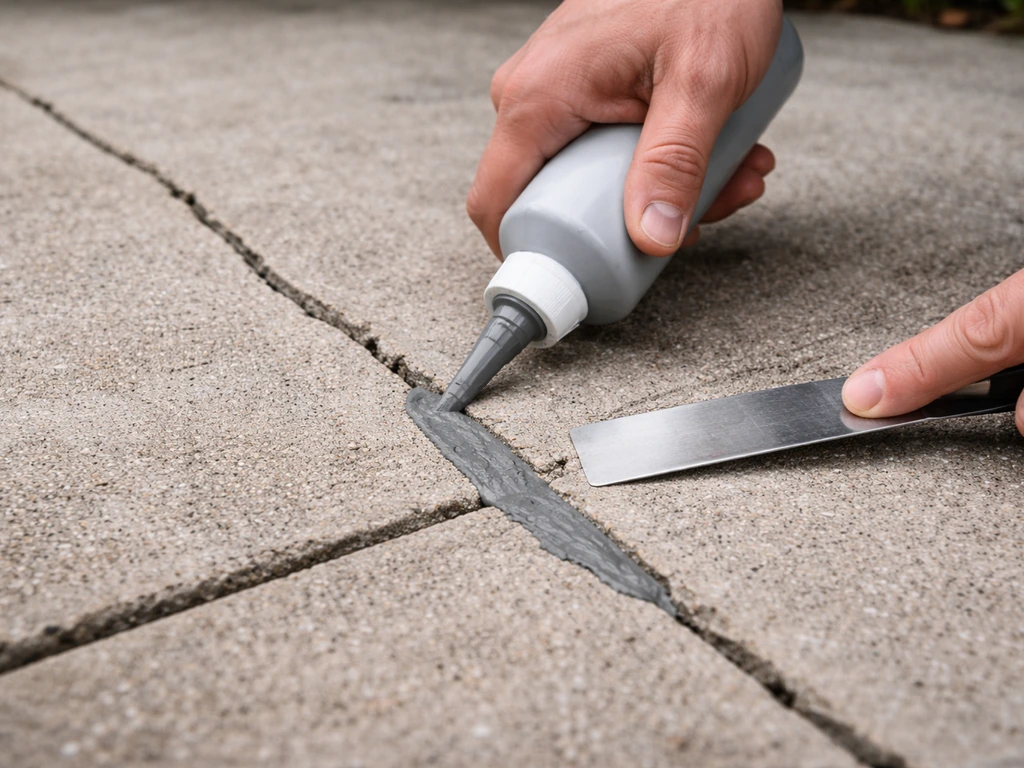
For a cracked concrete slab, QUIKRETE Concrete Crack Seal or similar products work well for cracks in the 1/8 in to 1/2 in range. For larger repairs, spalls, or areas where concrete has popped out, a pre-mixed concrete patch compound is better. SAKRETE Pre-Mixed Concrete Patch, for example, requires you to apply it in layers no thicker than 1/8 in, allowing 24 hours of cure time between each layer. It sounds tedious, but skipping this step causes the patch to shrink, crack, and fall out. For deep structural voids, epoxy repair mortar is more appropriate because it bonds more aggressively to a properly prepared substrate, though it requires more care to work with and is temperature-sensitive.
Sealants for perimeter and expansion joints
The joint where your patio meets a house wall, a step, or a curb is designed to move. That's why it's called an expansion joint. Filling it with mortar or concrete patch is one of the most common patio DIY mistakes: rigid filler pops out within a season because the joint flexes as temperatures change. Use a polyurethane or silicone sealant rated for exterior masonry joints instead. These stay flexible after curing. One key detail: the material needs to be at least 50°F (10°C) when you apply it, and for joints wider than about 1 in, you need a foam backer rod pressed into the joint first so the sealant doesn't slump and so the geometry is correct for long-term performance. WRT-09 WaterTite polyurethane sealant application conditions in the TDS specify that the material temperature should be at least 50°F (10°C) prior to application the material needs to be at least 50°F (10°C) when you apply it.
Prep work: the step most people skip
Preparation is where patio repairs succeed or fail. For u-can patio jointing repair, the key is matching the jointing material to the exact gap type and making sure the base and prep are solid. A well-prepared gap with a decent product will outlast a sloppy repair with a premium product every time. Plan to spend as much time prepping as you do filling. If you’re trying to figure out how to joint patio slabs, start by cleaning and profiling the gap so the filler and sealant can actually bond and stay flexible. If you're wondering how to fill gaps in patio tiles, start by identifying the gap type and choosing a filler that matches it.
- Clear out all loose material: Remove all existing sand, old mortar, weeds, roots, and debris from the gap. Use a screwdriver, wire brush, or a small grout saw to get into corners. If weeds have roots deep in the joint, pull them fully. Any organic material left behind will decompose and create a void under your new filler.
- Clean the surfaces: Wash the area with a stiff brush and water. For oily or stained surfaces (especially before epoxy), you need to mechanically clean the surface, meaning wire brushing or grinding, not just rinsing. Dirt and laitance (that white chalky surface layer on old concrete) will prevent bonding.
- Let everything dry completely: This is non-negotiable. Polymeric sand applied to damp pavers will cause polymer to stick to the surface and leave a haze that's very hard to remove. Concrete patch and epoxy also need a dry substrate. Wait at least 24 hours after rain before starting, and check that the joint itself is dry, not just the surface.
- Control weeds and prevent regrowth: After cleaning, if you've had persistent weed problems, consider a weed killer rated for hardscaping before you refill. Let it dry fully before applying any filler.
- Check the base: Gently press and rock any nearby pavers. If they move, the bedding sand underneath has shifted. You may need to lift those pavers, re-level the sand or base material underneath, and reset them before filling the joint. Skipping this turns a recurring problem into a guarantee.
- Check your weather window: Plan for at least 24 to 48 hours of dry weather after application. For polymeric sand especially, rain before it has cured can wash it across paver surfaces and ruin the job.
How to actually fill and finish the gap
Filling paver joints with polymeric sand
- Pour polymeric sand over the dry paver surface and sweep it into the joints using a push broom. Work it into all joints thoroughly.
- Use a plate compactor (rentable for about $50 to $80 a day) or a hand tamper to compact the pavers and settle the sand into the joints. This step is important: it drives sand deeper and seats the pavers properly.
- Sweep again to fill any joints that have dropped after compaction. Joints should be filled to within about 1/8 in of the paver surface, not flush and not mounded.
- Blow off all excess sand from the paver surface using a leaf blower. Leftover sand on the surface can cause haze when wet. Blow again after misting to remove any pooled water from the surface.
- Mist the entire area with water using a garden hose on a gentle spray setting. You're activating the polymer, not washing the sand out. Soak until water no longer beads but don't flood. Blow off surface water again afterward.
- Keep foot traffic off for at least 24 hours. Keep vehicles off for 48 to 72 hours. Avoid rain exposure for at least 24 hours after installation.
Patching concrete cracks and spalls
- For cracks up to 1/2 in wide, use a concrete crack filler applied directly from a bottle or tube, pressing it fully into the crack rather than just laying it on top.
- For wider or deeper repairs, apply pre-mixed concrete patch in layers no thicker than 1/8 in per application. Trowel it flush with the surrounding surface or very slightly proud, as it will shrink slightly as it cures.
- Allow 24 hours between layers for deeper repairs. Surface cure is typically around 48 hours, but full strength takes longer, especially in cooler weather.
- For color matching: Most gray concrete patches dry close to standard concrete color, but new patch almost always looks lighter at first and darkens as it cures. If your existing slab is weathered or stained, a perfect color match is unlikely without a decorative overlay or sealer applied to the whole surface.
- For epoxy mortar in deep structural repairs: mix per manufacturer instructions (ratios matter), apply to a mechanically prepared dry surface, and be aware that working time shortens significantly in warm weather. Don't mix more than you can use in about 20 minutes.
Sealing perimeter and expansion joints
- If the joint is wider than 1/2 in, press a foam backer rod into it first, leaving enough depth for the sealant to fill the top 1/4 to 3/8 in. This prevents the sealant from sagging and creates the right shape for long-term flexibility.
- Apply sealant from a caulk gun in a steady bead, slightly overfilling the joint.
- Tool the sealant smooth with a wet finger or a caulk tool, pressing it into contact with both sides of the joint.
- Cure time varies by product and temperature, but most polyurethane sealants are tack-free in a few hours and fully cured in 24 to 72 hours. Don't apply below 50°F (10°C).
Stopping the gaps from coming back
A repair that doesn't address the cause is just buying time. Here's what actually prevents recurring gaps.
- Fix drainage first: If water pools on or runs under your patio, every repair will eventually fail. Check that your patio slopes at least 1/8 in per foot away from any structure. Add a channel drain or redirect downspouts if needed before you refill anything.
- Repair the base if pavers are sinking or rocking: This means lifting pavers, adding or re-leveling bedding sand, compacting it, and resetting the pavers before filling joints. It's more work, but it's the only way to stop the cycle.
- Wait before sealing after polymeric sand: Techniseal recommends waiting at least 30 days after installing polymeric sand before applying a paver sealer. Sealing too soon traps moisture and can cloud the surface.
- Seal the patio surface: A quality penetrating sealer protects concrete and pavers from water infiltration and freeze-thaw damage. It won't last forever, but reapplying every two to three years dramatically extends the life of any joint repair.
- Keep joints clean: Blow out debris and pull weeds as soon as you see them rather than letting roots establish. A little maintenance each season is far easier than a full re-sand every few years.
When to stop DIYing and call someone
Most patio gap repairs are genuine DIY territory, but some situations are signs of something bigger. Here's when you should get a professional assessment before doing anything.
- The crack is actively growing or moving: If you mark the ends of a concrete crack and it extends further over a few weeks, or if you see vertical displacement where one side of the crack is higher than the other, that's structural movement. Surface patching will just crack again.
- Water is getting into your house: If gaps at the perimeter of your patio are allowing water to migrate toward your foundation or into a basement or crawl space, that's a waterproofing and drainage issue that goes well beyond patio repair.
- There are large voids under the surface: Tap your concrete slab with a hammer or your heel. A hollow sound indicates a void underneath, meaning the slab has separated from its base. Patching the surface over a void will just cause it to crack and settle again. This needs professional evaluation and likely mudjacking or slab lifting.
- Multiple pavers are sinking in a pattern: A localized soft spot or a section of the patio that keeps sinking despite repairs often means a drainage problem is actively washing out the base. That may need excavation and base reconstruction.
- Cracks are wider than about 1/2 in and spanning the full slab: Wide, continuous cracks across a concrete slab can indicate significant settling or soil issues underneath that a patch product can't fix long-term.
If you're dealing with straightforward joint washout, surface cracks in stable concrete, or perimeter sealant that's dried out and cracked, you can handle it this weekend with the right materials and the prep steps above. If you're seeing any of the warning signs in the list above, get someone with a shovel and some experience to look at what's underneath before you spend money on surface repairs that won't last.
FAQ
How do I figure out whether my patio gaps are paver joints or an expansion joint along the edge?
Look for movement cues. Paver joints are between individual pavers and usually have sand-filled lines, while expansion joints run along a border where the patio meets a house wall, curb, or a fixed structure and often looks wider with a distinct seam. If the gap is where two rigid surfaces meet and the seam needs to flex, treat it as an expansion joint and use an exterior masonry-rated flexible sealant, not sand or mortar.
Can I use polymeric sand to fill any kind of patio gap if I have pavers and concrete nearby?
No. Polymeric sand is meant for paver joint widths (roughly up to 2 in depending on the product) and relies on proper joint depth and water activation. If your gap is an expansion joint or a cracked concrete void, polymeric sand is the wrong tool, it can wash out, weed will return, or the repair will fail when the area moves.
What’s the best filler for tiny gaps, like hairline spaces between pavers or tiles?
For small, non-moving paver joints, choose a polymeric jointing sand designed for narrow joints (many are specifically rated for up to about 1/2 in). For cracked concrete, use a product designed for that crack size range rather than a general patch. If you are dealing with a true expansion seam, even a small one should still get a flexible sealant so it can move with temperature changes.
How do I know if my patio base needs fixing before I fill the top gaps?
Do a simple check: press down on pavers near the gap, or use a straightedge to see if the surface is uneven around the joint. If stones rock, lift, or the same line opens repeatedly, the joint is being forced apart from below (washout or settlement). In that case, adding filler alone is temporary, you typically need to re-level and re-compact the base before joint repair.
Do I need to remove old sand or old filler before adding new polymeric sand?
Yes, usually. Remove loose or contaminated material so you start with clean, sound joint walls and correct depth. If old sand is packed in and you can’t reach to the recommended joint depth, the new material may not activate properly with water or may not form a strong, semi-flexible bond, leading to faster washout or gaps returning.
What should I do if polymeric sand keeps washing out after it rains?
First confirm you used the right product for your joint width, then check activation and joint depth. If the joints were not saturated during activation, or if joints were overfilled without proper clearance, polymeric sand can fail. Also verify drainage and avoid repeat over-watering, polymeric systems still rely on the patio being stable and joints being properly prepped.
Can I fill an expansion joint with concrete patch if I want it to match the patio color?
It generally fails for the same reason rigid fillers do not belong in movement seams. Expansion joints are designed to flex, so a concrete-based patch or mortar typically pops out as temperatures change. Use a flexible polyurethane or silicone sealant rated for exterior masonry joints, and for wider joints add a foam backer rod first so the sealant has the correct geometry and does not slump.
What’s the proper way to apply layered concrete patch so it doesn’t shrink or crack?
Apply in thin lifts, typically no thicker than about 1/8 in per layer, and allow full cure time between layers (often around 24 hours depending on the product and conditions). Skipping the layer schedule is a common reason patches crack or fall out because the patch shrinks as it cures and cannot fully form strength in one thick pour.
At what temperature can I safely apply sealants or patch products?
For expansion-joint sealants, aim for at least around 50°F (10°C) during application, because cure and adhesion are sensitive to temperature. If it’s colder, plan for warmer conditions or choose a product rated for lower temperatures, otherwise you risk poor bonding and premature failure.
Should I caulk patio tiles or patch the tile grout if the gaps keep reappearing?
Treat it like a gap diagnosis problem, not a “more filler” problem. If the tile has movement, the underlying substrate likely shifts, and the gap will re-open even with new grout. If the seam is truly a movement joint, use a sealant system designed for that type of joint and consider having someone evaluate the underlying base or setting materials if rocking or unevenness is present.
When is it time to stop DIY and get a pro to inspect the patio?
Get an assessment if gaps re-open after repairs more than once, if pavers visibly sink, rock, or the surface is uneven around the gap, or if you suspect base washout or structural issues beneath the surface. These cases usually require sub-surface correction, and repeated surface repairs tend to waste money and time.
Next Article
How to Repair Patio Joints: Pavers, Concrete, Expansion
Learn how to repair patio joints by type, diagnose causes, replace paver sand, repoint concrete, and recaulk expansion j