To joint patio slabs correctly, you need to first figure out why the existing joint failed, because the fix is completely different depending on whether you're dealing with washed-out pointing, cracked sealant, or slabs that are actually moving. For most standard repairs, the process goes: [clear out the old material, clean and dry the joint, install a backer rod if the gap is deep enough, then fill with a flexible polyurethane sealant](https://www. slabcalc.
How to Joint Patio Slabs: Fix Cracks, Gaps, and Drainage

Talia Lang
31 May 2026
co/guides/concrete-joint-problems-guide) or repoint with mortar depending on joint type. If you want the best way to fill patio joints, focus on choosing the right joint filler for the gap size and the likely movement. Once the gaps are cleaned and stable, you can fill them using backer rod and a flexible polyurethane sealant fill gaps in patio slabs. Skipping the diagnosis step is exactly how people end up with a repair that fails within one winter.
Why your patio joints are failing in the first place
Before you pick up a trowel or buy a tube of sealant, spend five minutes actually looking at what's happening. Joints fail for several different reasons, and the wrong fix wastes both time and money.
Washed-out or crumbling pointing is the most common issue. The original mortar or jointing compound has just eroded over the years, leaving open gaps. You'll see weeds growing through, loose grit in the joints, and possibly some minor edge chipping on the slabs themselves. This is a straightforward repair job.
Failed sealant looks different: it's usually a rubbery material that has pulled away from one or both sides of the joint, gone hard and brittle, or is visibly cracked and no longer bonded. This is common on joints that were sealed rather than pointed, and it's tempting to just caulk over the top. Don't. Applying new sealant over failed sealant is one of the most common and costly mistakes in joint maintenance. The new layer has nothing solid to bond to and will fail just as fast.
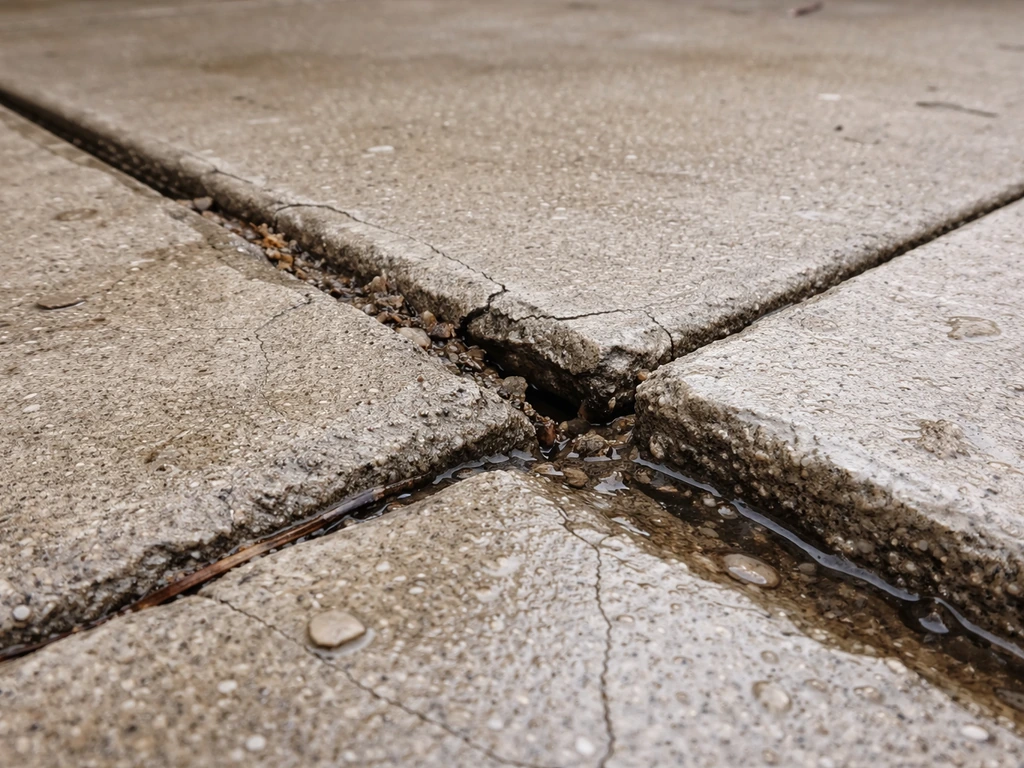
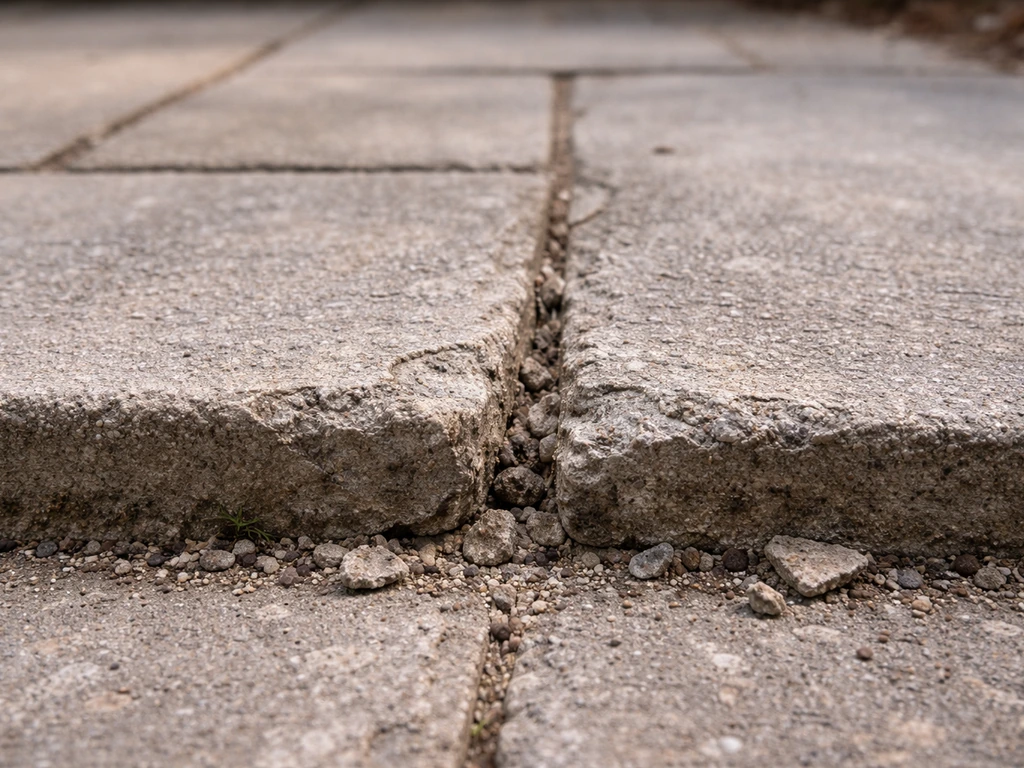
Wide, irregular cracks that get worse over time usually mean water is getting underneath and eroding the bedding layer. Left alone, this leads to settlement. The self-reinforcing nature of this problem is worth understanding: water gets in, weakens the base, the slab sinks slightly, the joint opens more, more water gets in. Once weeds establish in the gaps, their roots actively push slabs apart and accelerate the whole process.
Rocking or uneven slabs are a different problem altogether. If you can push down on a slab corner and feel it move, or if adjacent slabs are sitting at noticeably different heights, the issue is sub-base movement, not a surface joint problem. You can fill those joints all day and it won't fix anything, because the instability is underneath. That situation is covered separately below under the re-level section.
Prep work: clear out weeds, old sealant, and loose edges
Good prep is genuinely 80 percent of a successful joint repair. This part takes longer than the actual filling, and rushing it is how you get a repair that lasts one season instead of ten.
- Pull all visible weeds by hand and treat the joint area with a path weedkiller. Wait the recommended time before continuing so you're not sealing live root material into the joint.
- Remove old sealant completely using a sealant removal tool or an oscillating multi-tool with a scraper blade. Do not leave any old sealant in place and try to seal over it. It will fail.
- Rake out loose mortar and debris with a pointing tool, screwdriver, or narrow chisel. You want to get down to solid, sound material on both sides of the joint. If the mortar is soft and comes out easily, keep going until you hit something that doesn't.
- Chip back any crumbling or spalling edges on the slab faces adjacent to the joint. Use a cold chisel and hammer. Loose edges will undermine any new material you apply.
- Brush out all loose grit, dust, and plant material. A stiff wire brush works well here.
- Wash the joint out with water and a brush. For sealant applications specifically, the joint must be completely clean, dry, and dust-free before you proceed. Do not apply sealant to a damp surface.
- Let the joint dry fully. In warm weather this might be a few hours; in cooler or humid conditions, wait until the following day.
Wear safety glasses and gloves throughout this process, particularly when chipping and when handling chemical weedkiller. Small concrete chips are genuinely dangerous.
Choose the right repair method before you start

There are three main repair paths, and picking the right one matters. Here's a plain comparison to help you decide.
| Situation | Right approach | DIY difficulty |
|---|---|---|
| Washed-out or crumbling mortar joints, slabs are stable and level | Re-point with jointing mortar or compound | Low to moderate |
| Failed or missing sealant on stable slabs, joint is clean and sound | Install backer rod and apply flexible polyurethane sealant | Low |
| Joint is open but cracked slab edges or surface spalling present | Chip back to solid concrete, patch edges, then re-point or seal | Moderate |
| Slabs are rocking, sunken, or sitting at different heights | Lift and re-bed affected slabs, address drainage/sub-base first | High — consider a pro |
| Widespread drainage failure or recurring movement across the patio | Full investigation of sub-base and drainage system | Call a professional |
If your slabs are rocking or visibly uneven, don't spend money on sealant. The movement is what's breaking the joints, and no surface product will hold against ongoing slab movement. You need to sort the instability first, then do the joint work. If the settlement is widespread or you're unsure what's causing it, that's genuinely a job for a professional with the right equipment.
Step-by-step: how to fill and point joints between concrete patio slabs
This method is for stable slabs where the mortar or jointing compound has simply failed or eroded. For many homeowners, the best way to fill in gaps on a patio is to match the repair method to the joint type and gap depth, and then use a flexible exterior sealant with proper prep best way to fill in gaps on patio. After prep work is done and the joint is clean and dry, here's the process.
If you want an easy fix for patio joint mortar, start by clearing the failed material, cleaning and drying the gap, then repoint with the right mortar for stable slabs easy fix patio joint mortar. If you need a complete walkthrough, follow the step-by-step section on how to fill and point joints between concrete patio slabs.
If you are wondering how to fill gaps in patio tiles, the process starts with clearing the old material and then choosing the right filler for the depth of the joint.
For narrow joints (under 10mm): repointing with mortar or jointing compound
- Mix your jointing mortar to a firm, damp consistency — not sloppy. It should hold its shape when squeezed. A 3:1 sharp sand to cement mix works for standard applications, or use a ready-mixed jointing compound like Rompox or similar.
- Pack the mortar into the joint in layers if it's deep, pressing it firmly against both slab faces. Don't try to fill a 50mm-deep joint in one pass — it'll shrink and crack.
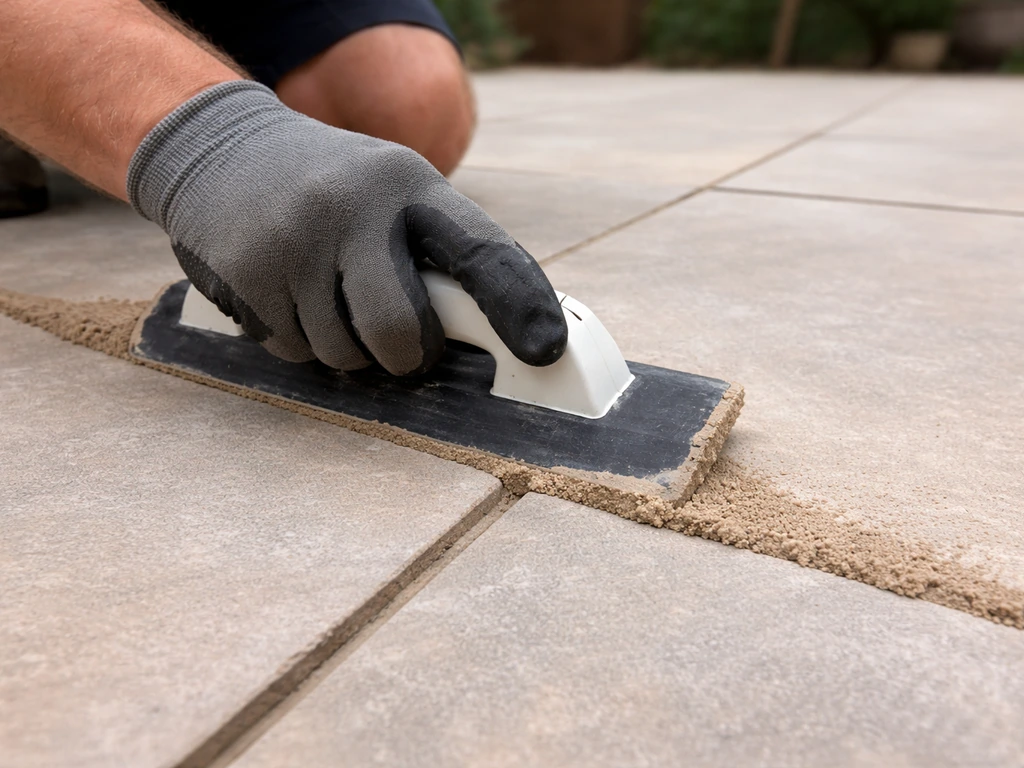
- Use a pointing iron or the edge of a trowel to compact and shape the joint. A slightly recessed finish (a few millimetres below the slab surface) is better than a raised one, which catches water.
- Work in sections, keeping the fresh mortar damp with a light misting of water if conditions are hot and dry. This slows the cure and prevents cracking.
- Once the mortar has hardened enough not to smear (usually a couple of hours), brush off any material from the slab surface with a dry brush.
- Keep foot traffic off for at least 24 hours. Full cure takes around 3 to 7 days depending on conditions.
For wider joints (10mm or more): filling with backer rod and sealant
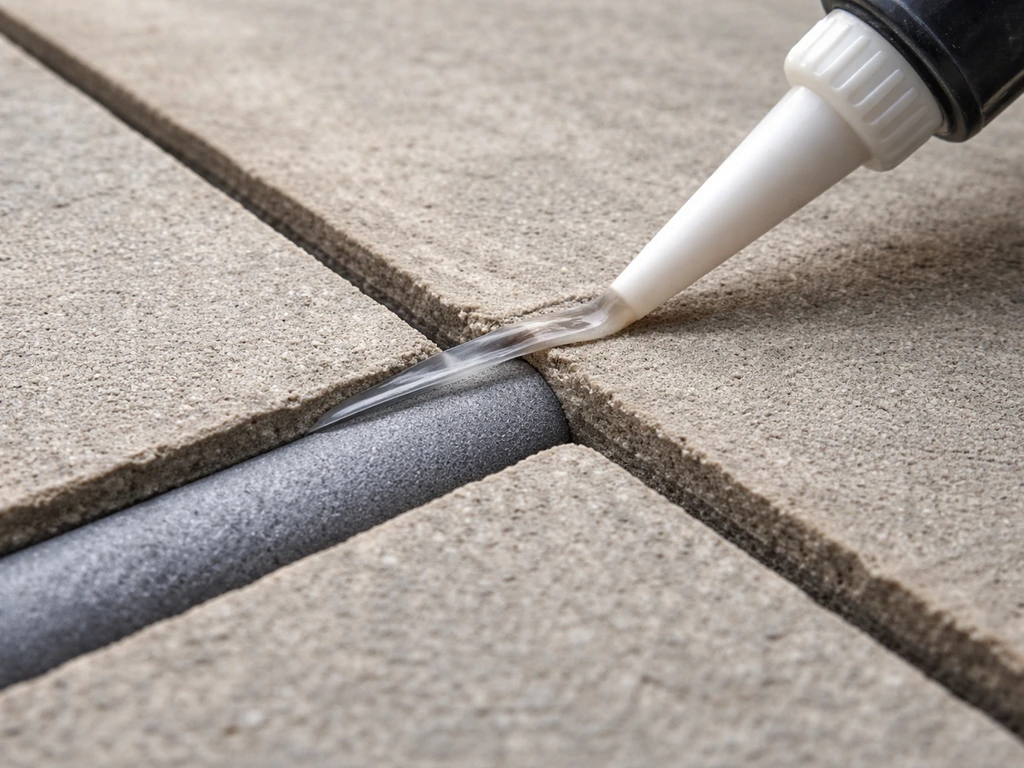
- Measure the joint width. Select a closed-cell polyethylene backer rod that is slightly larger in diameter than the joint width — you want a snug fit that compresses slightly when pushed in.
- Push the backer rod into the joint using a blunt tool (a flat screwdriver or purpose-made roller works). Cut to length with scissors. The backer rod should sit at a depth that leaves enough room for sealant at the correct depth: the target is a width-to-depth ratio of 2:1, with sealant depth between 6mm (1/4 in) minimum and 13mm (1/2 in) maximum.
- The backer rod serves two purposes: it stops the sealant going too deep (which causes it to fail), and it prevents the sealant bonding at the bottom of the joint. You want the sealant bonded to two sides only, not three. Three-sided adhesion prevents the sealant from flexing properly with slab movement.
- Apply masking tape along both slab edges if you want a clean finish.
- Apply a concrete primer to the joint faces if recommended for your sealant product. Some polyurethane sealants are self-priming on concrete, but check the product data sheet. For porous or dusty concrete, primer significantly improves adhesion.
- Load your polyurethane sealant into a caulk gun and apply it into the joint in a steady, continuous bead, slightly overfilling.
- Tool the sealant immediately with a wetted finger or a purpose-made tooling tool to press it into contact with both faces and create a slightly concave surface. A concave profile handles movement better than a flush or convex one.
- Remove masking tape before the sealant skins. Leave undisturbed until fully cured.
If you're working with jointing compound products designed to be brushed or swept into joints dry and then activated with water, the process is simpler: sweep the dry compound into the joints, brush off the excess, then wet down according to the manufacturer's instructions. If you’re wondering how to use jointing compound on a patio, follow the same prep and filling steps, then use the correct method for your joint width. These products work well for smaller patio slabs with tight joints but aren't suitable for wider gaps.
Step-by-step: sealing joints to stop water getting in
Sealing is about keeping water out of the joint once you've filled or pointed it. In a freeze-thaw climate this is genuinely important: water that gets into a joint, freezes, and expands is one of the main things that pushes slab edges apart over time. Here's how to do it properly.
- Make sure the joint filling (mortar or compound) is fully cured before applying any sealant over it. For mortar, wait at least 7 days. Sealing over fresh mortar traps moisture and can cause blistering.
- Clean the joint surface one more time with a dry brush to remove any dust or debris from curing.
- Check the weather forecast. Do not apply sealant in rain, freezing conditions, or in temperatures below the manufacturer's minimum application temperature. Most polyurethane sealants require temperatures above 5°C (40°F). Cold slows cure dramatically; freezing rain before the sealant has skinned can ruin the whole application.
- For mortar joints, apply a penetrating concrete sealer or joint sealant along the joint line using a brush or applicator bottle. Work it into the joint face on both sides.
- For sealant-filled joints, the sealant itself acts as the waterproofing layer — no additional sealer is needed on top. Your job here is making sure there are no gaps, pinholes, or areas where the sealant hasn't bonded.
- On the broader slab surface, a penetrating silane or siloxane sealer applied across the whole patio (not just the joints) significantly reduces water absorption and extends the life of your joint repairs. This is optional but worth doing if you're already doing the joint work.
- Allow full cure before exposing to foot traffic or rain.
Materials and tools you'll need
Here's everything to have on hand before you start. Doing two hardware store trips mid-job because you forgot backer rod is deeply annoying.
Tools
- Cold chisel and club hammer (for removing old mortar and chipping back edges)
- Oscillating multi-tool with scraper blade (fastest method for removing old sealant)
- Stiff wire brush and hand brush
- Pointing iron or margin trowel
- Caulk gun (for cartridge sealants)
- Blunt tool or small roller for seating backer rod
- Scissors (for cutting backer rod)
- Masking tape
- Safety glasses and gloves
- Garden hose or pressure washer for final cleaning
Materials
- Closed-cell polyethylene backer rod in the correct diameter for your joint width
- Flexible polyurethane sealant meeting ASTM C920 (e.g., Quikrete Polyurethane Self-Leveling Sealant No. 8660 for horizontal surfaces, or Sikaflex HY 35 for a hybrid option with good adhesion on concrete)
- Jointing mortar (3: 1 sharp sand to cement) or a ready-mixed patio jointing compound for pointing applications
- Concrete primer compatible with your chosen sealant (check the product data sheet)
- Penetrating concrete sealer for the wider slab surface (optional but recommended)
- Path weedkiller for pre-treatment
- Masking tape
On sealant selection: for horizontal patio joints, a self-leveling polyurethane sealant is the practical choice. It flows to fill the joint profile without laborious tooling, stays flexible through freeze-thaw cycles, and products meeting ASTM C920 Type S, Grade P, Class 25 are rated for 25 percent movement. Avoid using standard interior caulk or silicone on exterior concrete joints. They don't bond well to concrete, degrade quickly in UV, and rigid or semi-rigid products crack in joints that experience any movement.
Curing times, weather windows, and what to watch for
Curing is where impatience costs you a repair. Temperature is the main factor controlling how fast sealants and mortars cure: cold slows everything down, and applying either material in near-freezing conditions is a waste of time and material.
| Material | Tack-free time | Foot traffic | Full cure |
|---|---|---|---|
| Polyurethane sealant (approx. 20°C) | 1 to 4 hours | 24 hours | 7 to 14 days |
| Pointing mortar (approx. 20°C) | N/A | 24 hours | 3 to 7 days |
| Ready-mixed jointing compound | Varies by product | 24 hours | Check manufacturer |
| Penetrating concrete sealer | 1 to 2 hours (dry) | 24 hours | 48 to 72 hours |
Polyurethane sealants are moisture-cure products, meaning they need some ambient humidity to cure. Very dry, hot conditions can slow the surface skin; very cold conditions slow the cure dramatically through the full depth of the sealant. Most manufacturers specify a minimum application temperature of around 5°C (40°F). If it's going to drop below freezing in the first 24 hours after you apply, wait for a better weather window.
Ideal conditions are a dry spell of at least 48 hours, temperatures between 10°C and 25°C (50°F to 77°F), with no rain forecast for the first day at minimum. In the UK this usually means late spring or early autumn rather than midsummer or mid-winter.
Ongoing maintenance and warning signs
Joint repairs don't last forever, but they last a lot longer with basic maintenance. Walk the patio once a year, ideally in early spring, and look for: any new weed growth in joints (pull them early before roots cause damage), any hairline cracks in the sealant surface, and any signs of slab movement. For u-can patio jointing repair, keep an eye on weeds, hairline sealant cracks, and any early signs of movement so small issues can be caught before they spread. Early adhesion failure caught quickly can often be fixed with partial resealing at much lower cost than a full strip-back-and-redo job.
Stop doing DIY repairs and call a professional if you see any of the following: slabs that are rocking or have settled significantly below adjacent slabs, cracks that reappear in the same location season after season despite repairs, water pooling next to the house foundation after rain, or widespread drainage failure across the patio. These are symptoms of sub-base failure or drainage problems that no surface repair will fix. Continuing to spend money on joint filler while the base erodes just delays an eventual larger repair bill.
FAQ
How do I tell if I should use sealant or mortar for patio joints?
If the slabs are stable and the joint is mostly missing pointing or bedding, repoint with the right exterior mortar. If you have a narrow, flexible joint profile that needs water blocking after filling, use flexible polyurethane sealant (self-leveling for horizontal joints). If the joint repair reopens quickly or slabs show height change, the issue is usually under the slabs, not the surface, so sealant or mortar alone won’t last.
Should I remove all old joint material before re-jointing?
Yes, down to sound material. Even small patches of failed, loose, or non-bonded old sealant or crumbling mortar can prevent the new product from adhering, leading to a hollow bond line that fails with the next freeze-thaw. Clean out to firm edges, then dry the gap thoroughly.
Can I just caulk the joint over weeds and loose grit?
No. Weeds and grit act like a barrier and indicate ongoing moisture and soil movement. Remove weeds (including as much root as practical), then dig out loose material, clean, and dry the joint before filling. If weeds return quickly, treat the drainage or water source as part of the repair.
What backer rod diameter should I use, and can I skip it for shallow gaps?
Backer rod size should fill the depth so the sealant stays at the correct thickness, not too deep and not flush to the surface. For shallow joints, you may be able to fill without rod only if the product instructions allow it. If the gap is deep enough that sealant would be too thick, use backer rod to control the depth and improve performance.
How deep can I fill a joint with polyurethane sealant, and what happens if it’s too thick?
Don’t guess, follow the specific product guidance. Overly thick sealant layers can skin over but cure poorly through the full depth, which reduces adhesion and flexibility. Using backer rod helps keep sealant depth within the recommended range and improves freeze-thaw durability.
Can I use interior caulk or silicone because it’s cheaper?
Avoid it. Interior caulk and silicone typically bond poorly to exterior concrete, degrade under UV, and many are too rigid for moving patio slabs. Choose an exterior self-leveling polyurethane sealant rated for concrete joint movement (products that meet ASTM C920 Type S, Grade P, Class 25 are commonly referenced for 25 percent movement).
Why did my new joint filler crack again after a winter?
Common reasons are diagnosing the wrong problem (slab movement or bad bedding), skipping full prep (old material left in place), filling over wet joints, applying in cold conditions, or using a product that cannot handle movement. If the same seam reappears season after season, suspect base settlement or drainage issues and consider a professional assessment.
How do I know whether it’s drainage causing the cracks instead of just failed pointing?
Look for signs of water management problems, such as widening cracks after rain, water pooling near the house wall, or joints that worsen in wet seasons. If you see repeating settlement patterns, widespread drainage failure, or water that keeps migrating into the same areas, the surface joint repair can only be a temporary fix.
What temperature range is safe for applying mortar or sealant?
Plan for above-freezing application and curing. Many manufacturers specify a minimum application temperature around 5°C (40°F). If temperatures are likely to drop below freezing in the first 24 hours, wait for a better window. Colder conditions slow cure and can waste material.
How long should I wait before using or walking on the patio after sealing?
Use the product’s instructions for tack-free and full cure times. Even if the surface seems set, sealants and mortars can still be vulnerable while deeper layers cure. If rain is forecast, protect the repair for at least the first day and follow the recommended dry weather period.
Is there an easy way to maintain joints so they don’t fail early?
Do a quick spring walk and pull any new weeds before they establish. Also inspect for hairline sealant surface cracks and any edge lifting or re-opening gaps. Early adhesion failure can sometimes be handled with targeted partial resealing instead of full strip-out and redoing the entire joint.
When should I stop DIY repairs and call a professional?
If slabs are rocking or significantly below adjacent slabs, cracks reappear in the same locations despite repairs, you see water pooling near the foundation after rain, or you observe widespread drainage failure across the patio. Those point to sub-base movement or drainage issues that surface joint products cannot correct.
Next Article
How to Fill Gaps in Patio Tiles: DIY Step-by-Step
DIY steps to fill patio tile gaps: pick the right filler, prep joints, fill without washout, cure, and troubleshoot drai