If your patio joints are crumbling, growing weeds, or washing out every time it rains, the fix is usually straightforward: remove the failed material completely, prep the joints properly, and refill with the right product for your specific patio type. If you want step-by-step guidance, follow this complete guide on how to repair patio joints. If you want to fill gaps in patio tiles, start by removing failed filler, then refill with the correct jointing product for your patio type and drain away water properly. Polymeric sand for paver joints, mortar or cementitious filler for slab joints, and flexible sealant for concrete control joints. Get that match wrong and you'll be back doing the same repair in 12 months.
U-Can Patio Jointing Repair: Step-by-Step DIY Guide

Talia Lang
27 May 2026
Identify what's wrong with your patio joints
Before you buy anything or start pulling material out, take a close look at what's actually happening. The failure signs tell you a lot about what went wrong and what you need to do next.
- Crumbling or flaking joint filler: the material has broken down, often from freeze-thaw cycles or water ingress
- Sand washing out after rain: joint sand was either never properly activated, or drainage is overwhelming the joint system
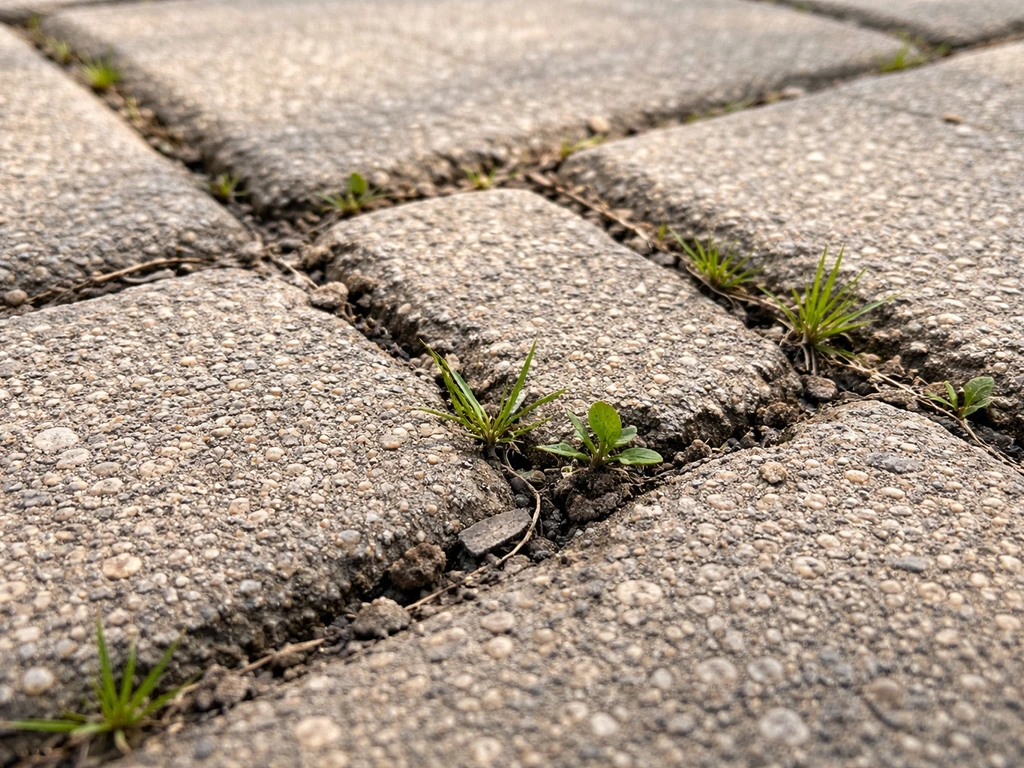
- Weeds pushing through: gaps have opened up enough for seeds to germinate; roots then accelerate the damage
- Ant tunnels and loose grit: ants excavate from below, displacing sand and creating voids that eventually collapse
- Pavers rocking or sinking: the joint failure has progressed to base-level movement, meaning the problem is deeper than just the joint material
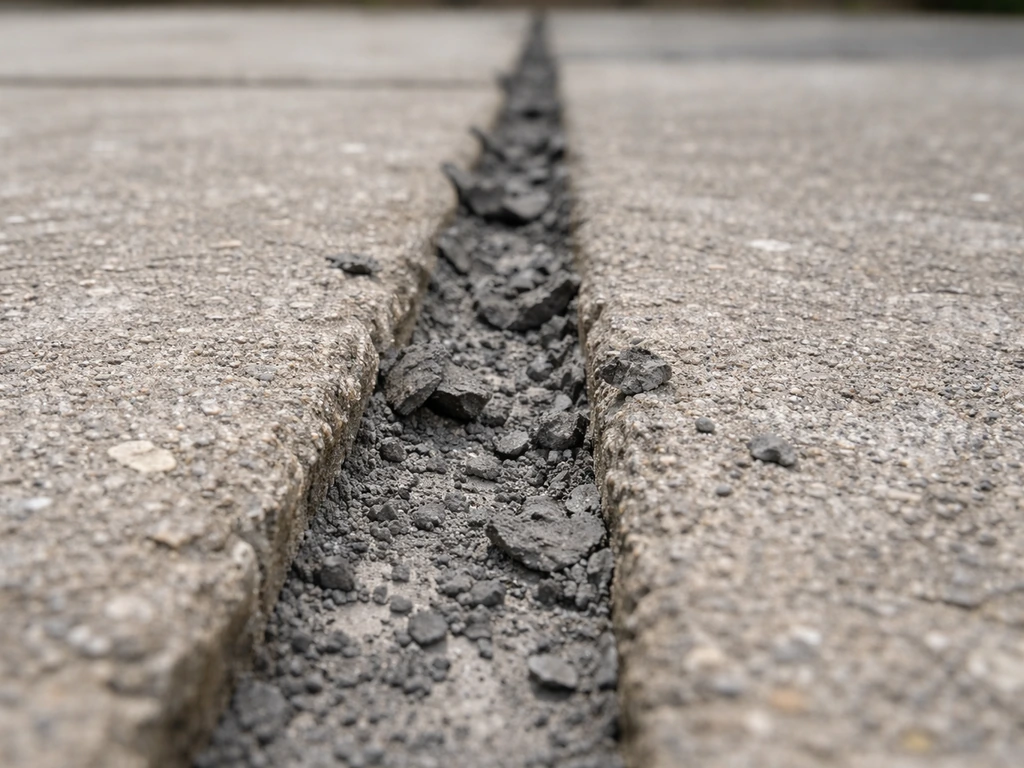
- Visible gaps or wide cracks in concrete slab joints: the filler has shrunk, cracked, or been forced out by slab movement
- Dark staining or moss growth along joints: persistent moisture sitting in the joint, usually a drainage or compaction issue
If you're seeing just one or two of these signs in an isolated area, you're likely dealing with a localised material failure and a DIY repair is very achievable. If the damage is widespread across the whole patio, or if pavers are rocking and sinking, that's a sign something deeper is wrong and you need to think harder before grabbing a bag of jointing compound.
Diagnose the cause before you start
This is the step most people skip, and it's why the same repair fails again. There are four main causes of patio joint failure, and each one needs a slightly different approach.
Water and drainage problems
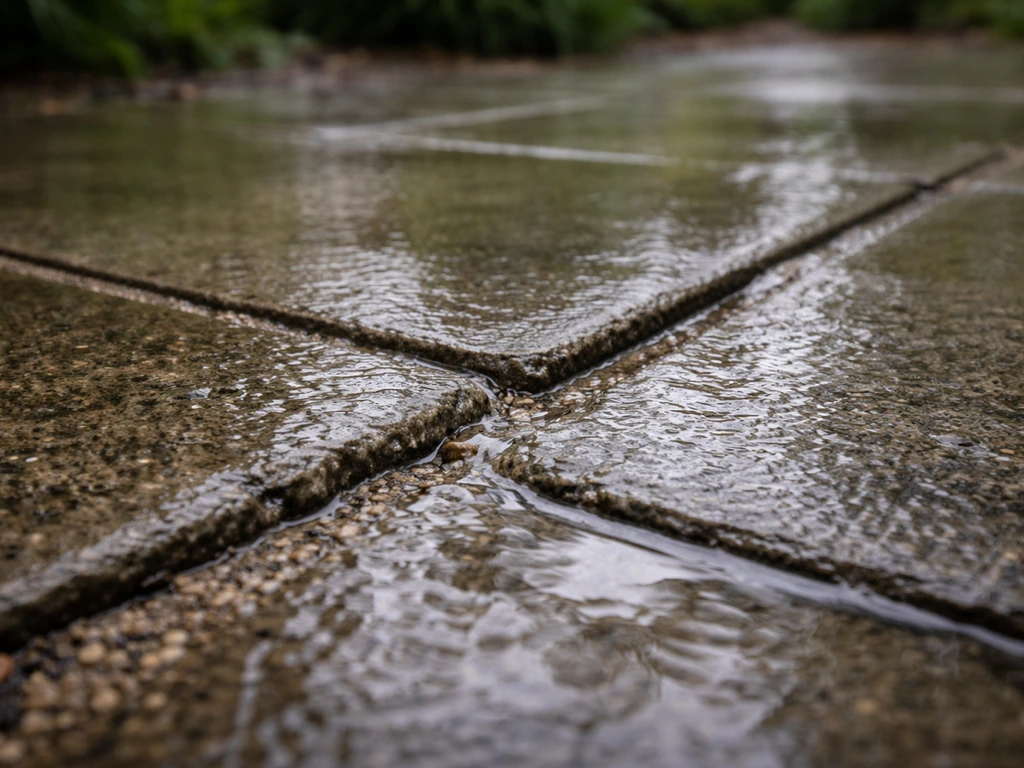
This is the most common cause. Water runs across or through the patio, carries joint sand with it, and slowly empties out the joints. Polymeric sand and similar joint stabilizing systems are moisture sensitive, and if they are not properly activated or allowed to cure, they can wash out and then weeds and ants return Polymeric sand and joint stabilizing systems can wash out if activation or curing is wrong. After a heavy downpour, you might even see a muddy residue on the patio surface or at the edge of the patio where the sand has been deposited. If this is happening, you need to address drainage as part of the repair, not just refill the joints. Check whether the patio has a slight slope away from the house (1:80 is the standard minimum fall), and look for any low spots where water pools.
Settlement and base movement
If individual pavers are rocking, uneven, or sunken, the sub-base beneath them has moved or compacted unevenly. In this case, re-jointing without fixing the base is a waste of time. The new joint material will crack and fail again as the slabs continue to move. You need to lift the affected pavers, re-level the sub-base or bedding layer, and relay before you re-joint.
Weed and biological growth
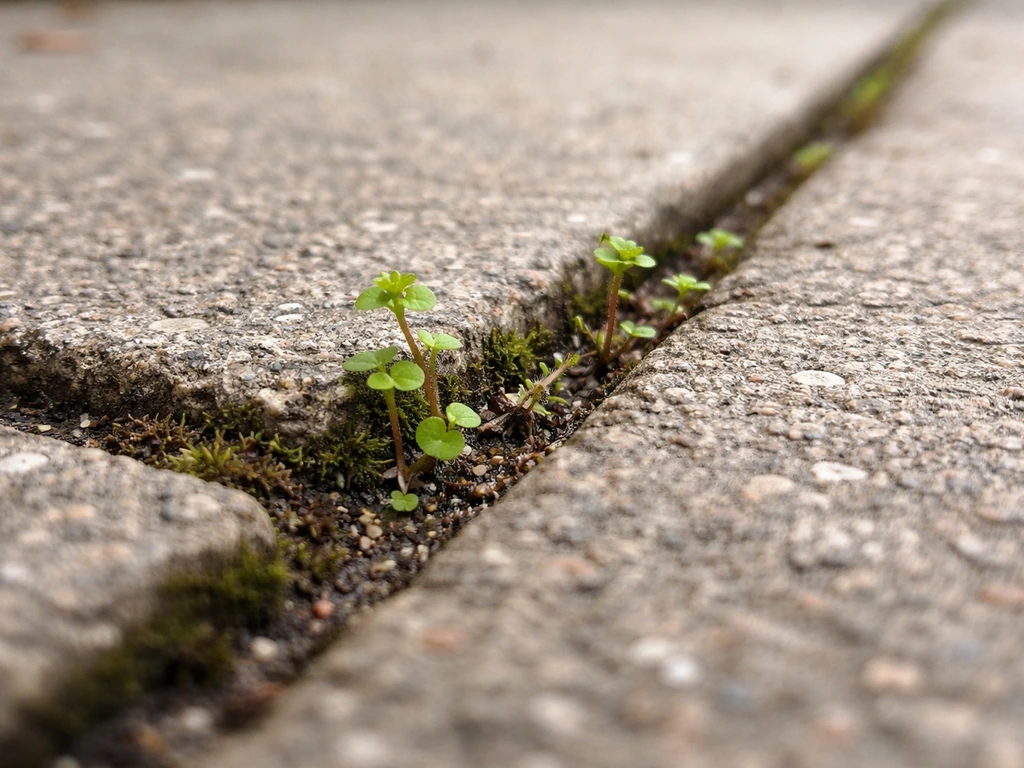
Weeds don't cause joint failure on their own, but they're excellent indicators that gaps have opened up. Once roots take hold they actively prise joints apart and hold moisture in the gap, which accelerates the breakdown of whatever filler is left. The weed growth is a symptom, not the root cause, but it does make the repair more involved because you need to remove the roots completely or they'll come straight back through new jointing material.
Joint material failure
Sometimes the material itself is just at the end of its life, or it was installed incorrectly in the first place. Polymeric sand in particular is surprisingly sensitive to how it's activated with water during installation. If it wasn't watered in correctly, or if it rained before it had cured, it never binds properly and behaves more like loose sand from day one. Cementitious mortar can simply crack and crumble with age. If the base is solid and drainage is fine but the joints are just hollow and empty, this is your most likely culprit.
Choose the right repair method for your patio type
This matters more than most people realise. Using the wrong material for your patio type is one of the most reliable ways to end up back at square one within a year.
| Patio Type | Joint Width | Best Material | Avoid |
|---|---|---|---|
| Concrete block or clay pavers | 3–12mm | Polymeric jointing sand | Standard kiln-dried sand (washes out easily) |
| Natural stone or porcelain slabs | 5–20mm | Brush-in jointing compound or flexible pointing mortar | Rigid cement mortar (cracks with movement) |
| Concrete slabs with control joints | 5–25mm | Flexible polyurethane or silicone sealant | Rigid mortar (will crack as slab expands) |
| Pressed concrete or poured patio | Narrow cracks under 5mm | Concrete crack filler or liquid joint sealant | Polymeric sand (won't adhere to concrete) |
| Wide flagstone or natural slate | 15mm+ | Cementitious pointing mortar (flexible additive recommended) | Polymeric sand (too fine for large gaps) |
If you're unsure what your patio is made of, the joint width is usually your most reliable guide. Narrow, consistent gaps between uniform pavers almost always call for polymeric sand. Wide, irregular gaps between natural stone slabs need a pointing mortar. Concrete slab joints, those straight lines you see in larger concrete patios that allow for thermal expansion, need a flexible sealant that can move with the slab.
Tools and materials checklist
Get everything together before you start. Running out of jointing sand halfway through a repair on a sunny day is a problem because the surface can dry unevenly. Here's what you'll need for most patio joint repairs.
- Stiff-bristled brush or hand brush (for clearing loose debris from joints)
- Oscillating multi-tool or angle grinder with a joint raking disc (for removing old mortar or hard joint filler)
- Flat-bladed screwdriver or joint scraper (for hand-raking softer failed material)
- Pressure washer or garden hose with a jet nozzle (for cleaning joints after raking)
- Leaf blower or compressed air (for drying joints after washing)
- Jointing material of your choice (polymeric sand, brush-in compound, pointing mortar, or flexible sealant)
- Rubber mallet and plate compactor or hand tamper (for bedding polymeric sand)
- Pointing trowel and grout float (for mortar-based repairs)
- Weed killer or white vinegar (for pre-treating stubborn weed roots)
- Fine watering can or hose with a gentle rose head (for activating polymeric sand)
- Bucket and mixing paddle (for cementitious mortars)
- Patio or stone sealant (optional, for after the joints have cured)
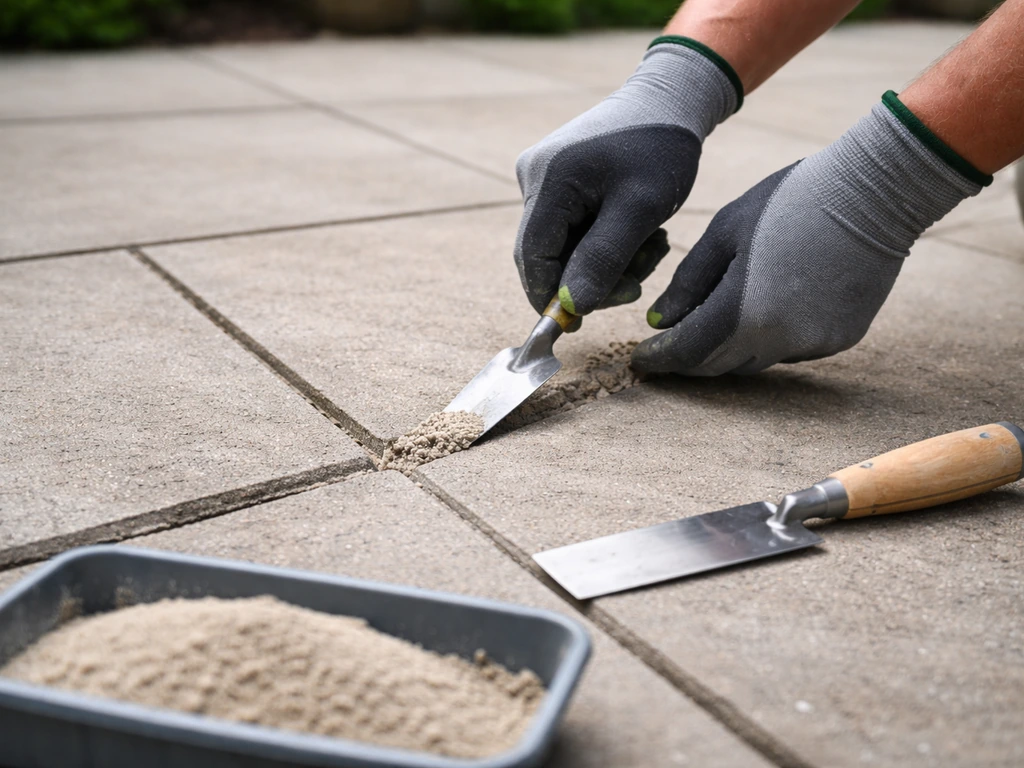
Remove failed jointing and prep the surface properly
Proper preparation is genuinely 80% of whether this repair will last. Once the joints are clean and ready, you can fill gaps in patio slabs with the correct jointing product and install it properly so the repair lasts. You cannot just brush new jointing material into a joint that still has old failed material sitting in it. The new filler won't bond and you'll be back to square one within a few months.
- Clear the surface: sweep the whole patio thoroughly to remove loose grit, leaves, and debris. This gives you a clear picture of where the damage actually is.
- Treat weeds first: if there are weeds growing in the joints, treat them with a weed killer at least 48 hours before you start raking. You want them dead so you can pull the roots out cleanly. If you remove live weeds and leave the roots, they'll grow back through new jointing.
- Rake out the failed material: use a joint scraper, old flat-head screwdriver, or oscillating tool to remove as much of the old jointing as possible. For polymeric sand, you need to get down at least 25–30mm to give the new material enough depth to lock properly. For mortar joints, rake back to clean, solid material.
- Remove all roots and debris: once you've raked the joints, go along with a stiff brush and work out every bit of root, loose sand, and old filler. Any material left behind will compromise the bond of the new jointing.
- Jet wash the joints: use a pressure washer or strong garden hose to flush out the joints. Work at an angle to avoid undercutting the sub-base. This removes fine dust and organic material that the brush can't reach.
- Let everything dry completely: this is the step people rush and it causes failures. For polymeric sand, the joints and paver surfaces must be completely dry before you apply the new sand, otherwise it clumps on the surface and won't brush in evenly. Allow at least 24 hours of dry weather, or longer after a wet spell. Check the forecast.
- Inspect for base problems: while the joints are open and cleaned out, look down into them. If you can see voids, soft spots, or areas where the bedding sand has dropped away, you need to top up the sub-base before re-jointing, not after.
Install the new jointing material correctly
The method varies depending on what product you're using, so I'll cover the three most common scenarios separately.
Polymeric sand (paver patios)
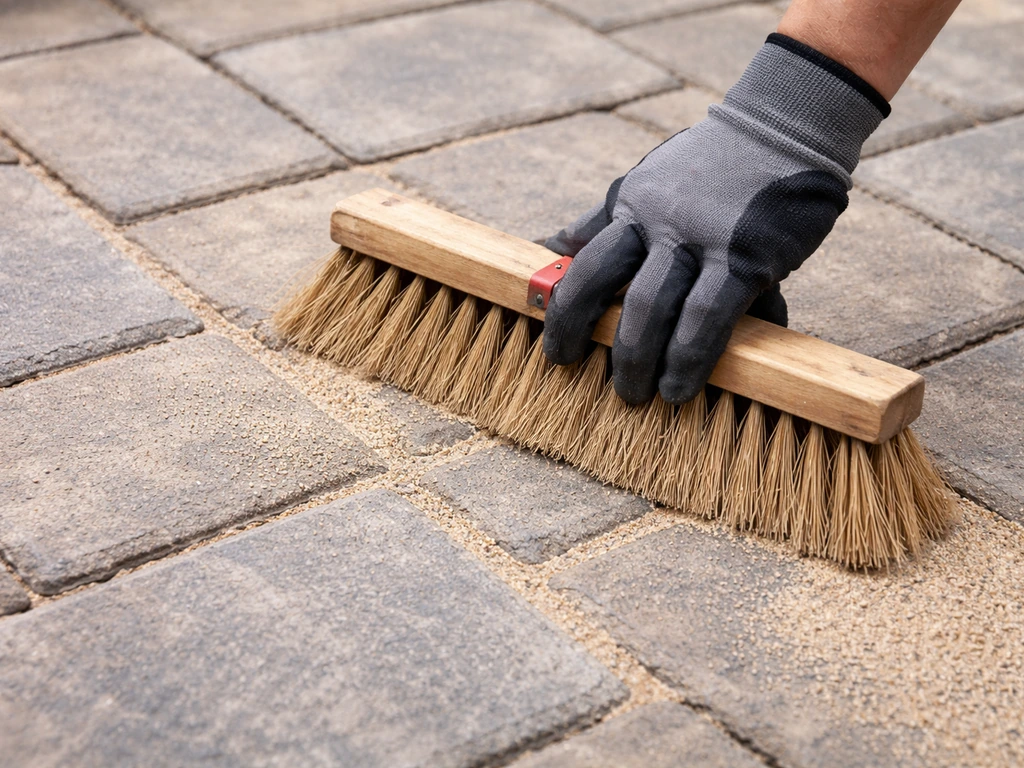
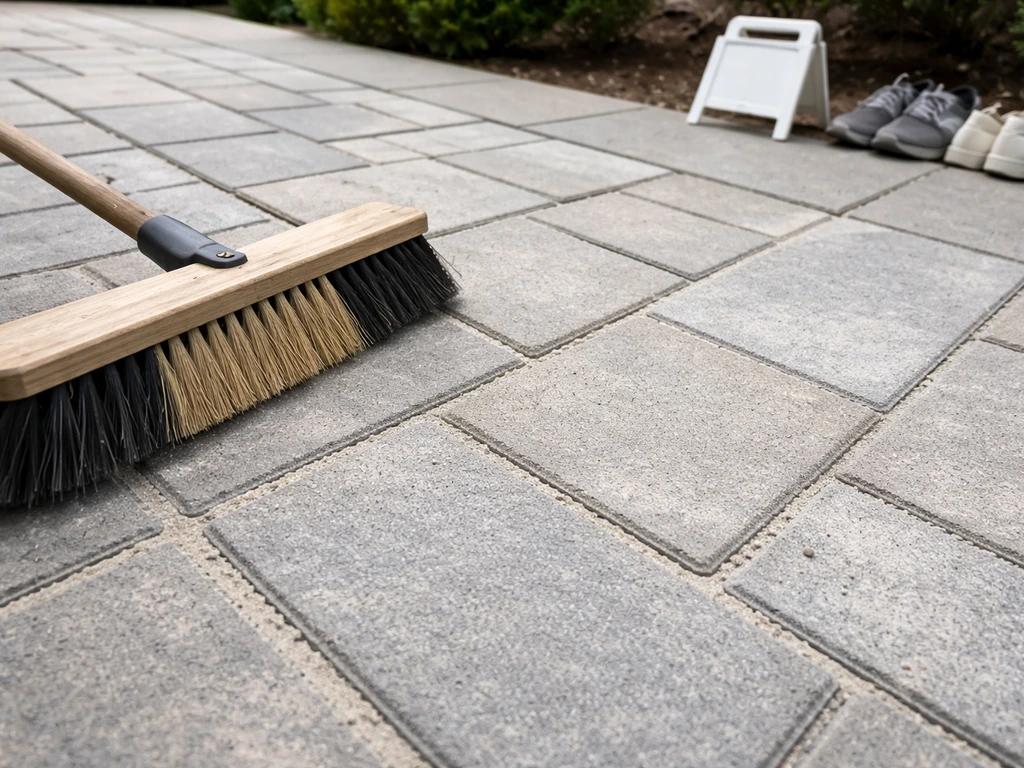
- Pour the dry polymeric sand onto the patio surface and spread it across the joints with a stiff brush. Work it in all directions to pack the gaps evenly.
- Once the joints look filled, run a plate compactor or hand tamper over the patio to settle the sand. This is important because polymeric sand compacts down, and joints that look full will drop after vibration.
- Brush more sand in to top up after compacting, then compact again. Repeat until the joints are filled to within 3–5mm of the surface.
- Blow or brush off all excess sand from the paver surface. This is critical. Any polymeric sand left on the surface when you activate it with water will cure onto the paver face and leave a haze that's very difficult to remove.
- Activate with water using a gentle spray. You want to thoroughly wet the joints without flooding them. Work in sections, making sure water penetrates all the way down through the sand.
- Allow to cure for at least 24 hours without rain or foot traffic. Most products advise 48–72 hours before full use. Do not install polymeric sand if rain is forecast within 24 hours.
Brush-in jointing compound (natural stone and porcelain slabs)
- These products work similarly to polymeric sand but are formulated for wider joints and often have a cementitious binder. Follow the manufacturer's mixing instructions if a wet mix is required.
- Brush or trowel the compound into the joints, working it in firmly to eliminate air pockets.
- Compact down with a rubber mallet on a timber offcut placed across the joint to avoid marking the slabs.
- Wipe the slab surface clean before the compound starts to set. Most brush-in compounds have a working window of 20–30 minutes in warm weather.
- Mist the joints lightly to initiate curing, then keep the patio clear for at least 24 hours.
Flexible sealant or pointing mortar (concrete slabs and large format stone)
- For concrete control joints, apply masking tape to both edges of the joint to keep lines clean.
- If using a backer rod (a foam rope you push into the joint), insert it first to control the depth of sealant. You don't want to fill a 50mm deep joint entirely with sealant.
- Apply the sealant from a cartridge gun in one smooth, continuous bead. Tool the surface with a wet finger or jointing tool to create a slightly concave profile that sheds water.
- For cementitious mortar on large slab joints, mix to a stiff consistency and pack it firmly into the joint in layers if the joint is deep. Don't try to fill a 30mm deep joint in one pass or it will crack as it shrinks.
- Remove masking tape before the sealant or mortar skins over.
Curing, sealing, and keeping joints in good shape
Curing times
Polymeric sand needs a minimum of 24 hours before light foot traffic and 48–72 hours before heavy use. If you are using jointing compound on a patio, follow the product’s activation, spreading, and curing times so it bonds properly between the pavers Polymeric sand needs a minimum of 24 hours. Cementitious mortars and pointing compounds typically need 72 hours minimum, and a full 28 days to reach their maximum hardness. Flexible sealants are usually touch-dry within a few hours but take 24 hours to fully cure. Don't rush any of these. The most common reason a repair fails within a month is that someone walked on it, pressure washed it, or it got rained on before it had properly set.
Should you seal the patio after re-jointing?
Sealing is worth doing for most paver and natural stone patios because it slows down moisture ingress and makes the surface easier to clean, but it's not always essential. If you've used polymeric sand, wait at least 30 days after installation before applying a sealer to make sure the sand has fully cured. Applying sealer too soon traps moisture in the joint and can actually weaken the bond. For porcelain patios, check whether your specific tile has been pre-sealed or is naturally impervious, as many sealers won't absorb and just sit on the surface. Concrete patios benefit from a penetrating concrete sealant applied to the slab and joint, which reduces water absorption and freeze-thaw damage.
Long-term maintenance to avoid repeat repairs
- Inspect joints annually, ideally in early spring, and top up any areas where sand has dropped before they become wide enough for weeds to establish
- Deal with weeds as soon as you spot them, before roots have time to penetrate deeply and widen the joint
- Avoid using a pressure washer directly into joints at close range, as this is one of the most common ways people inadvertently wash out polymeric sand
- Reapply sealant every 3–5 years depending on how much traffic and weather the patio takes
- Check that the patio still has an adequate slope away from the house after any significant ground movement or settlement in the garden
When to stop and call a professional
Most patio joint repairs are genuinely manageable as a DIY job. But there are situations where going ahead without professional input will just cost you more money in the long run.
- Multiple pavers are rocking, sunken, or significantly uneven: this is a sub-base or drainage problem, not a jointing problem, and needs to be fixed from the bottom up
- You've re-jointed before and it failed within a year: something structural is causing repeat failure, and adding more jointing material on top of a moving base is money wasted
- Water is pooling on the patio surface or running toward the house: the fall is wrong, and this needs to be corrected before you re-joint anything
- The patio is lifting near tree roots: root pressure will keep breaking joints and eventually damage slabs, and the options range from root barrier installation to rerouting the patio
- Large sections of a concrete patio are cracking rather than just losing joint filler: this can indicate ground movement or structural failure underneath that needs assessment
If you're dealing with straightforward joint material failure on a stable, level patio, the approach above will fix it and the results should last five to ten years with basic maintenance. Get the prep right, match the material to the patio type, let it cure properly, and you won't be back doing this again next spring.
FAQ
How do I tell if I should fix drainage first or just replace the jointing material?
If joints empty out or you see muddy residue after rain, drainage is likely pulling the jointing out. Check for a consistent fall away from the house (around 1:80) and look for low spots or clogged edges, then re-joint. If water still pools after you repair the joints, the jointing will fail again even if you use the right product.
Can I re-joint over old failed material if I brush it clean?
No. The new filler typically does not bond to remnants of old failed jointing, so it will wash out or crack quickly. Remove the loose, hollow, or contaminated material fully, then vacuum and use the correct bedding depth so the jointing sits where it can cure properly.
What happens if it rains before polymeric sand fully activates and cures?
Rain before proper activation and cure can prevent the sand from binding, leaving it loose and prone to washout. If it has already been rained on and you suspect incomplete binding, wait for it to dry, then test a small area by gently scraping a joint. If it behaves like loose sand, you will likely need to remove and re-do that section.
How deep should I remove and refill patio joints during u-can patio jointing repair?
Aim to remove down to sound, stable material and to a depth that matches the joint product's instructions (for many systems, you refill enough to achieve the intended jointing profile, not just a thin surface layer). If the joint is overfilled, it can haze, stop proper activation, or crack sooner; underfilled joints can leave voids that let water work through.
Do I need to use polymeric sand in every paver joint repair?
Only if your paver joints and installation are suitable for polymeric sand, and the joints are within typical width ranges for the product. If your gaps are wider or irregular, pointing mortar may be a better match. If you are unsure about paver type or joint width, measuring gap width is the quickest decision aid.
Why are weeds coming back so fast after I re-joint the patio?
Weed growth usually means roots or seed material are still in the gap. Remove the roots completely, then thoroughly clean and re-joint. If you only refill the top, roots can re-open the joint and keep moisture in, causing faster breakdown of the new filler.
Should I pressure wash before or after patio joint repairs?
Avoid pressure washing during or immediately after the repair because it can dislodge uncured jointing and disturb the joint profile. Clean thoroughly before installing the jointing material (gentle cleaning and vacuuming), then follow cure time guidance and keep foot traffic off until set.
How long should I wait before walking or using the patio after repairing joints?
Follow cure and cure-strength windows based on the product: polymeric sand usually needs at least 24 hours for light foot traffic and 48 to 72 hours for heavier use. Cementitious mortars and pointing compounds commonly need about 72 hours before heavy disturbance and up to 28 days for maximum hardness. Flexible sealants are often touch-dry quickly but still require about 24 hours to fully cure.
Is sealing always necessary after u-can patio jointing repair?
Not always. It can help reduce moisture ingress and staining, but timing matters. For polymeric sand, applying sealer too soon can trap moisture in the joint. For porcelain, confirm whether the tile is already impervious or pre-sealed, since some sealers will not absorb properly. For concrete, penetrating concrete sealers are typically preferred over surface coatings.
When is a DIY patio joint repair likely to be a waste of time?
If you have widespread failure or pavers are rocking and sinking, the base or bedding layer likely moved or compacted unevenly. In that case, lifting and re-leveling the sub-base is usually required before re-jointing, otherwise the new jointing will crack and fail again.
Next Article
How to Fill Gaps in Patio Slabs Step by Step
Step-by-step guide to fill patio slab gaps with the right outdoor joint filler, prep, leveling, and troubleshooting.