To make grout for a patio, mix a polymer-modified cementitious grout powder with clean, cool water at roughly a 3:1 powder-to-water ratio by volume, stir until it reaches a smooth peanut-butter consistency with no dry lumps, and let it slake for about 5 minutes before a final stir. For patio pavers with wide joints, skip the tile grout entirely and use polymeric jointing sand instead. The product you pick and the method you use depend on whether you're grouting tile-style patio surfaces with narrow joints or filling the wider gaps between patio pavers.
How to Make Grout for Patio: Mix and Grout Tiles or Pavers

Talia Lang
18 Jun 2026
Choosing the right patio grout (tile vs pavers)
This is the most important decision you'll make, and getting it wrong means cracked, washed-out joints within a season. Outdoor conditions are hard on grout: freeze-thaw cycles, UV exposure, foot traffic, and rainwater all attack joint material constantly. Not every grout is built for that.
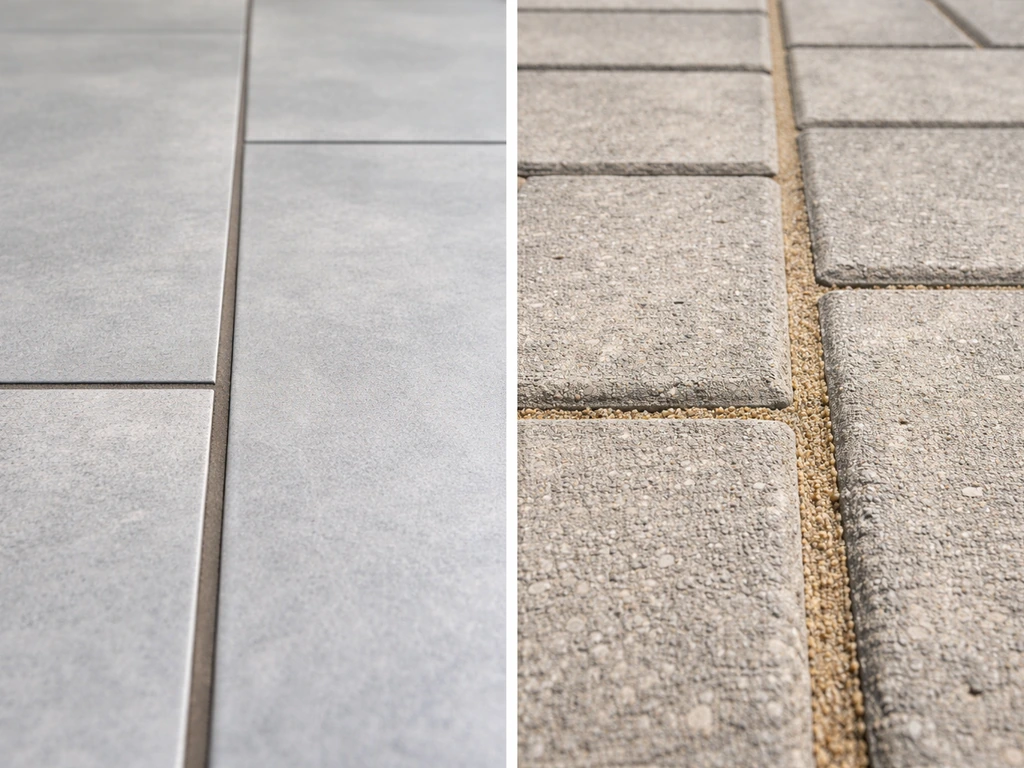
For patio tiles, porcelain pavers, or natural stone slabs with joints between roughly 1/16 inch and 1/2 inch wide, use a polymer-modified cementitious grout. Products like MAPEI Ultracolor Plus FA or LATICRETE PERMACOLOR Grout are specifically formulated to be nonshrinking, color-consistent, and efflorescence-free outdoors. These are your go-to choices for almost any tile-style patio grouting job.
Epoxy grout is extremely durable and chemical-resistant, but it has real downsides outdoors. UV exposure causes yellowing and color change over time, the working time is tight (about 80 minutes at 70°F), and it's significantly more expensive and harder to work with. It makes sense for things like a covered outdoor kitchen counter or a heavily trafficked commercial surface, but for a typical residential patio in full sun, polymer-modified cement grout performs better and costs less. If you go epoxy, LATICRETE SPECTRALOCK PRO Premium is the benchmark product.
For traditional brick or concrete patio pavers with joints wider than 1/2 inch, polymeric jointing sand is the right material, not tile grout. Polymeric sand (brands like SAKRETE PermaSand or Techniseal EZ Sand) is swept into the joints dry and then activated with water. It locks together, resists weeds and insects, and flexes slightly with the pavers rather than cracking rigid like cement grout. If you're specifically regrouting patio pavers, the process is completely different from tiling and is covered in its own step-by-step section below. For brick patio joints, you’ll typically need to remove the old material first and then choose the right grout or jointing sand for your joint width regrouting patio pavers.
| Surface type | Joint width | Best material | Avoid |
|---|---|---|---|
| Porcelain/ceramic patio tile | 1/16" to 1/2" | Polymer-modified cementitious grout | Standard unsanded indoor grout |
| Natural stone (slate, travertine, flagstone) | 1/8" to 1/2" | Polymer-modified sanded grout | Epoxy (UV yellowing outdoors) |
| Concrete or brick pavers | 1/4" to 1.5" | Polymeric jointing sand | Tile grout (too rigid, will crack) |
| Large-format porcelain pavers | 1/16" to 3/8" | Polymer-modified unsanded grout | Pure cement grout (shrinks) |
Tools and materials for patio grouting
Get everything on the job site before you open the bag. Once grout is mixed, you have limited working time and zero time to run to the hardware store.
- Polymer-modified grout (or polymeric sand for pavers) — sized to your joint width
- Clean, cool potable water (cold water extends your working time outdoors)
- Rubber grout float
- Two large buckets (one for mixing, one for clean rinse water)
- Several large, clean sponges
- Margin trowel or mixing paddle and a drill for larger batches
- Cheesecloth or clean cotton rags for final buffing
- Grout haze remover (MAPEI UltraCare Cement Grout Haze Remover works well)
- Knee pads
- Painter's tape for sensitive edges or adjacent materials
- Stiff brush and vacuum for joint prep
- Sealer compatible with your grout type (for after curing)
For polymeric sand jobs on pavers, swap the float and sponges for a push broom, a plate compactor (or hand tamper), and a garden hose with a shower-pattern nozzle. You won't need most of the wet-tile grouting tools.
How to grout patio tiles (step-by-step)
Step 1: Prep the joints
Remove all old grout, debris, dirt, and any loose material from the joints. If your slate patio joints are failing, removing the old grout and regrouting with a patio-appropriate grout is the key to stopping further cracking and water intrusion regrout slate patio. A grout saw or oscillating tool works for removing old grout. Vacuum the joints thoroughly, then blow out or brush away any dust. Joints must be dry and free of standing water before you grout. If there's any sign of a drainage problem underneath or a sunken section, fix that first. Grouting over a base problem just delays the failure.
Step 2: Pre-wet the tiles
Lightly mist the tile surface with cold water before spreading grout. This lowers tile temperature and slows moisture absorption from the grout into the tile body, which buys you more working time outdoors on a warm day. Don't flood it, just a damp surface. This step is especially important for dark-colored tiles and for any work done in direct sun.
Step 3: Mix the grout
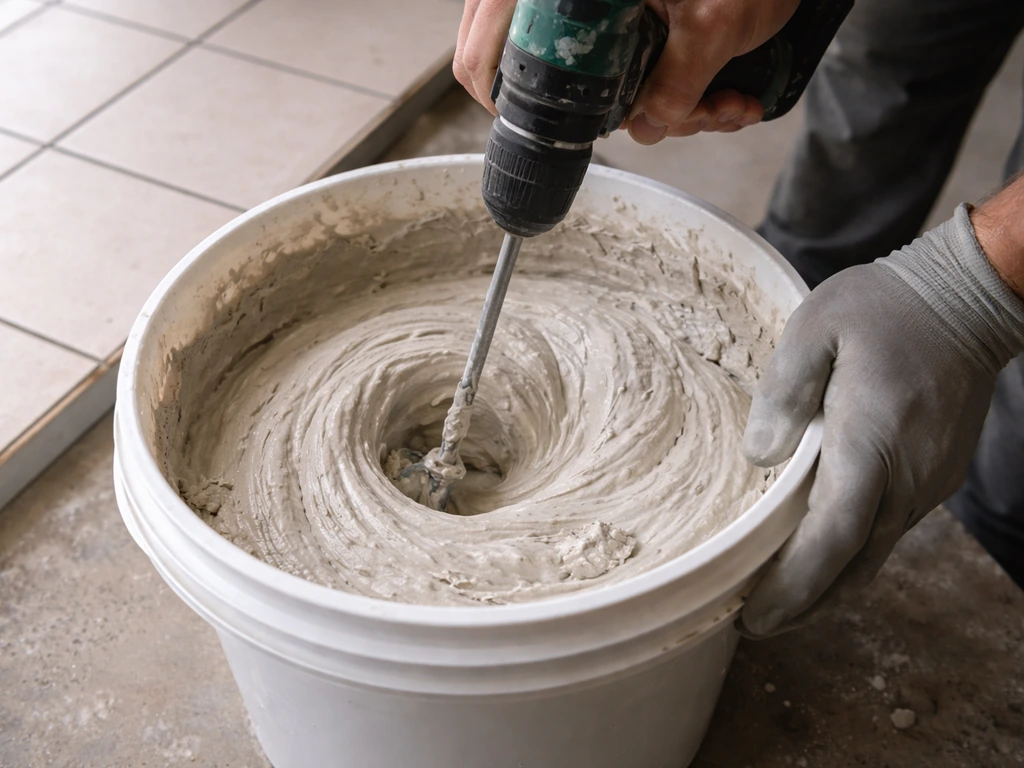
For MAPEI Ultracolor Plus FA, the ratio is roughly 3 parts powder to 1 part water by volume. For a 25-lb bag of LATICRETE PERMACOLOR Grout, use 2 quarts (1. 9 liters) of clean water. Add the powder to the water gradually, not the other way around, and mix until you get a smooth, lump-free consistency similar to peanut butter.
Let it slake for 5 minutes, then stir once more. Don't add extra water to loosen it up, that's how you wash out the pigment and weaken the joint. Mixed grout has about a 2-hour pot life, but your actual spreading window (the time before the grout on the tiles starts to set) is closer to 30 to 60 minutes depending on temperature and humidity. Mix only as much as you can use in that window, especially in warm weather.
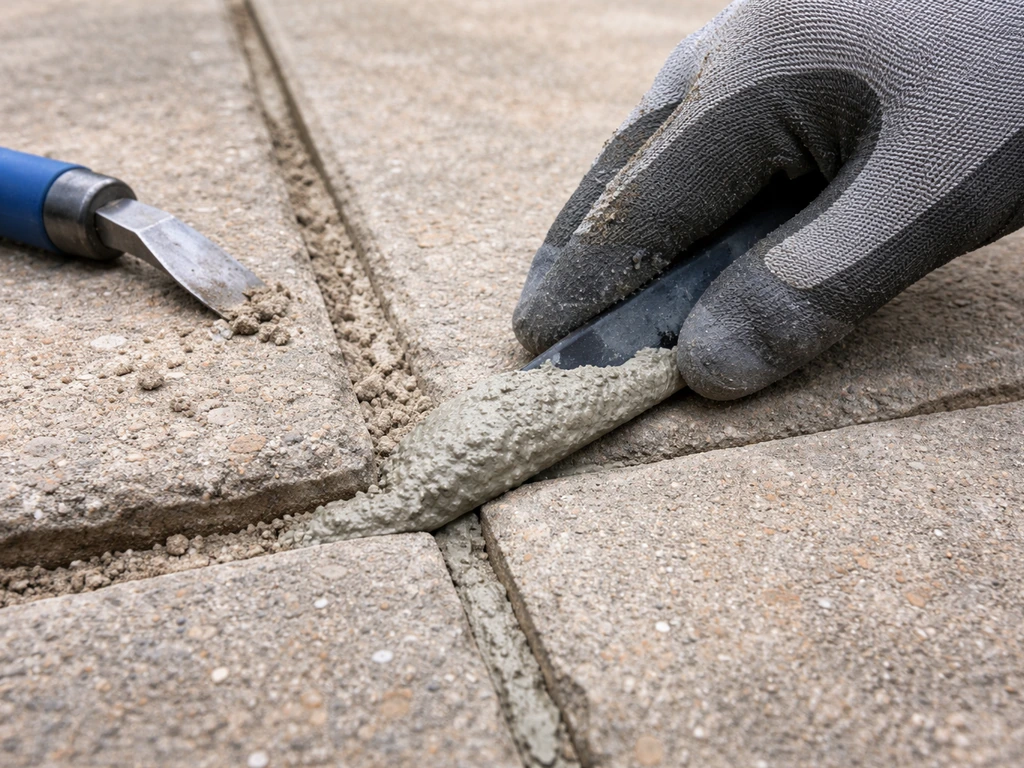
Step 4: Apply the grout
Load your rubber float and press grout into the joints, holding the float at roughly a 45-degree angle and pushing diagonally across the joints, not parallel to them. Working diagonally packs grout into the joint properly and avoids dragging it back out. Cover a manageable section at a time, about 10 to 15 square feet per pass outdoors, less in hot weather. Don't let excess grout sit on the tile surface for more than a few minutes.
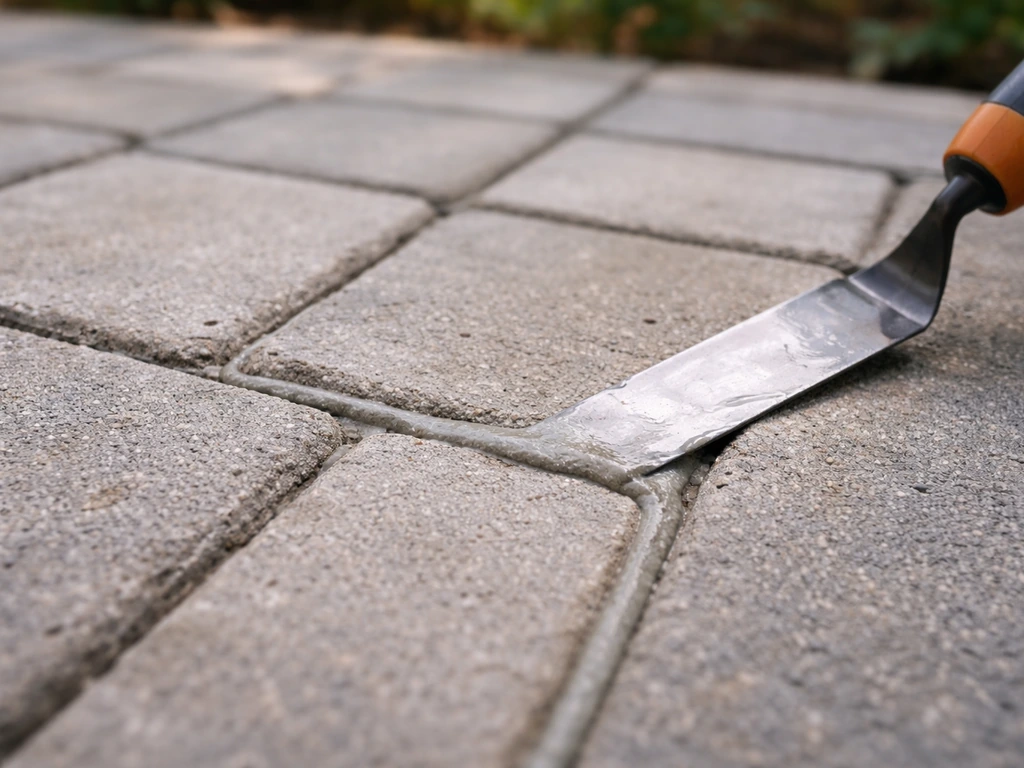
Step 5: Clean the surface
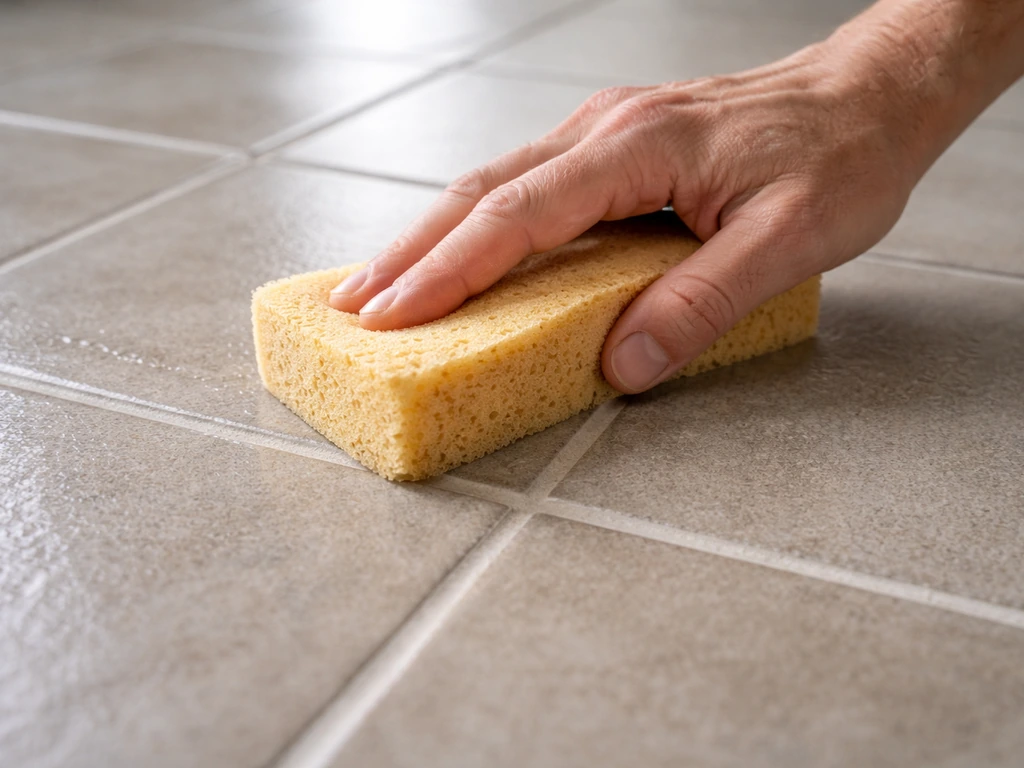
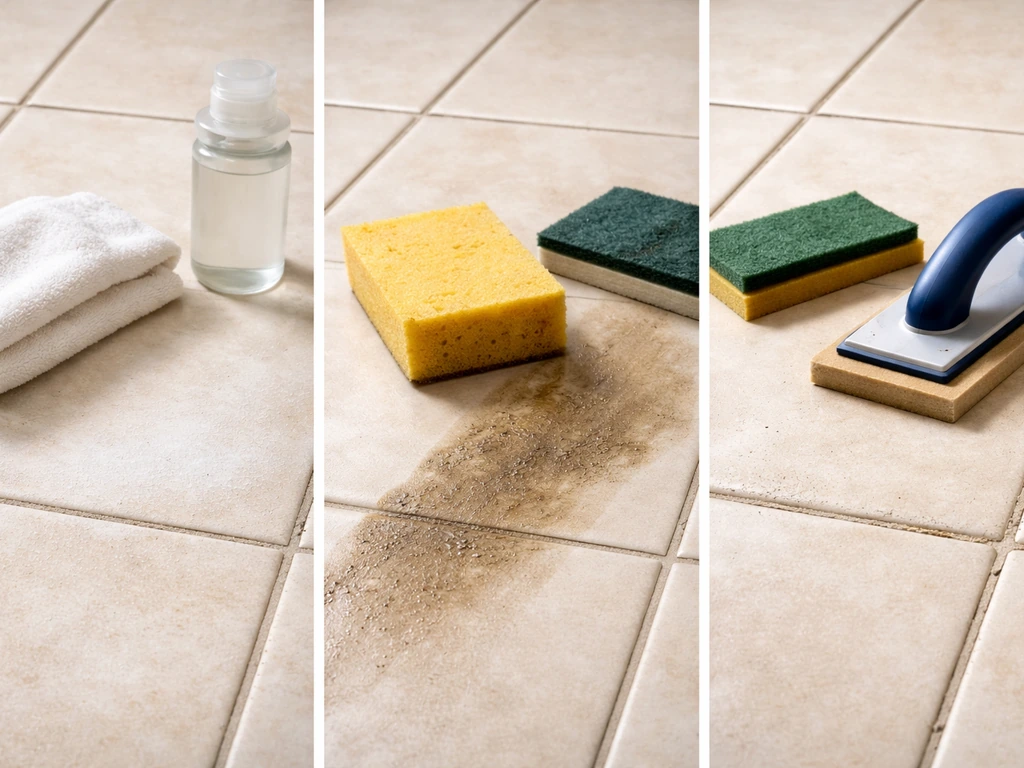
Once the grout in your section starts to firm up (it should hold a finger press without smearing), do your first wash. Wring your sponge almost completely dry, a wet sponge is one of the most common mistakes in grouting and will wash out pigment, leaving lighter-looking joints. Wipe diagonally across the joints with light pressure, rinse the sponge in clean water, and repeat. Do a second wash pass about 15 to 20 minutes after the first.
Around 30 to 45 minutes after that second wash, buff the tile surface with a cheesecloth or dry cotton cloth to remove the grout haze. If haze has already dried and bonded, you'll need a dedicated cement grout haze remover.
MAPEI’s UltraCare catalog includes dedicated grout haze removal and grout-release/cleaner products, such as a [Cement Grout Haze Remover](https://cdnmedia. mapei. com/docs/librariesprovider10/line-technical-documentation-documents/ultracare-catalog-en. pdf?
sfvrsn=cf941977_53), designed for haze and cleanup challenges. Apply it, scrub, and rinse, just don't let it dry on the surface.
Step 6: Protect from foot traffic and weather
Keep people off the freshly grouted surface for at least 3 hours, and ideally longer if conditions are cool or humid. Full cure before applying sealer takes a minimum of 72 hours at around 70°F. If rain is coming within that window, cover the area with plastic sheeting. Newly grouted patio tile should not get soaked before it has cured.
How to grout patio pavers (step-by-step)
You can absolutely grout patio pavers, but the right approach depends on your joint width. For joints over 1/2 inch wide between concrete, brick, or natural stone pavers, polymeric sand is the correct material. For tighter joints on porcelain pavers or small-format stone set with thin-set adhesive, use the tile grout method above. The polymeric sand method is what most homeowners dealing with standard paver patios actually need. If your patio needs regrouting, make sure you identify whether you have tile-style joints or paver joints first, because the regrout steps differ how to regrout patio slabs.
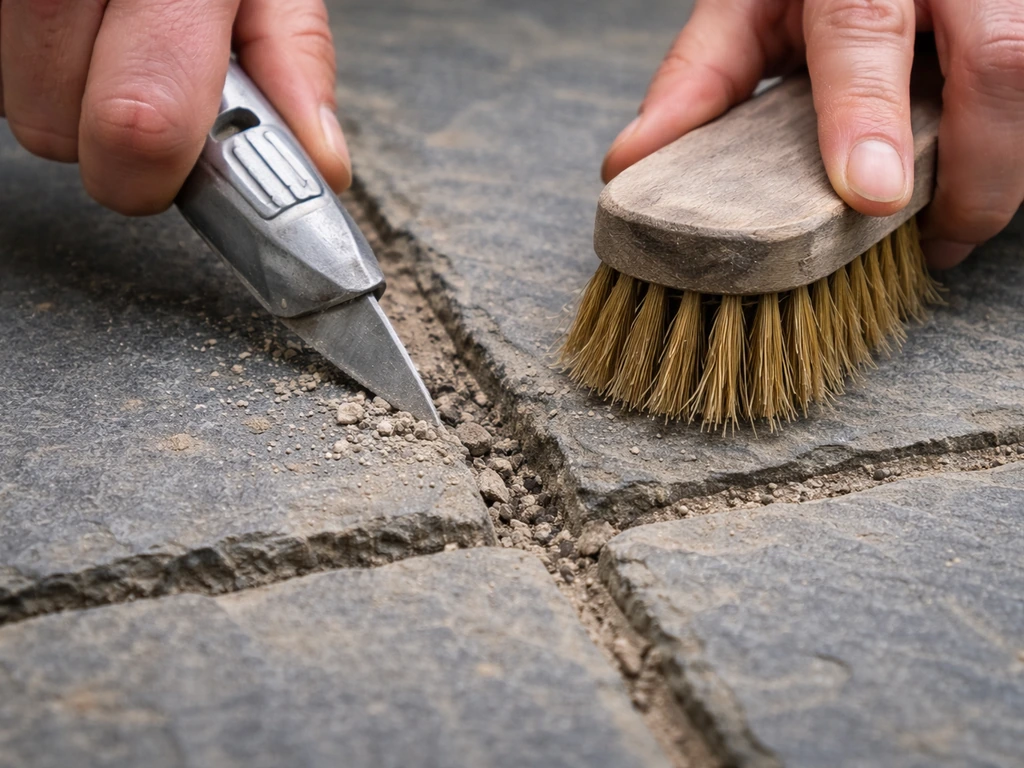
Step 1: Clear and prep the joints
Remove all weeds, old sand, and debris from the joints. A stiff brush, a vacuum, and some elbow grease. If there's grass or persistent weeds, apply a contact weed killer and wait for it to fully dry before proceeding. This is the single most important step for long-term results, skip it and weeds will be back within months.
Step 2: Check weather conditions
Do not install polymeric sand if rain is forecast within the next 24 hours. This is non-negotiable. Rain before the polymer has activated and set will wash the sand out of the joints completely, and you'll be starting over. Check the forecast the night before and the morning of. Pavers also need to be dry when you apply the sand.
Step 3: Apply the polymeric sand
Pour the polymeric sand onto the paver surface and use a push broom to sweep it into the joints. Work it in all directions to fill gaps thoroughly. For deeper joints, tamp the pavers with a plate compactor or hand tamper with a rubber pad between the compactor and the surface, this vibration settles the sand. Add another pass of sand and sweep again until joints are filled to within about 1/8 inch of the paver surface. Then sweep or blow any remaining sand off the paver tops completely. Any sand left on the surface will bond there once you add water, creating a haze that's hard to remove.
Step 4: Activate with water
Use a garden hose set to a shower or mist pattern, not a jet. Wet the surface thoroughly until you see the joints saturated, then wait for the water to absorb. Mist again in 2 to 3 passes, letting each soak in before the next. The goal is to activate the polymer binder in the sand without washing the sand out of the joints. A high-pressure blast will undo everything you just did. If any sand residue appears on the paver surface after wetting, gently wipe or sweep it off before it bonds.
Step 5: Allow to cure
Keep foot traffic off for at least 24 hours and protect from rain during that window. The polymer needs time to harden and bind the sand into a firm, cohesive joint. After 24 to 48 hours, joints should feel firm to the touch and resist minor scuffing.
Common mistakes, troubleshooting, and cleanup
Most grout failures come down to a handful of predictable mistakes. Here's what goes wrong and how to deal with it.
| Problem | Why it happens | What to do |
|---|---|---|
| Grout haze on tile surface | Not buffing in time, or sponge was too wet | Use a dedicated cement grout haze remover; apply, scrub, rinse — don't let it dry on the tile |
| Light-colored or faded joints | Too much water during mixing or washing | Match grout color and regrout affected joints; use a properly wrung sponge next time |
| Cracking or shrinkage in joints | Wrong product, too much water in mix, or movement in the base | Remove cracked grout, check for base movement, regrout with polymer-modified product |
| Polymeric sand washing out | Rain before full cure or too much water pressure during activation | Remove and replace; check 24-hour weather window before applying |
| Grout setting too fast outdoors | Hot weather, direct sun, or dry porous tile absorbing water | Pre-wet tiles, mix smaller batches, work in shade if possible, use cold water |
| Uneven joint fill | Float held parallel to joints instead of diagonal, or grout too stiff | Rework wet grout diagonally while still workable; if set, rake out and regrout |
| Weeds returning through paver joints | Old weed roots not fully removed before applying polymeric sand | Remove all growth, treat with weed killer, wait for full die-back, then apply fresh polymeric sand |
One cleanup note worth repeating: when removing grout haze from tile, keep moving and keep that sponge as dry as possible. If you’re looking to refresh older joints, follow these steps for how to regrout patio pavers, since the process differs from tile-style grout cleaning and reseating. More water is almost never the answer on a grouting job. A lightly damp sponge used consistently does a cleaner job than a soaking wet one used once.
Curing, sealing, and maintenance for outdoor grout
Curing and sealing are the steps most DIYers skip or rush, and it shows. Outdoor grout and polymeric sand take longer to fully cure than indoor applications because outdoor conditions are less controlled.
For cementitious tile grout like PERMACOLOR or Ultracolor Plus FA, wait a minimum of 72 hours at around 70°F before applying sealer. In cooler weather or high humidity, wait longer. The grout needs to be completely cured before sealer goes on, or you'll trap moisture inside the joint and cause efflorescence (white salt deposits) or delamination. Once cured, apply a penetrating sealer compatible with your grout and tile type. For natural stone, use a stone-safe impregnating sealer. For porcelain tile, grout joint sealer alone is often sufficient since porcelain itself is nearly impervious.
For polymeric sand, a sealer isn't strictly required, but paver sealer applied over the surface and joints after full cure (typically 7 days) extends the life of the installation and adds stain resistance. If you seal your pavers, plan to reseal every 2 to 3 years.
Maintenance is straightforward. Sweep patio surfaces regularly to prevent grit from grinding into joint material. Inspect joints every spring after the freeze-thaw season. Minor cracking or sand displacement caught early is a quick fix. If your stone patio grout is already failing, the same core principles apply: remove loose grout, clean and dry the joints, then regrout with the right repair product for natural stone. Left for a season, small failures become bigger ones. If you're dealing with ongoing joint failures in the same spots, that's a drainage or base problem, not a grout problem.
When to stop DIY and call a pro
Grouting is one of the more beginner-friendly outdoor repair tasks, but there are situations where it genuinely isn't the right fix and calling someone is the honest answer. If you are wondering how to replace patio grout, start by removing the old, failing grout completely and then regrout with the right type for your patio surface.
- Widespread cracking across multiple joints in a pattern: this usually means the base (sub-base or concrete slab) has moved, settled, or failed. Regrouting over base movement will just crack again.
- Drainage problems pooling water on or under the patio: standing water under a tiled patio or between pavers will destroy any grout or jointing sand eventually. Fix drainage before grouting.
- Sunken or rocking pavers across a large area: if pavers are sinking, the compacted base or bedding layer has eroded or shifted. That's a base rebuild, not a grout job.
- Efflorescence returning repeatedly after cleaning: persistent efflorescence is a sign of ongoing moisture migration through the slab or base. Sealing or regrouting won't stop it without addressing the moisture source.
- Large-format or heavy stone that has cracked or displaced: repositioning large stone slabs safely often requires equipment and experience to avoid breaking the material or injuring yourself.
- Historic or specialty materials: some natural stone and antique brick require specific products and techniques. If you're not sure what you have, get a professional assessment before mixing anything.
There's no shame in stopping when the job gets over your head. The point of doing this yourself is saving money and getting a result that lasts. Grouting over a base failure just means doing the job twice. If you want the full process, follow this guide on how to use patio grout from start to finish. If the issue turns out to be more than the joints themselves, a structural or drainage fix done right once is almost always cheaper in the long run than repeated DIY repairs on top of a problem that keeps coming back.
FAQ
Can I grout a patio if the weather is cold or I’m working in the evening?
Yes, but only if your grout is made for exterior use and you’re working within the temperature range on the bag. In cold weather, cementitious grout can take longer to firm up and may be more prone to cracking from uneven curing, so plan extra wait time before foot traffic and before sealing (often longer than 72 hours).
What should I do if my mixed grout gets too thick while I’m working?
Don’t add water to “fix” the mix after it starts to thicken. Adding water increases shrinkage and reduces pigment, which leads to lighter, weaker joints and more water penetration. If a batch begins to set, discard it and mix a smaller amount rather than loosening it.
How long do I have to wait before sealing patio grout, and what if rain is likely?
For cementitious tile grout, wait at least 72 hours at about 70°F before sealing, and longer in high humidity or cool temperatures. Sealing too early can trap moisture and increase efflorescence risk, especially on dense porcelain or natural stone where curing may be slower.
My joints look cloudy after washing, can I just mist and wipe it off?
If you already have a haze or residue that has fully dried, spot-cleaning during the original wash is too late. You’ll need a dedicated grout haze remover formulated for cement grout, and you should test it on a hidden area first because some removers can dull finishes on certain natural stones.
Can I use polymeric sand but apply it with a wet method instead of dry sweeping?
Typically no, if you’re using polymeric sand for paver joints. The whole system depends on dry sweeping in the sand and then activating it with misted water, while excess moisture or washing before activation can cause sand loss and weak joints.
Do polymeric sand joints need sealer the same way tile grout does?
You still need good joint preparation, but sealing strategy differs. For polymeric sand, sealer is usually optional, and most failures from sealer-related issues come from sealing too soon or sealing before the sand has fully cured and stabilized.
How can I tell if my grout failure is really a drainage or base problem?
If drainage underneath is compromised (sinking areas, recurring wet spots, or water pooling), grout or polymeric sand will fail again even if mixing and wash technique are perfect. Fix the base slope, drainage, and any settling first, then regrout or re-sand.
What if the new grout doesn’t seem to bond, and it wipes out during cleanup?
If you can still scrape out material easily after cleaning, that usually means the joint isn’t properly removed or it wasn’t deep enough to accept new grout. Vacuum and remove loose residue until the joint walls are solid and clean, then grout again, staying within the joint width guidance for your product.
Can I grout in phases over multiple days without getting noticeable color differences?
Yes, but coverage and color consistency matter. Use grout powder within the same batch code when possible, and mix by volume using the manufacturer’s specified water amount. If you partially grout and stop, you may see color variation unless you keep a consistent mixing method and timing across the whole area.
How do I confirm I’m using the right product type for my patio joint width?
Using the wrong type is the most common mismatch for patios: tile-style grout for joints that are too wide, or polymeric sand for joints intended for cement grout. As a rule of thumb, polymeric sand is for paver joints wider than about 1/2 inch, while cementitious grout is for narrower tile-style joints (roughly 1/16 to 1/2 inch).
Next Article
How to Regrout Patio Slabs: Step-by-Step DIY Guide
Learn how to regrout patio slabs step by step: remove old grout, choose exterior materials, pack and cure for lasting jo