Replacing a patio slab is a full weekend job, but it's well within DIY reach if you approach it in the right order: lift and remove the damaged slab, rebuild the base properly (this is where most people skip steps and regret it), drop in your new slab or paver, level it, lock it in with jointing material, and give it time to cure before you put furniture back on it. The steps below walk through the whole process from diagnosis to cleanup, with the common mistakes called out so you don't make the same ones twice.
How to Replace Patio Slabs: DIY Step-by-Step Guide

Talia Lang
31 May 2026
Replace or repair? Make this call first

Not every damaged slab needs to come out. A hairline crack running across a solid, stable slab can often be filled and left. What you're looking for before deciding to replace is this: the slab is cracked deeply enough that edges are lifting or crumbling, it's sinking or rocking underfoot, or the surface has deteriorated to the point where patching would only be cosmetic. Severe spalling (where the surface is flaking off in chunks) and any slab that shifts or wobbles when you step on it are clear replacement signals. Patches on structurally compromised slabs rarely hold more than a season.
One distinction worth making: if only one or two slabs in a paved patio have failed while the rest look fine, you almost certainly have a localized base problem rather than a patio-wide issue. That's good news, because you can fix the specific spot. If you're seeing widespread sinking, multiple cracked slabs in a pattern, or water pooling all over the patio after rain, the base or subgrade may have failed across a larger area, and that's a bigger project. We'll talk about when to call a pro at the end.
If your slab is loose but otherwise intact and undamaged, you may not need a replacement at all. Relaying a loose slab is a simpler process covered separately on this site. Relaying a loose slab follows similar principles, but the key is stabilizing the base and leveling the surface before you lock the edges in place relining a loose slab. This guide is for situations where the slab itself is broken, crumbling, or needs to come out completely.
What you'll need before you start
Getting your tools and materials together before you start saves a lot of back-and-forth frustration. Here's what the job typically calls for, split into tools and materials.
Tools
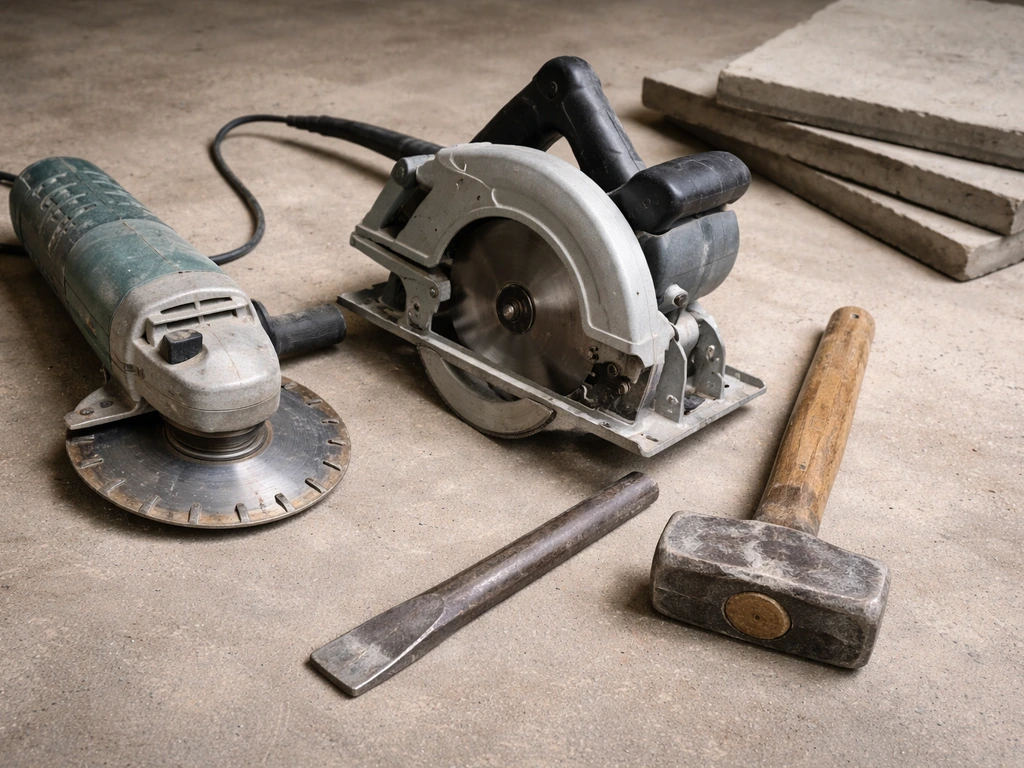
- Angle grinder or circular saw with a diamond blade (for cutting mortar joints or saw-cutting a concrete slab cleanly at the edges)
- Cold chisel and lump hammer (for breaking out the slab once it's scored)
- Pry bar or flat bar (for lifting pavers or concrete sections)
- Spade and square-head shovel (for excavation and spreading base material)
- Hand tamper or plate compactor (plate compactor is worth renting for anything bigger than one slab)
- Spirit level, at least 4 feet long
- Rubber mallet
- Tape measure and chalk line or string line
- Safety gear: eye protection, heavy-duty gloves, dust mask (concrete dust is silica dust, and you need a proper P2/N95 mask, not a paper one), steel-toed boots
Materials
- Replacement slab or paver (match thickness and material as closely as possible to existing slabs; bring a piece of the old one to the supplier if needed)
- Sharp sand or bedding sand (for the laying bed under the slab)
- Compactable gravel or crushed stone (MOT Type 1 or road base, for rebuilding the sub-base if needed)
- Polymeric jointing sand or mortar (for filling the joints after installation)
- Patio sealant (optional but recommended for natural stone or concrete pavers prone to staining)
Check utilities before you dig
Before you lift a single slab, call 811 (in the US) or your local utility locate service to have underground lines marked. Even for a shallow patio excavation of 4 to 6 inches, it's not worth the risk. Also check whether any drainage pipes, irrigation lines, or electrical conduit run under your patio. Look for downspout discharge points and follow where the water goes. If a failed slab is sitting right where water exits the house, drainage is likely part of why it failed in the first place.
Remove the damaged slab without wrecking the ones around it
This is the step where most DIYers cause more damage than they started with. Going at a concrete slab with a sledgehammer might feel satisfying, but the shockwaves can crack neighboring slabs or disturb the base under them. Controlled removal is the goal.
- Score the joints first. Use an angle grinder with a diamond blade to cut along the joint lines on all four sides of the slab you're removing. For mortar joints, cut through the full depth of the mortar. For sand-set pavers, this step just ensures you're not dragging surrounding slabs with you when you lift.
- For a concrete slab: after scoring the perimeter, use your chisel and lump hammer (or a rotary hammer if you have one) to break the slab into manageable pieces from the center outward. Work toward the edges, not from them. Concrete sections weighing more than 30 to 40 pounds should be broken down further before moving.
- For a sand-set paver: once the joints are clear, work a flat bar or pry bar into the joint at one corner and lever the paver up gently. Have a second person ready to grab it, or use suction cup lifters if the paver is heavy.
- Clear debris carefully. Don't dump broken concrete back into the excavation hole. Remove all broken pieces completely and dispose of them properly (most concrete disposal goes to a recycling facility or dumpster rental).
- Protect your surroundings. If adjacent slabs are in good condition, push a piece of scrap wood against their edges before levering or hammering to absorb any shock and prevent chipping.
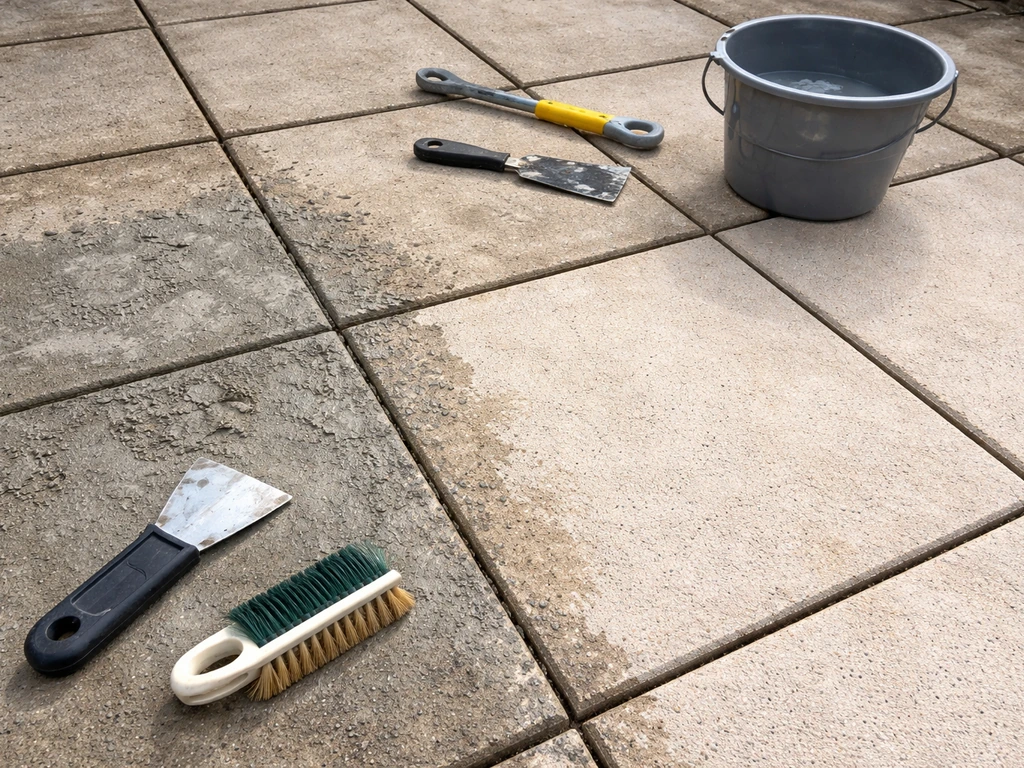
If the mortar between slabs is particularly stubborn and you need to clean it off surrounding slabs, that's a separate process worth doing carefully. For thorough results, follow the cleaning steps to remove mortar buildup from the surrounding patio slabs before you re-point the joints. Residue left on adjoining slabs looks bad and can interfere with the new joint later.
Rebuild the base properly (don't skip this)
If you just drop the new slab onto whatever's left in the hole, you'll be back here doing this again in two to three years. The base is why slabs fail, almost every time. To fully fix patio slabs, you also need to address drainage, compaction, and water flow before setting the replacement. Either it was too thin, poorly compacted, or water got in and washed it out. Fix that now.
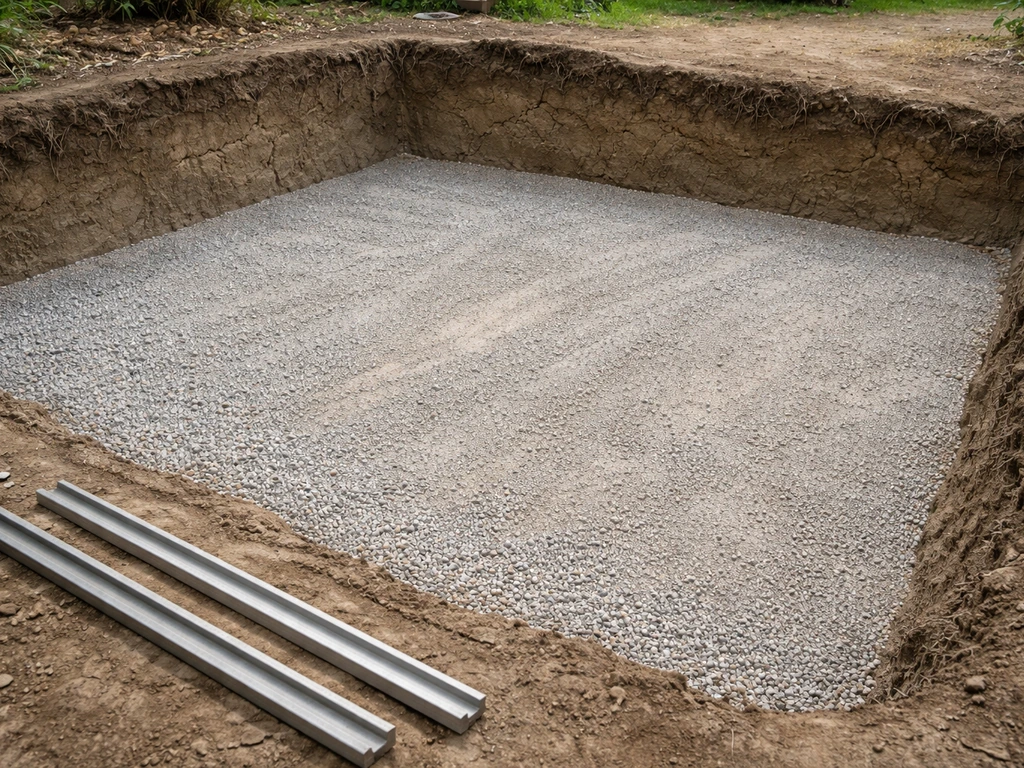
Excavate to the right depth
Once the slab is out, look at what's underneath. You need to account for the thickness of the new slab plus a bedding sand layer of about 1 inch plus your compacted gravel sub-base. A typical residential patio calls for 4 to 6 inches of compacted gravel sub-base under the bedding layer. Most standard pavers are 2 to 2.5 inches thick; concrete slabs can be 3 to 4 inches. So your total excavation depth (from finished surface level) is roughly 7 to 11 inches depending on materials. Compare that against what's in the hole. If there's only 2 inches of crumbling sand, you need to dig down further.
Check for voids and soft spots
Probe the soil at the bottom of the excavation with a rod or screwdriver. If it sinks easily or feels soft, you've found the real problem. Soft, wet, or organic-rich subgrade soil needs to be compacted and in some cases replaced with compactable fill. If you hit a void (an actual hollow space underneath), that indicates significant erosion or a subsurface drainage problem that needs to be addressed before you do anything else.
Build up the sub-base and grade for drainage
Add compactable gravel (crushed stone or road base) in 2-inch layers and compact each layer before adding the next. Don't dump in the full depth at once; compaction only works effectively at 2 inches at a time. The finished sub-base should be firm enough that you can walk on it without leaving impressions. Critically, grade the sub-base so water drains away from the house at a slope of about 1 inch per 8 feet. This is the slope your patio should already have, but confirm it here by holding your long spirit level against the adjacent slabs and noting the low side. Match that slope in the new base.
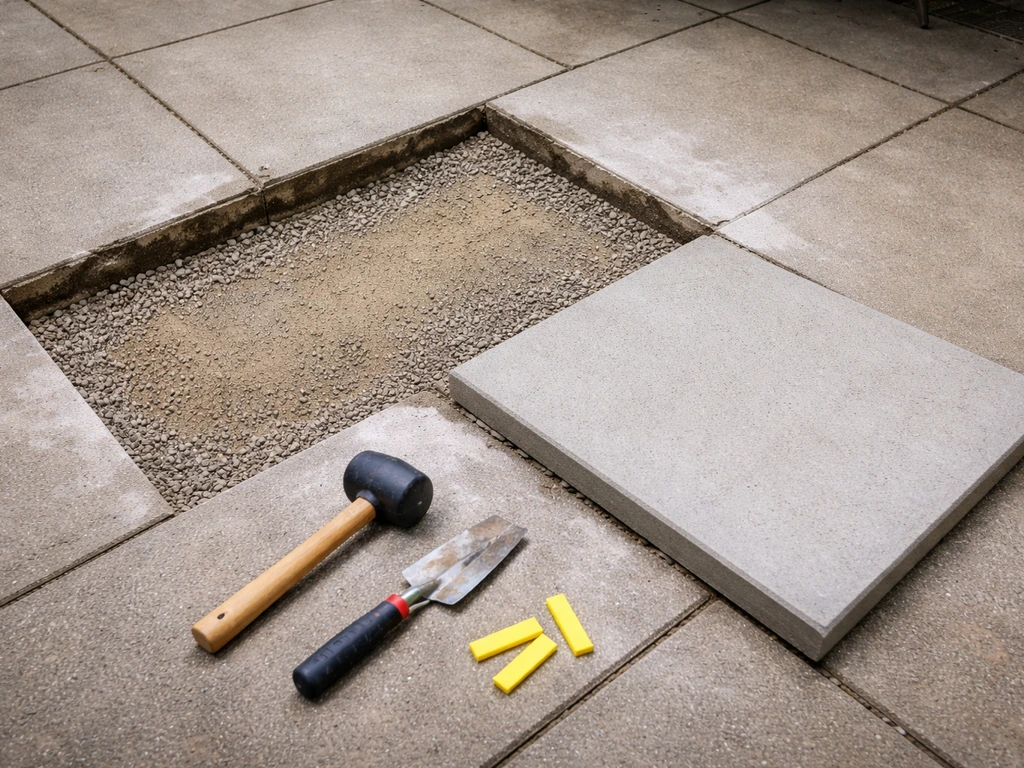
Add the bedding sand layer
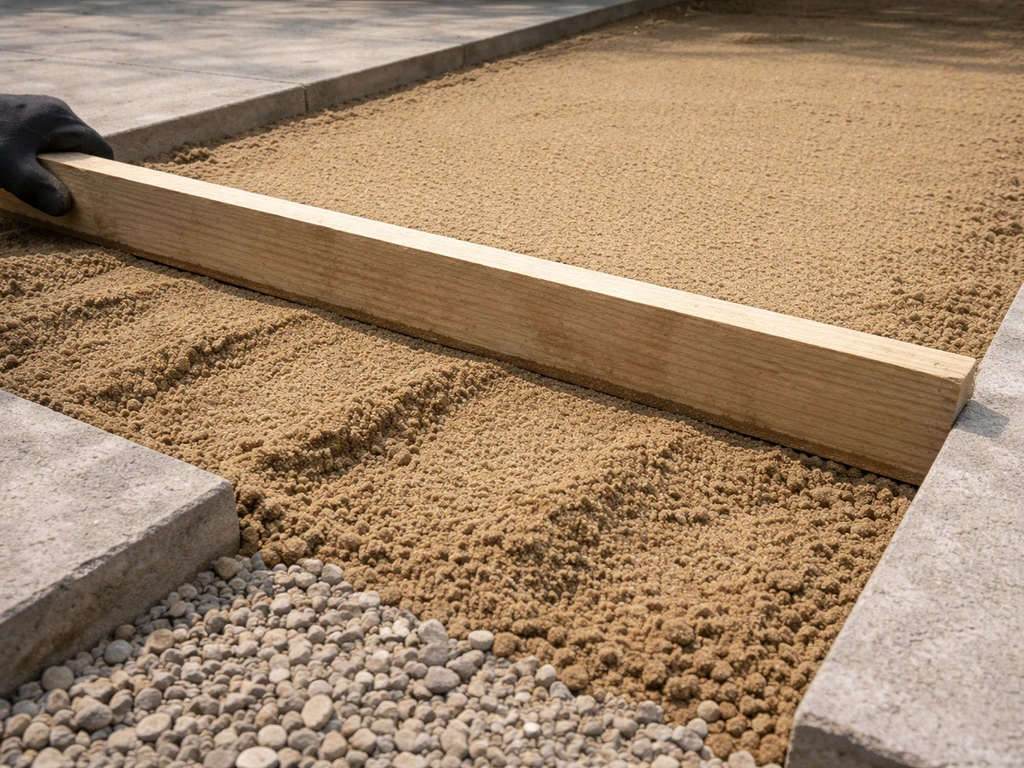
Spread about 1 inch of sharp (coarse) sand over the compacted gravel and screed it flat using a straight board dragged across the tops of the surrounding slabs as guides. The idea is to get the sand layer smooth and at a consistent depth so the new slab sits at exactly the same level as the surrounding ones. Don't walk on the screeded sand after leveling it. Lay a piece of scrap wood across it if you need to kneel over it while setting the slab.
Set the new slab and get it level
Lower the new slab or paver into position, keeping it as close to final position as possible before it touches the sand. Sliding it around on the bedding layer disturbs the screed and creates uneven spots. Have a helper hold the far edge while you position and lower it together.
- Set the slab down onto the bedding sand and check it immediately with your spirit level in both directions (front to back and side to side).
- Use a rubber mallet to tap it down gently if it's sitting too high. Work from the center outward in small taps, not big blows at one edge.
- Check the level against the surrounding slabs, not just in isolation. The surface of the new slab should be flush with or very slightly higher (no more than 1 to 2mm) than the neighbors, since bedding sand compresses slightly underfoot over the first few weeks.
- Check the gap on all four sides. Aim for consistent joint width matching the rest of the patio, typically 3 to 10mm depending on your jointing material and existing style.
- If the slab is too low, lift it, add a little more sand, re-screed, and reset. Don't be tempted to poke sand under the edges; it won't compact properly and you'll get a wobble.
- If the slab is rocking (high in the center), lift it and remove a small amount of sand from the middle of the bed before resetting.
For edge restraint: if the slab you're replacing sits at the outer edge of your patio, check that there's a stable edge restraint (a concrete haunch, metal edge restraint, or solid border slab) holding the bedding layer in place. Without it, the sand washes out from the edge and the slab tips over time. This is a very common cause of edge slab failure.
Finish the job: joints, curing, and sealing
Fill the joints
Once the slab is set and level, fill the joints. For most sand-set patios, polymeric jointing sand is the best choice. It looks like ordinary kiln-dried sand but contains a [binder that, once activated with water, sets hard and resists erosion from rain and insects](https://www. pavingexpert.
com/jointing12). Pour the sand over the new slab and joints, sweep it in diagonally across the joints with a stiff brush, compact it with your plate compactor or a hand tamper (put a piece of plywood under it to protect the slab surface), then sweep in a second fill. Follow the product directions for wetting the surface to activate the binder.
Keep it off the slab surface when you do this, since polymeric sand stains if it dries on top of the slab.
If the surrounding patio uses mortar joints instead of sand, mix up a stiff mortar (not wet and sloppy) and point the joints using a pointing trowel or grout bag. Keep mortar off the slab face, or clean it off immediately before it sets. For guidance on cleaning mortar off existing slabs without damaging them, that process is covered in more detail on this site.
Curing time before sealing
This is where patience matters. If you've used polymeric jointing sand, the manufacturer guidance is typically 30 days before you apply a sealant over the top. Sealing too early traps moisture in the joints and prevents the binder from curing properly, which leads to crumbling joints within the first season. For mortar-pointed joints, allow at least 5 to 7 days before foot traffic and a minimum of 28 days before applying sealant.
Walking on a freshly laid slab is discussed in more depth separately on this site, but the short version for a single replaced slab is: light foot traffic is usually fine after 24 to 48 hours, furniture and heavy loads should wait at least a week.
If you want the exact timing for your situation, factor in whether you're using polymeric jointing sand or mortar joints, since that affects when the surface is ready to walk on how long before you can walk on new patio slabs.
Sealing (optional but worth it)
A good patio sealant protects against staining, reduces water absorption, and slows surface erosion. For concrete and natural stone slabs it's generally worth doing once the curing period is complete. Use a penetrating sealer for natural stone (not a surface film sealer, which can peel) and an acrylic or polyurethane-based sealer for concrete. Apply on a dry day with no rain forecast for at least 24 hours. Two thin coats beat one heavy coat every time.
Why slabs fail (and how to stop it happening again)
If you've just replaced a slab that failed, it's worth understanding exactly why it failed. Fix the cause and this repair lasts decades. Miss the cause and the new slab fails in the same way.
| What you see | Likely cause | Fix during replacement |
|---|---|---|
| Slab sinking toward house or one corner | Base not sloped away from house, water pooling underneath | Re-grade sub-base to 1 inch per 8 feet slope, away from the house |
| Slab cracked in the middle, solid underneath | Slab too thin for load, or a tree root | Use thicker replacement slab (3+ inches for driveways, 2 inches minimum for patios), remove root and treat stump |
| Slab wobbles underfoot, no visible crack | Bedding sand washed out, or sub-base void | Excavate fully, re-compact sub-base, use correct bedding sand depth |
| Slab crumbling at edges | Freeze-thaw cycle damage combined with absorbed moisture | Use a denser slab, seal after installation, ensure edge restraint is in place |
| Joint sand gone, gaps visible | Rain washout of kiln-dried sand (wrong product) | Refill with polymeric jointing sand, not standard kiln-dried |
| New slab slightly high after a week | Bedding sand not compacted before screeding | Reset: lift, compact sand, re-screed, relay |
When to stop and call a professional
Replacing one or two isolated slabs is a reasonable DIY project for most homeowners. Call a professional when you find any of these situations: the sub-base is failing across a large area of the patio (multiple sunken or rocking slabs), there's a drainage problem originating from the house's foundation or a failed drainage pipe, the soil underneath is moving or heaving (common with expansive clay soils), you uncover a structural issue like a buried void, old tree roots, or a collapsed pipe, or the patio is attached to a structural element of the house. These situations need proper engineering assessment, not just a new slab dropped on top.
If you're also wondering what to do with the old slabs once they're out, broken concrete has limited reuse options but intact old pavers can be repurposed in other ways around the garden. If you are wondering can you use old bricks to make a patio, reuse is usually only practical when the units are intact, clean, and suitable for the base and bedding you plan to build intact old pavers.
If you want to keep things simple, plan to sort debris first and decide whether you can reuse, recycle, or dispose of the old patio pieces responsibly what to do with the old patio slabs. That's a separate topic worth considering before you haul everything to the tip. Before you dispose of them, you can repurpose old bricks into durable patio and walkway areas if they’re clean, sound, and properly laid over the right base.
FAQ
Can I replace just one patio slab without changing the height?
Yes, but only if you determine the new slab can sit at the same finished height as the surrounding surface. Measure from the top of adjacent slabs down into your excavation after you remove the old unit, then confirm your plan includes the slab thickness plus about 1 inch of bedding sand and the required compacted gravel depth. If you end up short, you will create a high or low spot that will rock when loaded and fail faster at the edges.
What happens if I set the new slab on the remaining sand or debris in the hole?
Not a good idea. Even if the new slab fits, leaving loose or contaminated bedding behind usually causes uneven support and future rocking. Before setting the new slab, remove all crumbling material, re-compact the sub-base in 2-inch lifts, and re-screed the sand to a consistent 1 inch thickness, using adjacent slabs as level references.
Do I need to lift neighboring slabs when replacing a broken one?
You should usually avoid removing an intact slab next to the damaged one. Extra demolition creates more edge area that can move later. Instead, carefully control removal around the failed slab and only clean or chip back what affects the new joint and the ability to compact the gravel underneath. If neighboring slabs are rocking, then they are not truly intact, and you may need to address more than one slab.
How do I verify the patio slope is correct after replacing slabs?
Plan on checking the drainage grade with a long straight level before and after you rebuild the base. The target is about 1 inch of fall for every 8 feet away from the house, and you should match that direction in the new gravel and sand. If the low side is not corrected now, water will keep collecting at the repaired location and can undermine the bedding within a season.
If the slab failed, is it ever enough to replace it without fixing drainage?
Not unless the system under the patio is still functional and properly addressed. If water pooling was a symptom, the fix could be correcting grading, repairing a damaged drain line, or replacing eroded subgrade. After slab removal, look for voids and soft or wet soil, and treat those as evidence the subgrade or drainage is failing, not just the top slab.
What should I do if I uncover a hollow space under the patio?
If you find an actual void, soft pumping soil, or an area that collapses when probed, do not proceed by adding more gravel over it. Those signs suggest erosion or a subsurface drainage pathway. Typically you need to remove the failing material to solid, compactable ground (and sometimes replace with engineered fill). This is one of those cases where a pro assessment is often the safest route.
How careful do I need to be when wetting polymeric jointing sand?
For polymeric jointing sand, keep the surface clean and do not let it dry on top. Many manufacturers also require a specific wetting method (light mist or controlled watering) after filling joints, and the sand should be compacted and swept in fully before activation. If you over-wet or leave residue on the slab face, the jointing can stain or fail to set correctly.
What are common mistakes when re-pointing mortar joints between slabs?
For mortar joints, match the joint size and aim for a stiff mix that holds shape rather than slumping. Pointing too wet reduces strength and increases cracking and washout risk. Also clean mortar from the slab faces right away, because cured mortar left on top can become permanent staining and can interfere with sealing.
Can I seal the repaired area immediately, or do I need to wait?
Yes, but timing matters by joint type and conditions. If you can, wait until joints are cured and dry, and do not seal when rain is likely or temperatures are too cool or high for the product. For polymeric sand, sealing too early can trap moisture and disrupt curing, and for mortar you generally need a longer dry-out period. Use the product instructions as the final authority for your exact sealant.
Which patio sealer should I choose for concrete versus natural stone slabs?
Different sealants require different preparation. If your patio is natural stone, use a penetrating sealer and avoid surface film coatings that can trap moisture or peel. For concrete, acrylic or polyurethane penetrating systems generally perform better than decorative coatings. Also plan on cleaning and fully drying the slabs first, because sealer over dust or joint residue can cause blotchy or weak bonding.
What safety or damage risks should I watch for when removing an old slab?
Wear eye protection and work in controlled chunks. When removing old slabs, use wedges or a demolition method that prevents shock to neighboring slabs, and check for cracks radiating outward. If you find widespread sub-base failure, avoid trying to “save time” by patching only the surface, because the new slab can end up rocking from the same underlying movement.
Can I reuse the old concrete slabs or pavers after replacement?
Yes, but only if the pieces are sound and you can reuse them on the right base. Intact pavers can be repurposed elsewhere after cleaning, but cracked or crumbling units should not be reused as load-bearing patio slabs. If you plan to reuse bricks or pavers, sort first by thickness and condition, and make sure the new location has an appropriate bedding and compaction plan so you do not recreate the same failure mode.
Next Article
How to Remove Mortar From Patio Slabs: DIY Steps
Step by step DIY to remove fresh or hardened mortar from patio slabs safely, with tools, chemical options, and cleanup.